Table of Contents
Advertisement
Advertisement
Table of Contents

Related Manuals for Samsung SPC-6000


Summary of Contents for Samsung SPC-6000
- Page 1 SYSTEM CONTROLLER User Manual SPC-6000...
- Page 2 Samsung Techwin. Disclaimer Samsung Techwin makes the best to verify the integrity and correctness of the contents in this document, but no formal guarantee shall be provided. Use of this document and the subsequent results shall be entirely on the user’s own responsibility.
-
Page 3: Important Safety Instructions
overview imporTAnT SAfeTy inSTruCTionS 1. Read these instructions. 2. Keep these instructions. 3. Heed all warnings. 4. Follow all instructions. 5. Do not use this apparatus near water. 6. Clean only with dry cloth. 7. Do not block any ventilation openings, Install in accordance with the manufacturer’s instructions. 8. - Page 4 overview wArninG TO REDUCE THE RISK OF FIRE OR ELECTRIC SHOCK, DO NOT EXPOSE THIS PROCUCT TO RAIN OR MOISTURE. DO NOT INSERT ANY METALLIC OBJECT THROUGH THE VENTILATION GRILLS OR OTHER OPENNINGS ON THE EQUIPMENT. Apparatus shall not be exposed to dripping or splashing and that no objects filled with liquids, such as vases, shall be placed on the apparatus.
- Page 5 Please read the following recommend safety precautions carefully. Do not Place this apparatus on an uneven surface. Do not install on a surface where it is exposed to direct sunlight, near heating equipment or heavy cold area. Do not place this apparatus near. Do not attempt to service this apparatus yourself.
- Page 6 Samsung Techwin cares for the environment at all product manufacturing stages, and is taking measures to provide customers with more environmentally friendly products.
-
Page 7: Table Of Contents
ConTenTS overview Important Safety Instructions Contents Key Features What’s Included System Controller at a Glance inSTALLATion Precautions Before Installation Adjusting the Screen Angle of the System Controller Switching the Layout of Joystick and Jog Shuttle ConneCTinG To An eXTernAL To Connect a RS-485 Device DeviCe Connecting to other System Controller uSinG THe menu... - Page 8 overview menu SeTTinG To Access the Main Menu PTZ setting DVR Setting Controller Setting Firmware Update To Check the Controller Information AppenDiX Specifications Q & A GPL/LGPL Software License 8_ overview...
-
Page 9: Key Features
Key feATureS SPC-6000 system controller enables you to control external devices such as PTZ camera, DVR, MATRIX using RS-485 communications. It provides a user-friendly interface with onscreen menu, touch screen and joystick. • Long-distance remote control • With RS-485 communications, the control distance is a maximum of 1km. -
Page 10: What's Included
overview wHAT’S inCLuDeD Unpack the product package and place the product on the floor or a flat surface. Check if the following components are all included in the product package. Main Unit User Manual Power Adaptor 1EA Power Cable 1EA Terminal Block 1EA 10_ overview... -
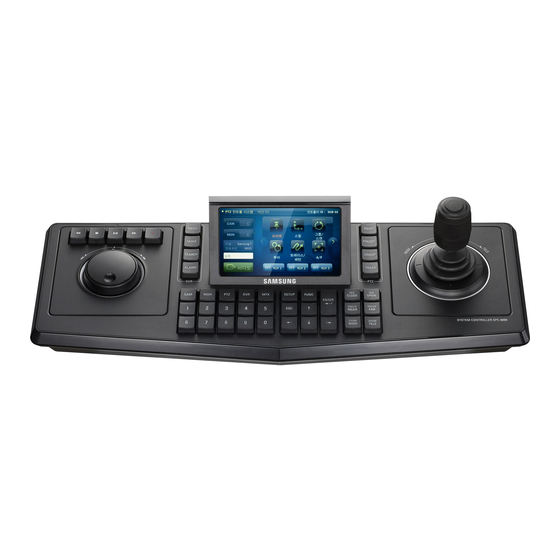
Page 11: System Controller At A Glance
SySTem ConTroLLer AT A GLAnCe front Side Item Description DVR Play Bar Play/Pause, Fast Forward/Fast Backward, Stop, Record DVR Control Bar Access the selected menu, search, select a split mode, or control the alarm. LCD Display Display the operation status and the setup menu of the system controller. SETUP Bar Press the [FUNC] button and press [SETUP] to enter the Setup menu. - Page 12 overview Item Description IRIS Control Iris (CLOSE/OPEN) Camera Lens Bar FOCUS Adjust the focus (NEAR/FAR) ZOOM Zoom In/Out (WIDE/TELE) Navigate Navigate through menu items. Navigate, ENTER, ESC ENTER Move to a desired item using the navigation buttons and select it. Cancel the current operation.
- Page 13 Connected to a controller such as camera or DVR through RS-485 PORT 1 communications. RS-485 PORT 2 Connect to other SPC-6000 system controller. USB Port Used for backup of the system controller settings or upgrading the firmware. Power DC 12V input port ( To prevent the power cable from being loose.
-
Page 14: Precautions
installation preCAuTionS Before you install the product, read through and comply with the following instructions. • The product is designed for indoor use only. • Keep it away from water or moisture. • Do not put excessive force on it. • Do not pull out the power cable forcibly. -
Page 15: Before Installation
Before inSTALLATion • You must turn off the product before installing it. • A severe impact or vibration may cause a system failure. • Keep it away from a strong magnetic field or electric interference, or wireless devices such as radio or TV set. • Keep the installation site clean and dust-free all the time while or after you have installed the product. -
Page 16: Switching The Layout Of Joystick And Jog Shuttle
installation SwiTCHinG THe LAyouT of joySTiCK AnD joG SHuTTLe For convenience you can switch the position of joystick and jog shuttle module. To switch between left and right, turn off the system controller and switch the modules manually. Or, press <Change> in the controller setup menu and switch the modules manually. -
Page 17: Connecting To An External
SPC-6000 system controller can be used in connection with an external device such as camera or DVR. To ConneCT A rS-485 DeviCe With the system controller, you can control the PTZ camera or DVR that supports RS-485 communication protocols. - Page 18 connecting to an external device if connecting the keyboard without using mATriX main Controller Sub1 Controller Sub2 Controller Sub16 Controller 18_ connecting to an external device...
- Page 19 if connecting the keyboard using mATriX main Controller PTZ Camera / DVR Sub Controller PTZ Camera / DVR 1. Connect the [mATriX] port of the main controller to the [KeyBoArD] port of the matrix. The MATRIX port contains the power line so you don’t need to supply DC 12V separately. 2.
- Page 20 Connecting the pTZ Camera By connecting RS-485 port on the rear of the PTZ camera with PORT 1 of SPC-6000, you can control the camera. Depending on the camera, the polarity may differ. For more information, refer to the user manual of the PTZ camera.
- Page 21 Connecting SrD-16XX/8XX Series, SHr-8/7/6XXX Series Dvr Connect between DVR and SPC-6000 using RS-485 port on the rear of the DVR. for the half duplex system - Connect TX (+) of RS-485 port of the DVR with TX (+) of PORT 1 of SPC-6000.
- Page 22 Connecting SrD-4XX or SHr-604X series with Dvr Connect RS-485 port on the rear of SRD-4XX or SHR-604X series with SPC-6000. ❖ for the half duplex system - Connect TX (+) of SRD-4XX or SHR-604X with TX (+) of PORT 1 of SPC-6000.
-
Page 23: Connecting To Other System Controller
For communication settings of the controller, refer to “Sub List” of “Menu Setting”. (► page 37) for the half duplex system - Connect TX (+) of PORT 2 of SPC-6000 with TX (+) of PORT 2 of the other SPC-6000. -
Page 24: Using The Menu
using the menu GeTTinG STArTeD 1. Turn on all system component devices. 2. When you connect the power adapter to the rear port of the system controller, the login dialog appears. 3. Use the number pad to enter the password and press [enTer]. - Page 25 2. Enter a desired number(s) using the number buttons and press [preSeT]. 3. The preset will be executed. For SCP-3430, SCP-2430, SCP-3250 and SCP-2250 PTZ dome series, a maximum of 512 presets are supported only if Samsung E protocol is selected. English _25...
- Page 26 using the menu SwinG You can move the camera between two preset points to monitor the course. Swing setup 1. Select <SwinG> from the menu screen. 2. Press <SeTTinG>. 3. Use the number buttons to select PAN/TILT and specify the start preset and end preset. 4.
- Page 27 Group You can make a group of multiple presets before calling them in sequence. To set a group 1. Select <Group/SCAn> from the menu screen. 2. Select <Group Setting>. 3. Enter a group number and press [enTer]. 4. Specify the speed and dwell time. 5.
- Page 28 using the menu Tour You can make a tour of at least one group before executing the groups in sequence. To set a tour 1. Select <Tour> from the menu screen. 2. Select <Tour Setting>. 3. Each time you press the number of a group that you want to add to the tour, the group will be added to the tour.
- Page 29 To execute a trace 1. Select <TrACe/pATTern> from the menu screen. 2. Select <pLAy>. 3. Specify a trace number to execute. 4. The trace function will be executed. Auto focus 1. Select <A/f> from the menu screen. 2. The auto focus feature will be activated. reSeT 1.
-
Page 30: Controlling Dvr
using the menu ConTroLLinG Dvr Depending on the model, the DVR may have different features available. For details, refer to the applicable user manual. An improper setting may cause a problem using the DVR. To select a Dvr 1. Press [Dvr]. 2. - Page 31 To select a Dvr channel 1. Use the number buttons to enter the number for a desired DVD channel. 2. Press [CAm]. To control the Dvr menu 1. To control the menus of the selected DVR, press [menu] in the DVR control bar. 2.
-
Page 32: Controlling Matrix
using the menu ConTroLLinG mATriX To control monitor and camera in matrix mode You can control the monitor and camera in Matrix mode. 1. Press [mTX]. 2. Select a monitor number and press [mon]. 3. Select a camera number and press [CAm]. The selected monitor will play the video of the selected camera. - Page 33 3. When the <Auto Select Set> screen appears, select a monitor and a camera to connect and specify the dwell time. 4. When camera #1 settings are completed, press <Continue> and specify the dwell time for camera #2. 5. When completing the dwell time setting, press <Save>. run / HoLD RUN/HOLD will run or hold the Auto Select setting that you have made.
-
Page 34: To Access The Main Menu
menu setting To ACCeSS THe mAin menu 1. Press the [funC] button on the controller and press [SeTup]. 2. When the setup system screen a ppears, select a desired menu item. pTZ SeTTinG From the PTZ setup screen, you can specify the protocol and baud rate. 1. -
Page 35: Dvr Setting
Dvr SeTTinG From the DVR setup screen, you can specify the DVR type and baud rate. 1. From the setup main screen, press <Dvr>. 2. Use the direction buttons or joystick to select a camera number and specify the DVR type. 3. - Page 36 menu setting porT 1 iD You can specify the controller ID if communicating with other devices. 1. Press [port 1] from the control ID setup screen. 2. Specify the ID and press <Save>. porT 2 iD You can specify the main or sub controller for communications between controllers, and also set the use of matrix and sub list.
- Page 37 Sub List For a communication system featuring the main and sub controllers, you must set the <Sub List>. 1. Press <Sub List>. 2. Use the direction buttons to select a desired item and configure the settings using [Zoom wiDe] or [Zoom TeLe].
- Page 38 menu setting factory Default You can return the current settings to the factory default. 1. Press <reset>. 2. Press <oK>. The current settings will return to the factory default. 3. To exit the menu, press <exit>. To switch between modules You can switch the position between jog shuttle and joystick from left to right or vice versa.
- Page 39 password You can enable or disable the controller’s password. 1. Press the password <Set> button. 2. To enable the password, set it to <on>. If not, set it to <off>. 3. Provide the current password. 4. To apply the changes, press <oK>; To cancel your setting, press <exit>.
-
Page 40: Firmware Update
menu setting firmwAre upDATe You can update the current firmware using the firmware files in the USB memory. To update the controller firmware You can download the latest firmware files and update the controller. 1. Connect the USB memory containing the latest firmware files to the system controller. - Page 41 To backup the controller settings If you want to change the controller or replace the camera, you can save the settings of the controller as a file and load the controller settings into a new camera. 1. From the menu setup screen, press <update>. 2.
-
Page 42: To Check The Controller Information
menu setting To CHeCK THe ConTroLLer informATion You can check the model name and software version of the system controller. Status Screen You can check the controller status. 1. From the menu setup screen, press <Status>. 2. Check the controller status. 42_ menu setting... -
Page 43: Specifications
Max. 255 Baud Rate 2,400 ~ 38,400 bps Compatibility PTZ / DVR / MATRIX / RECEIVER Protocol (PTZ) Samsung-T, Samsung-E, PELCO-D, PELCO-P, Panasonic, Vicon, AD, Honeywell, ELMO, BOSCH, GE Protocol (DVR) SVR, SRD, SRP Protocol (MATRIX) SMX-25632 Protocol (RECEIVER) Samsung-T... - Page 44 • Check if the RS-485 communication cable is connected properly. • If the communication state is unstable due to a noise on the communication line, connect the G port of the device to the G port of SPC-6000. I cannot communicate with the system controller.
-
Page 45: Gpl/Lgpl Software License
The software included in this product contains copyrighted software that is licensed under the GPL/LGPL. You may obtain the complete Corresponding Source code from us for a period of three years after our last shipment of this product by sending email to help.cctv@samsung.com If you want to obtain the complete Corresponding Source code in the physical medium such as CD-ROM, the cost of physically performing source distribution might be charged. - Page 46 7. If, as a consequence of a court judgment or allegation of patent infringement These requirements apply to the modified work as a whole. If identifiable sections of that work are not derived from the Program, and can be reasonably considered or for any other reason (not limited to patent issues), conditions are imposed independent and separate works in themselves, then this License, and its terms, on you (whether by court order, agreement or otherwise)that contradict the...
- Page 47 preamble RENDERED INACCURATE OR LOSSES SUSTAINED BY YOU OR THIRD PARTIES OR A FAILURE OF THE PROGRAM TO OPERATE WITH ANY The GNU General Public License is a free, copyleft OTHER PROGRAMS), EVEN IF SUCH HOLDER OR OTHER PARTY HAS BEEN ADVISED OF THE POSSIBILITY OF SUCH DAMAGES.
- Page 48 A “covered work” means either the unmodified Program or a work based on the Conveying under any other circumstances is permitted solely under the conditions Program. stated below. Sublicensing is not allowed; section 10 makes it unnecessary. To “propagate” a work means to do anything with it that, without permission, would 3.
- Page 49 by this License, on a durable physical medium customarily used for software License, to the extent that they are valid under applicable law. If additional permissions interchange, for a price no more than your reasonable cost of physically performing apply only to part of the Program, that part may be used separately under those this conveying of source, or (2) access to copy the Corresponding Source from a permissions, but the entire Program remains governed by this License without regard network server at no charge.
- Page 50 9. Acceptance not required for Having Copies. grant is automatically extended to all recipients of the covered work and works based on it. You are not required to accept this License in order to receive or run a copy of the Program.
- Page 51 16. Limitation of Liability. on, the recipients should know that what they have is not the original version, so that the original author’s reputation will not be affected by problems that might be IN NO EVENT UNLESS REQUIRED BY APPLICABLE LAW OR AGREED TO introduced by others.
- Page 52 for all modules it contains, plus any associated interface definition files, plus the corresponding machine-readable source code, which must be distributed scripts used to control compilation and installation of the library. under the terms of Sections 1 and 2 above on a medium customarily used for software interchange.
- Page 53 d) If distribution of the work is made by offering access to copy from a It is not the purpose of this section to induce you to infringe any patents or other designated place, offer equivalent access to copy the above specified property right claims or to contest validity of any such claims;...
- Page 54 enD of TermS AnD ConDiTionS How to Apply These Terms to your new Libraries If you develop a new library, and you want it to be of the greatest possible use to the public, we recommend making it free software that everyone can redistribute and change.
- Page 56 SAMSUNG TECHWIN AMERICA Inc. SAMSUNG TECHWIN EUROPE LTD. 100 Challenger Rd. Suite 700 Ridgefield Park, NJ 07660 Samsung House, 1000 Hillswood Drive, Hillswood Business Toll Free : +1-877-213-1222 Direct : +1-201-325-6920 Park Chertsey, Surrey, UNITED KINGDOM KT16 OPS Fax : +1-201-373-0124 TEL : +44-1932-45-5300 FAX : +44-1932-45-5325 www.samsungcctvusa.com...