D-Link Mydlink DNR-322L User Manual
Mydlink network video recorder
Hide thumbs
Also See for Mydlink DNR-322L:
- User manual (110 pages) ,
- Quick installation manual (81 pages) ,
- Quick install manual (8 pages)
Table of Contents
Advertisement
Advertisement
Table of Contents

Related Manuals for D-Link Mydlink DNR-322L


Summary of Contents for D-Link Mydlink DNR-322L
- Page 1 Version 1.1 | 29/12/2011...
-
Page 2: Manual Revisions
Manual Overview D-Link reserves the right to revise this publication and to make changes in the content hereof without obligation to notify any person or organization of such revisions or changes. Information in this document may become obsolete as our services and websites develop and change. -
Page 3: Table Of Contents
RAID Configuration and Drive Mapping ....15 Status ..................53 Search Camera ..............16 Camera Status ..............53 Set up Internet connection ..........18 System Info ................54 D-Link NVR Search Utility ............25 System Log ................55 Web UI Login ................27 NVR Log ..................56 Configure Hard Drive............28 Support ..................57 Auto Search Camera ............29... - Page 4 Verification Tool ..............81 Verify Image / Video ............82 Troubleshooting ..............83 Choose a RAID Level .............. 85 Replacing or Adding a New Hard Drive ......86 Technical Specifications ............87 Firmware Specification ............87 Hardware Specification ............88 D-Link DNR-322L User Manual...
-
Page 5: Package Contents
Note:Using a power supply with a different voltage than the one included with your product will cause damage and void the warranty for this product. If any of the above items are missing, please contact your reseller. D-Link DNR-322L User Manual... -
Page 6: System Requirements
Make sure you have the latest version of Java installed. Visit www.java.com to download the latest version. Optional UPS with USB interface *Hard disk drives should be from the same manufacturer. To ensure maximum performance, identical drives are recommended for RAID 1 configurations. D-Link DNR-322L User Manual... - Page 7 NVR can record video from network cameras located in local or remote sites into a dedicated HDD storage without turn on PC. Empowered by Mydlink technology, DNR-322L can be easily setup for internet access. It supports real-time monitoring and playback from everywhere via IE browser. The triplex function can keep recording while user live viewing or searching playback at the same time.
-
Page 8: Features
Complete Network Functionality • PPPoE Support: The D-Link NVR utilizes ADSL services. It can connect to the Internet via an ADSL modem over Ethernet. • DDNS Support: Dynamic DNS is a solution for users without a fixed IP address. With DDNS service, users can connect to the NVR from the Internet using an easy-to-remember domain name. - Page 9 2. Flexible Event Management: Event setup is another key configuration of the NVR. The NVR can monitor all of the camera triggers from motion detection. One of the most powerful functions is notification application. The NVR centrally controls the E-mail and recording of all the connected cameras. D-Link DNR-322L User Manual...
- Page 10 3. Video Enhancement: Users can enhance the recorded video with controls such as brightness, contrast, and sharpness. 4. Print Picture: If a printer is connected to the user’s PC, the NVR can also print the selected still image. D-Link DNR-322L User Manual...
-
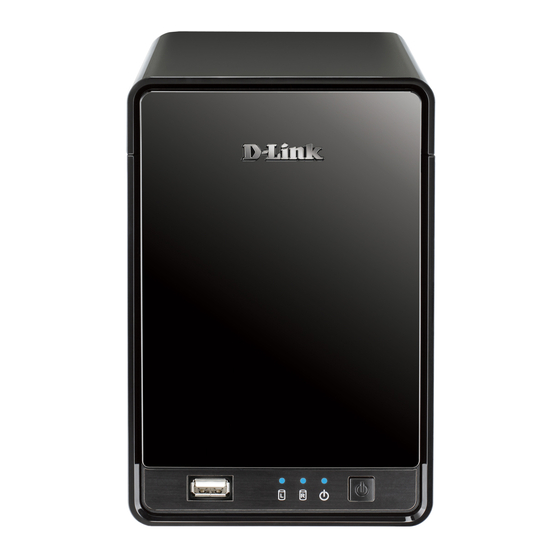
Page 11: Hardware Overview
These LEDs will be solid BLUE when the drives are connected but inactive. The LEDs will blink when the drives Drive LED are being accessed, formatted or synchronized. They will illuminate AMBER if a drive has failed. USB Port USB port for UPS status update. D-Link DNR-322L User Manual... -
Page 12: Rear Panel (Connections)
Press this button for more than 5 seconds to reset the unit to factory defaults. Power Receptacle Connect the supplied power cord to the receptacle. Use the Gigabit Ethernet Port to connect the device to the local network. The port is equipped with both a LAN Gigabit Ethernet Port LINK (R) and Traffic LED (L) to indicate connectivity and traffic respectively to the local LAN Security Lock This lock can be used to tie the DNR-322L to the desk to prevent theft. Cables are sold separately. D-Link DNR-322L User Manual... -
Page 13: Getting Started
Section 2 - Getting Started Getting Started NVR Software CD To get started with the NVR Setup Wizard, insert the supplied CD into your CD-ROM drive: Click the Install button to start the NVR Setup Wizard. D-Link DNR-322L User Manual... -
Page 14: Installation
Note: The computer used to access the NVR web-based configuration manager must be on the same subnet as the NVR. If your network is using a DHCP server, the NVR will automatically be in the same subnet. D-Link DNR-322L User Manual... -
Page 15: Install The Hard Drives
This step shows you how to open your NVR so that you can install one or two hard drives. Click Next to continue. Slide either one or two hard drives into the open hard drive bays of your device. Click Next to continue. D-Link DNR-322L User Manual... - Page 16 Once the hard drives are installed, you can attach the top cover. Click Next to continue. A standard CAT5E Ethernet cable with a RJ-45 connector is needed to connect your NVR to your network. Click Next to continue. D-Link DNR-322L User Manual...
-
Page 17: Power And Device Selection
If the connection is good then check that the hard drives are installed correctly and have no other issues. Click Next to continue. Note: When you select your device from the list, it will cause the LEDs to blink to confirm the device selection. D-Link DNR-322L User Manual... -
Page 18: Admin Password
Click Next to continue. In this step you can create a new password for the Admin username. It is recommended you set a password however you may also leave the fields blank. Click Next to continue. D-Link DNR-322L User Manual... -
Page 19: Raid Configuration And Drive Mapping
This step allows you to map the volume created as a network drive on your computer. Click Next to continue. Note: 1. Only Volume 2 is able to format as a File Server and mount to your Windows system as a Network Drive. 2. You can also use “NVR Search” utility to set up the Network Drive mapping. D-Link DNR-322L User Manual... -
Page 20: Search Camera
NVR will use default login ID: admin and blank password to add new camera(s). If you have an existing camera(s) with a different password, you can change the password in the Password field in the camera list. D-Link DNR-322L User Manual... - Page 21 Section 3 - Installation Find the camera in the camera list and type the camera’s password in the Password field. D-Link DNR-322L User Manual...
-
Page 22: Set Up Internet Connection
Internet, the Setup Wizard will guide you to go through the “Local Access” process later. If the NVR is able to connect to the Internet, you will need to login to mydlink or create a new mydlink account first. D-Link DNR-322L User Manual... - Page 23 The final window of the installation wizard shows successful completion. Your device is now installed and ready for use. Note: Your drives are network mapped, so you will be able to access them under My Computer. D-Link DNR-322L User Manual...
-
Page 24: Mydlink Portal
After registering your NVR with a mydlink account in the NVR Setup Wizard, you will be able to remotely access your NVR from the www.mydlink.com website. After you log in to your mydlink account, you will see a screen similar to the following: D-Link DNR-322L User Manual... -
Page 25: Nvr Status
If your NVR is offline, try the following: • Check to make sure that the Internet connection to your NVR is working properly. • Try restarting your Internet router. • Check your NVR’s cable connections and make sure they are secure. • Check to make sure that the LED on your NVR is lit solid blue. If you still cannot access your NVR, reset your NVR and run the NVR Setup Wizard again from the CD-ROM included in your package. D-Link DNR-322L User Manual... - Page 26 In the main part of the screen, the Live Video tab will be selected by default. If the NVR is available, you will need to login NVR first, default login ID is “ admin”, password is blank. The Live Video feed will then be displayed. You can choose a different camera from the drop down list. If the NVR is recording, you will see the red dot icon at the right top coner. D-Link DNR-322L User Manual...
- Page 27 Section 3 - mydlink Portal NVR Settings The NVR Settings tab allows you to access your NVR’s configuration interface. To open your NVR’s configuration interface, click NVR web page and enter the password. D-Link DNR-322L User Manual...
-
Page 28: Nvr Info
MAC Address: Displays the MAC address of your device. Device activated On: Displays the time and date that your device was added to mydlink. Support: This section provides you with links to various support websites and downloads related to your product. D-Link DNR-322L User Manual... -
Page 29: D-Link Nvr Search Utility
NVR IP address, you can use the NVR Search Utility provided on the product CD to locate the device on your network and make any needed changes. Network Video The D-Link NVR Search Utility displays any NVR devices it detects on the Recorder: network. - Page 30 Note: The computer used to access the NVR web-based configuration manager must be on the same subnet as the NVR. If your network is using a DHCP server and the computer receives IP settings from the DHCP server, the NVR will automatically be in the same subnet. D-Link DNR-322L User Manual...
-
Page 31: Web Ui Login
Web UI Login This section will show you how to configure your new D-Link NVR using the Web-based Configuration Utility. To access the configuration utility, click the NVR name or IP on the NVR Search Utility or manually open a web-browser (Internet Explorer only) and enter the IP address of your NVR. -
Page 32: Configure Hard Drive
You must decide on the RAID type you would like to format your HDDs with. Click the Next button to continue or click Exit to cancel. Note: Any data on the installed hard drives will be lost by the formatting! D-Link DNR-322L User Manual... -
Page 33: Auto Search Camera
If you have existing camera(s) with different ID and password, NVR will add the camera(s) but not able to connect and record. You can change the settings in the NVR Setup page. Click Exit Wizard to finish the auto search. Type admin for the username and leave the password field blank. Click Login D-Link DNR-322L User Manual... - Page 34 Section 3 - Configuration After login, you will be redirected to the NVR web UI: D-Link DNR-322L User Manual...
-
Page 35: Web Ui
RAID configuration options. System configuration, backup, and restore functions are also available. • STATUS - Contains system, NVR, and event logs. These pages and their configuration options will be discussed in detail in the following pages of this manual. D-Link DNR-322L User Manual... -
Page 36: Configuring The Nvr
Event Setup Step 2: - Configure event options with various combinations. Events can be triggered in the event of camera motion detection or full hard disk warning. An event action can be configured to send E-mail. D-Link DNR-322L User Manual... -
Page 37: Network Setup
ISP. The connection status will be determined automatically by the system. DHCP server: Enable or disable the DHCP server. If your network doesn’t have DHCP server, enable NVR DHCP server for easier local network setup. D-Link DNR-322L User Manual... -
Page 38: Camera Search
Step 4: Click the Add button to add the selected camera. Step 5: After clicking Add, the updated information will be displayed in the camera List. Step 6: Repeat step 2 through 5 to add other cameras into your list. D-Link DNR-322L User Manual... -
Page 39: Camera Setup
If you have already input the camera IP, you may simply click this button to automatically detect camera information (such as the channel, protocol, vendor, and model number). Note Some cameras will limit the login authority to the administrator only. D-Link DNR-322L User Manual... -
Page 40: Audio And Video
NVR to receive the trigger message. Step 3: Click the Save Settings button. Note: The system will adjust the frame rate automatically based on the maximum frame rate which that camera can support. D-Link DNR-322L User Manual... -
Page 41: Live And Playback Setup
Note: When setting Maximum Connections in Live Streaming Server settings, 1 connection means that 1 user can connect to 1 camera only. If the maximum number of connections is 16 and if each user connects to 4 cameras, then the maximum number of connected users is 4 and not 16. D-Link DNR-322L User Manual... -
Page 42: Recording Schedule
This will overwrite the earliest recorded video with the latest video one day at a time. Store Videos by Set the duration to store recorded video clips. After Schedule: the duration, the clips will be purged. D-Link DNR-322L User Manual... - Page 43 Insert new schedules. Delete: Delete the selected schedule. Configure: Modify the schedule and recording mode setting. Copy: Copy current Day Schedule to other channel(s); copy current Week Schedule to other day(s) of a week or to other channel(s). D-Link DNR-322L User Manual...
- Page 44 Step 6: If you would like to add another new schedule, click the Insert button. Note: • When configuring the Motion Detection event, be sure to set up the motion detection function on your camera first. • After changing the motion detection settings of your camera, be sure to disconnect the camera from the NVR and then re-connect it to update all new changes. • Alternatively users can drag the time bar to change the recording period. The red bar represents the Always Record feature and the blue bar represents the Event Recording feature. D-Link DNR-322L User Manual...
-
Page 45: Event Setup
E-mail to the pre-set contacts. Step 3: Click the action, and then click the Configure button to modify the details of that action if necessary. Step 4: Repeat step 2 through 3 to add more actions. D-Link DNR-322L User Manual... -
Page 46: Auto Backup
FTP causes the system unable to write files on FTP, the system would try each file three times before starting to backup the next file. If the connection is lost, the system would wait for the connection, so no file would be skipped. D-Link DNR-322L User Manual... - Page 47 The password to login FTP server. Folder: The folder format is “FolderName”, “FolderName/SubFolderName”, and so on. Test Backup After setting up all the information, click the Test FTP button and the system will create a folder to FTP. Please check it after testing. Server: D-Link DNR-322L User Manual...
-
Page 48: E-Mail Setup
Step 1: Insert the name of a new contact. Step 2: Insert the E-mail address of this new contact. Step 3: Click the Add Contact button. Step 4: Click the Save Settings button to save the new contact list. D-Link DNR-322L User Manual... -
Page 49: Time And Date Setup
Select or enter an NTP Server here. An NTP Server is a server on the Internet that maintains time. The NVR will contact the server you entered and receive the correct time. Click Save Settings after entering an NTP Server. D-Link DNR-322L User Manual... -
Page 50: Maintenance
“admin” is blank. Setting a password after the first login is strongly recommended. If the administrator password is lost, you may hold the reset button on the rear panel of the device to reset the NVR to factory defaults. Note: This will erase all the previously-saved settings. D-Link DNR-322L User Manual... - Page 51 Step 3: Click the Finish button to save. Click Exit to abort. Delete A User Step 1: Select the user name you want to delete and click Delete button. Step 2: In the confirmation box, click the OK button. D-Link DNR-322L User Manual...
-
Page 52: System
Live Video and Playback Page, NVR will count the idle time when user doesn’t has any movement. it will force logout user and request to login again for security concern. Change the period of idle time here. D-Link DNR-322L User Manual... -
Page 53: Raid
RAID 1: Mirrors the hard drives for redundancy. If one hard drive fails, the other still has all of the data. Replace the failed hard drive and it will re-mirror, restoring maximum data protection. D-Link DNR-322L User Manual... - Page 54 A RAID 1 array can only be as large as its smallest member disk. Because the data is stored on both disks, RAID 1 provides fault tolerance and protection, in addition to performance advantages. D-Link DNR-322L User Manual...
-
Page 55: Dynamic Dns
Enter the password or key provided by your Key: service provider. Verify Re-type the password or key provided by your Password or service provider. Key: Status: Displays the current status of connection to the DDNS server. D-Link DNR-322L User Manual... -
Page 56: Firmware Update
The device firmware can be upgraded from this page. The firmware update must be saved on the local hard drive of your computer. Click the Browse button to search the local hard drive for the firmware update file. Click Apply to upgrade. You may always check for firmware updates on the D-Link Support Page. D-Link DNR-322L User Manual... -
Page 57: Status
Disk Status: Shows the hard drive space and estimated remaining recording time status. Note: The recording time information is estimated by current bit rate. This may change each time a user refreshes this page. D-Link DNR-322L User Manual... -
Page 58: System Info
Displays the local network settings of the NVR. Information: Device Displays the device name and current Information: temperature of the NVR. Hard Drive Displays the hard drive information, including Information: the disk mode, total size, used and remaining drive space. D-Link DNR-322L User Manual... -
Page 59: System Log
This page displays the system event list of your NVR. The System Log is different from the NVR Log as it includes the following items: 1. User login/logout 2. Modify/delete account 3. System restart 4. System reset to default 5. System firmware update D-Link DNR-322L User Manual... -
Page 60: Nvr Log
This NVR Log displays the event log information. NVR Log: Displays the NVR log information such as stop recording or NVR system start. NVR Event Displays the event log information such as Log: motion detection or lost camera connection. D-Link DNR-322L User Manual... -
Page 61: Support
Section 3 - Configuration Support The NVR Help page provides a list of support topics. D-Link DNR-322L User Manual... -
Page 62: Live Video
5. Snapshot: Right click on the video and select the snapshot function to capture a specific video image immediately. 6. Right clicking on the video will show the option to Toggle to Full Screen. Press the ESC button on the keyboard to return to normal display. Drag and Drop or double click D-Link DNR-322L User Manual... - Page 63 You may control the camera view by utilizing the PTZ camera control panel to adjust the camera’s view. This is only available with PTZ Camera cameras that support the PTZ function. Control: Click the + or - button to zoom in or zoom out. This option is only available with cameras that support the optical zoom function. Zoom: D-Link DNR-322L User Manual...
- Page 64 Select a camera/ video and click this button to play/stop/disconnect a particular channel. Information Display Display video information including camera name, video status, and bit rate for a selected channel. Window: Manual Record: Click to start recording immediately. Click again to stop recording. D-Link DNR-322L User Manual...
-
Page 65: General Setting
2. Set the foreground and background settings of the OSD. 3. Select which kinds of information will be displayed on the screen. 4. Click the Apply button to preview the result. 5. Click the Default button to back to the default settings if necessary. D-Link DNR-322L User Manual... - Page 66 2. Check Show camera event to display the words of detected camera event on the correspondent screen. 3. Check Popup system event to pop up system event message dialog as a warning when a system event occurred. D-Link DNR-322L User Manual...
- Page 67 You can choose the function from the drop-down menu for the button of the joystick. Parameter: Choose the preset point from the drop-down menu. Default: Click to back to default setting. Import: Click to import the settings. Export: Click to export the settings. D-Link DNR-322L User Manual...
-
Page 68: Multiple View
Connect / Click to connect or disconnect the designate camera. Disconnect: Connect All Click to connect or disconnect all cameras. / Disconnect All: D-Link DNR-322L User Manual... -
Page 69: Playback
Step 4: The Record Display Window will show information about the available video clips. Select the date you would like to find the video records. Step 5: Highlight the video records that you would like to review. Step 6: Click the OK button. D-Link DNR-322L User Manual... - Page 70 Information Window Digital Zoom Single/Quad User may view a single camera or 4 cameras at a time. The DNR-322L only supports 1 camera playback. split Screen: Full Screen: Select to display the video with full screen. Press the ESC key on the keyboard to return to normal display.
- Page 71 Click the Cue In or Cue Out button to set the period for Save Video. Step Forward/Reverse: Click to pause the playback and move to next frame or last frame. Fast Forward/Reverse: Click to pause the playback and move to next minute or last minute. D-Link DNR-322L User Manual...
-
Page 72: Open Record And Setting
Set the interval for the video to go forward Next Interval: when you click the Forward button on the control panel. Set the interval for the video to go back when Previous Interval: you click the Reverse button on the control panel. D-Link DNR-322L User Manual... - Page 73 By pre-setting a path/URL and the image format, the system will autmatically save the image accordingly when the image file: you click the Save Image button in the control panel. Miscellaneous Check Synchronize video frames to avoid the tearing problem occurring in video display while increasing the CPU loading. D-Link DNR-322L User Manual...
-
Page 74: Search The Recorded Video To Playback
Display the available recorded video records. Date Time Period: Select the start and end points that indicate the time period you would like to view. Video Preview: Check the Enable Preview option to view the selected video. D-Link DNR-322L User Manual... - Page 75 Note The Record Display Window can be shown in (a) calendar view or (b) list control view. To modify the settings of the record display window, click the Setting button at the right of the page. D-Link DNR-322L User Manual...
-
Page 76: Recorded Video Enhancement
Select this option and move the slider control to the right or left to increase or decrease the contrast. Greyscale: Select this option to display the image in black and white. Default: Reset settings to their defaults. Apply the modifications. D-Link DNR-322L User Manual... -
Page 77: Save Video
Step 7: Select the Export Audio option if the video has audio and you would like to export with the video. Step 8: Click the OK button. Note The .asf format is recommended for exporting video. D-Link DNR-322L User Manual... -
Page 78: Save Image
Step 4: Choose the desired image format (BMP or JPEG). Step 5: Input the file name. Step 6: Click the Save button. Note You may skip step 3 by pre-selecting a folder and format for images. See the “Setting” option for more details. D-Link DNR-322L User Manual... -
Page 79: Print Image
Select this option to have the image print in original size. original size: Fit the page: Select this option to fit the image to the page. Align Image: Align the top, center or bottom. Step 4: Click the Print button. D-Link DNR-322L User Manual... -
Page 80: Backup The Recorded Video
Step 4: Select the cameras that you would like to backup. Step 5: Select the directory where you would like to backup the data to. Step 6: Click the Backup button. The system will then begin backup process automatically. D-Link DNR-322L User Manual... -
Page 81: Playback Manager Application
1/4/9/16 Split Users can select to view a single camera or 4 cameras Screen: at a time. DNR-322L only supports 1 camera playback. Full Screen: Select to display the video with full screen. Press ESC button on the keyboard to return to normal display. -
Page 82: Set Connections To The Units
Step 10: Click the OK button. The Search, Playback, Video Enhancement, Print Image, Save Video, Save Image, Backup functions are the same as the steps in the Internet Explorer, please see page 60-68. D-Link DNR-322L User Manual... -
Page 83: Backup And File Manager Application
Step 8: Select the cameras you would like to backup. Step 9: Click the OK button. Step 10: Select the time slot which you would like to backup. Step 11: Click the Backup button. D-Link DNR-322L User Manual... - Page 84 Step 12: Select the location where you would like to save the backup data. Step 13: Check the Include Playback application option, which will add Playback application into the backup folder. Step 14: Click the OK button. D-Link DNR-322L User Manual...
-
Page 85: Verification Tool
Add Folder: Choose the folder with multiple files to list for verification. Remove File: Remove indicated file(s) from list. Select All: Select all files in list for verification. Note Choose the file type first before selecting files. D-Link DNR-322L User Manual... -
Page 86: Verify Image / Video
1. Select single or multiple files for verification. 2. Click the Verify button to start verification. 3. The verification result will show on watermark column. If a file was tampered with, it will show ; if a file passed verification, it will show D-Link DNR-322L User Manual... -
Page 87: Troubleshooting
During the rebuild, the Disk Status LED will blink. If the replacement drive is free, i.e. not assigned to a RAID Volume or as a spare, the Disk Status LED remains dark after you install the new drive. Check RAID Volume Status Click the Status -> Device Info tab from the menu. D-Link DNR-322L User Manual... -
Page 88: Respond To A Critical Raid Volume
Step 3: Click the upper bar to begin the installation process. Step 4: Click the Install button to complete the process. Cannot Login to the Unit through Internet Explorer 1. Check the settings of your anti-virus software. 2. Adjust the settings of or disable anti-virus software. D-Link DNR-322L User Manual... -
Page 89: Choose A Raid Level
Simplest RAID storage subsystem design • Can increase read performance by processing data requests in parallel since the same data resides on two • different drives Disadvantage Very high disk overhead - uses only 50% of total capacity • D-Link DNR-322L User Manual... -
Page 90: Replacing Or Adding A New Hard Drive
After you have installed the new drive, turn on the NVR and then connect to the Web UI. The NVR will prompt you to format the new drive. Note: Formatting a hard drive will erase the data stored on the hard drive. Please backup important data before formatting a hard drive. D-Link DNR-322L User Manual... -
Page 91: Technical Specifications
+ D-Link DDNS server support + H.264, MPEG-4, M-JPEG (depend on the Network Cameras) SYSTEM TIME VIDEO SETTING + Set the system time (D-Link NTP, Input time, Sync with computer. + Resolution, quality, frame rate, enable audio, go to camera interface REMOTE BACKUP RECORDING TYPE + Remote software can backup raw data to redundant storage... -
Page 92: Hardware Specification
+ RAID 1 OPERATING TEMPERATURE + JBOD + Operating: 0˚ to 55˚ C (32˚ to 131˚ F) + Storage: -20˚ to 70˚ C (-4˚ to 158˚ F) TWO RESET MODES + Reset firmware GUI button HUMIDITY + Operating: 5% to 90% (non-condensing) D-Link DNR-322L User Manual... - Page 93 Formatted drive capacity for RAID 1 operation is dependant on the drive capacity of the lowest-sized drive. Some older generation SATA drives may not be compatible. For a list of SATA drives that have been tested to work with the NVR, visit the D-Link support web site. D-Link DNR-322L User Manual...