
Related Manuals for Mackie MDR 24


Summary of Contents for Mackie MDR 24
- Page 2 11. Servicing — Do not attempt to service the MDR24/96. All servicing should be referred to the Mackie Service Department. 12. Lightning — Unplug the MDR 24/96 during lightning storms or when unused for long periods of time. 13. Grounding and Polarization — To prevent electric shock, do not use the MDR24/96 polarized plug with an extension cord, receptacle or other outlet unless the blades can be fully inserted to prevent blade exposure.
- Page 4 Please write your serial number here for future reference: Purchased at: Date Of Purchase: Manual Part No. 0000107 Rev. B 10/02 © 2002 Mackie Designs Inc. All rights reserved Printed in the U.S.A.
- Page 5 1. If you collect ten MDR24/96 boxes, Greg will come over for dinner (this offer does not apply to dealers or distributors). In the unlikely event that you should need to send the MDR24/96 back to Mackie for service, please use the shipping box it came in. This box has been specially designed to minimize damage to the MDR24/96 during shipping, so that it won’t...
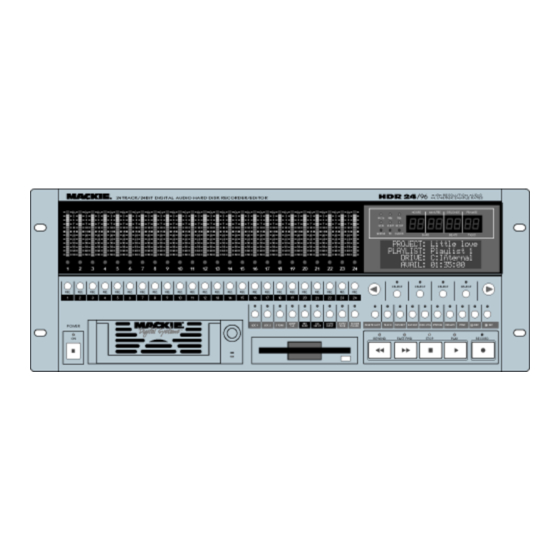
- Page 6 The MDR24/96 Quick Start Guide uses the following conventions to help you find information quickly: a) File or folder names (example: C:\HDR Projects\Ode To Masters\Ode To Masters.hdr) b) Software or hardware controls (example: Punch) c) Proper names of objects on front/rear panel (example: PLAY) This icon identifies in-depth explanations of features and practical tips.
- Page 7 Pairs of SELECT buttons with << >> displayed above them are used to select among choices or move a cursor ‘v’ through a text field. The (–)DEC and (+)INC (decrement and increment) buttons scroll through choices in the active field. Sometimes they duplicate the <<...
- Page 8 [The amount of recording time left on the disk] AVAIL: The MDR 24/96 allows only one playlist. If a project is brought from an HDR24/96, the last active playlist is used (you are not able to switch to other playlists from the MDR24/96).
- Page 9 By combining traditional multitrack tape recording features with the power and flexibility of hard disk recording, the Mackie Designs MDR24/96 takes multitrack recording to a level never before achieved by a product in its price range. In addition to the standard battery of traditional tape-based features, the MDR24/96: •...
- Page 10 Of course, there’s more to a studio than a recorder and some musicians. At a minimum, you’ll need the following to make the MDR24/96 feel at home: • Three Mackie 8-channel I/O (input/output) cards. • A console with a minimum of 24 tape sends (buses or direct outputs) and returns (line inputs or monitor returns).
- Page 11 DB25 cables that break out to XLR connectors, and double-ended DB25 to DB25 AES/EBU cables for mating with your console, are readily available. The PDI•8 is the only Mackie I/O card that currently supports 88.2 or 96 kHz operation. At these sample rates, the PDI•8 card runs in “double- wide”...
- Page 12 1. If the MDR24/96 is plugged into AC power, unplug it. 2. Unscrew the thumbscrews at the top and bottom of each I/O card to be removed. Grasp one thumbscrew with each hand and gently pull the card out. ANALOG I/O ANALOG I/O ANALOG I/O TAPE IN/OUTS 3.
- Page 13 MDR24/96 Inputs and Outputs are connected to the Tape Inputs and Outputs of a Mackie Digital 8•Bus console using TDIF, either the MDR24/96 or D8B can be the word clock master. However, if you later synchronize the MDR24/96 to time code from a VTR, you must lock the VTR and MDR24/96 to a master video sync source and lock the D8B (which can’t sync to video) to word clock from the MDR24/96.
- Page 14 The following are recommended setups for establishing proper sample clock synchronization with the devices connected to the MDR24/96 digital I/O cards. With the MDR24/96 as a master, connect Word Clock Out of the MDR24/96 to Word Clock In on the receiving device(s). If connecting to older TASCAM DTRS recorders, use the Sync Out port on the first DIO 8 card instead of •...
- Page 15 90 and • Mackie Media PROJECT drives. Both drives come complete with a plug-in tray for quick removal and a nifty storage case for shelving and transporting the drives. Trays can be purchased separately if you want to use your own UDMA IDE drives.
- Page 16 MDR24/96 while both are powered on, you must power cycle the Remote 48 to reset the connection. Back panel of the TO HDR/MDR REMOTE 24 FOOT SW Mackie Remote 24 REMOTE JACK WARNING DO NOT PLUG INTO ETHERNET Footswitch Remote...
- Page 17 Before starting a Project, you will need to configure the MDR24/96 I/O card options and synchronization parameters. These parameters determine where the sample clock is coming from, how fast the sample clock runs, and how many bits are recorded in every sample. Some options, like sample rate and bit depth, will become “standards”...
-
Page 18: Sample Rate Convert
The PDI•8 card options include sample rate conversion for each stereo AES/EBU input, and status bit control (pro/consumer mode) for each output. When a PDI•8 card is first installed, its default settings are for sample rate conversion Off, and channel status bits set to indicate the Pro (AES/EBU) format. In most circumstances you won’t need to change these settings. - Page 19 SYNC The Sample Clock setting determines the source of the MDR24/96 sample clock. If the MDR24/96 is a clock master or is not connected to any other digital device(s), set it to Internal. If the MDR24/96 is a word clock slave, set it to Word Clock. When Video is selected as the clock source, an additional parameter, the video frame rate is required.
- Page 20 If the MDR is set to slave to external time code (MTC or SMPTE time code), engaging the Time Code Chase mode causes the MDR24/96 transport to follow time code coming from an external master source. If disengaged, the MDR will go off line and will no longer follow the external time code.
- Page 21 (like when the guitar solo begins), but when punching in at that point, you want to start rolling a few seconds before hand. The MDR 24/96 allows you to set a Preroll amount and then toggle the Preroll on or off as needed.
- Page 22 These options allow you to select whether SMPTE time code or MIDI time code (or both) are generated. This is the amount of time (hours, minutes, seconds and frames) that is added to the incoming time code value, and the resulting time is the Current Time of the MDR24/96 when in Time Code Chase.
- Page 23 This section shows how the MDR24/96 is typically connected to both analog and digital consoles (using the Mackie Analog and Digital 8•Bus consoles as examples). These examples assume that the rest of your studio equipment (monitors, sound sources, outboard processing, etc.) is already connected, or that you know how to connect it.
- Page 24 2. Connect three snakes to the MDR24/96 Outputs (top connector). Connect the plug end of the snakes to the like-numbered Tape Return jacks on the 24•8 console. 1. Set the Sample Clock to Internal. 2. Set the Sample Rate and Bit Depth according to your preference. Set the 24•8 console to the nominal +4 dBu operating level by setting the five Operating Level switches in the Sub Out and Tape Return sections to the ‘OUT’...
- Page 25 (3) DIO•8 cards for MDR24/96 (3) DIO•8 cards for D8B (1) Clock I/O card for D8B (3) TDIF cables (1) 75 Ω BNC word clock cable 1. Connect the three TDIF cables between the corresponding TDIF jacks on the MDR24/96 and D8B. 2.
- Page 26 Apogee Clock I/O Card DIO•8 Cards APOGEE APOGEE APOGEE APOGEE Word SYNC DIGITAL I/O DIGITAL I/O DIGITAL I/O Clock Out TDIF Connection TDIF Cables Word (DB25) Clock In Word Word Clock Out Clock Out Sync APOGEE APOGEE APOGEE (MDR24/96 (D8B as DIGITAL I/O DIGITAL I/O DIGITAL I/O...
- Page 27 (3) DIO 8 or OPT 8 cards for MDR24/96 • • (3) DIO 8 or OPT 8 cards for D8B • • (1) Clock I/O card for D8B (6) ADAT Optical cables (1) 75Ω BNC word clock cable 1. Connect three ADAT Optical cables from the MDR24/96 Optical Outputs to the Optical Inputs on the corresponding D8B I/O cards.
- Page 28 Apogee Clock I/O Card DIO•8 Cards APOGEE APOGEE APOGEE APOGEE SYNC Word DIGITAL I/O DIGITAL I/O DIGITAL I/O Clock Out ADAT Optical Out ADAT Optical In Word Clock In Word Word Clock Out Clock Out Sync APOGEE APOGEE APOGEE DIGITAL I/O DIGITAL I/O DIGITAL I/O (MDR24/96...
- Page 29 OPT•8 Cards Apogee Clock I/O Card APOGEE Word SYNC Clock Out ADAT Optical Out ADAT Optical In Word Clock In Word Word Clock Out Clock Out Sync (MDR24/96 (D8B as Card as Master) Master) ADAT Optical Out WARNING Use one only Depress the Termination...
- Page 30 (3) PDI•8 cards for MDR24/96 (3) PDI•8 cards for D8B (1) Clock I/O card for D8B (3) DB25 to DB25 AES/EBU snakes (1) 75Ω BNC word clock cable 1. Connect the three AES/EBU cables between the corresponding AES/EBU connectors on the MDR24/96 and D8B. 2.
- Page 31 PDI•8 I/O Cards Apogee Clock I/O Card APOGEE PDI•8 PDI•8 PDI•8 Word SYNC Clock Out Word Clock In AES/EBU Cables (DB25) Word Word PDI•8 PDI•8 PDI•8 Clock Out Clock Out Sync (MDR24/96 (D8B as Card as Master) Master) WARNING Use one only Depress the Termination...
- Page 32 After you’re done recording, you will learn how to back up your project to Mackie Media M•90 and Mackie Media PROJECT drives. Now that you have a few basics down, you’re ready to start recording. First, you’ll need to create a new Project.
- Page 33 4. The name “Project#1” appears on the left side of the LCD screen. A pointer (“v”) appears above the first character of the name to indicate that you can change that character. Press the (–)Dec / (+)Inc buttons to select the character you want in that position.
- Page 34 First and foremost, backup your projects daily on an external drive, either the Mackie M90 hard drive or the Mackie Project Drive. When you have finished a project and no longer need the project on the internal drive, perform a final backup and remove it from the internal drive.
- Page 35 With Mackie Media drives, you can back up your Projects on removable media that you can hand to the client or store in your tape library. Backing up and restoring Projects is as simple as copying the Projects between the internal and the Mackie Media drives.
-
Page 36: Press Play
The MDR24/96 transport and recording controls are similar to those on most multitrack tape recorders. PLAY puts the MDR24/96 into play from any state (as if you didn’t know). Play also punches out of record and cancels master record standby while leaving the Transport in play.