Table of Contents
Advertisement
Advertisement
Table of Contents
Troubleshooting

Related Manuals for Cisco NMH


Summary of Contents for Cisco NMH
- Page 1 LINKSYS@by • I I • I I • Cisco CISCO.
- Page 2 Network Security www.linksysbycisco.com/security www.linksysbycisco.com/support Support Copyright and Trademarks Linksys, Cisco and the Cisco Logo are registered trademarks or trademarks of Cisco Systems, u.s. Inc. and/or its affiliates in the and certain other countries. Copyright 2008 Cisco Systems, © Inc. All rights reserved. Other brands and product names are trademarks or registered...
-
Page 3: Installation
Overview The "Installation" section explains how to install the Media Hub and set up your computer for access to the Media Hub. The "Setup of Additional Computers" section explains how to set up additional computers for access to the Media Hub. - Page 4 Welcome -------------~- LINKSYS·by Cisco To begin installation, click Start Setup. Welcome to the Setup Wizard First T me Setup comgUft yOIJ: ~1ed13 Hllll • Read the License Agreement. To accept this agreement and continue with the installation, select I accept this agreement.
- Page 5 Connect the included power adapter to the Power port of the Media Hub. Click Next. Plug the power cord into an electrical outlet. Click ext. Please wait while the Media Hub boots up. This may take a few minutes. Create a password to protect access to the Media Hub.
- Page 6 • Enter a descriptive name for the Media Hub. (Examples: HomeMedia or Medial) Click Next. Please wait while the Setup Wizard configures the Media Hub. This may take a few minutes. The Setup Wizard saves the settings of the Media Hub in Unlcsys ~dia Hub setup...
- Page 7 The drive letter will be used to identify the media folder of the Media Hub on your computer for convenient access. Keep the default drive letter, or select a different letter. A shortcut to the Media Hub will be created on your computer's desktop.
- Page 8 The Media Importer is an import tool you can use to automatically find, copy, and update media files to the \import folder on the Media Hub. The Media Importer will continually monitor the selected folder(s) for any changes you make or any new files you add, and it will automatically update the Media Hub with your latest changes or files.
-
Page 9: Setup Of Additional Computers
The Media Hub has been configured. Its Media Browser will launch automatically. If you do not want to access the Media Browser, Access the Media deselect Browser now. To exit the Setup Wizard, click Finish. orE: You can register the Media Hub later at www.linksysbycisco.com/registration The Media Browser requires Adobe Flash Player (version 9 or higher). - Page 10 • The screen appears. To Welcome set up your computer for access LtNKSYS'by Osco - - ~ - - - - - - - to the Media Hub, click Connect Welcome to the Setup Wizard Computers. Read the License Agreement. To accept this agreement and continue with the installation, select I accept this agreement.
-
Page 11: Tools
NTI Shadow is a backup tool you can use to automatically create a backu p of you r fi les located in the Documents folder (named "Users in Windows Vista or"Documents and Settings" in Windows XP). The default backup job has been created to run every hour to back up files to the \backup folder on the Media Hub. - Page 12 Watch the video to learn how to take advantage of the Media Hub's featu res. Next. Click OlE: To access the Media Hub through your web browser, use the Friendly Name and Password you set up during the Setup Wizard. Example: http://mediahub The Media Hub has been configured.
- Page 13 The Media Hub offers different ways to take advantage of its features. Video Player Support The Media Hub plays video content through a browser plug-in. Download and install your favorite media player to enable video playback within the Media Browser. Please note that media players have varying levels of support for different video formats.
- Page 14 http://www.ciscomediahub.com In the Address field, enter Enter. press Enter the Remote Device Name of the Media Hub, and then click Go. orE: Depending on the web browser you are using, certificate or security warning screens may appear. To continue with the login process for remote access, accept the warnings.
- Page 15 To install NTI Shadow, refer to the previous section, "Setup of Additional Computers':) Access Go to Start> All Programs> Cisco Media Hub> TI Shadow. After you have accessed NTI Shadow for the fi rst ti me, the system tray icon appears.
- Page 16 Main Menu • The main menu appears. The Setup Wizard creates a default backup job that backs up specific files in the Documents folder. These files use the following file formats and extensions: .doc, .xls, .pdf, .ppt, .adb, .rtf, .xml, .htm, .html, .txt, and .pst.
- Page 17 During the Setup Wizard, you created a Friendly Name or device name for the Media Hub. Address In the field of Windows Explorer, enter the Friendly Name of the Media Hub: \\<Friendly_Name> (Examples: \\mediahub) Press Enter. Instructions to Copy Med·a Files to the Media Hub Follow these guidelines: •...
- Page 18 Linksys, Cisco and the Cisco Logo are registered trademarks or trademarks of Cisco Systems. Inc. and/or its affiliates in the U.s. and certain other countries. Copyright © 2008 Cisco Systems, Inc. All rights reserved. Other brands and product names are trademarks or registered trademarks of their respective holders.
-
Page 20: About This Guide
About This Guide Icon Descriptions NOTE: WARNING: WEB: Online Resources http:// http:// Resource Website www.linksysbycisco.com www.linksysbycisco.com/international www.linksysbycisco.com/glossary www.linksysbycisco.com/security Copyright and Trademarks Media Hub... -
Page 21: Table Of Contents
Chapter 1: Product Overview Chapter 3: Ways to Use the Media Hub Chapter 2: Getting Started Chapter 4: Use of the Media Browser Chapter 6: Windows File Backup (Windows only) Chapter 5: Use of the LCD Menu Media Hub... - Page 22 Chapter 7: Advanced Configuration Appendix A: Troubleshooting Appendix B: Specifications Appendix C: Warranty Information Appendix D: Regulatory Information Appendix E: Software End User License Agreement Media Hub...
-
Page 23: Chapter 1: Product Overview
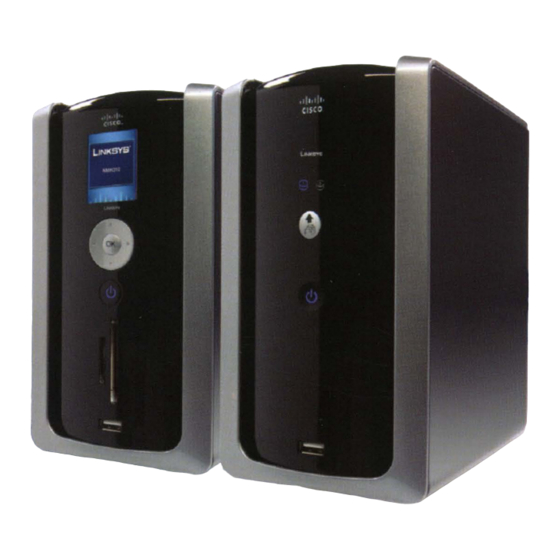
Chapter 1: Navigation Pad Product Overview Power Button and LED Front Panel of the Media Hub with LCD (NMH400 Series) Appendix A: Troubleshooting page 51 NOTE: Secure Digital (SD) Memory Card Slot CompactFlash (CF) Memory Card Slot LCD Screen Chapter 5: Use of the LCD Menu page 37 Media Hub... -
Page 24: Front Panel Of The Media Hub (Nmh300 Series)
Front Panel of the Media Hub (NMH300 Power Button and LED Series) Appendix A: Troubleshooting page 51 NOTE: Back Panel DISK 1 DISK 2 Back Up Button back up NOTE: NOTE: Air Vent WARNING: Media Hub Media Hub... -
Page 25: Top Panel
Install a Second Hard Disk Security Slot NOTE: Ethernet Available Disk Configuration Actions page 45 Reset Reset Power NOTE: Top Panel Replace a Hard Disk WARNING: Before You Begin page 53 Button Media Hub... -
Page 26: Product Overview
Media Hub... -
Page 27: Chapter 3: Ways To Use The Media Hub
Chapter 3: Ways to Use the Local Access Media Hub Overview Chapter 2: Getting Started Centralized Storage page 9 Remote Access Remote Access page 47 Remote Access page 47 File Browser page 29 Media Hub www.linksysbycisco.com Media Hub... -
Page 28: Digital Media Sharing
Digital Media Sharing Media Server page 49 Media Browser NOTE: Edit > Preferences > Sharing Look for shared libraries Remote Access Remote Access page 47 Copy-and-Paste page 12 File Browser page 29 Copy-and-Paste page 12 Local Access http://www.ciscomediahub.com Chapter 4: Use of the Media Browser page 18 Media Hub... - Page 29 NOTE: Submit Photos http://www.linksysbycisco.com/support http://www.ciscomediahub.com http://www.ciscomediahub.com Submit File Browser Download to PC Submit NOTE: File Browser Upload to Media Hub http://www.ciscomediahub.com Remote Access page 47 Media Hub...
-
Page 30: On-Demand Backups
On-Demand Backups Computers (Windows only) Default Backup Job NTI Shadow page 33 NOTE: Additional Backup Jobs Create Backup Job page 33 Backup page 37 USB Storage Devices Devices page 20 Copy-and-Paste page 12 Memory Cards Devices page 20 Copy-and-Paste page 12 Automatic Backup of Computers (Windows only) Media Hub... -
Page 31: Chapter 2: Getting Started
Mac Media Importer page 6 Chapter 3: Ways to Use the Media Hub page 5 Start > All Programs > NOTE: Cisco Media Hub > Linksys Media Importer > Linksys Media Importer NOTE: Media Importer Open Go to Media Hub Online... -
Page 32: Getting Started
Media Importer Status Disconnect/Connect Switch Media Hub Import Status Manage Media Importer Time Left Current Transfers Files imported in this session Close Mac Media Importer Choose the folders that will be regularly searched www.linksysbycisco.com for media Only these types Finish Macintosh Application >... -
Page 33: Nti Shadow (Windows Only)
Shutdown Media Importer Import Status Time Left Current Transfers Files imported in this session Disconnect/Connect Change Media Hub NTI Shadow (Windows only) Manage Media Importer Connect Computers Access Start > All Programs > Cisco Media Hub > NTI Shadow Media Hub... -
Page 34: Copy-And-Paste
Start Backup Shadow Setting Edit About NTI Shadow Disable Disable All Exit Delete Main Menu Done NOTE: Help Copy-and-Paste NOTE: Create Backup Job Create Backup Job page 31 Media Hub... - Page 35 Instructions to Copy Media Files to the Media Hub Start Computer My Computer Connect Computers Start > Programs > Accessories > Windows Explorer NOTE: Start Explore My Computer Computer Windows Access Map Network Drive \\<Friendly_Name>\media NOTE: Finish Mac Access page 11 Start >...
- Page 36 media > devices > mnt Start > Programs > Accessories > Windows Explorer Start Explore Computer Computer Map Network Drive \\<Friendly_Name_of_Media_Hub>\<folder_ name> Finish Media Hub...
- Page 37 Edit > Copy NOTE: media\music Edit > Paste. NOTE: NOTE: WEB: www.linksysbycisco.com/support NOTE: Mapped Drive page Example Showing How to Copy Media Files to the Media Hub Media Hub...
- Page 38 Mac Access Macintosh HD MediaHub Media Hub...
-
Page 39: Chapter 2 Getting Started
Example Showing How to Copy Media Files to the Media Hub Edit > Copy NOTE: media\music Edit > Paste. WEB: www.linksysbycisco.com/support Media Hub... -
Page 40: Chapter 4: Use Of The Media Browser
Chapter 4: Use of the NOTE: Media Browser Status page 38 How to Access the Media Hub Copy-and- Paste page 12 Remote Access Instructions page 48 http://<Friendly_Name> How to Use the Media Browser http://<xxx.xxx.xxx.xxx> Enter http://<Friendly_Name>.local http://<xxx.xxx.xxx.xxx> return NOTE: http://mediahub http://mediahub.local NOTE: Media Hub... - Page 41 NOTE: to Playlist Play NOTE: Configuration Chapter 7: Advanced Configuration page 41 Re-Scan Search Search page 21 ? (User Guide) Help ! (Message Center) Messages NOTE: Message Center page 21 Recent Photos Music Music page 22 Photos Photos page 25 Videos Videos page 28 View Photo...
- Page 42 Recent Videos NOTE: Play NOTE: Memory Cards http://www.linksysbycisco.com/support Devices page 20 Disk Space Import Media NOTE: Devices page 20 Media Hub...
- Page 43 Eject Size Info Cancel Home left right arrow Home Music Music Cancel Photos Photos Search Videos Videos File Browser magnifying glass File Browser Message Center # new messages/# total messages Show: All, New, or Read Read Delete All Messages Date Subject Search results for Add to Playlist...
-
Page 44: Music
Music Timer Volume speaker Shuffle Playlist Shuffle Playlist Repeat Playlist Repeat Playlist Clear Playlist Clear Playlist down list view Home Photos Videos File Browser Album Add to Playlist Add to Playlist Play Play NOTE: Add to Playlist Add to Playlist Play Play Previous... - Page 45 Album Artist Name Genre Add to Playlist Add to Playlist Play Play Play Entire Album Play Add to Playlist Add to Playlist Add to Playlist Add to Playlist Play Play Artist Name Add to Playlist Add to Playlist Recent Play in External Application Play in External Application Play Play...
- Page 46 Add to Playlist Play in External Application Add to Playlist Play in External Application Play in External Application Play in External Application Play Play Play Play Add to Playlist Add to Playlist Add to Playlist Play in External Application Add to Playlist Play in External Application Play in External Application Play in External Application...
-
Page 47: Photos
Photos Previous Previous Play Play Next Next Play Play list view Previous Page Previous Page NOTE: Scroll Left scroll left Scroll Right scroll right Next Page Next Page View Photo View Photo Slidebar slidebar 2 5 10 30 60 Seconds Delay Pause/Play Enter Full Screen... - Page 48 Home Music Videos File Browser View Photo View Photo Album Play Play View Photo View Photo Play Play Date Photo Photo-Album Size Dimension Back Play Play Date Play Play Photo-Album Media Hub...
- Page 49 View Photo View Photo Play Play View Photo View Photo Date Photo Play Play Photo-Album Size Dimension View Photo View Photo Play Play Recent Date Photo Photo-Album Size Dimension Name View Photo View Photo Play Play View Photo View Photo View Photo View Photo Play...
-
Page 50: Videos
Size Slidebar Dimension Volume speaker Videos Pause/Play Stop Stop Home Music list view Photos File Browser Name Play in External Application Play in External Application Play Play NOTE: Play in External Application Play in External Application Play Play Play in External Application Play in External Application http://www.linksysbycisco.com/support Play... -
Page 51: File Browser
Video Type File Browser Date Size Duration NOTE: Recent Copy-and- Paste page 12 admin Submit Play in External Application Play in External Application Play Play Play in External Application Play in External Application Play Play Video Type Page Date Options page 32 Size Duration Media Hub... - Page 52 NOTE: NOTE: Move File USB page 20 ctrl + click shift + click Move File(s) File and Folder Options Refresh file list Delete File ctrl + click shift + click NOTE: NOTE: Rename File Copy File ctrl + click shift + click Submit Copy File(s) New Folder...
- Page 53 Delete Folder NOTE: Copy Folder NOTE: Copy Folder Rename Folder Submit Download to PC Download File NOTE: Move Folder Move Folder NOTE: Upload to Media Hub Browse Remove Remove All Media Hub...
-
Page 54: Chapter 4 Use Of The Media Browser
Upload Page Options First Page Previous Page Page _ of <Total_Pages> Next Page Last Page Media Hub... -
Page 55: Chapter 6: Windows File Backup (Windows Only)
NOTE: Create Backup Job Create Backup Job page 33 NTI Shadow Access Modify Backup Job page 35 Start > All Programs > Cisco Media Hub > NTI Shadow Create Backup Job Next Shadow Setting About NTI Shadow Exit Main Menu... - Page 56 Browse Save your folder/file changes every On Demand On-Demand Backup page 36 Next Computer My Computer Make New Folder Save all the previous file versions Save a limited number of previous versions Do not save any previous file versions Next On Demand (Only) Demand Backup page 36 Save your folder/file changes to the backup...
-
Page 57: Backup Jobs
Back Finish Start Backup Edit Disable Disable All Delete Done NOTE: Help Backup Jobs NOTE: Automatic Backup Create Backup Job page 33 Media Hub... - Page 58 On-Demand Backup NOTE: Back Up Button Backup Using LCD Menu back up Backup Both Series of the Media Hub Chapter 7: Advanced Configuration page Configuration Submit Backup Backup PC Backup Media Hub...
-
Page 59: Chapter 5: Use Of The Lcd Menu
Chapter 5: Use of the LCD Menu How to Access the LCD Menu Backup NTI Shadow page 33 Status Settings NOTE: Power Off Status > Network Backup How to Navigate the LCD Menu Media Hub... -
Page 60: Status
PC Backup NOTE: NOTE: Backup Folder page 15 NTI Shadow page 33 Status Device Backup Device Backup NOTE: Space Media Hub... -
Page 61: Settings
Usage Screensaver Never Network 5 seconds 30 seconds 1 minute Backlight Internet IP Address Chapter 7: Advanced Configuration page 41 Never 5 seconds Settings 30 seconds 1 minute Media Hub... -
Page 62: Power Off
Firmware Current version Latest version Update Update WARNING: Power Off Alerts New Device Alert Backup Folder page 15 NOTE: Backup page 37 Media Hub... -
Page 63: Chapter 7: Advanced Configuration
Chapter 7: NOTE: Advanced Configuration http://mediahub http://mediahub.local NOTE: NOTE: Status page 38 Remote Access Instructions page 48 NOTE: Configuration System page 42 How to Access the Configuration Utility NOTE: Chapter 4: Use of the Media Browser page 18 http://<Friendly_Name> http://<xxx.xxx.xxx.xxx> admin Submit Enter... -
Page 64: Overview
Disk View Details Disk page 45 Services Configure Services Services page 47 System Overview Overview Refresh Search Search page 21 ? (User Guide) Help ! (Message Center) Messages Message Center page 21 Hostname Workgroup house Photos Videos MAC Address File Browser Serial Number System Model... - Page 65 Up Time Subnet Mask Media Hub Name Gateway DNS Server 1 Workgroup DNS Server 2 Change Submit Cancel Password Change Media Hub Name Workgroup Submit Cancel IP Address Change Current Password New Password Confirm New Password Submit Cancel Guest Password Enable DHCP Change IP Address...
- Page 66 Submit Cancel System Date Time Zone Change Update Cancel WARNING: Current Media Hub Date Restart Restart Time Zone Submit Cancel Device Language NOTE: Change Select Language Submit Cancel Firmware Update: Latest Firmware Version Update NOTE: Media Hub...
-
Page 67: Disk
Disk Disk Usage by Space Current Disk Configuration Vendor Model Health RAID Mode RAID Status Slot A Slot B Available Disk Configuration Actions Install a Second Hard Disk page 3 ? Disk Configuration Help Overview Add/Replace Drive Configuration Recovery Disk Usage by Type NOTE: Media Hub... - Page 68 ? Increase Space NOTE: WARNING: ? Revert to single disk mode ? Increase Protection Rebuild NOTE: Replace a Hard Disk page 3 NOTE: Media Hub...
-
Page 69: Backup
Backup NTI Shadow page 33 NOTE: Remote Access Backup Backup NOTE: www.ciscomediahub.com NOTE: Configure Services Enable Remote Access to the Media Hub Remote Device Name www.linksysbycisco.com Media Hub... - Page 70 Password Submit Guest login NOTE: Submit Cancel Guest Password Submit http://www.ciscomediahub.com Enter NOTE: Windows File Sharing Media Hub...
- Page 71 Configure Media Server Enable Windows File Sharing Enable Windows File Sharing Configure Close Find Shared Media on My Local Network New share name Save Close pencil Chapter 2: Getting Started page 9 Edit share name Submit Cancel Save Close NOTE: Close Media Hub...
- Page 72 iTunes Server WEB: www.linksysbycisco.com/support Disable NOTE: Edit > Preferences > Sharing Look for shared libraries FTP Server Configure Enable FTP access Require Username and Password for FTP access Username Password Confirm Password Submit Cancel NOTE: internal port numbers IP address Media Hub...
-
Page 73: Appendix A: Troubleshooting
Appendix A: http://<Friendly_Name> Troubleshooting http://<xxx.xxx.xxx.xxx> You cannot play one of your videos through the Media Enter Browser of the Media Hub. http://<Friendly_Name>.local http://<xxx.xxx.xxx.xxx> return NOTE: http://mediahub http://www.linksysbycisco.com/support http://mediahub.local The power LED of the Media Hub continuously flashes blue or red. You have configured the Media Hub, but you do not see it displayed in Windows Explorer or the Finder. -
Page 74: Troubleshooting
The iTunes Library does not display the Media Hub. Edit > Preferences > Sharing Look for shared libraries NOTE: You cannot access the Media Browser, or the Media Hub does not respond to commands. NOTE: WARNING: Chapter 7: Advanced Configuration page 41 Configuration Reset... - Page 75 The Media Hub is using Increase Protection: RAID 1 mode. One of the hard disks has failed. Chapter 7: Advanced Configuration page 41 Configuration NOTE: Submit Disk Rebuild NOTE: WARNING: You want to install a hard disk that was previously used in a Windows computer.
-
Page 76: Appendix A Troubleshooting
You initiated an on-demand backup job using the Media Hub and backup software, but the backup job did not run. Create Backup Job page 33 NOTE: You ran a backup job using the Media Hub and backup software, but you cannot find the backup files on the Media Hub. -
Page 77: Appendix B: Specifications
Appendix B: Specifications Environmental Model NMH300 - Media Hub Model NMH405 - Media Hub with LCD Environmental Model NMH305 - Media Hub Environmental Media Hub... -
Page 78: Model Nmh410 - Media Hub With Lcd
Model NMH410 - Media Hub with LCD Environmental Media Hub... -
Page 79: Appendix C: Warranty Information
Appendix C: Exclusions and Limitations Warranty Information Limited Warranty Media Hub... - Page 80 Obtaining Warranty Service www.linksysbycisco.com/support www.linksysbycisco.com Technical Support www.linksysbycisco.com/support Media Hub...
-
Page 81: Appendix D: Regulatory Information
Appendix D: WARNING: Regulatory Information FCC Statement www.dtsc.ca.gov/hazardouswaste/perchlorate Industry Canada Statement Avis d’Industrie Canada Safety Notices WARNING: WARNING: WARNING: Media Hub... -
Page 82: User Information For Consumer Products Covered By Eu Directive 2002/96/Ec On Waste Electric And Electronic Equipment (Weee)
User Information for Consumer Products Čeština (Czech) - Informace o ochraně životního prostředí pro zákazníky v zemích Evropské unie Covered by EU Directive 2002/96/EC on Waste Electric and Electronic Equipment (WEEE) Dansk (Danish) - Miljøinformation for kunder i EU English - Environmental Information for Customers in the European Union Deutsch (German) - Umweltinformation für Kunden innerhalb der Europäischen Union... - Page 83 Eesti (Estonian) - Keskkonnaalane informatsioon Français (French) - Informations environnementales Euroopa Liidus asuvatele klientidele pour les clients de l’Union européenne Español (Spanish) - Información medioambiental para clientes de la Unión Europea Italiano (Italian) - Informazioni relative all’ambiente per i clienti residenti nell’Unione Europea Ελληνικά...
- Page 84 Lietuvškai (Lithuanian) - Aplinkosaugos informacija, Nederlands (Dutch) - Milieu-informatie voor klanten skirta Europos Sąjungos vartotojams in de Europese Unie Malti (Maltese) - Informazzjoni Ambjentali għal Klijenti Norsk (Norwegian) - Miljøinformasjon for kunder i EU fl-Unjoni Ewropea Polski (Polish) - Informacja dla klientów w Unii Magyar (Hungarian) - Környezetvédelmi információ...
- Page 85 Português (Portuguese) - Informação ambiental para Slovenščina (Slovene) - Okoljske informacije za stranke clientes da União Europeia v Evropski uniji Suomi (Finnish) - Ympäristöä koskevia tietoja EU- alueen asiakkaille Română (Romanian) - Informaţii de mediu pentru clienţii din Uniunea Europeană Svenska (Swedish) - Miljöinformation för kunder i Europeiska unionen Slovenčina (Slovak) - Informácie o ochrane životného...
-
Page 86: Appendix E: Software End User License Agreement
Appendix E: Software End User License Agreement Cisco Products Software Licenses www.linksysbycisco.com www.linksysbycisco.com/gpl/ Schedule 1 Cisco Software License Agreement License. www.linksysbycisco.com/gpl www.linksysbycisco.com/gpl www.linksysbycisco.com/gpl/ Media Hub... - Page 87 License Restrictions Collection and Processing of Information Ownership Third Party Services, Links and Advertising Media Hub...
- Page 88 Term and Termination. Limited Warranty Software Upgrades etc Changes to Browser Settings and Error Processing Media Hub...
- Page 89 Disclaimer of Liabilities END OF SCHEDULE 1 Schedule 2 Network Magic Features Network Magic License Restrictions. Terms of Service for Subscription Licenses Technical Support www.linksysbycisco.com/support Export 1. Network Magic Cancellation U.S. Government Users. 2. Modifications General Terms 3. Email Notification Media Hub...
- Page 90 END OF SCHEDULE 2 Schedule 3 Open Source and Third Party Licenses http://www.gnu.org/licenses/old-licenses/gpl-2.0.html Media Hub...
- Page 91 Media Hub...
- Page 92 Media Hub...
- Page 93 END OF TERMS AND CONDITIONS Media Hub...
- Page 94 Media Hub...
- Page 95 Media Hub...
- Page 96 Media Hub...
- Page 97 Media Hub...
- Page 98 http://www.openssl.org/ http://www.openssl.org/ http://www.openssl.org/source/license.html. Media Hub...
-
Page 99: Appendix E Software End User License Agreement
Media Hub... - Page 102 No. NMH400 Series Model Installation CD ver.1.0.00...
- Page 103 Please visit http://www.linksysbycisco.com/support for more information. Unksys, Clsc:o and the Gsco logo are registered trademarks or trademarks of Cisco Systems, Inc. and/or Its affiliates in the U.S. and certain other countries. Copyright CO 2001 Cisco Systems, Inc. All rights reserved.