
Related Manuals for Philips CE139DR


Summary of Contents for Philips CE139DR
-
Page 1: User Manual
Always there to help you Register your product and get support at www.philips.com/welcome CE139DR Question? Contact Philips User manual... -
Page 2: Table Of Contents
Contents 7 Play from a storage device 1 Safety Control play Switch tracks 2 Your car audio system Introduction 8 Play from an iPod/iPhone What's in the box Compatible iPod/iPhone models Overview of the system Connect your iPod/iPhone Control play 3 Install the car audio system Charge your iPod/iPhone Connect wires... -
Page 3: Safety
1 Safety Read and understand all instructions before you use this device. If damage is caused by failure to follow instructions, the warranty does not apply. • Modification of the product could result in hazardous radiation of EMC or other unsafe operation. -
Page 4: Your Car Audio System
ID3 tag V2.0 or later Congratulations on your purchase, and • Unsupported files: welcome to Philips! To fully benefit from the AAC, WAV, and PCM files support that Philips offers, register your product DRM protected WMA files (.wav, .m4a, at www.philips.com/welcome. -
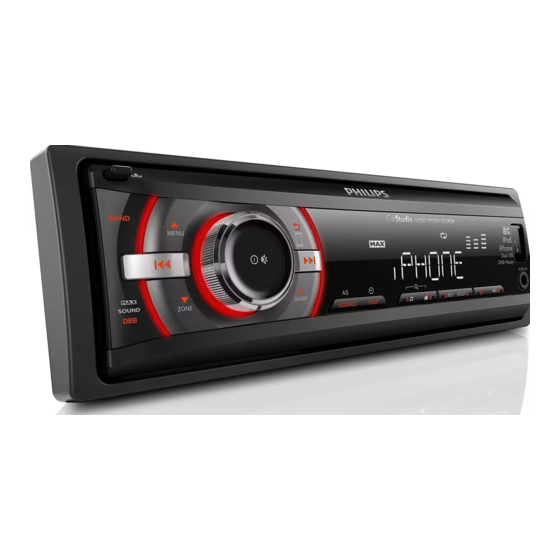
Page 5: Overview Of The System
Overview of the system t srq l k j i h • Return to the previous menu. • Unlock the front panel. • For iPod/iPhone, press repeatedly to select a control mode: control play on • For .wma and .mp3 tracks, press to the iPod/iPhone or on this system. - Page 6 f AUDIO-IN • In FM/MW radio mode, press and hold • Connect to the audio output socket to store the current radio station at (usually the headphone socket) of an channel No. 2. external device. • For .wma and .mp3 tracks on a storage device, press to access the folder list.
-
Page 7: Install The Car Audio System
3 Install the car • For .wma and .mp3 tracks on a storage audio system device, press to select the next folder. • In DAB mode, press and hold to access the list of radio stations. • In a mode other than DAB mode, Caution press and hold to activate the selection •... -
Page 8: Connect Wires
Connect other wires if necessary. Connect wires Note • Make sure that all loose leads are insulated with electrical tape. • Consult a professional to connect wires as instructed below. Check the car's wiring carefully and connect them to the the supplied ISO male connectors. -
Page 9: Mount Into The Dashboard
Secure the DAB radio receiver to your car. Connect the DAB radio receiver Note • The DAB radio receiver and DAB radio antenna are not bundled. Consult your local retailer for purchase. • Make sure that no lead other than the DAB radio antenna contacts the antenna connector of the DAB radio receiver. -
Page 10: Attach The Front Panel
Remove the mounting sleeve with the Attach the trim plate. supplied disassembly tools. Install the sleeve into the dashboard and Reconnect the negative terminal of the car bend the tabs outward to fix the sleeve. battery. Attach the front panel Insert the notch on the front panel to the chassis on the main unit. -
Page 11: Get Started
Press to turn on the system. Press to release the front panel. » [PHILIPS] is displayed and then Pull the front panel outwards to remove it. [SELECT OPERATING REGION] (select a radio region) scrolls. When one of the following options is... -
Page 12: Set The Clock
Set the clock Select a listening zone Press and hold to access the system Press and hold until one of the menu. following options is displayed. • [ALL]: For all passengers Press repeatedly until [CLOCK] is [FRONT-L]: For the front-left seat only •... -
Page 13: Listen To Fm/Mw Radio Stations
5 Listen to FM/ Select a tuner sensitivity MW radio To search for radio stations with strong signals stations only or more radio stations, you can change the tuner sensitivity. Press and hold to access the system menu. repeatedly until [LOCAL Press ON] or [LOCAL OFF] is displayed. -
Page 14: Play With Rds
Rotate to select [RDS ON]. Store radio stations automatically » The RDS function is enabled. Press repeatedly to select a band. • To disable the RDS function, rotate to select [RDS OFF]. Press and hold AS/SOURCE until [STORE---] is displayed. »... - Page 15 Item Program Description Receive traffic announcement type If you want to receive traffic announcement, CHILDREN Children’s programs enable the TA (Traffic Announcement) function. SOCIAL Social Affairs Press and hold to access the system RELIGION Religion menu. PHONE IN Phone In Press repeatedly until [TA ON] or TRAVEL...
-
Page 16: Listen To Dab Radio Stations
6 Listen to DAB Tune to a detected station radio stations Press to exit the system menu. Press again to access the list of detected stations. » is displayed. Press repeatedly or rotate Note until the name of the target station is •... -
Page 17: Display Dab Information
• To tune to a programmed radio Set up for weak reception station, press its corresponding numeric button When the current reception gets poor, the product can automatically switch the source or , , or mute the speakers according to your setup. Press and hold to access the system Program stations manually... -
Page 18: Reset The Dab Tuner
Reset the DAB tuner Note Press and hold to access the system • Philips does not guarantee compatibility with all storage menu. devices. » [DAB SCAN] is displayed. • NTFS (New Technology File System) file system is not supported. -
Page 19: Control Play
Press AS/SOURCE repeatedly to switch Switch tracks the source. [FRONT USB]: For a USB storage • During play, you can switch tracks or folders device that is connected to the USB quickly. socket on the front panel [REAR USB]: For a USB storage •... -
Page 20: Play From An Ipod/Iphone
8 Play from an Press AS/SOURCE repeatedly to switch the source to [FRONT USB] (Front iPod/iPhone USB socket) or [REAR USB] (Rear USB connector). » The system starts playing tracks that are stored on your iPod/iPhone. Note Note • During play, no audio signals are transferred through •... -
Page 21: Charge Your Ipod/Iphone
9 Listen to an Search for a track external player After accessing the iPod/iPhone menu, you can select a specific track quickly. Press to access the iPod/iPhone menu. » [PLAYLIST] scrolls. You can use the system to amplify the audio Rotate to select a category. -
Page 22: 10 Adjust Sound
10 Adjust sound 11 Additional information The following operations are applicable to all supported media. Button Function Reset the system Rotate to increase or decrease the volume level. If the system works abnormally, reset the Press to mute the speakers or release system to factory default settings. -
Page 23: Upgrade The Firmware
• If the fuse gets damaged immediately after it is replaced, an internal malfunction may occur. In such Log in with your account for Club Philips. case, consult your Philips retailer. » Support information about your registered product is displayed. -
Page 24: Product Information
12 Product Usable sensitivity - 30 µV AM(MW) (S/N = information 20 dBA) Frequency range - 174.928 - 239.200 MHz Note Usable sensitivity - < -95 dbm DAB (EN50248) • Specifications are subject to change without prior notice. General Power supply 12 V DC (11 V - 16 V), negative ground Fuse... -
Page 25: 13 Troubleshooting
16). product, check the following points before requesting service. If the problem remains Display shows ERR-12. unsolved, go to the Philips Web page (www. • Data error. Check the USB storage device philips.com/support). When you contact Philips, or SD/SDHC card. -
Page 26: 14 Notice
Trademark notice Any changes or modifications made to this device that are not expressly approved by Philips Consumer Lifestyle may void the user’s Windows Media and the Windows logo authority to operate the equipment. are trademarks, or registered trademarks of Microsoft Corporation in the United States and/or other countries. - Page 27 Specifications are subject to change without notice © 2013 Koninklijke Philips Electronics N.V. All rights reserved. CE139DR_05_UM_V1.0...