Table of Contents
Advertisement
USER MANUAL FOR YOUR
HRCI2570.1 Built-in
combi fridge/freezer
NOTE
: This User Instruction Manual contains important
information, including safety & installation points, which will
enable you to get the most out of your appliance. Please keep it
in a safe place so that it is easily available for future reference, for
you or any person not familiar with the operation of the appliance.
GS 18/09/12
Advertisement
Table of Contents

Related Manuals for Baumatic HRCI2570.1


Summary of Contents for Baumatic HRCI2570.1
- Page 1 USER MANUAL FOR YOUR HRCI2570.1 Built-in combi fridge/freezer NOTE : This User Instruction Manual contains important information, including safety & installation points, which will enable you to get the most out of your appliance. Please keep it in a safe place so that it is easily available for future reference, for you or any person not familiar with the operation of the appliance.
-
Page 2: Table Of Contents
Contents Environmental note Important safety information 4 – 5 Specifications of your combi fridge freezer 6 -9 Product and aperture dimensions Product specifications Description of your appliance Description of the product features Using your combi fridge freezer 10-13 Before switching on During first use Turning on the appliance Setting the fridge thermostat... -
Page 3: Environmental Note
Environmental note Note : Before discarding an old appliance, switch off and disconnect it from the power supply. Cut off and render any plug useless. Cut the cable off directly behind the appliance to prevent misuse. This should be undertaken by a competent person. Disable the door lock to make sure that children cannot get stuck inside the appliance. -
Page 4: Important Safety Information
Important safety information Your safety is of the utmost importance to us. Please make sure that you read this instruction booklet before attempting to install or use the appliance. If you are unsure of any of the information contained in this booklet, please contact the Advice Li IMPORTANT: Any installation work must be carried... - Page 5 Child safety o Packaging material should be kept away from children. o Children should not be allowed to touch the controls or play with the appliance. General safety o Do not pull on the power supply cable to remove the plug from your mains supply socket.
-
Page 6: Specifications Of Your Combi Fridge Freezer
Specifications of your combi fridge freezer Product dimensions Height: 1772 mm Width: 540 mm Depth: 540 mm Aperture dimensions Height: 1772-1776 mm Width: 560 mm Depth: 550 mm Product specifications o Total gross / net capacity: 259 / 250 litres o Gross capacity fridge / freezer: 190 / 69 litres o Net capacity fridge / freezer: 188 / 62 litres o Freezing capacity: 3 kg / 24 hours... - Page 7 Energy efficiency class Energy class: IMPORTANT: When you install your appliance it is important to bear in mind its climatic rating. In order to find out the climatic rating of your appliance, you should check the rating plate. The rating plate is located on the front left edge of the inside of the fridge section.
-
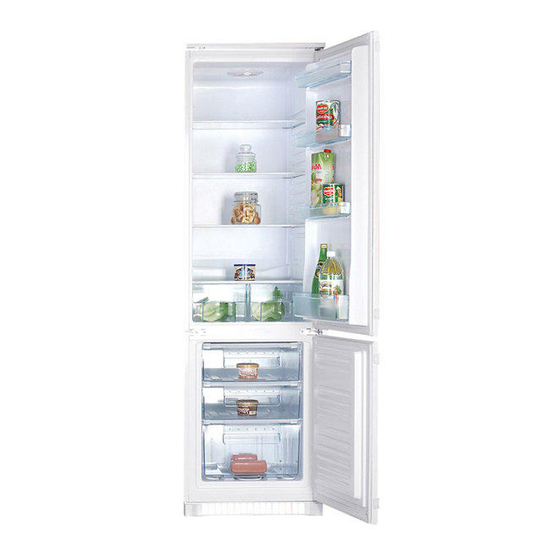
Page 8: Description Of Your Appliance
Description of the appliance 1. Internal light / thermostat control dial 2. Adjustable safety glass shelves 3. Salad crisper shelf 4. Salad crispers 5. General door racks 6. Bottle rack 7. Transparent freezer drawers Description of the product features 1) Adjustable shelves o The shelves may be placed in any of the guide slots within the interior of the appliance. - Page 9 o It is important that this channel never becomes clogged (see “Defrosting the refrigerator compartment” on pages 18 - 19 for a detailed explanation of how to keep the channel clear). 3) Crisper drawers and cover o The crisper drawers are in the bottom of your refrigerator and there is a cover that goes over them.
-
Page 10: Using Your Combi Fridge Freezer
Using your combi fridge freezer Before switching on o Make sure that it has been installed by a suitably qualified person, as per the information contained in the manufacturer’s installation instructions. o After delivery, wait for eight hours before connecting the appliance to your mains supply. -
Page 11: Turning On The Appliance
Turning on the appliance and setting the thermostat in the fridge section You switch on your appliance by connecting it to your mains supply and setting the thermostat. o The thermostat automatically regulates the temperature inside the refrigerator, depending on what number you have turned the thermostat control knob to. -
Page 12: Arranging And Storing Food In The Fridge Section
Arranging and storing food in the fridge section A) Cooked food B) Cooked meat C) Fruit and vegetables D) Bottles / cartons E) Butter / cheese / yoghurt F) Frozen foods o Warm food or evaporating liquids should not be stored in your refrigerator, as this will increase the humidity inside of the appliance. -
Page 13: The Freezer Compartment
o Some organic solutions, such as the oils in lemon/orange peel and acid in butter, can cause damage to the plastic parts contained inside of the refrigerator. o Do not open the refrigerator door too often or leave the door open for long periods of time, as this will increase the temperature inside of the appliance and will increase the energy usage. -
Page 14: Freezing Fresh Food
o Warm food should be allowed to cool down before you attempt to freeze it. If you place warm food in the freezer compartment, then the increased humidity will cause quicker ice formation and increase the amount of power that the appliance uses. o The guidance of the food manufacturer should be followed, in regard to the maximum storage time. -
Page 15: Making Ice Cubes
o Do not place bottles (glass or tin) containing liquids (especially sparkling liquids) into the freezer as they could cause the bottle to burst during freezing. o For a guide to the recommended freezer storage time for different foods please refer to the chart below. Making ice cubes o Fill the ice cube tray with water and place it in the upper freezer drawers. -
Page 16: Saving Energy When Using Your Fridge-Freezer
Compressor noise o There will be an operating noise when the compressor is running. o After installation, the compressor may be noisier for a short period of time. Bubbling and burbling sound o This noise is emitted as the coolant flows through the pipework within the fridge freezer. -
Page 17: Cleaning And Maintenance
o The freezer compartment should operate at around -18 degrees Celsius. The refrigerator compartment should operate at around 3 to 4 degrees Celsius. o Allow food to sufficiently cool before putting it in the appliance (but do not let it sit at room temperature for too long). o In the freezer compartment, food packages should be scattered and never grouped or stacked together until they are completely frozen. -
Page 18: Defrosting The Refrigerator Compartment
o Do not use abrasive products, detergents or soaps. o After washing the appliance, wipe over the area that you have cleaned with a damp cloth and then dry it thoroughly. o You should periodically clean the air vents and condenser at the rear of the appliance with a vacuum cleaner or brush. -
Page 19: Defrosting The Freezer Compartment
o You should be careful to make sure that food packages do not touch the rear wall of the appliance, as this can interrupt the automatic defrosting process and deflect water into the base of your refrigerator. Defrosting the freezer compartment The frost in the freezer compartment should be removed periodically. -
Page 20: Replacing The Light Bulb
o Do not defrost the appliance with other electrical devices (e.g. hair dryer). Do not use sharp metal objects to remove the ice on the freezer, as this could cause damage to the refrigerant system. Replacing the light bulb WARNING: PLEASE ENSURE THAT YOUR APPLIANCE IS DISCONNECTED FROM YOUR MAINS... -
Page 21: Positioning
Brown Live Blue Neutral Green and yellow Earth o As the colours of the wires in the appliance’s mains lead may not correspond with the coloured markings identifying the terminals in your spur box, please proceed as follows: The brown wire must be connected to the terminal marked “L” (live), or coloured red. -
Page 22: Reversing The Doors Of Your Appliance
Reversing the doors of your appliance The doors of your fridge freezer can be set to open from the left or the right. If you want the doors to be hinged on the left hand side and opening from the right hand side, you will need to follow the door reversal process. - Page 23 o Remove the two screws (3) holding the middle hinge (4) in place. Remove the middle hinge (4). o Lift the lower door off the bottom hinge pin and place it on a cushioned surface to prevent scratching it. o Remove the hinge pin (5) from the bottom right hinge (6) and move to the bottom left hinge (7).
-
Page 24: Aperture Dimensions And Ventilation Requirements
IMPORTANT: DO NOT HEAT THE DOOR SEAL ON ANYTHING BUT THE LOWEST HEAT SETTING, OR HEAT THE SEAL FOR A LONG PERIOD OF TIME. OTHERWISE DAMAGE MAY BE CAUSED TO THE DOOR SEAL, WHICH WOULD NOT BE RECTIFIED UNDER THE GUARANTEE FREE OF CHARGE. IMPORTANT: WHEN YOU HAVE REVERSED THE DOORS OF THE APPLIANCE;... - Page 25 to cool down the condenser located in the rear part of the appliance. o The housing unit must be equipped with a rear chimney with an upper opening that must not be blocked and a front slot which should be covered with a ventilation grill. IMPORTANT: The appliance aperture MUST have a minimum...
-
Page 26: Installing Your Fridge Freezer
o The diagram on the left shows the minimum gap which should left between the top of the housing unit and the ceiling allow sufficient ventilation. Installing your fridge freezer o Insert the appliance into the housing unit, leaving a 5mm gap for the gasket on the opposite side of the hinges. - Page 27 o Make sure the top fixing bracket fits perfectly into the top of the cabinet o Fasten the top part of the appliance to the cabinet using the screws provided. o Fasten the bottom part of the appliance by means of the screws provided.
-
Page 28: Door Slider Fittings
o Tighten the fixing screws of the central right-hand hinge/fixing unit. o Perform the same operations on the central left-hand hinge/fixing unit. Door slider fittings The appliance is equipped with coupling devices for the appliance doors with the doors of the housing unit. o Open the doors of the built-in housing unit and the fridge. -
Page 29: Troubleshooting
o Fasten the sled in the inner part of the panel of the built-in housing unit at the desired height and at approximately from outer edge of the door. Tighten screws as indicated in the diagram. When complete, attach screw and slide covers. Troubleshooting IMPORTANT: If your fridge freezer appears not to be operating properly, before contacting the Advice... - Page 30 My fridge freezer is noisy o The refrigerant gas that circulates the pipe work of the appliance may make a slight noise, even if the compressor is not running. o If the noise worsens or the appliance gets louder than normal; check that it is levelled off correctly, that nothing is touching the rear of the fridge freezer and that nothing placed inside the appliance is rattling.
- Page 31 IMPORTANT: If your appliance appears not to be operating correctly, then you should disconnect it from your mains supply and then contact the Advice Line on telephone number (0118) 933 6918. DO NOT ATTEMPT TO REPAIR THE APPLIANCE YOURSELF. Please note that if an engineer is asked to attend whilst the product is under guarantee and finds that the problem is not the result of an appliance fault, then you may be liable for the cost of the call out charge.
-
Page 32: Technical Data
Technical Data Manufacturer HOMEKING Model Number HRCI2570 Product Category 7 – Refrigerator-Freezer Energy Efficiency Class (1) Annual Energy Consumption (2) 274 kWh Storage Volume of Fridge 188 litres Compartment Storage Volume of Freezer 62 litres Compartment Star Rating Frost Free Compartments... -
Page 36: Contact Details
United Kingdom 6 Bennet Road, Reading, Berkshire RG2 0QX United Kingdom Customer Care (0118) 933 6918...