
Related Manuals for Grizzly 7 1/2" Mini Shear Brake T21322


Summary of Contents for Grizzly 7 1/2" Mini Shear Brake T21322
- Page 1 MODEL T21322 ⁄ " MINI SHEAR BRAKE OWNER'S MANUAL (FOR MACHINES MANUFACTURED AFTER 2/09) WARNING: NO PORTION OF THIS MANUAL MAY BE REPRODUCED IN ANY SHAPE OR FORM WITHOUT THE WRITTEN APPROVAL OF GRIZZLY INDUSTRIAL, INC...
-
Page 3: Table Of Contents
INTRODUCTION ... 2 SECTION 1: SAFETY ... 5 SECTION 2: SETUP ... 8 SECTION 3: OPERATIONS ... 13 Table of Contents SECTION 4: ACCESSORIES ... 18 SECTION 5: MAINTENANCE ... 20 SECTION 6: SERVICE ... 22 SECTION 7: PARTS ... 25 WARRANTY AND RETURNS ... -
Page 4: Introduction
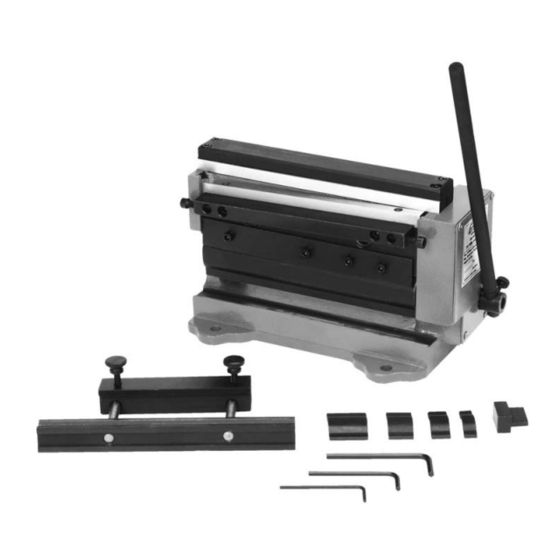
INTRODUCTION Functional Overview Manual Accuracy Brake your machine may not exactly match the manual Shear www.grizzly.com Contact Info... - Page 5 Identification Figure 1 Shear Brake...
- Page 6 Machine Data Sheet MACHINE DATA SHEET MODEL T21322 7-1/2" MINI SHEAR BRAKE Product Dimensions: Shipping Dimensions: Capacities: Construction Other Specifications: Features: Model T21322 Page 1 of 1...
-
Page 7: Section 1: Safety
Safety Instructions for Machinery... - Page 9 Additional Safety for Shear Brake OVERLOADING BRAKE Page 4 USAGE METAL EDGES PINCHING GLOVES, GLASSES, AND BOOTS TOOLS IN POOR CONDITION Like all machinery there is potential danger when operating this machine Accidents are frequently caused by lack of familiarity or failure to pay attention Use this machine with respect and caution to lessen the pos- sibility of operator injury If normal safety...
-
Page 10: Section 2: Setup
SECTION 2: SETUP This machine presents serious injury hazards to untrained users Read through this entire manu- al to become familiar with the controls and opera- tions before starting the machine! Wear safety glasses dur- ing the entire setup pro- cess! Set Up Items Needed Description... - Page 11 Inventory Note: If you can't find an item on this list, check the mounting location on the machine or examine the packaging materials carefully. Occasionally we pre-install certain components for shipping purposes. Box 1: Figure 2 Figure 2 Clean Up Setup G2544—Solvent Cleaner &...
- Page 12 Site Considerations Workbench Load Machine Data Sheet Placement Location Figure 4 Figure 4 Children and visitors may be seriously injured if unsuper- vised around this machine Lock entrances to the shop or disable start switch or power connection to prevent unsupervised use Mounting Figure 5...
- Page 13 Setup To set up the machine: Figure 7 Figure 7 Figure 8 Figure 8 Figure 9 Figure 23 Page 18 Figure 8 Figure...
- Page 14 Figure 10 Figure 11 Figure 10 Figure 11...
-
Page 15: Section 3: Operations
OMMEND that you read books, trade maga- zines, or get formal training before begin- ning any projects Regardless of the con- tent in this section, Grizzly Industrial will not be held liable for accidents caused by lack of training General Brake... - Page 16 Bend Allowance Figure 12 Figure 12. Machinery's Handbook Bending Sheet Metal Do not operate the Model T21322 unless it has been securely clamped in place or mounted to a workbench, or it could tip over on you, causing an injury! Tip: During a bending operation, the fingers push the sheet metal down into the groove of the finger receiver.
- Page 17 Figure 14 Figure 14 Figure 15 Figure 15 Note: For quick repeatability of bends that need to be made at the same location in sheet metal, the adjustable stop is used. Figure 15 Figure 16 Figure 17 Note: The minimum reverse bend possible is ⁄...
- Page 18 OMMEND that you read books, trade maga- zines, or get formal training before begin- ning any projects Regardless of the con- tent in this section, Grizzly Industrial will not be held liable for accidents caused by lack of training Shearing Tips For example: 16 Ga.
- Page 19 Cutting Sheet Metal To cut sheet metal: Figure 19 Figure 19 Figure 19 Figure 20 Figure 20 Figure 20 Figure 21 Figure 21 Note: For maximum knife life, and ease in shearing metal, keep the knives well oiled.
-
Page 20: Section 4: Accessories
SECTION 4: ACCESSORIES H5614—Wire Gauge US Standard Figure 22 G5562—SLIPIT ® 1 Qt Gel ® G5563—SLIPIT 12 oz Spray G2871—Boeshield ® T-9 12 oz Spray ® G2870—Boeshield T-9 4 oz Spray ® H3788—G96 Gun Treatment 12 oz Spray H3789—G96 ® Gun Treatment 4 5 oz Spray Figure 23 H6073—Deluxe Power Snip... - Page 21 G4956—Super Nibbler Figure 26 H5958—Sheet Metal Pliers Figure 27 G8781—4 ⁄ " Suction Cup Figure 28 H6131—Heavy-Duty Hand Riveter Figure 29...
-
Page 22: Section 5: Maintenance
SECTION 5: MAINTENANCE Schedule Daily Check: Weekly Maintenance: Bi Annual Maintenance: Cleaning Unpainted Cast Iron Section 5: Accessories Lubrication To lubricate the machine: Figure 30 General oil lubrication locations. Page 18 Figure 31 End shaft oil lubrication. Figure 30 Figure 31... - Page 23 Figure 32 Gear cover removal. Figure 32 Figure Figure 33 Gear grease locations. Figure 33...
-
Page 24: Section 6: Service
SECTION 6: SERVICE Brake Operation Shear Operation Troubleshooting Page 23 Page 12 Page 12 Page 24 Page 23 Figure 1 Page 23 Page 24 Page 23 Page Page... - Page 25 Adjusting Knives The shear on this machine presents a cutting hazard Make sure no body part is near the knives when shearing occurs to follow this warning may result in fingers being cut leading to personal injury Tools Required To perform the knife adjustment: Figure 34 Figure 34 Failure...
- Page 26 Knife Sharpening/ Replacement The shear on this machine presents a cutting hazard Make sure no body part is near the knives when shearing occurs to follow this warning may result in fingers being cut leading to personal injury Tools Required To rotate or replace the knives: Figure 36 Failure...
-
Page 27: Section 7: Parts
SECTION 7: PARTS Parts Breakdown and List REF PART # DESCRIPTION PB44M HEX BOLT M10-1.5 X 75 PT21322002 WORK LEVER PT21322003 KNURLED THUMB KNOB PAW05M HEX WRENCH 5MM PT21322005 MAIN CASTING PT21322006 FIXED KNIFE PT21322007 SHEARING KNIFE PT21322008 FINGER 8" PT21322009 FINGER 1-1/8"... - Page 28 MUST maintain the original location and readability of the labels on the machine If any label is removed or becomes unreadable, REPLACE that label before using the machine again Contact Grizzly at 800 523-4777 or www grizzly com to order new labels PART #...
-
Page 31: Warranty And Returns
WARRANTY AND RETURNS... - Page 32 Buy Direct and Save with Grizzly Visit Our Website Today For Current Information On Events And Specials! SECURE ORDERING ORDERS SHIPPED WITHIN 24 HOURS Call Today For A ® – Trusted, Proven and a Great Value! ~Since 1983~ -OR- FREE...