Advertisement
Quick Links
•Failure to follow theSE guide-
lines will result in serious per-
sonal injury.
•ALWAYS
WEAR
ANSI
APPROVED EYE AND EAR
PROTECTION WHEN USING
THIS BIT.
•The use of a router table is
strongly recommended.
•Never feed lumber with the
rotation of the bit.
•Follow the safety guidelines
set forth by the manufacturer
of the router and router table.
The primary purpose of the Model C1367 router bit is to create extended lengths of
ing the user to match and connect shorter lengths end-to-end. If handled carefully, clean, good-looking joints
can be made which will stand up well to inspection.
• Unplug
shaper
b e f o r e
installing or adjusting cut-
ter.
• Keep all guards and anti-kick-
back devices in place.
• Double check bit to insure it
i s t i g h t a n d s e c u r e i n
spindle.
• Always inspect lumber and
other wood materials for
cracks, knots, or other imper-
fections that could cause
lumber to kick or shatter
while milling.
fence(s) will be required. Set the fence face to the bearing on the
cutting side of the bit. Before cutting the workpiece, make some trial
cuts using scrap lumber. It must be the same thickness as your work-
piece. Make cuts on two boards and assemble these pieces to deter-
mine if the height of the bit needs correcting. Adjust height and test cut until the desired accuracy has been
achieved.
Helpful hint: For each paired joint, make your first cut with the marked face up. To make the matching cut on
your second piece of lumber, turn it over so the marked face is down. When you have completed your second
525503622
INSTRUCTIONS FOR C1367
FINGER JOINT BIT
Make certain the ends of your stock have good clean cuts which are square to the
the face and long edge. Lay out the pieces to be joined and match grain and color.
It is unlikely that you will be able to match grains exactly, but a close match of color
and grain width can be quite attractive. The care you take here will depend upon
whether you plan to stain or paint the finished product. Once you have paired the
butt ends, mark each piece on the faces which will be on the same side.
When using bit on a router table:
Set the router bit height so that the
router bit is centered to the wood (See
drawing). The lower portion of the cutter
should protrude from the table surface
excatly the same amount as the upper-
most portion of the bit. The use of a
These router bits have sharp
edges. use care while removing
the waxy protective
Never turn on the router with
the protective coating still on
the bit.
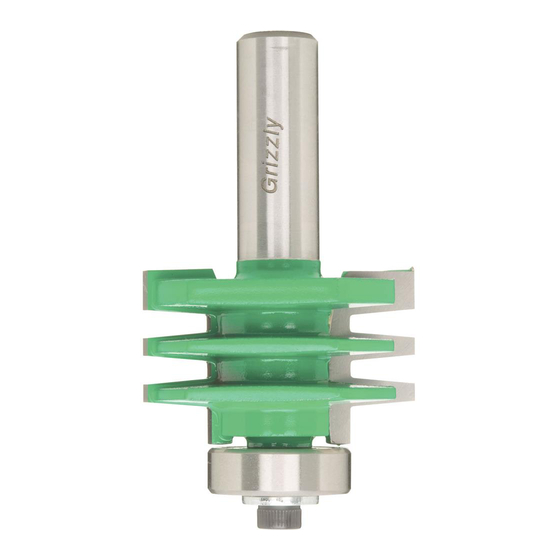
The Model C1367 Finger Joint Bit is
designed specifically for creating strong,
tight-fitting end joints in
The bit features tough carbide cutting
surfaces and a ball-bearing roller guide.
This bit can be used in either a hand-
held router or in a router table. For best
results, we recommend using a router
rated at a minimum of 1 horsepower,
mounted in a router table to ensure max-
imum safety and efficiency.
3
⁄
" thick lumber by allow-
4
© May 2003 Grizzly International, Inc.
coating.
3
⁄
" thick stock.
4
Advertisement

Related Manuals for Grizzly C1367


Summary of Contents for Grizzly C1367
- Page 1 The primary purpose of the Model C1367 router bit is to create extended lengths of ing the user to match and connect shorter lengths end-to-end. If handled carefully, clean, good-looking joints can be made which will stand up well to inspection.
- Page 2 Use a square to make sure that this guide board is square to the workpiece. Make sure the workpiece is flush to or protrudes from, the edge of the guide board a small amount- less than ⁄ ". 525503622 © May 2003 Grizzly International, Inc.