Table of Contents
Advertisement
User Manual for your Baumatic
BAEC2SS.2
Semi-automatic built-in espresso maker
NOTE
: This User Instruction Manual contains important
information, including safety & installation points, which will
enable you to get the most out of your appliance. Please keep it
in a safe place so that it is easily available for future reference; for
you or any person not familiar with the operation of the appliance.
DD 17/02/11
1
Advertisement
Table of Contents

Related Manuals for Baumatic BAEC2SS.2

Summary of Contents for Baumatic BAEC2SS.2
- Page 1 User Manual for your Baumatic BAEC2SS.2 Semi-automatic built-in espresso maker NOTE : This User Instruction Manual contains important information, including safety & installation points, which will enable you to get the most out of your appliance. Please keep it in a safe place so that it is easily available for future reference; for you or any person not familiar with the operation of the appliance.
-
Page 3: Table Of Contents
Contents Environmental note IMPORTANT SAFETY INFORMATION 5 – 7 Specifications 7 – 11 Product and aperture dimensions Product specifications 7 - 8 Standard accessories Technical specifications Description of the coffee machine 9 - 10 Control panel The filters Things to do before first use 11 –... -
Page 4: Environmental Note
Environmental note o The packaging materials that Baumatic uses are environmentally friendly and can be recycled. o Please discard all packaging material with due regard for the environment. -
Page 5: Important Safety Information
IMPORTANT SAFETY INFORMATION Your safety is of the utmost importance to Baumatic. Please make sure that you read this instruction booklet before attempting to install or use the appliance. If you are unsure of any of the information contained in this ooklet, please contact Think. - Page 6 Child Safety o Baumatic strongly recommend that babies and young children are prevented from being near to the appliance and not allowed to touch the appliance at any time. o If it is nece ssary for younger family members to be in the kitchen, please ensure that they are kept under close supervision at all times.
-
Page 7: Specifications
o The manufacturer declares that the espresso maker is built using certified materials and requires the appliance to be installed in accordance with the standards currently in force. This appliance must be used by a trained person for domestic purposes only. pecific ations Product Dimensions... - Page 8 o Removable water tank (capaci ty 1.8 litres) o Empty water tank warning light o LED high density ill umination Standard accesso ries o Filter holder o 1 x one measure espresso cup fi lter o 1 x two measure espresso cup filter o 2 x espresso cups with saucers o Water softener...
-
Page 9: Standard Accessories
Description of the espr esso maker Standard accessories Filter holder Spout for a single coffee dose Spout for a double coffee dose Filter for 1 Italian coffee pod or 1 d ose of ground coffee Filter for 2 doses of e spresso coffee or 1 French coffee pod Espresso coffee batcher (ground) Coffee pressing tool... -
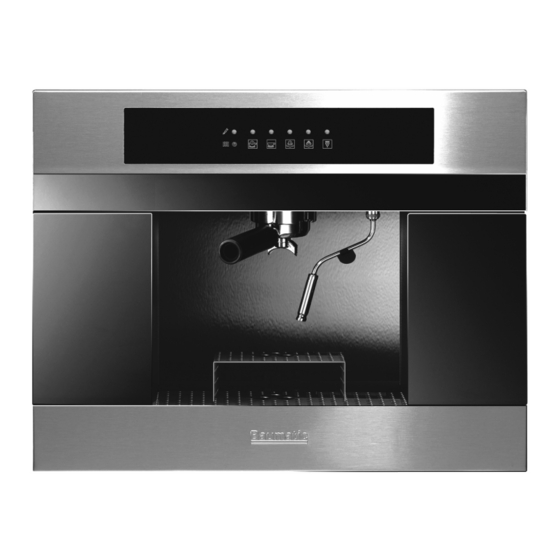
Page 10: Control Panel
Filter holder ring nut Power ON/OFF switch Light Control panel 22) Power ON indicator (green) 23) Main boiler status indicator (green) 24) Main boiler dispensing indicator (green) 25) Steam boiler status indicator (green) 26) Steam dispensing indicator (green) 27) Boiling water dispensing indicator (green) 28) Low water level indicator (red) 29) Main boiler activation button 30) Main boiler dispensing button... -
Page 11: The Filters
The filters o Filter for 1 Italian coffee pod or 1 dose of ground coffee. o Filter for 2 measures of espresso coffee of 1 French coffee pod. Things to do before first use 1) Cleani o It is strongly recommended to clean the appliance prior to its first use. -
Page 12: What To Do If The Water Level Runs Low During Operation
o Install the appliance as per the installation instructions contained within this booklet. o Open the water reservoir door (14) and remove the water reservoir (15) from the cabinet. o Remove the water softener filter (11) from its connecting pipe and immerse it in a bowl of cold water for approximately five minutes prior to reconnecting. -
Page 13: Getting Started (Loading The System With Water)
o Restart the machine using the power ON/OFF switch (20). o You must start the drinks making process right from the beginning, as stated in the “Using your espresso maker” section (pages 15 – 17). 3) Getting started (Loading the system with water) IMPORTANT: YOU MUST FOLLOW THE STEPS BELOW BEFORE HEATING THE WATER BOILER FOR THE FIRST TIME. -
Page 14: Dispensing Steam Through The Steam Boiler
Noise generated during this operation is perfectly normal. This is caused by the activation of the high pressure pump during this operation. It is also quite normal for a certain amount of water to drip into the drip tray after water has been dispensed. -
Page 15: Dispensing Boiler Water Through The Steam Boiler
whilst dispensing steam. 3) Dispensing boiling water through the steam boiler o Follow the instructions on filling the water reservo ir (pages 11 – 14) as stated previously and proceed as follows:- o Press the steam boiler activation button (31) to allow the boilers to heat up. -
Page 16: Making Drinks
aking drinks Connecting the filter ho lder to the main boiler o Lift the filter holder (1) towards the filter holder ring nut (19); making sure that it is in the position shown in the drawing above. o Continue lifting the holder until it locates inside of the ring nut. o Turn the handle o f the holder anti-clockwise, making sure that it is fully secured. -
Page 17: Making Drinks Using Espresso Ground Coffee
o To make a single dose of espresso, use the spout for a single coffee dose (2) and use one espresso cup. To make a double dose of espresso, use the spout for a double coffee dose (3) and use two espresso cups. Insert an appropriately sized coffee pod filter (4) or (6) into the filter holder (1). -
Page 18: Tips On Making An Espresso
o Using the supplied espresso coffee batcher (ground) (9) put the required amount of espresso coffee into the filter holder (1). Use the coffee pressing tool (10) to pack down the espresso ffee in the filter holder. Place the filter holder into the filter lder ring nut (19) on the main boiler and lock it in position. -
Page 19: Tips On Making A Cappuccino
The espresso cups should also be warmed before making any espresso dri k. Tips on making a cappuc cino n espresso topped with an equal amount of teamed milk and froth. o IMPORTANT: When making a cappuccino, the steam boiler should be heated before the main boiler in order to reduce the time taken to heat up the main boiler. -
Page 20: Tips On Making Tea
o Put the e spresso shot into a large cup and then pour the heated milk from the jug into it. The froth achieved during the frothing proce ss should be spooned over the top. o IMPORTANT: To get the best results, milk should semi-skimmed preferably room... -
Page 21: Cleaning And Maintenance
leaning and maintenance Cleaning operations must only be carried out when the coffee maker is cold. The appliance should be disconnected from your mains supply before commencing any cleaning process. S ainless steel sections o The stainless steel sections should be cleaned using warm soapy water. - Page 22 o Clean the water reservoir regularly using warm soapy water and make sure that the water reservoir has been rinsed thoro ughly before being placed back in the machine. The drip tray o Pull the storage drawer forward and remove the drip tray. You can either wash this drip tray in warm soapy water or wash it in a dis hwasher.
-
Page 23: Installation
A replacement water softener can be obtained from the Baumatic Spares Department. o Whe n a new ater softener is fitted, you should follow the filling water res rvoir instructions. NSTALLATION Installation of this appliance must be carried suitably... -
Page 24: Installing The Espresso Maker Into A Kitchen Cabinet
nstalling th e espresso maker into a kitchen cabinet Ensure that the aperture that you will be fitting the coffee machine into is of the size given in the diagram above. o Ensure that the rear panel of the furniture housing unit has been removed and that the ventilation cut out shown is adhered to. - Page 25 o You must ensure that there is a hole to feed the electrical cable through. These steps must be done before commencing the rest of the installation process. 1. Measure a height of 200 mm from the base of the housing unit.
- Page 26 5. Sit the coffee machine in the housing unit. You must make sure that the coffee machine is flush with the housing unit, otherwise it will not line up properly with the support pieces. 6. There are two screw holes on the main body of the coffee maker, one on the right hand side of the machine and the other on the left hand side.
-
Page 27: Troubleshooting
TROUBLESHOOTING My espresso machine will not work at all. o Check your mains supply and the electrical connection. My espresso machine will not dispense water. Check that the water reservoir is filled with water and the water softener and other tubes are immersed in the water reservoir. -
Page 28: Coffee Glossary
Coffee glossary Caffe- Italian word for a standard espresso Caffe Americano- a thin espresso with water added Caffe latte- a double espresso mixed in a large cup with hot milk. It should be topped with little or no foam. Caffe mocha- made from equal parts milk and cocoa. - Page 29 appliance fault, then you may be liable for the cost of the call out charge. The appliance must be accessible for the engineer to perform any necessary repair. If your appliance is installed in such a way that an engineer is concerned that damage will be caused to the appliance or your kitchen, then he will not complete a repair.