Casio LD-80 User Manual
Hide thumbs
Also See for LD-80:
- Function manual (9 pages) ,
- User manual (11 pages) ,
- User manual (12 pages)
Table of Contents
Advertisement
Advertisement
Table of Contents

Related Manuals for Casio LD-80


Summary of Contents for Casio LD-80
- Page 1 USER’S GUIDE LD80-E-2 Page 1 02.10.31, 14:18...
- Page 2 GUIDELINES LAID DOWN BY FCC RULES FOR USE OF THE UNIT IN THE U.S.A. (not applicable to other areas). NOTICE This equipment has been tested and found to comply with the limits for a Class B digital device, pursuant to Part 15 of the FCC Rules.
-
Page 3: Welcome
• The AC adaptor is not a toy. Welcome... • Be sure to disconnect the AC adaptor before cleaning the To the happy family of satisfied CASIO electronic musical instru- product. ment owners! To get the most out of the many features and func- tions of this musical instrument, be sure to carefully read this manual and keep it on hand for future reference. -
Page 4: Main Features
Main Features LIGHTING GUIDE SYSTEM Super Bass A light on each pad and the pedal indicators flash to let you The press of a button enhances low range sounds, making know when it’s time to strike the pad or press the pedal. them more powerful and realistic. -
Page 5: Safety Precautions
This indication stipulates matters that have the risk of causing injury as well outlet. 3. Contact your original retailer or an authorized CASIO Service as matters for which there is the likelihood of occurrence of physical damage only if the product is operated incorrectly while ignoring this indication. - Page 6 AC Adaptor 3. Contact your original retailer or an authorized CASIO Service Misuse of the AC adaptor’s electric cord can damage or break it, Provider. creating the risk of fire and electric shock. Always make sure you observe the following precautions.
- Page 7 Connectors CAUTION Connect only the specified devices and equipment to the product’s connectors. Connection of a non-specified device or equipment cre- AC Adaptor ates the risk of fire and electric shock. Misuse of the AC adaptor creates the risk of fire and electric shock. Always make sure you observe the following precautions.
-
Page 8: Care Of Your Instrument
Care of your Instrument Avoid heat, humidity or direct sunlight. Important! When using batteries, be sure to replace them or shift to one of the alternate Do not overexpose the instrument to direct sunlight, or place it near an air power sources whenever you notice any of the following symptoms. -
Page 9: Table Of Contents
Contents Welcome................. E-1 Using Rhythms ............. E-18 Important! ....................E-1 Selecting a Rhythm ..................E-18 Starting and Stopping Rhythm Play ............E-18 Main Features ..............E-2 Adjusting Accomp volume ................ E-19 Adjusting the Rhythm Tempo ..............E-19 Safety Precautions ............E-3 Turning Rhythm Parts On and Off ............E-19 Care of your Instrument .......... -
Page 10: General Guide
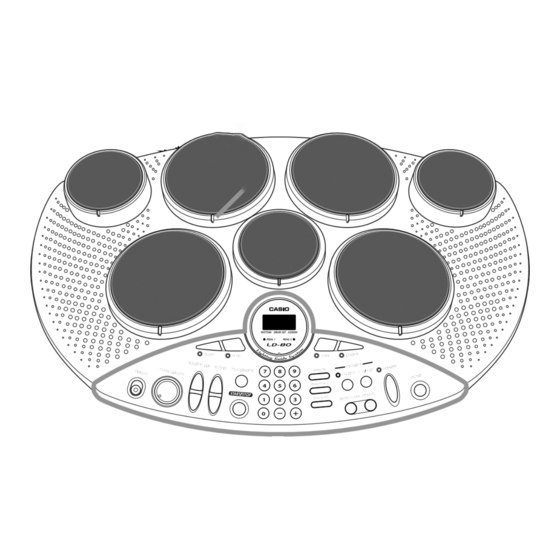
General Guide • Names of keys, buttons, and other items are indicated in the text of this manual using bold type. Rear Panel Drum pads PEDAL 1 jack PHONES/OUTPUT jack Drum pad light PEDAL 2 jack DC 12V (AC adaptor) jack MIDI IN/OUT terminals Control panel 273A-E-010A... - Page 11 Control Panel Foot Pedal indicators Rhythm Part Buttons Display DRUM button BASS button • The display shows rhythm numbers, tempo setting values, and other information. RECORD button PERC. button CHORD button PLAY/STOP button POWER switch DEMO button MAIN VOLUME dial LESSON button REVERB button ACCOMP VOL.
-
Page 12: Accessories And Options
Connections Audio Equipment (2) The following describes how to connect external equipment to the Digital Drum’s PHONES/OUTPUT jack. See “MIDI” on page E-23 for information Connect the digital drum to an audio equipment using a commercially about connecting to another MIDI device. available connecting cord with a standard plug on one end and two PIN •... -
Page 13: Connecting The Foot Pedals
Connecting the Foot Pedals Important! • Turn off power before connecting the foot pedals. Your Digital Drum comes with two foot pedals that you can connect to the • Do not hold down either of the foot pedals while connecting them to the PEDAL 1 and PEDAL 2 jacks. -
Page 14: Power Supply
Power Supply Your Digital Drum can run under battery power or under power supplied Important Battery Information by an optional AC adaptor. The following shows the approximate battery life provided by different battery types. • Standard battery life: Approximately 5 hours (LR14) Using Batteries The above value is standard battery life at normal temperature, with the digital drum volume at a medium setting. -
Page 15: Using The Ac Adaptor
Using the AC Adaptor Important! • Make sure that the digital drum is turned off before connecting or discon- Make sure you use only the AC adaptor specified for this Digital Drum. necting the AC adaptor. • Using the AC adaptor for a long time can cause it to become warm to the Specified AC Adaptor: AD-12 touch. -
Page 16: Basic Operations
Basic Operations This section provides the most basic information you need to get your Digital Drum running. To turn power on and off Slide the POWER switch up and down to turn power ON and OFF. Adjusting Main volume Rotate the MAIN VOLUME dial to adjust overall volume, including non- drum sounds, rhythms, metronome, etc. -
Page 17: Playing The Drum Pads
Playing the Drum Pads You can select from among 20 different drum sets for the seven pads and Foot Pedal Assignments (Drum set 001) two pedals. Strike a pad to play the percussion sound assigned to it. The volume of the sound produced when you strike a drum pad depends on how much force you use, and the area of the drum pad that you strike. -
Page 18: Selecting A Drum Set
Selecting a Drum Set Configuring a Custom Drum Set The percussion sounds that make up the drum set you select are assigned to Your Digital Drum comes with 76 high-quality percussion sounds that you the seven drum pads and two foot pedals. See “Drum Set List” on page A-2 can assign to any one of the seven drum pads and two foot pedals. - Page 19 Use either of the following techniques to assign the percussion sound you To select the custom drum set want to the pad you selected in step 3 (Pad 7 in our example). • Strike the drum pad to scroll through percussion sounds sequentially. Perform the procedure under “To select a drum set”...
-
Page 20: Using Rhythms
Using Rhythms This section explains how to select accompaniment rhythms and control About rhythm types their playback. • There are two types of rhythms: looped rhythms and fixed-length rhythms. Looped rhythms (rhythm numbers 00 to 79) keep playing in an endless loop until you stop them. -
Page 21: Adjusting Accomp Volume
Adjusting Accomp volume Adjusting the Rhythm Tempo The ACCOMP VOL. buttons control the volume level of the rhythm only. Perform the following steps to change the tempo (speed) of the rhythm. This They do not affect the volume of sounds you play on the drum pads, so you setting also affects demo play (page E-14). -
Page 22: Other Settings
Other Settings This section describes other settings you can use to make your Digital Drum play more enjoyable and realistic. Current Super Bass on/off setting Using Reverb You can select from among four different reverb depth levels to help make •... -
Page 23: Using The Lighting Guide System
Using the LIGHTING GUIDE SYSTEM The LIGHTING GUIDE SYSTEM of your Digital Drum provides you with a valuable Lesson tool that you can use to learn and play along with the preset rhythms. To use the LIGHTING GUIDE SYSTEM Select the rhythm you want to practice. •... -
Page 24: Recording
Recording You can use the RECORD mode to record up to 300 notes in Digital Drum Strike a pad or press the START/STOP button to start recording. memory for later playback. The following is the type of data you can record •... -
Page 25: Midi
RHYTHM TUNE/MIDI VOLUME ACCOMP SONGBANK VOLUME POWER / MODE MAIN VOLUME START / STOP BACKLIGHT LCD FINGERED – SONG BANK CONTROLLER CASIO CHORD NORMAL TEMPO STOP MUSICAL INFORMATION SYSTEM PLAY/PAUSE CLEAR sus4 add9 100 SONG BANK KEYBOARD SYNCHRO/ LEFT RIGHT... -
Page 26: Troubleshooting
Troubleshooting If this happens: It could mean this: So you should do this: See page No sound is produced when I strike a pad. The Digital Drum is not being supplied power. Check that batteries are loaded correctly, or that the Pages E-12,13 AC adaptor is connected properly and plugged into an electrical outlet. -
Page 27: Specifications
Specifications Model: LD-80 Drum Pads: 7, with Touch Response Lights indicate pad play during rhythm playback Lighting Guide System: 76 PCM drum voices Sounds: POWER; MAIN VOLUME; ACCOMP VOL.; TEMPO; START/STOP; number keypad; RHYTHM; DRUM SET; ASSIGN; LESSON; SUPER BASS;... -
Page 28: Reference
Reference This section contains percussion sound lists, specifications, and other useful reference information. Percussion Sound List Percussion Program Note Percussion Program Note Percussion Program Note Sound Name Sound Name Sound Name Sound No. Change Sound No. Change Sound No. Change Kick Drum 2 Electronic Mid Tom 2 Cabasa... -
Page 29: Drum Set List
Drum Set List Pad 1 Pad 2 Pad 3 Pad 4 Pad 5 Drum Name Sound Sound Sound Sound Sound Set No. Sound Name Sound Name Sound Name Sound Name Sound Name Standard 1 Crash Cymbal 1 High Tom 1 Mid Tom 1 Ride Cymbal Snare Drum High... -
Page 30: Rhythm List
Rhythm List Looped rhythms Fixed-length rhythms Rhythm No. Rhythm Name Rhythm No. Rhythm Name Rhythm No. Rhythm Name Rhythm No. Rhythm Name 8 Beat 16 Beat Funk 1 Latin 8 Beat 8 Beat 1 16 Beat Funk 2 Reggae 1 8 Beat 1 8 Beat 2 Dance... - Page 31 273A-E-031A Page 5 02.10.31, 14:19...
- Page 32 This recycle mark indicates that the packaging conforms to the environmental protection legislation in Germany. CASIO COMPUTER CO.,LTD. 6-2, Hon-machi 1-chome MA0111-C Printed in China Shibuya-ku, Tokyo 151-8543, Japan LD80-E-2 Page 3 02.10.31, 14:18...