Table of Contents
Advertisement
Quick Links
Advertisement
Table of Contents

Related Manuals for AEG FM7531KAN


Summary of Contents for AEG FM7531KAN
- Page 1 INSTRUCTION BOOK FM 7531K-an 325 88-8450 rev. 3-343 949 601 403...
-
Page 2: Your New Appliance
Your New Appliance Thank you for purchasing an AEG appliance. To enable you to use your new appliance efficiently and safely, please read this instruction book carefully before installing or using the appliance, and retain for future reference. Should the appliance be transferred to a new owner please ensure this instruction book is left with the appliance in order that the new owner can get to know the functions of the appliance and the relevant warnings. -
Page 3: Table Of Contents
Contents Page no. For the User Your New Appliance ..................Safety Information ..................Product Description ..................Ceramic Hob ..................Cooking Zones ..................Electronic Control .................. Before use ......................Protect the Ceramic Hob ................ How to Use the Hob ..................Ceramic Hob ..................Finger Touch .................. -
Page 4: For The Installer
Contents Page no. For the Installer Unpacking ......................Technical Data....................Installation......................Mounting ......................How to read the operating instructions 1... 2...Step by step Hints and tips Safety information Environmental information The products are continuously being developed and it may occur that some product specifications are changed after this instruction book was printed. -
Page 5: Safety Information
Safety Information Service The hob is intended for domestic use Service and repair must be per- only. If it is used in any other way formed by our service organisation there is a risk of accidents. or an organisation approved by us. Only spare parts supplied by our Children service organisation may be used. -
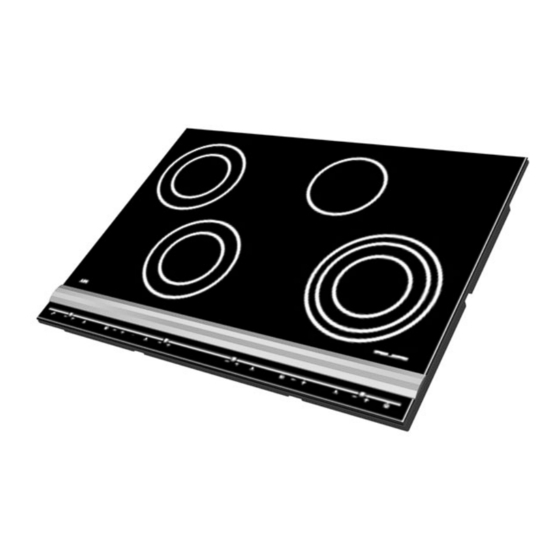
Page 6: Product Description
Product Description 1. Double cooking zone Ø 120 / 180 mm, 700 / 1700 W. 2. Double cooking zone Ø 120 / 180 mm, 700 / 1700 W. 3. Single cooking zone Ø 140 mm, 1200 W. 4. Triple cooking zone Ø 120 / 175 / 210 mm, 800 / 1600 / 2300 W. -
Page 7: Ceramic Hob
Ceramic hob Ceramic glass is insensitive to tem- perature shock and very robust: however it is not unbreakable. Especially sharp and hard objects that fall on the cooking sur- face can damage it. Cooking Zones The ceramic surface has one single cooking zone, two double cooking zones and one triple cooking zone. -
Page 8: Before Use
Before Use Protect the ceramic hob Before using the hob for the first time it must be cleaned for manufac- turing residues such as dust, dirt etc. Apply a protective coating on the ceramic hob before you use it. This way it becomes easier to clean the glass and you prevent any spillage from burning. -
Page 9: How To Use The Hob
How to use Ceramic hob Never place wet cooking utensils on the ceramic hob. Make sure there is Never use a cracked ceramic no sand, sugar or salt on the utensil. hob. On spillage liquid may Sand may cause scratches, sugar and penetrate into live parts. -
Page 10: Finger Touch
Finger Touch The keys are to be touched for mini- mum 1 sec. before activation. Automatic pan registration Under the ceramic hob all cooking zones have a sensor which registers the material and size of the pan. The cooking zone you intend to use must be switched on before placing the pot on the zone. -
Page 11: Cooking Zones
Cooking Zones The cooking zones can be adjusted from 0-9, where 9 is the highest set- ting. 1. Push the key. 2. Push key to adjust the zone you wish to use. The zones must be adjusted within 10 seconds or the hob turns off again. -
Page 12: Residual Heat Indicator
Residual Heat Indicator Each cooking zone has a residual heat indicator. When the cooking zone is turned off the “H” is lit up in the display until the cooking zone has cooled. “H” is a warning that the cooking zone is still hot. Automax With AUTOMAX you do not need to turn down the temperature. - Page 13 AUTOMAX Settings Settings Type of cooking Examples Keeping small portions warm. Keep warm Gelatine, chocolate, butter . Melting Heating, hollandaise sauce etc. Heating Rice, dishes made from milk . Simmering Low boiling Boiling of stock etc. Boiling, brazing Continued boiling of vegetables and potatoes .
-
Page 14: Safety Turn-Off
Safety Turn-off If one of the keys are activated for more than 10 seconds (e.g. by a child, pot spillage etc.) the hob is automatically turned off. Autostop If by mistake one or more cooking zones have not been turned off Autostop will automatically turn off the hob after a certain amount of time. -
Page 15: Activating The Child Safety Device
Activating the Child Safety Device With the child safety function chil- dren can be prevented from turning on the hob unintentionally. When the child safety is activated you can still use the key and the minute minder. Activating the Child Safety Device 1. - Page 16 De-activating the Child Safety 1. Push the key. 2. Push the key for 3 seconds. The control lamp for child safety turns off.
-
Page 17: Minute Minder
Minute Minder Setting the Minute Minder The minute minder can only be used when the timer is not in use. 1. Turn on the hob, push 2. Push once on 3. Push the key till the desired time is shown in the dis- play. -
Page 18: Timer
Timer This function can automatically turn off a cooking zone at any given time. When this function has not been chosen the clock can be used as a minute minder (see the section “Minute minder”) Timer and minute minder cannot be used simultaneously. - Page 19 Both cooking zones can be set simultaneously with two different timings. When both cooking zones have a setting the time for the indi- vidual cooking zone is read in the following way: The time in the display belongs to the cooking zone for which the con- trol lamp is lit.
-
Page 20: Choice Of Pans
Choice of Pans Pans used on the glass ceramics must: - Completely cover the cooking zone, and may be slightly larger than the cooking zone - Have a plane bottom or at most curve slightly inward (max. 1 mm) as the bottom on heating up will curve outwards - Be thick-bottomed - Aluminium pans must minimum... -
Page 21: Advise And Tips For Using The Cooking Zones
Advise and Tips for Using the Cooking Zones Put a tight-fitting lid on the By using below advise you pan. Bring to the boil at the high- can save energy and ease est setting and turn down to the cleaning. lowest possible setting when The pans must cover the full there is heavy steaming at the lid. -
Page 22: Cleaning And Maintenance Of
Cleaning and Maintenance Aluminium 3. Wipe the plate with a damp cloth or kitchen paper. Stubborn stains Carry out daily cleaning with a well are removed by rubbing hard on wrung-out cloth. For more stubborn the stain with a cleaning liquid on soiling, use a cloth or a soft plastic paper towel. -
Page 23: Unpacking
Unpacking Check that the appliance has no faults and is undamaged on delivery. Transport Damages Any damages resulting from a trans- port which you have not performed yourself must be communicated to the dealer within one week of receipt of the product. On the rating plate which is placed on the back of the product you will find the CE marking and the prod-... -
Page 24: Technical Data
Technical Data Model FM 7531K-an: Product dimensions: Width: 720 mm Depth: 520 mm Height: 49 mm Installation dimensions: Width: 700 mm Depth: 490 mm Height: 38 mm Dimensions/output: Front left: 120/180 mm 700/1700 W Front right: 120/175/210 mm 800/1600/2300 W Rear left: 120/180 mm 700/1700 W... -
Page 25: Installation
Installation Electrical Installation Installation may only be per- formed by a qualified elec- trician or a person autho- rised by the manufacturer. Work performed by an unqualified person may cause injury or damages to property and deteriorate the hob. Connecting the Appliance Min. -
Page 26: Mounting
Mounting The unit may be mounted in any type of kitchen worktop with a thickness of 28 to 40 mm. Cutting Out When mounting the hob: Read the instructions on this page. When mounting this unit together with other units: Read the instructions on the next page. - Page 27 Mounting more than one hob Distance to wall: Min. 150 mm (flammable material) Distance to wall: Min. 50 mm ( non-flammable material ) Reinforcement beam Cutting out The measurement of the selected combination is calculated in the following way: Depth: 490 mm Width: 1.
- Page 28 Mounting: When mounting several hobs together you must use a reinforcement beam between each hob as well as the silicone supplied with the hobs (see fig.) 1. Cut a hole of the calculated size in the table top 2. Place the individual hobs upside down on a mat. Take care that the top side is not scratched.
- Page 29 To optimise joints between the installed hobs, the gap between the ceramic hob may be grouted with silicone: 1. Remove the aluminium panels from the hobs. 2. Apply a stripe of silicone to the gap between the two ceramic hob. Use only the silicone supplied, as it is designed to tolerate the appliance’s high temper- ature.
- Page 30 Overview of the outside width of the units 180 mm Downdraft 360 mm Glass ceramic hob with 2 cooking zones Gas hob with 2 burners Induction hob with 2 cooking zones Grill Grill / Fryer 580 mm Glass ceramic hob with 4 cooking zones Gas hob with 4 burners 720 mm...
-
Page 31: What To Do If
What to do if... If the appliance is not working correctly, please carry out the following checks before contacting your local AEG Service Force Centre. IMPORTANT: If you call out an engineer to a fault caused by incorrect use or installation, a charge will be made even if the aookuabce is under guarantee. - Page 32 Problem Remedy When I switch on the cooking zone Registration depends on the materi- it is bigger than the pot. al and size of the saucepan. The cooking zones won’t turn on. The child safety function has been The display shows: activated.
-
Page 33: Service And Spare Parts
Service and Spare Parts In the event of your appliance requiring service, or if you wish to purchase spare parts, contact your local AEG Service Force Centre by telephoning: 08705 929 929 Your call will automatically be routed to the Service Centre covering your post code area. - Page 34 GUARANTEE CONDITIONS Standard guarantee conditions We, AEG, undertake that if within 12 months of the date of the purchase this AEG appliance or any part thereof is proved to be defective by reason only of faulty workmanship or materials, we will, at our discretion repair or replace the same FREE OF CHARGE for labour, materials or carriage on condition that: ·...
- Page 35 · Appliances found to be in use within a commercial environment, plus those which are subject to rental agreements. · Products of AEG manufacture which are not marketed by AEG. European Guarantee If you should move to another country within Europe then your guarantee moves with you to your new home subject to the following qualifications: ·...