Advertisement
Available languages
Available languages
Table of Contents
- 1 Table of Contents
- 2 Safety Instructions
- 3 Description
- 4 Technical Specifications
- 5 To Install Battery
- 6 How to Use Laser Guided Measuring Tool
- 7 Operation
- 8 How to Measure
- 9 Measurement of Two Distances and Computing Their Sum
- 10 Computing Area
- 11 Computing Volume
- 12 Maintenance
- 13 Troubleshooting
- Download this manual
Advertisement
Table of Contents

Related Manuals for Craftsman 320.48252


Summary of Contents for Craftsman 320.48252
- Page 1 EASU LASE GUHDED _OOL with LASE Model No. 320.48252 o SAFETY o OPERATION CAUTION: Read, understand and follow • MAINTENANCE all Safety Rules and Operating Instructions • ESPAI_OL, PAGINA 11 in this manual before using this product. Sears, Roebuck and Co., Hoffman Estates, iL 60179 U.S.A.
- Page 2 ONE FULLYEAR WARRANTY ON CRAFTSMAN TOOL tf this Craftsman Tool fails due to a defect in material or workmanship within one year from the date of purchase, RETURN ITTO THE NEAREST SEARS SERVICE CENTER IN THE UNITED STATES, and Sears will repair it, free of charge.
- Page 3 J^_,,_,,,,,_.tl_w_nr_uu_l LASER LIGHT. LASER RADIATION Avoid Direct Eye Exposure. Do Not Stare into beam. Class ilia Laser Product 1. DO NOT remove or deface any product labels,, Removing product labels increase the risk of exposure to laser radiation, 2. DO NOT stare directly at the laser beam or project the laser beam directly into the eyes of others.
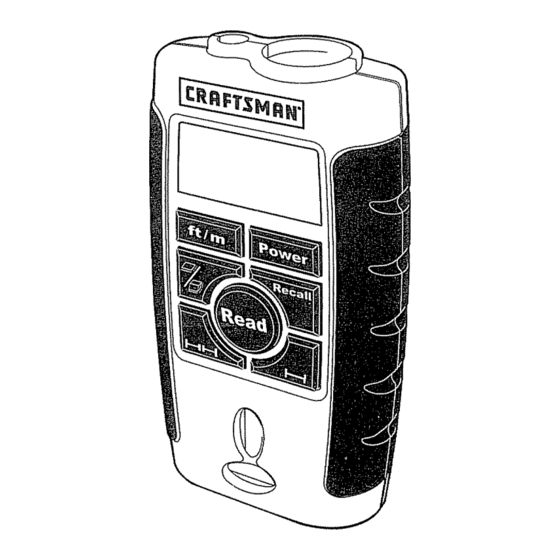
- Page 4 Fig. 1 1, Ultrasound Sensor Aperture 2_ Laser Aperture 3. Back-Lit LCD Display screen 4, Feet / Meter Conversion Key 5, Area / Volume Computation Conversion Key 6, Addition Computation Key Of Two Distances 7. Read Key 8. Single Distance Measurement Key 9o Recall Key 10, Power Key 11, Horizontal Bubble Indicator...
-
Page 5: To Install Battery
INSTALL BATTERY (See Figure 3) NOTE: This tool operates on one 9-volt battery (not included). 1. Open battery compartment door on the back of tool 2. Plug 9-vott battery into the battery conductor, 3. Close battery compartment door_ IMPORTANT NOTE: When the battery is low, the low battery will be continuously displayed on the upper left side of the LCD display screen, HOWTO USE LASER GUIDED MEASURING TOOL... -
Page 6: How To Measure
HOW TO MEASURE 1.Turn on power by pressing the power key (see Fig° 5)_The temperature of the area will be shown on the LCD display screen (see Fig 6)_The tool can also be used as a thermometer, The temperature display will disappear within 30 seconds° Fig, 5 Fig. -
Page 7: Computing Area
COMPUTING AREA Fig, 11 1,Position t ooltomeasure a realength 2.Press the,,,_:__//(__ I,,key, t heblinking l inein,,z_:__ means t helength tobemeasured (seeFig.11),, 3. Press "Read" k ey todisplay t hemeasured length inthe upper r owofthescreen; thewidthline in "_" will also start to blink,, 4. -
Page 8: Troubleshooting
6. Check the batteries regularly to avoid deterioration. ALWAYS remove the batteries from the tool, if it is not going to be used for an extended period of time 7. Replace the batteries when the low battery icon is continuously displayed on the LCD. 8. - Page 9 NOTES...
- Page 10 NOTES...
- Page 11 Manual del Usuario GUHADA PO TRAC MR Modelo No. 320.48252 ATENCION: Antes de usar este producto, ° SEGURIDAD lea, comprenda y siga todas ias reglas de seguridadv las instrucciones • FUNCIONAMIENTO funcionamiento incluidas en este manual. o [vIAINTENIMIENTO Sears, Roebuck and Co., Hoffman Estates, IL 60179 U.S.A.
- Page 12 COMPLETA DE UN A|;'_ODE LA HERRAMIENTA CRAFTSMAN Siesta herramienta Craftsman no le otorga compteta satisfacci6n dentro de un aSo de la fecha de compra, DEVUELVALA AL ALMACEN SEARS MAS CERCANO EN LOS ESTADOS UNIDOS y Sears la reempIazar_, gratuitamente.. Siesta herramienta Craftsman se usa para propSsitos comerciales o de arriendo, esta garantfa es vdlida solamente durante 90 dfas desde la fecha de compra_ Esta garantfa le otorga derechos legales especfficos y usted adem&s puede tener otros...
- Page 13 [,& ADVERTENCUAI LUZ LASER. RADIACION LASER Evite exposici6n directa de los ojos. No mire fijamente el rayo I_iser. Producto Laser de la Clase Ilia 1. NO retire ni deteriore ninguna de las etiquetas del producto, Si se retiran las etiquetas del producto se aumenta el riesgo de exposiciSn a radiaci6n laser 2.
- Page 14 Fig. 1 1, Abertura del Sensor de Ultrasonido 2, Abertura del L_ser 3. Pantalla de Visualizaci6n de Cristal Liquido (LCD) 4. Tecla de ConversiSn de Pies/Metros 5, Tecla de Conversi6n de Superficie/Volumen 6. Tecla de Cfilculo de Adici6n de Dos Distancias 7.
- Page 15 INSTALACION DE LA PILA (Ver Figura 3) Fig. 3 NOTA: Esta herramienta funciona con una pila de 9 voitios (no se incluye). 1, Abra la tapa del compartimiento de la pita situado en la parte trasera de la herramienta.r 2. Enchufe ta pita de g voftios en el conductor de ta pila, 3, Cierre la tapa del compartimiento de la pila.
- Page 16 COMO MEDIR 1. Encienda la herramienta oprimiendo ta tecla de encendido (ver Fig. 5),,En ia pantalla LCD aparecer4 ta temperatura de1&rea (ver Fig,,6), La herramienta tambi6n puede utilizarse como un term6metro, Et despliegue de la temperatura desaparecer& dentro de 30 segundos. Fig.
- Page 17 CALCULO DE LA SUPERFICIE Fig° 11 1_Coloque la herramienta para medir el largo de_ _reao 2. Optima la tecla -'/b:__,, , la lfnea que parpadea en " _" significa el largo que va a ser medido (vet Fig. 11), 3. Optima la tecla "Read" para desplegar el largo medido en ta illa superior de la pantalla;...
- Page 18 4.SIEMPRE mantenga la herramienta l ibredepolvo y lfquidoso 5.SiEMPRE limpiey sequebienla herramienta d espu6s decadauso,, 6.Verifique regularmente l aspi{asparaevitarsu deterioro. SIEMPRE retire las pilas de la herramienta si no va a ser usada pot un perfodo de t{empo pro!ongado,. 7. Reemplace la pilas cuando et sfrnbolo de baterfa agotada se despliegue continuamente en Ia pantalla LCDo...
- Page 19 NOTAS "19...
- Page 20 Your Home For repair in your home of all major brand appliances, lawn and garden equipment, or heating and cooling systems, no matter who made it, no matter who sold it! For the replacement parts, accessories owner's manuals that you need to do-it-yourselfo For Sears professional installation of home appliances...