Epson 5000 User Manual
Multimedia storage viewer
Hide thumbs
Also See for 5000:
- User manual (13 pages) ,
- User manual (176 pages) ,
- User manual (153 pages)
Table of Contents
Advertisement
Quick Links
Download this manual
See also:
User Manual
Advertisement
Table of Contents
Troubleshooting

Related Manuals for Epson 5000


Summary of Contents for Epson 5000
- Page 1 User’s Guide Copyright © 2006 Seiko Epson Corporation. All rights reserved.
-
Page 2: Table Of Contents
Launching the Epson Link2 software ........ - Page 3 P-5000 User’s Guide Copying particular data ..........27 Chapter 4 Viewing Images Copying Data to My Photos/My Videos Folder .
- Page 4 Before Contacting Epson ........
- Page 5 P-5000 User’s Guide Warnings, Cautions, and Notes ......... . . 81 Safety requirements.
- Page 6 Neither Seiko Epson Corporation nor its affiliates shall be liable to the purchaser of this product or third parties for damages, losses, costs, or expenses incurred by the purchaser or third parties as a result of accident, misuse, or abuse of this product or unauthorized modifications, repairs, or alterations to this product, or (excluding the U.S.)
- Page 7 Microsoft. General Notice: Other product names used herein are for identification purposes only and may be trademarks of their respective owners. Epson disclaims any and all rights in those marks. Copyright and Trademarks...
-
Page 8: Chapter 1 Introduction
With the viewer, you can easily save, view, and print images you have taken with a digital camera. You can also play videos and music. The main features are described below. Epson Photo Fine Ultra is a high-resolution, wide color gamut (Adobe RGB) liquid crystal display. You can view images easily in high resolution anywhere, anytime without a computer or other special device. -
Page 9: Chapter 2 Getting Started
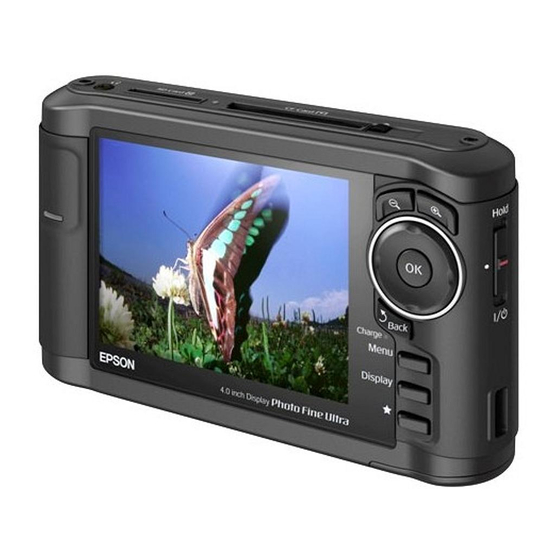
P-5000 User’s Guide Chapter 2 Getting Started Parts Front SD Card slot Headphones connector Liquid Crystal Display (LCD) Back Battery cover CF Card slot Access lamp CF Card eject button Hold USB connector (host) USB connector (slave) Reset button AC adapter... - Page 10 P-5000 User’s Guide LCD and control panel Press to zoom a photo, and adjust the volume. 4-way ring Press to move the cursor or highlight. You can select an item by pressing this (Up/ Down/Left/Right key to the up, down, left, or right.
-
Page 11: Setting Up The Viewer
P-5000 User’s Guide Setting Up the Viewer This section describes how to turn the power on/off and use the Home screen, and so on. Turning the power on Slide the power switch to position. Illumination The Illumination lamp turns on. -
Page 12: Turning The Power Off
P-5000 User’s Guide 3. Set the date and time using the 4-way ring. 4. After you finish all settings, select Complete using the Right or Left key, then press the OK key. Note: If approximately 24 hours passes after battery power is cut, the date and time settings may be lost, and will need to be set again. -
Page 13: Holding The Key Operations
P-5000 User’s Guide Holding the key operations You can deactivate the keys temporarily by sliding the power switch to Hold as shown below. Note: To release Hold, slide the power switch back to the middle. Putting the key operations on hold is a useful function when carrying the viewer in your bag while listening to music with the headphones. -
Page 14: Using The Software
Using the Software This section describes how to install the software on your computer. You can transfer data from the computer to the viewer easily using the Epson Link2 software. About the software The viewer uses the following specified software. -
Page 15: For Macintosh Users
P-5000 User’s Guide For Windows users Note: Do not delete the installer (EXE file) in the viewer’s hard disk. It is recommended to back up the installer onto the computer. For Windows XP and Windows 2000, you need administrative privileges to install the software. - Page 16 P-5000 User’s Guide Note: P_XXXX is the model name of your viewer. 3. Double-click the MacOSX icon. 4. On the software installation screen, click Easy Install. Note: If you are prompted to select a language, select your preferred language. 5. When the software license agreement screen appears, read the statement and then click Agree.
-
Page 17: Uninstalling The Software
P-5000 User’s Guide Uninstalling the Software To uninstall the Epson Link2 software, follow the procedure below. Be sure to back up any viewer installation data before deleting. For Windows users 1. Click Start, point to All Programs (or Programs), then select EPSON. Select Epson Link2, then click Epson Link2 Uninstall. -
Page 18: Chapter 3 Transferring Data
P-5000 User’s Guide Chapter 3 Transferring Data Transferring the data of a full memory card or other USB devices to the viewer makes it possible for you to continue taking pictures. Setting and Removing CF/SD Memory Cards The viewer has a CF Card slot and an SD Card slot. -
Page 19: Removing A Cf Memory Card From The Slot
P-5000 User’s Guide Insert the memory card into the memory card slot with the label side facing the display side of the viewer, then push it fully into the slot. Note: Insert memory cards in the correct direction. Otherwise, the memory card or the viewer may be damaged. -
Page 20: Inserting An Sd Memory Card Into The Sd Card Slot
P-5000 User’s Guide Inserting an SD memory card into the SD Card slot You can insert an SD memory card, SD High-Capacity card, MultiMedia Card, or MultiMedia Card Plus into the SD Card slot. Insert the memory card into the memory card slot with the label side facing the display side of the viewer, then push it fully into the slot. -
Page 21: Copying Data From Cf/Sd Memory Cards
P-5000 User’s Guide Copying Data from CF/SD Memory Cards You can copy the data from CF/SD memory cards onto Backup Files. Note: Before copying data, charge the battery fully. If the battery is low, connect the AC adapter. 1GB of data may take approximately 3 to 5 minutes or more to copy, depending on the memory card you use. -
Page 22: Copying Particular Data
(page 21). Note: You can copy particular data to My Photos or My Videos directly by selecting Copy/Move in step key to enter checkmarks in the check boxes of files or CF Memory Card [ EPSON DSC ] ANTLERS.JPG BALLOON.JPG FLOWERS.JPG GARDEN.JPG... -
Page 23: Copying Data From Usb Devices
You can use the following USB storage devices capable of copying: digital cameras, external HDD drives, USB memories, and card reader/writers. You can also use the following Epson Multimedia Storage Viewers: P-2000, P-4000, P-2500, P-4500, and P-3000. Connecting a USB device 1. -
Page 24: Copying All Data
P-5000 User’s Guide Copying all data 1. Select USB Device in the Home screen using the Up or Down key, then press the OK key. 2. Select Backup USB device to Viewer using the Up or Down key, then press the OK key. -
Page 25: Backing Up Data Onto The Computer
USB cable to the computer. The LCD turns off. 4. Launch the Epson Link2 software. For details, see “Launching the Epson Link2 software” (page 26). Only data that has not yet been backed up will be copied to the computer automatically. -
Page 26: Launching The Epson Link2 Software
User’s Guide Launching the Epson Link2 software For Windows Click Start, point to All Programs (or Programs), then select EPSON. Select Epson Link2, then click Epson Link2. Alternatively, click the shortcut icon of the Epson Link2 software on the desktop. -
Page 27: Backing Up Data Onto Other Usb Storage Devices
P-5000 User’s Guide Backing Up Data onto Other USB Storage Devices You can transfer the data of this viewer to USB devices. This is useful when you want to back up data in the viewer without using a computer. However, both the viewer and the USB device will require a power supply, and may take some time to transfer the data depending on the volume of data in the viewer. - Page 28 P-5000 User’s Guide 2. Press the Menu key to display the pop up menu, select Copy/Move using the Up or Down key, then press the OK key. 3. Select Copy to USB Device using the Up or Down key, then press the OK key.
-
Page 29: Copying Data To My Photos/My Videos Folder
Copying Data to My Photos/My Videos Folder Copying from a computer Using the Epson Link2 software makes it easy to copy photo and video data from a computer. For details about connecting a computer, see “Connecting the viewer to the computer”... -
Page 30: Photo/Video File Formats Supported By The Viewer
** The viewer supports images in RAW format taken with most digital cameras produced by Nikon, Canon, KONICAMINOLTA, PENTAX, Olympus, FUJIFILM, and Epson. Contact our customer support for details. ***The viewer supports only the JPEG preview embedded DNG format converted by Adobe DNG Converter or Adobe Photoshop. - Page 31 P-5000 User’s Guide Video File Video codec Format MPEG4 (Advanced Simple Profile) Motion-JPEG DIVX** DIVX* (Home Theater Profile) MPEG4 (Advanced Simple Profile) Motion-JPEG MPEG4 (Advanced Simple Profile) H.264/AVC (Baseline Profile Level 1.2) WMV*** Windows Media Video 9 (MP@LL) MPEG4 (Advanced...
-
Page 32: Viewing Photos And Videos
P-5000 User’s Guide ** You can see information about the DivX VOD Registration Code. Press Settings in the Home screen and select Movie Setting, then DivX Registration Code. This code is required when buying copyright-protected DivX VOD video content for download. Please see the distribution site for more information. -
Page 33: Switching The Contents Screen
P-5000 User’s Guide Note: Thumbnails of the video files which have not been played back, or have not been played back completely are displayed with Thumbnails of the folders which have been backed up on your computer in Backup Files are displayed with Files names that contain characters not supported by the viewer may be displayed as “?”, and... -
Page 34: Displaying Information
Pressing the Display key while the over-under exposure preview appears displays the image without any information. Press the Display key again to return to the previous display. Digital camera images taken in sRGB are displayed in sRGB, and the images taken in AdobeRGB are displayed in AdobeRGB. -
Page 35: About The Pop Up Menu
P-5000 User’s Guide Video For a video file, the progress information is displayed first. You can switch to the file information (as below) by pressing the Display key again. About the Pop Up Menu From the pop up menu displayed by pressing the Menu key, you can use the functions in the table below. -
Page 36: Displaying Photos Or Videos
P-5000 User’s Guide For video files Audio Track Setting* Copy/Move Delete Edit Display mode Play Settings Settings Sort Subtitle Setting* Video Print Wallpaper and Icon Settings * Availability of settings depends on video file being viewed. Note: Different pop up menus will appear when you press the Menu key, depending on which screen you are viewing. -
Page 37: Rotating A Photo
P-5000 User’s Guide 2. Select a folder to view using the 4-way ring, then press the OK key. (If there is no folder, skip this step.) Note: You can change the folder in which to display files and subfolders. When a file or folder to move or copy to the another folder is displayed, press the Menu key to display the pop up menu. -
Page 38: Basic Operations While Playing Videos
P-5000 User’s Guide Note: Photos can be rotated automatically if they have automatic rotate information and the viewer setting is set to Auto-Rotation ON. For details, see “Changing the Viewer Settings” (page 53). You cannot rotate a photo in Backup Files. -
Page 39: Managing Files And Folders
P-5000 User’s Guide Managing Files and Folders Displaying photos as a slide show You can display JPEG photos as a slide show. 1. Highlight a file or folder to display as a slide show. 2. Press the Menu key to display the pop up menu, select Slide Show using the Up or Down key, then press the OK key. -
Page 40: Changing A Folder's Name
P-5000 User’s Guide 4. Use the 4-way ring and the to set as private folders, then press the OK key. Note: Pressing the Menu key in the thumbnails screen displays the pop up menu. You can select either Select All or Deselect All, then press the OK key, or select Apply from the pop up menu. -
Page 41: Deleting Files Or Folders
P-5000 User’s Guide 4. The on-screen keyboard appears. Select a letter using the 4-way ring, then press the OK key to input the selected letter. Note: The cursor can be moved forward/backward by pressing the To delete the last letter input, press the Back key. -
Page 42: Protecting Files Or Folders
P-5000 User’s Guide When you want to delete files in full screen, press the Menu key to display the pop up menu, then select Delete to enter the deletion mode. Select Delete using the Up or Down key and press the OK key to complete. Press the Right or Left key to move to other files to delete. -
Page 43: Setting A Folder Thumbnail
P-5000 User’s Guide Note: Pressing the Menu key in the thumbnails screen displays the pop up menu. You can select either Select All or Deselect All, then press the OK key, or select Apply from the pop up menu. When you want to lock files in full screen, press the Menu key to display the pop up menu, then select Edit, Lock/Unlock to enter the lock mode. -
Page 44: Setting The Screen Saver
When a photo file is rated You can rate up to 3000 files. To edit a file that you rated with the viewer using AdobeBridge, see the online Epson Link2 User’s Guide. You can also rate a photo file from the pop up menu following the steps below. - Page 45 P-5000 User’s Guide 2. Press the Menu key to display the pop up menu, select Set as Screen Saver using the Up or Down key, then press the OK key. Note: For using a screen saver, see “Changing the Viewer Settings” (page 53).
-
Page 46: Chapter 5 Playing Music
You can listen to music on the viewer. Transferring Audio Data from the Computer Using the Epson Link2 software is recommended to transfer audio data from the computer to the viewer. 1. After installing the Epson Link2 software, connect the viewer to the computer. For details, see “Connecting the viewer to the computer”... -
Page 47: Starting Playback
P-5000 User’s Guide Starting Playback When playing back music, you can select the category or start resume play from the beginning of the previously played track. This function is useful to narrow down your music search. Selecting the category 1. Select My Music in the Home screen using the Up or Down key, then press the OK or Right key. -
Page 48: Resume Play
P-5000 User’s Guide Resume play 1. Select My Music in the Home screen using the Up or Down key, then press the OK key. 2. Select Resume using the Up or Down key, then press the OK key. You can start resume play from the beginning of the previously played track. -
Page 49: Using The Features For Music
P-5000 User’s Guide Repeat setting Select No Repeat Repeat One Song Repeat All Playback order setting Select Shuffle Normal Play Order Using the Features for Music Audio equalizer setting You can select the desired equalizer settings. 1. Press the Menu key to display the pop up menu in My Music. -
Page 50: Deleting Album Tracks From The Viewer
OK key to complete. Creating a Playlist on the Viewer Not only can you create a Playlist on the Epson Link2 software, you can also create them on the viewer. 1. Press the Menu key to display the pop up menu in a track name list in a category. - Page 51 P-5000 User’s Guide 4. The on-screen keyboard appears. Select a letter using the 4-way ring, then press the OK key to input the selected letter. Note: To delete the last letter input, press the Back key. To cancel the operation, select Cancel using the 4-way ring, then press the OK key.
-
Page 52: About The Audio Pop Up Menu
P-5000 User’s Guide 4. Move the track using the Up or Down key, then press the OK key to complete. About the Audio Pop Up Menu From the pop up menu displayed by pressing the Menu key, you can use the functions in the table below. -
Page 53: Chapter 6 Customizing Settings
P-5000 User’s Guide Chapter 6 Customizing Settings You can customize various settings for displaying and copying images, or change the sound setting to make the viewer more useful. Changing the Viewer Settings The settings described in the following table can be configured from Settings. To display the menu, select Settings in the Home screen, then press the OK key. - Page 54 P-5000 User’s Guide File Auto-Rotation Operation Unsupported Files Delete After Copying Set Password Movie DivX Setting Registration Code Play Settings Slide Show Effects* Duration* Slide Show Music* Clock* Sound Key Beep Backup Completion Sound Volume View Mode Brightness Video Out**...
-
Page 55: Chapter 7 Direct Printing
P-5000 User’s Guide Chapter 7 Direct Printing Preparing to Print You can print an image by connecting the viewer directly to a printer that is compatible with PictBridge. Available types of paper The viewer supports the following sizes and types of paper. -
Page 56: Setting The Number Of Prints In Full Screen
Pressing the Display key enters the print preview mode. You can check the print color in the case of selecting “PhotoEnhance6” with an Epson printer. However, the print result will differ according to the printer. Pressing the Back key returns to the normal mode. -
Page 57: Connecting To A Printer
P-5000 User’s Guide Connecting to a printer 1. Connect the USB cable and the AC adapter to the viewer. 2. Connect the other end of the USB cable to the connector on the printer. Note: See the printer’s manual for the location of the cable connector on the printer. -
Page 58: Printing Videos
P-5000 User’s Guide Note: For details of each setting, see “Printer settings” (page 59). The settings you made will be cleared when the image has finished printing. 2. Select Start Printing using the Up or Down key, then press the OK key to complete. -
Page 59: Printer Settings
P-5000 User’s Guide 7. In the Print Settings screen, make the appropriate settings using the Up or Down key, then press the OK key. Note: The settings you made will be cleared when the image has finished printing. 8. Select Start Printing using the Up or Down key, then press the OK key to complete. -
Page 60: Chapter 8 Viewing On A Tv
P-5000 User’s Guide Chapter 8 Viewing on a TV Using A/V Out The viewer has an A/V Out connector. You can play slide shows and videos on an external monitor by connecting the viewer to a monitor device, such as a TV, that has a video input connector. -
Page 61: Chapter 9 Maintenance And Troubleshooting
P-5000 User’s Guide Chapter 9 Maintenance and Troubleshooting Cleaning the Viewer To keep the viewer operating at its best, you should clean it thoroughly several times a year. Before you perform any maintenance on the viewer, be sure to read the “Important Safety Instructions”... -
Page 62: Charging The Battery
P-5000 User’s Guide 2. Insert the battery into the compartment in the direction of the arrow on the battery sticker. 3. Close the battery cover and slide it to the left until it clicks. Charging the battery After installing the battery, connect the AC adapter. The installed battery will be automatically charged. -
Page 63: Removing The Battery
P-5000 User’s Guide The Charge lamp lights green during charging. When the battery is fully charged, the Charge lamp turns off. It takes about 3.5 hours to fully charge the battery when the power is off, more time if the viewer is in use. -
Page 64: Troubleshooting
Some files failed to be copied. Check the data. Back up all the data to onto the computer and send the viewer to an authorized Epson service center. (The data on the viewer will be deleted.) Repairs will be chargeable and are not covered by Epson’s warranties. -
Page 65: Power Supply Problems
You can convert and transfer video and audio files with the Epson Link2 software. Copy the data again. See “Changing the Viewer Settings” (page 53) and make sure the LCD Brightness setting is set properly. - Page 66 30). For details about audio files, see “Audio file formats supported by the viewer” (page 46). You can convert and transfer video and audio files with the Epson Link2 software. What to do Check the audio codec and the volume. For details about audio codec, see “Photo/Video file formats supported by...
-
Page 67: Operation Problems
P-5000 User’s Guide Operation problems Cannot use the keys on the viewer. Cause The keys are deactivated because the power switch is set to Hold. Cannot access the existing folders. Cause The set language does not support the folders’ language. -
Page 68: Printing Problems
Cannot increase the hard drive capacity of the viewer even if deleting files. Cause Check if data was deleted without using the Epson Link2 software on the computer. Even if deleting data in the viewer on the computer, if the data has... -
Page 69: Resetting The Viewer
Contacting Customer Support Before Contacting Epson If your Epson product is not operating properly and you cannot solve the problem using the troubleshooting information in your product documentation, contact customer support services for assistance. If customer support for your area is not listed below, contact the dealer where you purchased your product. -
Page 70: Help For Users In North America
Speak to a Support Representative Dial: (562) 276-1300 (U.S.), or (905) 709-9475 (Canada), 6 Monday through Friday. Toll or long distance charges may apply. Before you call Epson for support, please have the following information ready: Product name Product serial number... -
Page 71: Help For Users In Australia
P-5000 User’s Guide Help for Users in Australia Epson Australia wishes to provide you with a high level of customer service. In addition to your product documentation, we provide the following sources for obtaining information: Your Dealer Don’t forget that your dealer can often help identify and resolve problems. The dealer should always be the first call for advise on problems;... -
Page 72: Help For Users In Thailand
To obtain technical support as well as other after-sales services, users are welcome to contact Epson Hong Kong Limited. Internet Home Page Epson Hong Kong has established a local home page in both Chinese and English on the Internet to provide users with the following information: Product information... -
Page 73: Help For Users In Malaysia
P-5000 User’s Guide Latest versions of Epson product drivers Users can access our World Wide Web home page at: http://www.epson.com.hk Technical Support Hotline You can also contact our technical staff at the following telephone and fax numbers: Phone: (852) 2827-8911... -
Page 74: Help For Users In India
Help for Users in India Contacts for information, support, and services are: World Wide Web (http://www.epson.co.in) Information on product specifications, drivers for download, and products enquiry are available. Epson India Head Office - Bangalore Phone: 080-30515000 Fax: 30515005 Epson India Regional Offices:... -
Page 75: Help For Users In The Philippines
User’s Guide Help for Users in the Philippines To obtain technical support as well as other after sales services, users are welcome to contact the Epson Philippines Corporation at the telephone and fax numbers and e-mail address below: Phone: (63) 2-813-6567... -
Page 76: Appendix A Appendix
P-5000 User’s Guide Appendix A Appendix Standards and Approvals P-5000 (Model: G961B) U.S. model: Safety European model: EMC Directive 89/336/EEC European model (Russia): EMC and Safety Korean model: Australian model: Taiwan model: EMC and Safety FCC Part 15 Subpart B Class B... - Page 77 P-5000 User’s Guide Chinese model: EMC and Safety AC adapter (Model: A351H) U.S. model: Safety European model: Low Voltage Directive 73/23/EEC EMC Directive 89/336/EEC European model (Russia): EMC and Safety Korean model: Safety Singapore model: Safety Australian model: Safety Taiwan model:...
- Page 78 P-5000 User’s Guide Chinese model: EMC and Safety Battery (Model: D111A) U.S. model: Safety European model: EMC Directive 89/336/EEC Australian model: GB4943 GB9254 GB17625.1 UL2054 EN 55022 Class B EN 55024 AS/NZS CISPR22 Class B Appendix...
-
Page 79: Specifications
P-5000 User’s Guide Specifications General Display LCD (Liquid Crystal Display) 4.0 inch 640 × R-YG-B-EG × 480 dots (Dot pitch 0.032 mm × 4 × 0.128 mm), (R: Red, YG: Yellow Green, B: Blue, EG: Emerald Green), Approx. 16,770,000 colors 2.5"... - Page 80 P-5000 User’s Guide Electrical Input voltage Rated current Power consumption Interface USB connector Two USB 2.0 (Mass Storage Class) interface Host: 2.0 Full Speed and High Speed mode (Standard-A) Slave: 2.0 Full Speed and High Speed mode (Mini-B) A/V Out connector Quadrupole mini pin jack (Ø 3.5 mm) Headphones 3-pole mini pin jack (Ø...
-
Page 81: About Optional Accessories
P-5000 User’s Guide AC adapter Model A351H Input AC 100 - 240 V, 50 - 60 Hz, 0.3 A - 0.1 A Output DC 5.0 V, 2.3 A Power Maximum 18 W consumption About Optional Accessories The following options are available for the viewer. - Page 82 Do not drop or apply any shock to the viewer. Take care when carrying it, as strong shocks may damage the internal hard disk drive and cause data to be lost. Epson is not responsible for backing up or recovering data. We recommend that you make your own backup files.
- Page 83 If a battery is swallowed, seek medical treatment immediately. Use only an Epson Lithium-ion battery for the viewer according to the directions in the user documentation. Use only AC adapter model A351H and the viewer (Model: G961A/G961B) to charge batteries.
- Page 84 P-5000 User’s Guide Prevent the battery from coming into contact with metal objects that could short-circuit it, such as coins or keys. Do not insert the battery into power outlets or other power sources such as car cigarette lighter sockets.
- Page 85 P-5000 User’s Guide For European users: Do not dispose of batteries with ordinary refuse. Instead, dispose of them in a recycle box in accordance with local laws. For users in the United States and Canada: This mark indicates that the battery will be recycled by RBRC.
- Page 86 P-5000 User’s Guide Do not use a damaged or frayed AC adapter. If you use an extension cord with the viewer, make sure the total amperage of all devices plugged into the extension cord does not exceed the cord’s amperage rating.
- Page 87 P-5000 User’s Guide When using the LCD The LCD panel on the viewer may contain a few small bright or dark spots. These are normal and do not mean that your LCD panel is damaged in any way. If the LCD panel on the viewer is damaged, consult your dealer.
-
Page 88: Safety Requirements
P-5000 User’s Guide Blue — Neutral Brown — Live As the colours of the wires in the mains lead of this appliance may not correspond with the coloured markings identifying the terminals in your plug, proceed as follows; The blue wire must be connected to the terminal in the plug marked with the letter N. - Page 89 P-5000 User’s Guide Index Audio equalizer setting Backing up data from the viewer onto the computer from the viewer onto USB devices Battery charging installing removing Changing a folder’s name Cleaning the viewer Connecting to the computer Contacting EPSON Copying data onto the viewer...
- Page 90 P-5000 User’s Guide Holding the key operations Home screen Important notice Information photo video while playing music while playing videos Main features Memory card inserting removing Music playback Optional accessories Parts back front LCD and control panel Playlist adding tracks...
- Page 91 P-5000 User’s Guide settings Printing photos videos Private folders Protecting files or folders Rate Resetting the viewer Safety instructions Safety requirements Screen icons switching Screen saver Setting auto-rotation backlight timer backup completion sound date and time delete after copying DivX registration code...
- Page 92 P-5000 User’s Guide launching Specifications Standards and approvals Technical support Transferring audio data Troubleshooting error messages/icons operation problems power supply problems printing problems viewing and playback problems Turning the power off Turning the power on Video output Index...