Epson P-2000 User Manual
Storage viewer
Hide thumbs
Also See for P-2000:
- User manual (80 pages) ,
- Basic manual (70 pages) ,
- Product support bulletin (21 pages)
Table of Contents
Advertisement
Quick Links
Advertisement
Table of Contents

Related Manuals for Epson P-2000


Summary of Contents for Epson P-2000
- Page 1 User’s Guide...
- Page 2 Epson product. Epson is not responsible for any use of this information as applied to other products. Neither Seiko Epson Corporation nor its affiliates shall be liable to the purchaser of this product or third parties for damages, losses, costs, or expenses incurred by the purchaser or third parties as a result of accident, misuse, or abuse of this product or unauthorized modifications, repairs, or alterations to this product, or (excluding the U.S.) failure to strictly comply with Seiko Epson Corporation’s operating and maintenance instructions.
-
Page 3: Table Of Contents
Chapter 1 Getting Started P-2000 Parts ........7 P-2000 Lights and Buttons . - Page 4 Chapter 5 Direct Printing Connecting the P-2000 to a Printer....43 Printing Your Photos......44 Creating Print Orders .
- Page 5 Troubleshooting Cleaning the P-2000 ......52 Error Messages ....... . . 52 Problems and Solutions.
-
Page 6: Introduction
Must be observed to avoid damage to your equipment. Note: Contains important information and useful tips on the operation of your product. If you need assistance using your P-2000, see “Where to Get ™ (Secure Digital) Help” on page 57. -
Page 7: Chapter 1 Getting Started
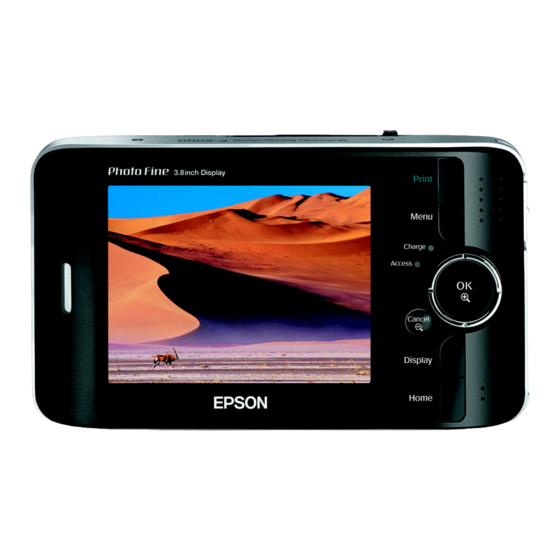
Chapter 1 Getting Started P-2000 Parts CompactFlash card slot SD card slot Eject button Power switch Reset button Audio/Video out connector Headphone connector AC adapter connector Speaker Battery cover connector connector cover Getting Started 7... -
Page 8: P-2000 Lights And Buttons
P-2000 Lights and Buttons Access light Flashes orange when you turn on the P-2000 or access data. Activity light Flashes blue during power on, printing, and certain other operations. Cancel button Cancels the current operation and returns to the previous screen. -
Page 9: About The Ac Adapter
About the AC Adapter The P-2000 comes with an AC adapter. Use the adapter to charge the battery and when the P-2000 is connected to a computer or printer. You might also want to use it whenever possible to view videos or photos, so you can save battery power. -
Page 10: Charging The Battery
After installing the battery, you need to charge it using the AC adapter. It takes about 3 hours to fully charge the battery when the P-2000 is off. It takes longer when the P-2000 is on. light is green while the battery is being Charge charged. -
Page 11: Removing The Battery
P-2000 has been powered off, you need to turn it back on with the power switch. Note: The power is also turned off if the P-2000 gets too hot. If this happens, let it cool before turning it back on. Getting Started 11... -
Page 12: Using The Viewing Stand
To turn on the power, slide the power switch down as shown below, then release it. The blue activity light flashes. Activity light Setting the Language, Date, and Time When you turn on the P-2000 the first time, you see the language setting screen: Language setting English (Intl.) Deutsch... -
Page 13: Locking The Buttons
P-2000, the date and time setting screen will be displayed. Locking the Buttons You can lock the buttons on the P-2000. This allows you to place the P-2000 in a purse or backpack and use it with headphones without accidentally pressing the buttons. -
Page 14: Using The Home Screen
Using the Home Screen Whenever you turn on the P-2000, the Home screen appears. All operations can be started from this screen. You can return to the Home screen at any time by pressing button. Home Home Saved Data Albums... -
Page 15: Turning Off The Power
Turning Off the Power Before you turn off the P-2000, make sure the light Access is off. Then slide the power switch as shown below, and hold it down for a few seconds until the light flashes Access and the P-2000 turns off. -
Page 16: Chapter 2 Using Memory Cards
Chapter 2 Using Memory Cards The P-2000 has two memory card slots, one for CompactFlash cards, and one for Secure Digital cards. This chapter explains how to insert and remove memory cards and how to display and copy files. Inserting and Removing Memory... -
Page 17: Using The Compactflash Card Slot
Back side Note: If you are using a CompactFlash adapter, remove the adapter from the P-2000; do not remove only the memory card. slot, first make sure the C/F Card light is off. Then press the eject button and pull out... -
Page 18: Using The Secure Digital Card Slot
Back side Caution: Make sure you insert memory cards in the correct orientation. Otherwise, the card and P-2000 may be damaged. To remove a card from the light is off. Then press in on the top of the card. Access When the card pops out, pull it out of the slot. -
Page 19: Copying Files From A Memory Card
Note: You cannot rotate JPEG files larger than 8.9 megapixels. The P-2000 supports images in RAW format that you have taken with the following digital SLR cameras: ❍ Epson R-D1 ❍... -
Page 20: Browsing Files On A Memory Card
Memory Card The files are copied to a folder that is automatically created on the P-2000. The folder is named according to the date, for example 20041225.001. Folders are numbered in the order they are copied. -
Page 21: Zooming An Image
Note: Although you can play audio and video files on a memory card, you will get better performance by copying them to the P-2000 before you play them. See “Playing Audio and Video Files” on page 29 for instructions. ❍... -
Page 22: Displaying A Histogram
Displaying a Histogram When an image is displayed full screen, press the button twice to see a histogram that shows the photo’s distribution of highlights, shadows, and mid-tones. Displaying Images as a Slide Show You can display JPEG images on a memory card as a slide Display show. -
Page 23: Chapter 3 Viewing And Playing Images, Audio, And Video
Battery status RAW file Travel P.I.F. is the abbreviation for Print Image Framer, Album3 you add frames to your images. Some Epson digital cameras support this feature. Video File with P.I.F. ™ frame Unsupported data file Locked... -
Page 24: Screen Icon Descriptions
Screen Icon Descriptions PC_DATA This is one of the default albums, folder which you use for copying files from your computer. Battery status See “Charging the Battery” on page 10. Folders Only folders that do not include image containing or video files display this icon. audio Album See “Creating an Album Shortcut”... -
Page 25: Displaying Images
Displaying Images You can display all images in Saved Data or Albums as thumbnails. You can also display an image in full-screen format. Select Saved Data Albums press the button. Home Saved Data Albums Latest Data Settings Folders or albums that include data such as images, videos, or audio appear. -
Page 26: Zooming An Image
Thumbnails of the images and other data are displayed: Saved Data / 2004.08.26 DSC00331.JPG DSC00330.mpg DSC00329.JPG DSC00327.JPG DSC00326.JPG DSC00325.JPG DSC00323.JPG DSC00322.JPG DSC00321.JPG Use the 4-way ring to select the image you want to view, then press the button. The selected image is enlarged to fill the screen: Zooming an Image ❍... -
Page 27: Displaying Images As A Slide Show
Displaying Images as a Slide Show You can display JPEG images as a slide show. Select the folder or album you want to display as a slide show. Press the button to display the pop-up menu: Menu Albums Edit Album Name Set as Album Shortcut PC_DATA Scenery... -
Page 28: Playing Audio And Videos
Playing Audio and Videos The P-2000 supports video files in resolutions ranging from 160 × 112 pixels to 640 × 480 pixels, with file sizes up to 2GB. The P-2000 supports audio files up to 100MB. WMV, MPEG1/2, and DVD-Video are not supported. -
Page 29: Playing Audio And Video Files
❍ You can listen to audio using headphones. Simply insert the headphone cable into the headphone connector on the side of the P-2000. Controlling Audio and Video Play The following table describes how the buttons work while playing audio and video files:... -
Page 30: Viewing Files On A Tv
Viewing Files on a TV You can connect the P-2000 to a TV or AV projector and view your images, videos, and slide shows. You will need a camcorder to TV/VCR audio/video cable (A/V cable with 3.5 mm mini-plug to 3 RCA phono plugs). -
Page 31: Chapter 4 Managing Files
The P-2000 includes several default albums, and you can easily create additional albums. You can also create up to three album shortcuts on the Home screen to quickly access your favorites. - Page 32 Press the button to display the pop-up menu, Menu then select by using the 4-way ring. Copy to Album Saved Data / 2004.08.26 Copy to Album Set as Folder Thumbnail DSC00331.JPG Lock DSC00330.mpg DSC00329.JPG Start Slide Show Copy to Memory Card Print Order Delete DSC00327.JPG...
-
Page 33: Creating A New Album
Select the album you want to copy to and press the button. The files are copied. Creating a New Album Follow steps 1 through 4 under “Copying Files to an Album.” Select and press the button. Saved Data / 2004.08.26 Please select an album DSC00331.JPG DSC00330.mpg... -
Page 34: Changing An Album's Name
Changing an Album’s Name Select the album whose name you want to change. Albums PC_DATA Scenery Flower Album1 Travel2 Photo Favorite Album4 Press the button to display the pop-up menu. Menu Select by using the 4-way ring, then Edit Album Name press the button. -
Page 35: Creating An Album Shortcut
Note: If the deleted album was set as an album shortcut, the shortcut on the Home screen is also deleted. Creating an Album Shortcut You can create three shortcuts on the Home screen to allow quick and easy access to your favorite albums. Select the album that you want to make a shortcut for. - Page 36 Press the button to display the pop-up menu, Menu then select by using the 4-way ring. Delete Saved Data / 2004.08.26 Copy to Album Set as Folder Thumbnail DSC00331.JPG Lock DSC00330.mpg DSC00329.JPG Start Slide Show Copy to Memory Card Print Order Delete DSC00327.JPG DSC00326.JPG...
-
Page 37: Protecting Files
Press the and select button. DSC00328.JPG DSC00324.JPG Files remain locked until you unlock them, even when you turn off the P-2000. icon is button to display the pop-up menu, Menu by using the 4-way ring. Then press the Lock Saved Data / 2004.08.26... -
Page 38: Creating An Album/Folder Thumbnail
Creating an Album/Folder Thumbnail You can select an image to use as a thumbnail for an album or folder in Saved Data. Select the file you want to use as a thumbnail in Saved Data. Press the button to display the pop-up menu, Menu then select Set as Album Thumbnail... -
Page 39: Settings Available In The Pop-Up Menu
See “Displaying Images as a Slide Show” on page 27. P.I.F. is an abbreviation for Print Image Framer, which lets you add frames to your images. Some Epson digital cameras support this feature. Managing Files 39... -
Page 40: Settings Available In The Slide Show Pop-Up Menu
You can connect the P-2000 to your computer using the USB cable that came in the box. Your computer recognizes the P-2000 as an external hard disk drive, and you can easily copy files back and forth. You should use the AC adapter when you connect the P-2000 to your computer. -
Page 41: Disconnecting The P-2000 From Your Windows Computer
P-2000; you cannot rename or delete it or create an album thumbnail for it. Note: You cannot copy files from a memory card in the P-2000 to your computer; you must first copy them to the P-2000. Disconnecting the P-2000 From Your... -
Page 42: Disconnecting The P-2000 From Your Macintosh
Disconnecting the P-2000 From Your Macintosh Drag and drop the P-2000 icon to the trash. Turn off the P-2000 and remove the USB cable from your Macintosh. Remove the USB cable from the P-2000. Managing Files 42... -
Page 43: Connecting The P-2000 To A Printer
For details about paper, see your printer documentation. PictureMate prints on 4 × 6-inch paper only. Connecting the P-2000 to a Printer Follow these steps to connect the P-2000 to your printer: Make sure the P-2000 and the printer are turned off. Open the USB connector cover:... -
Page 44: Printing Your Photos
Connect the small end of the USB cable to the P-2000. Connect the other end of the cable to the connector on the printer. The the connector may be in a different EXT I/F location on your printer. Connect the AC adapter to the P-2000. - Page 45 Do one of the following: ❍ To print only the selected image, choose Photo ❍ To print all the images in the selected folder or album, select Print All Photos ❍ To add images to be printed and select the number of copies, choose Select Photos to Print this screen:...
-
Page 46: Creating Print Orders
P-2000. Then you can print your images whenever it is convenient. Note: Print orders are saved even after turning turn off the P-2000. Select an image in the thumbnails screen or in full screen view. -
Page 47: Chapter 6 Customizing Settings
Chapter 6 Customizing Settings You can easily change the P-2000’s settings to make it work best for you. Select on the Home screen and press Settings button. You see this menu: Settings LCD Brightness Sound Slide Show Copy Mode Power Save... -
Page 48: Setting The Slide Show Options
Choose an interval from 3 seconds to 30 minutes. The default setting is 5 seconds. When you are finished, press the Changing the Copy Mode Setting This option lets you tell the P-2000 how to handle images on a memory card after copying. Select button. -
Page 49: Setting The Power Save Options
P-2000. ❍ Select Confirm before deleting P-2000 to ask before copying whether to delete the photos from the memory card after copying. When you are finished, press the Setting the Power Save Options... -
Page 50: Selecting The Video Out Signal
Press down on the 4-way ring to move to the setting. Unsupported Files Select if you want to see thumbnails for all files, Show including non-compatible file types. Select show only compatible files. When you are finished, press the Selecting the Video Out Signal If you have connected a TV, you may need to change the video output signal method. -
Page 51: Choosing The Language
Space Select and press the Hard Drive You may see a message while the P-2000 checks its space. After a moment, you will see the amount of disk space used, the amount available, and the total disk space. Press the button to return to the Settings menu. -
Page 52: Troubleshooting
Chapter 7 Maintenance and Troubleshooting This chapter describes how to clean the P-2000 and solve problems. Cleaning the P-2000 Follow these guidelines when cleaning the P-2000: ❍ Turn off the P-2000 before cleaning. ❍ Use a clean, dry cloth to wipe it clean. -
Page 53: Problems And Solutions
You must set the date and Set the correct date and time. time to ensure correct (See page 50.) operation. Wait until the P-2000 cools down. The battery power is running out. Charge the battery. See “Charging the Battery” on page 10 for details. -
Page 54: File Viewing Problems
“Adjusting the LCD Brightness” on page 47. The USB cable is connected No image is displayed on the LCD to the P-2000. when the USB cable is connected or during certain operations. A video cable is connected The LCD turns off when you to the P-2000. -
Page 55: File Operation Problems
Unlock the file and then delete it. (See “Protecting Files” on page 37 and “Deleting Files and Folders” on page 35.) You cannot locate files on the P-2000 when it is connected to your computer. Cause What to do The files are in subfolders. -
Page 56: Printing Problems
Printing Problems You cannot print. Cause What to do The printer is not supported. See “Connecting the P-2000 to a Printer” on page 43 to make sure your printer is supported. The printer’s power is off. Turn on the printer. -
Page 57: Where To Get Help
Where to Get Help Epson provides technical assistance 24 hours a day through the electronic support services and automated telephone services listed below. Service Access World Wide Web From the Internet, you can reach Epson Support at http://support.epson.com. At this site, you can download drivers... -
Page 58: Safety Instructions
Appendix A Notices Safety Instructions Read all these instructions before using the Epson P-2000, and keep this guide handy for later reference. Follow all warnings and instructions marked on the P-2000 and any options. Using the P-2000 ❍ Follow all warnings and instructions marked on this product. - Page 59 If a battery is swallowed, seek medical treatment immediately. ❍ Use only an Epson Lithium-ion battery for the P-2000 according to the instructions in this manual. ❍ Use only AC adapter model A351H and P-2000 (Model G941) to charge batteries.
- Page 60 Do not remove the AC adapter from this device during operations. ❍ The AC adapter included is designed for use with this product. Use of any other adapter could result in fire, electrical shock, or injury. ❍ Use only adapter model A351H with the P-2000. Notices 60...
- Page 61 ❍ Do not connect the AC adapter when the battery is not installed. Otherwise, the P-2000 may be damaged. ❍ Use only the power source that meets the power requirements indicated on the label attached to the product. If you are not sure of the power supply specifications in your area, contact your local power company or regulatory agency.
- Page 62 ❍ Do not remove a memory card or turn off the product while the light is flashing. ACCESS Storing, Maintaining, or Transporting the P-2000 ❍ Do not store this product outdoors. ❍ Do not store this product near water. ❍...
-
Page 63: Fcc Compliance Statement For United States Users
FCC Compliance Statement for United States Users This equipment has been tested and found to comply with the limits for a Class B digital device, pursuant to Part 15 of the FCC Rules. These limits are designed to provide reasonable protection against harmful interference in a residential installation. -
Page 64: Declaration Of Conformity
Declaration of Conformity According to 47CFR, Part 2 and 15 for Class B Personal Computers and Peripherals; and/or CPU Boards and Power Supplies used with Class B Personal Computers: Epson America, Inc. Located at: MS 3-13 3840 Kilroy Airport Way... -
Page 65: Specifications
Specifications General CPU: TMS320DM270 LCD: 3.8 inches, Epson VGA TFT LCD; × 480 pixels; 262,144 colors; 212 ppi Memory: 64MB SDRAM; 4MB flash ROM HDD: 2.5 inch HDD, 40GB, FAT 32 Dimensions Height 3.3 inches (84 mm) (without Width 5.8 inches (147 mm) -
Page 66: Interface
Interface USB connector: One USB 2.0 (Mass Storage Class) interface for Slave connection A/V Out Mini pin jack (3.5 mm) connector: Headphone Out M3 stereo mini pin jack (3.5 mm) connector: CF Card slot One slot (Type 1/Type 2, 3.3V) for CompactFlash memory card and MicroDrive SD Card slot... -
Page 67: Index
Index Numerics 4-way ring , 30 A/V Out connector , 28 aac files AC adapter , 10 connecting connector , 60 to 61 safety instructions , 66 specifications , 64 standards using Access light , 57 Accessories Activity light , 8, 12 Albums , 34 changing names... - Page 68 , 30 video , 19 Cameras, RAW files from Cancel button , 8, 10 Charge light , 10 Charging the battery , 52 Cleaning the P-2000 , 28 Codec CompactFlash adapter , 16 card slot , 7, 17 Computer connecting...
- Page 69 , 35 to 37 deleting , 20 naming , 49 view mode , 51 Hard Drive space Headphone connector Headphones, using with P-2000 , 29 Help, Epson , 57 Histogram, displaying , 22 Home button Home screen , 14...
- Page 70 Layout option , 45 , 7, 47, 61 Lights Locking files , 37 , 28 m4a files , 42 Macintosh, disconnecting P-2000 , 28 Maximum bit rate, video Memory card , 16 adapter , 20 to 22 browsing files , 14...
- Page 71 Projector, connecting to , 30 , 37 Protecting files , 19 RAW files , 7, 56 Reset button , 56 Resetting the P-2000 , 27 Rotating images , 58 to 62 Safety Instructions , 14, 20 Saved Data Secure Digital , 16...
- Page 72 Settings , 48 to 49 Copy Mode , 47 to 51 customizing , 12 to 13, 50 Date and Time Home screen option , 14, 47 Language , 12, 51 LCD Brightness , 47 Power Save , 49 Slide Show , 48 Sound , 47...
- Page 73 , 29 problems , 54 , 50 Video Out setting , 12 Viewing stand , 49 to 50 View Mode settings , 29 Volume, controlling , 41 Windows, disconnecting P-2000 , 16 xD-Picture card Zooming images , 21, 26...