Table of Contents
Advertisement
Quick Links
Notice for All Users
•
Consult the operation manual for proper use of your computer.
•
The product and the accessories are subject to change without prior notice.
•
SHARP assumes no responsibility for results arising from use of pre-installed and
third party software. Consult the software vendor for resolution of problems.
(Read the service condition of the software before use.)
•
SHARP assumes no responsibility for problems caused by incorrect handling,
repairs, defects, battery replacement or any other cause.
i
Advertisement
Table of Contents

Related Manuals for Sharp Actius PC-MP30


Summary of Contents for Sharp Actius PC-MP30
- Page 1 The product and the accessories are subject to change without prior notice. • SHARP assumes no responsibility for results arising from use of pre-installed and third party software. Consult the software vendor for resolution of problems. (Read the service condition of the software before use.) •...
-
Page 2: Notice For Users In The Usa
A shielded I/F cable is required to insure compliance with FCC regulation for Class B computing equipment. ® * As an ENERGY STAR Partner, SHARP has determined that this product meets ® the ENERGY STAR guidelines for energy efficiency. Declaration of Conformity SHARP PERSONAL COMPUTER, PC-MP Series This device complies with part 15 of the FCC rules. -
Page 3: About The Modem
If trouble is experienced with this equipment, please contact Sharp Electronics Corp. for repair and (or) warranty information (Refer to the end of this section). If the trouble is causing harm to the telephone network, the telephone company may request you remove the equipment from the network until the problem is resolved. - Page 4 For disposal or recycling information, please contact your local authorities or the Electronics Industries Alliance: www.eiae.org Copyright It is the intent of Sharp that this product be used in full compliance with the copyright laws of the United States and that prior permission be obtained from copyright owners whenever necessary.
- Page 5 CAUTION: TO PREVENT ELECTRICAL SHOCK, DISCONNECT THE AC CORD AND REMOVE THE BATTERY BEFORE SERVICING. CAUTION: FOR A COMPLETE ELECTRICAL DISCONNECTION, PULL OUT THE MAIN PLUG AND THE BATTERY. VORSICHT: UM DIE STROMZUFUHR VOLLSTÄNDIG ZU UNTERBRECHEN, DEN NETZSTECKER HERAUSZIEHEN UND DIE BATTERIE ÈNTFERNEN. ATTENTION: POUR UN ARRET TOTAL DU SYSTEME, DECONNECTEZ LA PRISE DE COURANT SECTEUR ET LA BATTERIE.
-
Page 6: Safety Precautions
Safety Precautions General • Follow all cautions and instructions marked on your computer. • Except as described elsewhere in this manual, refer all servicing to qualified personnel. Immediately shut off your computer and seek servicing under the following conditions: • when the power cord or plug is damaged or frayed •... - Page 7 • Do not press or place heavy objects on your computer. Strong pressure can damage the cabinet or make your computer fail. • If your computer or the AC power cord experiences an abnormal situation such as heat generation or smoking, or produces an abnormal odor, turn off your computer, unplug the power cord, and remove the battery pack immediately.
- Page 8 Handling • Never put the battery pack in a fire, as it could explode and cause injury. • Do not attempt to open or alter the battery pack. • Do not place the battery pack where it might get hotter than 140°F (60°C). •...
- Page 9 • Be sure to hold the plug of the AC power cord when removing it from a wall socket. • Check the AC power cord and power connectors periodically for damage. Change the power cord immediately if damage is found. Modem Precautions IMPORTANT SAFETY INSTRUCTIONS When using your telephone equipment, basic safety precautions should always be...
- Page 10 • Maintain a space of at least 7.9” (20cm) between the antenna and your body while communicating. • Never disassemble or alter the wireless LAN unit. • Do not remove the certification label on the wireless LAN unit. Product Conformance The wireless LAN unit equipped with your computer is in conformance with federal requirements.
-
Page 11: Other Precautions
The following measures are recommended for permanent data deletion: • Use special software or paid services for thoroughly erasing data • Hammer, or strongly magnetize, the hard disk to destroy the stored data Be sure to delete the software, such as operating system(s) or applications, on your hard disk when transferring your computer, to avoid conflict with the software agreement(s). - Page 12 For Your Health • Take regular breaks of ten to fifteen minutes after every hour of continuously viewing the screen to relieve your eyes. • Adjust the brightness for comfortable viewing. (Brightness level of about 500 lux is recommended.) • Do not use your computer in an environment where sunlight or indoor lighting reflects off the screen.
-
Page 13: Notice Of Computer Security
Notice of Computer Security The Windows operating system on this computer provides the Security Center, which manages the security features of the computer. It provides the status of the following security functions and enables you to change the settings. • Firewall •... - Page 14 * You can enable the LiveUpdate automatically to run and update the file if any updates are detected. (Refer to the Virus Protection section in the Appendixes.) * You will have the message “Your computer might be at risk” at the bottom right of the screen when one of the Firewall and Automatic updates is set to OFF.
-
Page 15: Notice Of Security With Wireless Devices
Security measures are important for all users to understand for a safe use of wireless LAN. SHARP encourages all users to configure the security settings with their own judgment and responsibility. -
Page 16: About This Manual
Information in this manual is subject to change without notice and does not represent a commitment on the part of SHARP Corporation and its sales subsidiaries. SHARP Corporation and its sales subsidiaries shall not be liable for technical or editorial errors or omissions contained herein; nor for incidental or consequential damages resulting from the furnishing, performance, or use of this material. -
Page 17: Recording Important Information
Recording Important Information For future reference, please record the following information in the spaces provided below. Model Number: Serial Number: Date of purchase: Dealer’s Name: Place of purchase: Password: The serial number is printed on a sticker located on the bottom of the computer. xvii... -
Page 18: Manual Conventions
Manual Conventions This manual uses a set of style conventions described below. Notes and Cautions are italicized with icons: A note icon informs you of a special technique or information that may help you perform a task or better understand a process. A caution icon alerts you to something that may cause problems or damage to hardware, software or data. -
Page 19: Table Of Contents
Table of Contents Notice for All Users....................i Notice for Users in the USA..................ii Safety Precautions ....................vi Notice of Computer Security ..................xiii Notice of Security with Wireless Devices ...............xv About This Manual....................xvi Recording Important Information................xvii Manual Conventions.....................xviii Table of Contents ....................xix Overview of Computer ..................xxii Basic Operations Connecting to AC Power Source................1-1... - Page 20 Peripherals Peripheral Device Ports..................3-1 Optional External Floppy Disk Drive Unit ............3-3 External Display..................... 3-6 Audio System ......................3-9 USB Device......................3-11 PC Card ........................ 3-12 Printer........................3-15 Communication Functions Built-in Modem...................... 4-1 LAN Unit ....................... 4-5 Wireless LAN....................... 4-11 Network Setup Utility ..................
- Page 21 Appendixes Memory Module ....................A-1 Maintenance and Care ...................A-5 Virus Protection.....................A-7 Data Execution Prevention ..................A-10 Data Backup and Restore ..................A-12 Re-installation Instructions..................A-13 Troubleshooting Common Problems ....................T-1 Trouble when Starting ................... T-2 Trouble with Display ..................... T-3 Trouble with Keyboard/Touchpad................. T-5 Trouble with Remote Control................
-
Page 22: Overview Of Computer
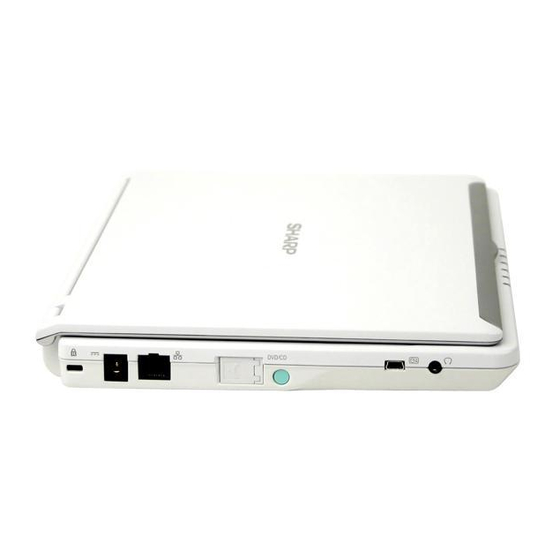
Overview of Computer Each number after an arrow indicates the page referring to the part. Actual appearance of your computer may be slightly different depending on the model. Front Antenna→ 4-14 LCD Screen → 1-22 Mobile Mode Switch → 2-4, 12 Power Button →... - Page 23 Right External PC Card Slot→ 3-12 Display Port → 3-6 USB Ports → 3-3, 11, 15 Left AC Adapter Jack→ 1-2 LAN Jack→ 4-5 Headphone/Audio Output/Remote Control Jack Modem Jack→ 4-2 → 1-11, 3-9, 10 DirectHD Port→ 6-5 Security Slot →...
-
Page 24: Battery Pack
Rear Ventilation Openings and Cooling Fan→ vi Bottom Battery Pack→ 2-1 xxiv... -
Page 25: Basic Operations
CHAPTER 1 Basic Operations This chapter describes the basic operations of the computer. Properties Dialog Box on Windows In this manual, you will often see the expression “XXX Properties dialog box.” A dialog box is a window containing text boxes, check boxes, buttons, etc., with which you can send commands to Windows or other application programs. - Page 26 Plug the AC power cord into the AC adapter. Plug the AC adapter cable into the AC adapter jack on the computer. Plug the AC power cord into a wall outlet. AC Adapter Jack AC Adapter AC Power Cord To Wall Outlet Steady the base cabinet of the computer with your hand and hold the jutted part with your thumb or finger and then, raise the cover.
- Page 27 Press the power button to turn on the computer. Power Button Power Indicator When you turn on the computer, the power indicator ( ) turns green, the computer goes through a self test to detect any problems, and Windows setup process starts. Do not touch or operate the keyboard and touchpad until Windows completely activates unless you are prompted to do.
-
Page 28: Turning Off Your Computer
Turning Off Your Computer When you’ve finished using the computer, turn it off with one of the following ways: • From the start menu Click start – Turn Off Computer. In the Turn off computer dialog box, click Turn Off. •... -
Page 29: Indicator Light
About Power Indicators The following indicators show the power status of the computer. Indicator Light Meaning Power On (green) Operating Blinking (green) In System Standby Powered off or in System Hibernate Fully charged Battery Connected to AC On (green) Power Source On (orange) Being charged Blinking... -
Page 30: Resetting System
Resetting System You may need to restart the system if the computer hangs up or new hardware or software is installed. When a message appears after the installation, click OK, Yes, etc. to restart Windows. You can also restart Windows by clicking start - Turn Off Computer; then, Restart. Resetting may cause data loss. -
Page 31: Using Touchpad
Using Touchpad The computer is equipped with an integrated touchpad pointing device. Using the touchpad, you can move the pointer, select an item from a menu, and perform other tasks in the same way you would with a mouse. Pointer Touchpad •... - Page 32 Click OK to close the dialog box. Close the Printers and Other Hardware dialog box. Completing the steps allows the computer always to respond to the touchpad, while the connected USB mouse also works. When the touchpad is disabled, the touchpad icon ( ) on the taskbar is crossed ( Using Touchpad...
-
Page 33: Using Keyboard
Release the button when the item reaches its destination. Or you can tap the pad twice and hold it instead of pressing the left button in the step 2. Scroll You can scroll through information in a list or in a document by using the touchpad. To view information vertically, place your finger on the most right part of the touchpad and slide your finger up and down. -
Page 34: Using Remote Control
only, and both (when connecting an external monitor). Fn + F6 ( Decreases the LCD screen brightness Fn + F7 ( Increases the LCD screen brightness Fn + F10 ( Mutes the sound. To resume, press them again. Fn + F11 ( Turns the LCD screen or an external monitor screen (when connecting it) on and off Fn + F12 (... - Page 35 Connecting Remote Control • The provided remote control is designed only for the computer. Do not use it with other devices. • Do not connect other controls to the computer. • The remote control can be used without the headphone connected. •...
- Page 36 Remote Control Operation You can slide the button up and down and also press it. Each operation gives different results according to the applications. (Refer to the next section.) The hold switch enables you to lock any operation on the remote control and prevent errors.
- Page 37 Operating Remote Control on Application The remote control works on selected applications. The functionality differs based on the application. Refer to the following table to use the remote control correctly. Win DVD Internet Outlook Adobe Power Point Applications /Windows Explorer 6.0 Express 6.0 Reader 6.0 2003...
-
Page 38: Using Optical Drive
Your computer supports non-cartridge discs or Type2/Type4 removable cartridge discs. When you use the removable discs, be sure to remove the cartridge from the discs. A list of recommended media may be found on the Sharp Systems website (http://www.sharpsystems.com). 1-14... - Page 39 Handling Disc • Do not write on either side of the disc, particularly the non-label side. Data is read from/written onto the non-label side. Do not mark this surface. • Keep your discs away from direct sunlight, heat and excessive moisture. •...
- Page 40 Gently pull out the tray. Lens Tray Holding the tray to support it, place your disc with label side up onto the tray and slightly press the center of the disc until it locks into place. Gently push the tray back into the computer. Do not leave the tray pulled out.
- Page 41 Removing Disc Make sure the optical drive indicator is not lit and press the eject button. The optical drive tray will pop out. Make sure the optical drive indicator is not lit before pressing the eject button (except during INSTANT PLAY running). Gently pull out the tray.
-
Page 42: Watching Dvd Video
Writing to CD-R and CD-RW You can use CD-R or CD-RW to write data on. CD-RW is an erasable disc onto which you can write data and from which you can erase data. CD-R is non-erasable disc onto which you can write data only once. If free space remains, you can add data until the disc is full. - Page 43 Changing Region Code A DVD video has a region code which prevents playback of the disc in certain regions. The region code is on the top of the disc. When shipped from the factory, your optical drive is set to a region code applicable to your area.
- Page 44 ROM drives string and then, MATSHITA xxxxxx. (xxxxxx is your optical drive name.) 4. Select the DVD Region tab, choose the listed distribution area of the DVD video, then, confirm the region code shown in the New Region field is correct and click OK. 5.
-
Page 45: Controlling Volume
Controlling Volume You can adjust the output volume of the computer with the following volume controls that interact with each other. With Keyboard Press and hold the Fn key and then, press the F3 ( ) key to decrease the output volume. -
Page 46: Adjusting Display
Adjusting Display You can adjust the brightness, resolution, and number of colors of the internal LCD display for more comfortable viewing. Changing Brightness of Display Press and hold the Fn key and then, press the F6 ( ) key to decrease the brightness of the internal LCD display. - Page 47 • You cannot switch to display resolutions and number of colors that are not available. • In the Color quality, Medium (16 bit) means 65,536 (64K) colors, and High (32 bit) means about 16,770,000 (16M) colors. Displaying Image Upside Down The computer enables you to show the images on the LCD screen upside down.
-
Page 48: Sharing Your Computer
Sharing Your Computer If you are sharing the computer with your colleagues or family members, set a user account for each person. Every user can choose their favorite desktop setting, web site lists, or make their own My Documents folder etc., and save them to their user accounts. -
Page 49: Setting Password
Select a new account to start Windows again. If you cannot see the Switch User in Log Off Windows dialog box, click the Change the way users log on or off string in the User Accounts dialog box, and check Use Fast User Switching and click Apply Options. Setting Password to User Account You can set a password to each user account to avoid unauthorized use of the computer. - Page 50 Changing Password Follow the steps 1-2 on the previous section. Select the account you want to change, if you log on to the computer as a member of the Computer administrators group. If you log on the computer with a limited account, go to the next step. (You cannot change the password of another user account.) Select the Change the password string or Change my password string.
-
Page 51: Battery And Power Management
CHAPTER 2 Battery and Power Management This chapter explains how to manage the computer’s power effectively and use the battery pack. In this section, you often see the expression “Power Options Properties dialog box”. To open the dialog box: 1. Click start – Control Panel. 2. -
Page 52: Checking Battery Level
Charging Battery Pack Connect the AC adapter to the computer and leave it until the battery is fully charged. To Wall Outlet Battery Indicator When the battery indicator ( ) lights orange, the battery is being charged. When green, the battery has been fully charged. •... -
Page 53: Low Battery Indication
On INSTANT PLAY Press the B key to display a numeric indication of the remaining amount of the battery power. To hide it, press the B key again. • The remaining operating time depends on the amount of the power the computer is consuming. - Page 54 Set the battery level at which the alarms are activated. We recommend you set the Critical battery alarm to 5% or more and the Low battery alarm to more than the value of the Critical battery alarm. Set the Alarm Action… to the appropriate settings. Click OK twice.
- Page 55 Discharging in the mobile mode will take longer to be completed. Press and hold the Fn key and then, press the F7 ( ) key several times to maximize the LCD screen brightness and then, leave the computer powered on to discharge the battery pack until the system automatically shut down.
- Page 56 Slide the battery release lever to the unlocked position ( ) and hold it, then, pull out the battery pack. Battery Release Lever Align the notched parts of a new battery pack to the projecting parts of the computer. Projecting Parts Notched Parts...
- Page 57 Gently insert the battery pack until you hear the clicking sound. Slide the battery stopper to the locked position ( ). Battery Stopper...
-
Page 58: Power Saving
Power Saving The computer has some power saving function, such as power management and the mobile mode switch, and also can turn off the optical drive to save electricity and extend battery life. The following performance reduces power consumption. • Power management •... - Page 59 Using System Standby/Hibernate System standby/hibernate is a very useful power management tool. For example, after the computer has entered the system standby mode, you can restart the computer more quickly when compared to restarting after a normal shutdown operation. When the computer resumes from the system standby/hibernate, the system restores the exact last state of the computer.
- Page 60 Supporting System Hibernate If your battery becomes completely discharged during the system standby, you will lose unsaved data and will need to reboot the computer. Therefore, if you are planning to leave the computer powered by battery for long periods of time, we recommend the system hibernate. Confirm that the system hibernate is supported with the following steps.
- Page 61 • The screen cover is closed. The above functions if you perform the following: In the Power Options Properties dialog box, select the Advanced tab. Select Hibernate or Stand by in the When I close the lid of my portable computer field.
-
Page 62: Disabling Power Management
Disabling Power Management In the Power Options Properties dialog box, select the Power Schemes tab. Set Turn off monitor, Turn off hard disks, System standby, and System hibernates to Never, then, click OK. Close the Control Panel window. Using Mobile Mode Switch The mobile mode switch enables the battery life to extend. - Page 63 • The screen brightness can be adjusted respectively in mobile mode and normal mode. • The mobile mode may cause an animation to produce an irregular motion or frame dropouts since the CPU performance is reduced. Powering Off Optical Drive Powering off the optical drive helps to reduce power consumption.
- Page 64 2-14...
-
Page 65: Peripheral Device Ports
CHAPTER 3 Peripherals This chapter describes how to use peripheral devices with the computer. You can connect an optional floppy disk drive unit, a printer, an external monitor, a PC card or other devices to the computer. To ensure proper use, be sure to read the instructions for each peripheral device before connecting it to the computer. - Page 66 Connection Ports for Peripherals Headphone/Audio USB Ports Output/Remote Control Jack External Display Port Port Design Port name Port Design USB Port External Display Port Headphone/Audio Output /Remote Control Jack...
-
Page 67: Optional External Floppy Disk Drive Unit
Optional External Floppy Disk Drive Unit You can use high-density (2HD) 1.44MB or double-density (2DD) 720KB floppy disks with the optional external floppy disk drive unit (CE-FD05). • 1.44MB (2HD) disks are appropriate for the drive unit. • There are restrictions in using 720KB (2DD) disks. Refer to the Trouble with Floppy Disks section in the Troubleshooting in this manual. - Page 68 Handling Floppy Disk • Do not open the shutter and touch the disk inside; otherwise, you will not be able to read or write data to the disk. • Do not place floppy disks near magnets or heat source, in direct sunlight or in a dusty place, etc.
- Page 69 Ejecting Floppy Disk Before ejecting the floppy disk, make sure the indicator of the floppy disk drive unit is not lit. Press the eject button firmly. The disk pops out slightly. Eject it and store it properly. Eject Button Formatting Floppy Disk Make sure the floppy disk is not write-protected, and insert it into the floppy disk drive.
-
Page 70: External Display
External Display You can use an external monitor with the computer. To display the images on both displays simultaneously, use the 1024x768 resolution. • Some monitors, which are not compatible with the computer, may not display correctly. • In this section, you often see the expression “Display Properties dialog box.”... - Page 71 Switching Display In the Display Properties dialog box, select the Settings tab; then, click the Advanced button. Click the Displays tab. Click the red-colored switch button ( Follow the appropriate steps below according to your needs. To display on the LCD display only: 1.
- Page 72 Extending Image onto External Monitor • While the image is being extended, you cannot use the Fn+F5 ( keys. • Only the LCD display can be the primary monitor. To extend the image on the LCD onto the external monitor: In the Settings tab of the Display Properties dialog box, select the “2”...
-
Page 73: Audio System
Audio System You can output sound to speakers, audio equipment or headphones. Connecting Speaker You can connect stereo speakers with an amplifier to the audio output jack on the computer. Speakers with an Amplifier Headphone/Audio Output /Remote Control Jack Stereo Mini Plug Connecting Audio Equipment You can connect analog audio equipment to the audio output jack on the computer. - Page 74 Connecting Headphone Use the headphone with an impedance of 8Ω or more. (32 Ω is recommended.) Headphone Headphone/Audio Output /Remote Control Jack Stereo Mini Plug 3-10...
- Page 76 Connecting to Network via an Access Point You can connect the computer to the Internet or a wired network via an access point supporting IEEE 802.11g or IEEE 802.11b. For details on the access point, refer to its manual or consult your network administrator. This section describes how to communicate or access to the Internet through the access point.
- Page 77 Connecting to Network This section describes how to connect to a WEP enabled access point or WPA- PSK/TKIP capable access point. (WPA-PSK/TKIP refers to WPA with pre-shared key (PSK) with Temporal Key Integrity Protocol (TKIP) encryption.) For access points with user authentication, consult your network administrator. WPA-PSK is a special mode allowing only devices with a matching network key to access the WPA-PSK capable access point.
- Page 78 • When the computer successfully connects to the selected access point, the Connected signage will appear in the connected network name field and the Wireless Network Connection icon ( ) on the taskbar will change to ( • Entering an incorrect network key or selecting an inappropriate key index will show the Limited or no connectivity signage in the network name field and the icon on the taskbar will change to ( ).
- Page 79 Communicating with Other Computers This section describes how to communicate between wireless computers with a built- in wireless module or a wireless LAN card installed. To enable wireless communication between the computers; • Assign IP address and subnet mask for each computer. •...
- Page 80 Type a name of the network in the Network name (SSID) field of the Wireless Network Properties dialog box. Confirm the computer and other computers are assigned the same Network name. 10. Confirm Open is selected in the Network Authentication pull-down menu and WEP in the Data encryption pull-down menu.
- Page 81 Changing Security Mode This section describes how to change the security mode to WEP or WPA-PSK with TKIP or AES. When using the user authentication security technology, consult your network administrator for the mode changes. Right-click the Wireless Network Connection icon ( ) on the taskbar.
- Page 82 • The key index options of the computer are 1 through 4. • Some access points and computers have the options 0 through 3. Refer to the table below for matching. Key index matching table Access Point1 Access Point Your computer /Computer2 /Computer1 (ex.
-
Page 83: Network Setup Utility
Network Setup Utility With the Network Setup Utility, you can define specific network settings based on your network environments such as work, home, etc. You can also allow for the computer automatically to switch to the appropriate network. • Not every setting item can be stored. •... - Page 84 Click OK in the confirmation window. In the Register an icon and network name dialog box, select the SHARP icon or Windows icon, then, click the Select icon button. Select an icon and click OK. Type a network name, then, click OK. The selected icon appears on the main screen of the Network Setup Utility window.
- Page 85 4-24...
-
Page 86: Setup Utility
CHAPTER 5 Setup Utility This chapter describes how to run the Setup Utility to change settings on the computer. Running Setup Utility With the Setup Utility, you can customize the system configuration information, such as time and date, port assignments, or passwords. The information you have specified is saved in a special area called CMOS RAM, which the system reads every time you turn on the computer. - Page 87 Entering and Exiting Setup Utility Turn on the computer. When Press F2 for System Utilities appears, press F2. Change to the desired settings. Refer to the next section. Select Exit. Select one of the exit methods, and press Enter. Confirm the message and press Enter again. The system restarts. When the Setup Utility is opened, power management does not work.
-
Page 88: Main Menu
(Num lock indicator will turn when Fn+NumLk are pressed regardless of this setting. An external keyboard will be numlocked if connected.) Quiet Boot defines whether the SHARP logo appears on the screen while booting. CPU Information shows the information on the CPU. -
Page 89: Advanced Menu
Advanced Menu Internal Pointing Device enables or disables the built-in touchpad. Resolution Expansion defines whether the Setup Utility screen is expanded when the resolution is 640x480 or 800x600. Enabled means that the screen image is expanded. (This item does not work in the Windows environment.) Plug&Play O/S normally has to be as default “Yes”. - Page 90 Password Setting a password will protect the computer against unauthorized access. Once a password is set, the system requires the password when entering to the Setup Utility. If the Password on boot is enabled, the system will require a password when the computer is turned on.
- Page 91 • To enable the supervisor password or the user password when booting up the computer, check the Password on Boot. • When entering the Setup Utility, the password will be required. Changing Password In the Security menu of the Setup Utility, select Set Supervisor password or Set User password and press Enter.
-
Page 92: Boot Menu
Boot Menu Boot Sequence specifies where the system boots from. Press Enter to open the sub menu. The system boots from the drive at the top of the list. If the system cannot find the drive, it will boot from the second one; then, third one; then forth one. Use arrow keys to select the drive you want to move and then, use the space bar or minus key to move it up or down. -
Page 94: Directhd Function
CHAPTER 6 DirectHD Function This chapter describes how to connect your computer (hereafter called MP series) with another computer (hereafter called Host computer), using the DirectHD function, to exchange data directly between the two computers without using network or external media. With this function, you can use the MP series as an external hard disk of your host computer and read/modify/save data stored in the MP series without powered on. - Page 95 DirectHD Precautions • When the host computer is in the standby or hibernation mode, do not turn on the MP series or connect/disconnect the DirectHD cable. It may damage the file or cause malfunction of the host computer when the host computer resumes. •...
- Page 96 • Do not remove both of the AC adapter and the battery pack from the MP series when turning it off. Otherwise, you cannot use the DirectHD function. If you remove them, start Windows of the MP series, finish it and then, connect to the host computer. Connect the AC adapter to the MP series.
-
Page 97: Connecting Mp Series To Host Computer
When the hard disk indicator is lit: • Do not turn off the host computer. • Do not unplug the DirectHD cable. • Do not remove the AC adapter or the battery pack of the MP series. • Do not move the MP series. Otherwise, the data may be collapsed or your MP series may malfunction. - Page 98 Connect your MP series with the host computer using the supplied DirectHD cable. Host Computer DirectHD Port DirectHD Cable DirectHD READY Lamp Do not plug the DirectHD cable in any USB port of the MP series when the other end is plugged in the DirectHD port. •...
-
Page 99: Disconnecting Mp Series From Host Computer
Disconnecting MP Series from Host Computer Before unplugging the DirectHD cable, stop the device by following these steps. You must stop the device before removing the DirectHD cable from the MP series and the host computer. Stopping Device On Windows XP Professional/Home Click Safely Remove Hardware icon ( ) on the taskbar. -
Page 100: Password Function
Password Function You can use the password function to protect against unauthorized access to the hard disk of the MP series by the DirectHD function. Setting User Password Set a user password of the MP series in the Setup Utility. (See Chapter 5.) •... - Page 101 In some cases, an alert box may appear. This is because once the password is cancelled; the host computer stops the connection with the USB device and then, reconnects with it. This causes no matters. Deleting User Password When your host computer runs Windows XP or Windows 2000 Run the Setup Utility on the MP series and delete the user password.
-
Page 102: Instant Play
CHAPTER 7 INSTANT PLAY INSTANT PLAY function on the computer allows you to play a DVD video and audio CD without starting up Windows. Using INSTANT PLAY INSTANT PLAY enables the computer to play a DVD video and audio CD without booting up Windows. - Page 103 Insert a DVD video or audio CD in the optical drive. (Refer to the Inserting Disc section of the Using Optical Drive in Chapter 1.) • When the DVD or CD disc is ready, it will be automatically played back. •...
- Page 104 Watching DVD Video INSTANT PLAY enables you to watch a DVD video without starting Windows. Remote Control Operation This section describes how to operate the remote control to watch a DVD video. To connect the remote control to the computer, refer to the Connecting Remote Control section in Chapter 1.
- Page 105 Keyboard Operation This section describes how the keyboard works on INSTANT PLAY for DVD video viewing. A key Moves to the previous chapter. S key Moves to the next chapter. D key Fast rewind play rotating among 2x, 4x, 8x, 20x, and 30x F key Fast forward play rotating among 2x, 4x, 8x, 20x, and 30x Z key...
- Page 106 Using Title Menu/Root Menu A DVD video supporting a title menu or root menu allows you to select menu options. To display the title menu or root menu, follow these steps. The supported menu name (such as title menu, root menu) and menu options vary depending on DVD videos.
- Page 107 : Increases the volume. : Mutes the volume. To resume, press it again. : Decreases the volume. Keyboard Operation This section describes how the keyboard works on INSTANT PLAY for audio CD playback. A key Moves to the previous track. S key Moves to the next track.
-
Page 108: Instant Play Setup Menu
INSTANT PLAY Setup Menu You can change the basic settings of INSTANT PLAY in the setup menu. It also provides timer settings, called sleep timer, automatically to shut down INSTANT PLAY. Displaying and Changing Setting of Setup Menu Press the Ctrl key and hold it, then, press the Esc key to display the setup menu. Use ↑... - Page 109 key to open the menu. • To hide the setup menu, press the Ctrl+Esc keys again. • With the setup menu displayed, the selected keys for INSTANT PLAY operation and remote control are disabled. Using Sleep Timer The duration of time to shut down INSTANT PLAY can be set in the setup menu. Press the Ctrl key and hold it, then, press the Esc key.
-
Page 110: Appendixes
Appendixes The appendixes contain additional information on the use and care of the computer. Memory Module You can upgrade the memory size of the computer by changing the preinstalled memory module to a commercially available module. See the specification on the provided supplement for the default and maximum memory size. - Page 111 Loosen the screws and remove the cover. Screws Cover Slightly bend both latches outwards until the memory module is released. Latches Memory Module Pull out the memory module straightly.
- Page 112 Align the notched part of a new module to the projecting part of the socket and then, insert the module until it is seated. Projecting Part Notched Part Memory Module Memory socket Softly press the module to place it into the socket, matching the notched parts of the module to the projecting parts of the socket.
- Page 113 Match the tabs of the cover with the notched parts of the computer, insert the cover until it is seated and then, put it down into the original position. 10. Tighten the screws. Screws 11. Install the battery pack, turn over the computer and connect the AC adapter. 12.
-
Page 114: Maintenance And Care
Maintenance and Care This section provides you with information on how to maintain the computer in excellent working condition. Using Security Cable You can connect a commercial security cable to the security slot on the computer to prevent theft. Security Slot Security Cable Connect the cable to a fixed object to ensure... -
Page 115: Traveling With Your Computer
Screen The surface of the screen may become dirty and accumulate dust during use. Avoid touching the screen with your fingers when using the system. Gently wipe the surface of the screen with a soft cloth that has been dipped in a mild detergent solution and squeezed dry. -
Page 116: Virus Protection
Virus Protection Computer viruses are programs written intentionally to enter a computer without the user’s permission or knowledge. When the computer is infected, several types of damage may occur; data in the hard disk may be destroyed; the computer may be provided external operation by unauthorized users;... - Page 117 Click start – Control Panel – Security Center. In the Security Center window, click the Turn on Automatic Updates button. Close the window. Updating Windows You can update Windows by clicking the Windows Update icon on the taskbar or accessing to the Microsoft site. For more information, visit the Windows Help and Support Center.
- Page 118 Running LiveUpdate Automatically The Automatic LiveUpdate automatically updates the definition file. Be sure to complete the Norton AntiVirus wizard before going on these steps. Click start – All Programs – Norton AntiVirus – Norton AntiVirus 2004. Click Automatic LiveUpdate in the Norton AntiVirus Subscription field. Click the Enable button.
-
Page 119: Data Execution Prevention
Data Execution Prevention The computer features a CPU that is compatible with Data Execution Prevention (DEP) technology (or a memory protection feature) built into the Windows operating system. With DEP, the operating system marks some memory regions as non- executable and prevents execution of malicious program code there, which will result in protecting the computer from virus infection. - Page 120 • Be sure to enable all the functions above. • For the Security Center, refer to the Notice of Computer Security on page xiii. Scan the system for viruses. • If some viruses are detected, eliminate them according to the instructions of the anti-virus software.
-
Page 121: Data Backup And Restore
Data Backup and Restore Your important data such as e-mails or files is stored on the hard disk of the computer. Backing up the data in another place is one of the ways that protect your data against any disaster, data corruption or data erase, for example. Backing Up Your Data The File and Settings Transfer Wizard can help you to back up several files and settings at one time. -
Page 122: Re-Installation Instructions
Re-installation Instructions Refer to this section to re-install the system of the computer. • The reinstallation process will overwrite all information in the C and D drives of the hard disk and restore the hard disk drive to its factory configuration. - Page 123 computer. This License authorizes you to use the Software for disaster recovery purposes only, to restore the hard disk image contained on the CD to the computer with which the CD and Software were originally shipped. 3. NONPERMITTED USES. Without the express permission of PowerQuest, you may not (a) use, copy, modify, alter, or transfer, electronically or otherwise, the Software or documentation except as expressly permitted in this License Agreement, or (b) translate, reverse program, disassemble, decompile, or otherwise reverse engineer the Software.
- Page 124 8. NO WAIVER. Any failure by either party to this agreement to enforce a specific part of the agreement in a specific situation is not a waiver of rights under the agreement. The party may still enforce the rest of the agreement in that situation and may still enforce some or all of the agreement in other situations.
-
Page 125: Backing Up Data
When you recover after preparing the recovery CD: • Operation Manual • The created recovery CDs Backing Up Data Before formatting the hard disk, you should back up your data. For details on how to back up your data, refer to Data Backup and Restore section on the earlier page. Selecting Way to Recover Your System The computer is configured with two drives (C: and D:) when it is shipped from the factory. - Page 126 Via Hard Disk With this way, recovery will come from data already installed on the computer rather than from external media such as CD. Note that if there is any chance of the data loss or corruption, you cannot format the hard disk drive(s) and reinstall Windows. Make sure the computer is turned off.
- Page 127 Although the pointer may be shown on the screen, never touch the keyboard or the mouse during recovery except when the message prompts you to. If you touch them, the re-installation will be canceled. 10. When the hard disk has been recovered successfully, the system will restart automatically.
- Page 128 Limitation of Liability: In no event shall ECI or Sharp be liable for any special, incidental, indirect, or consequential damages, or for damages for loss of business profits, business interruption, loss of business information, or other pecuniary loss, even if ECI or Sharp has been advised of the possibility of such damages.
- Page 129 Before creating the recovery CD, follow the instructions below: • Prepare five blank 650MB or 700MB CD-R discs. • Connect the AC adapter. If the battery is discharged, the operation will stop and fail. • Disable the power management. See Power Management section in Chapter 2.
- Page 130 If a dialog box or window appears, close it. Click start – All Programs – Create Product Recovery CD. In the Bootable CD Creator SE1.1 window, select the appropriate speed from the speed pull-down menu, then, click Create Recovery Disc. Read the message on the screen and then, click Yes, then, OK.
- Page 131 Click OK. Click OK. The icon ( ) will change to ( Turn off the computer. After more than ten seconds, turn it on again. Recovering with Recovery CD The first four created discs will be used for recovering the system. The last disc has application software.
- Page 132 When you select Recovers both C: and D: drive, the recovery process will delete the recovery data installed in the hard disk. Therefore you will not be able to recover your system from the hard disk. When you select Recovers both C: and D: drive, reinstall the INSTANT PLAY after completing the recovering process.
- Page 133 In the Exit menu, confirm Exit Saving Changes is highlighted and press Enter twice. The system will restart. In the InstantON screen, confirm English is highlighted and then, press Enter. When the message Installation Complete appears, press Enter. The optical drive will automatically open. Remove the CD-ROM.
-
Page 134: Troubleshooting
If you still have a problem after trying all the suggested remedies in this chapter, contact your dealer or call: 1-800-BE-SHARP(237-4277). The problems that you might encounter can be divided into two basic categories: hardware and software. -
Page 135: Trouble When Starting
Trouble when Starting Why doesn't the power indicator or the battery indicator turn on? • Make sure the AC adapter is correctly connected to the AC adapter jack of your computer. • Make sure the AC power cable is correctly connected to a live wall outlet. Connect another electric equipment to the wall outlet and check whether it is live or not. -
Page 136: Trouble With Display
Press F2 key while the message Press <F1> to resume, <F2> to setup is appearing. In the Exit menu, select Load Setup Defaults and press the Enter key to retrieve the default value. Confirm Yes is highlighted and then, press the Enter key. Set the desired values in the Setup Utility or just leave the default value. - Page 137 Why does the external monitor display nothing/why is the image on it distorted? • Confirm the monitor is turned on. • Confirm the monitor is connected correctly. • Make sure the external monitor is selected as the output display by pressing Fn+F5 ( •...
-
Page 138: Trouble With Keyboard/Touchpad
Trouble with Keyboard/Touchpad Why doesn't the keyboard or the touchpad function? • Try the following in this order: Press Ctrl+Alt+Delete and select the Applications tab of the Windows Task Manager dialog box. Click the program name that hangs up, then, End Task. If this does not solve the problem, select the User tab click Disconnect or Logoff of the Windows Task Manager dialog box, then Yes. -
Page 139: Trouble With Hard Disk
• Confirm the drive or file name is correct. • The floppy disk may not be formatted or could be corrupted. Format the disk or use another disk. • If you cannot write to a floppy disk, the disk may be write-protected. Eject the disk and ensure that the write-protect tab covers the detection hole. - Page 140 Why does not the drive open? • Confirm your computer is turned on. • When your computer is turned off, insert a fine rod into the drive tray ejection hole. Ejection Hole Why can’t I play the disc? • Confirm the disc is properly set onto the optical drive. •...
-
Page 141: Trouble With Communication
• In the mobile mode, an irregular motion or frame dropouts may be produced on the animation. Switch to the normal mode. • During playback on INSTANT PLAY, you may experience a picture with an irregular motion, or frame drops. Why isn’t the optical drive recognized? •... - Page 142 Why is the access speed so slow? • Close the currently running applications. • Try to connect another ISP (Internet Service Provider), or try to connect in some other time. Why can't I access the LAN? • Confirm the cable is properly connected to the LAN jack and the network hub. •...
- Page 143 • When you have more than one access points, your computer may be connected to other than right one you want to access. Follow the steps below. Right-click the Wireless Network Connection icon ( ) on the taskbar; then, click View Available Wireless Networks. Select the desired network in the Available wireless networks list;...
- Page 144 • Adjust the distance between your computers by bringing your computer closer to others and remove any obstructions that may impede the communication; then, try to connect again. • Confirm the IP address and the subnet mask of each computer are set correctly. •...
-
Page 145: Trouble With Peripherals
Trouble with Peripherals Why don't peripheral devices function? • Confirm they are correctly connected to your computer. • Confirm they are Windows XP compliant. • Confirm drivers necessary for the devices are installed. Why can't I print? • Make sure the printer is turned on. •... - Page 146 • Confirm your host computer is running Windows Me, Windows 2000 or Windows • Start Windows on the MP series, exit it to turn off the MP series and then, connect it to the host computer if you remove both of the AC adapter and battery pack. •...
-
Page 147: Trouble With Instant Play
Why aren’t the icons in My Computer window shown properly? • The peripheral devices connected to your host computer may cause it. Press the F5 key. (This may not work properly due to the setting condition or the installed operating system in your host computer.) Why does a message Please insert a disk drive…. -
Page 148: Trouble With Security Settings
Trouble with Security Settings Why do I have the message “Your computer might be at risk” each time I boot my computer? • If you have the message “Automatic Updates is turned off” addition to the above message, turn on the Automatic Updates to enable your computer periodically to update Windows. - Page 149 Enter the URL to be permitted in the Address of Web site to allow field and then, click Add. Why do I get the message This site might require the following AntiveX control in the information bar? • The Microsoft Internet Explorer restricts display of active contents. You can display the contents by following these steps.
- Page 150 CDs and in the DRIVERS folder on your computer. To open the folder; 1. Click start – My Computer. 2. Double-click SHP_V2600U(C:) – Program Files – SHARP – DRIVERS. • The applications are stored on the fifth recovery disc if you have created the recovery CDs.
- Page 151 What is the serial number for WordPerfect® Office 12? • When installing the WordPerfect® Office 12 from the created CD, you must enter the following serial number to complete the installation. Serial Number: WO12WRX-0000027-NDQ T-18...
-
Page 152: Index
Index AC adapter Data execution prevention connecting, 1-1 changing settings, A-10 using, 1-5 checking programs, A-10 Account disabling, A-11 creating, 1-24 DirectHD Utility switching, 1-24 installing DirectHD utility, 6-2 Antenna, 4-14 connecting to host computer, 6-4 Application disconnecting from host computer, 6-6 installing, A-24 password function, 6-7 Audio... -
Page 153: Network Setup Utility
File sharing copying, 4-10 configuring network, 4-7 sharing, 4-9 configuring unit, 4-6 Floppy disk connecting to network, 4-5 ejecting, 3-5 removing cable, 4-6 formatting, 3-5 troubleshooting, T-9 handling, 3-4 inserting, 3-4 troubleshooting, T-5 Floppy disk drive (external) Memory module, A-1 connecting, 3-3 Modem removing, 3-5... - Page 154 external display, 3-6 supporting, 2-10 headphones, 3-10 Status indicators, xxii PC cards, 3-12 printer, 3-15 speaker, 3-9 troubleshooting, T-12 Touchpad USB device, 3-11 changing configuration, 1-9 Power clicking and double-clicking, 1-8 choosing AC or battery, 1-4 drag and drop, 1-8 indicator, 1-3, 5 enabling, 1-7 Power management...
- Page 155 Index-2...