Yamaha HTR-6040 Owner's Manual
Yamaha htr-6040: user guide
Hide thumbs
Also See for HTR-6040:
- Quick connect manual (2 pages) ,
- Service manual (95 pages) ,
- Service manual (94 pages)
Table of Contents
Advertisement
Advertisement
Table of Contents

Related Manuals for Yamaha HTR-6040


Summary of Contents for Yamaha HTR-6040
- Page 1 HTR-6040 AV Receiver OWNER’S MANUAL...
-
Page 2: Important Safety Instructions
IMPORTANT SAFETY INSTRUCTIONS Important safety instructions CAUTION RISK OF ELECTRIC SHOCK DO NOT OPEN CAUTION: TO REDUCE THE RISK OF ELECTRIC SHOCK, DO NOT REMOVE COVER (OR BACK). NO USER-SERVICEABLE PARTS INSIDE. REFER SERVICING TO QUALIFIED SERVICE PERSONNEL. • Explanation of Graphical Symbols The lightning flash with arrowhead symbol, within an equilateral triangle, is intended to alert you to the presence of uninsulated “dangerous voltage”... - Page 3 This product, when installed as indicated in the instructions contained in this manual, meets FCC requirements. Modifications not expressly approved by Yamaha may void your authority, granted by the FCC, to use the product. 2 IMPORTANT: When connecting this product to accessories and/or another product use only high quality shielded cables.
- Page 4 12 Only voltage specified on this unit must be used. Using this unit with a higher voltage than specified is dangerous and may cause fire, damage to this unit, and/or personal injury. Yamaha will not be held responsible for any damage resulting from use of this unit with a voltage other than specified.
-
Page 5: Table Of Contents
Information on jacks and cable plugs ... 14 Connecting video components... 15 Connecting audio components... 17 Connecting a Yamaha iPod universal dock ... 18 Using the VIDEO AUX jacks on the front panel ... 18 Connecting the FM and AM antennas ... 19 Connecting the power cable... -
Page 6: Features
XM Satellite Radio broadcasts in multi-channels, resulting in a full surround sound experience iPod controlling capability ◆ DOCK terminal to connect a Yamaha iPod universal dock (YDS-10, sold separately), which supports iPod (Click and Wheel), iPod nano, and iPod mini ◆... -
Page 7: Getting Started
■ Checking the supplied accessories Check that you received all of the following parts. Remote control Batteries (2) (AA, R06, UM-3) CODE SET TRANSMIT POWER POWER STANDBY POWER MULTI CH IN AUDIO SEL CD-R TUNER DOCK V-AUX SOURCE TV VOL TV CH VOLUME TV MUTE... -
Page 8: Quick Start Guide
Quick start guide The following steps describe the easiest way to enjoy DVD movie playback in your home theater. Front right speaker Video monitor Subwoofer Front left speaker Center speaker DVD player Surround left speaker Step 1: Set up your speakers Step 2: Connect your DVD player and other components Step 3: Turn on the power and... -
Page 9: Step 1: Set Up Your Speakers
SUBWOOFER OUTPUT jack of this unit. Subwoofer Input jack Quick start guide Insert Tighten Front left speaker To the surround left speaker To the center speaker AV receiver OUTPUT (PLAY) CD-R (REC) WOOFER SUBWOOFER OUTPUT jack Subwoofer cable... -
Page 10: And Other Components
Composite video output jack Connect the video cable to the video input jack of your video monitor and the VIDEO MONITOR OUT jack of this unit. AV receiver Video input jack DVD DIGITAL INPUT COAXIAL jack AV receiver DVD player... - Page 11 • Connecting a CD player and an MD recorder • Connecting a DVD player via analog multi-channel audio connection • Connecting a Yamaha iPod universal dock • Using the VIDEO AUX jacks on the front panel Close the lever • Connecting an outdoor FM/AM antenna •...
-
Page 12: Step 3: Turn On The Power And Press Scene 1 Button
Quick start guide Step 3: Turn on the power and press SCENE 1 button Check the type of the connected speakers. If the speakers are 6 ohm speakers, set “SP IMP.” to “6Ω MIN” before using this unit (see page 13). Turn on the video monitor connected to this unit. -
Page 13: What Do You Want To Do With This Unit
Case C: “I want to listen to a music program from the FM radio station...” Press F SCENE 4 (or F SCENE 4) to select “Radio Listening”. Notes • To use the “Radio Listening” template (Case C), you must tune into the desired radio station in advance. See pages 38 to 40 for tuning information. -
Page 14: Connections
Connections Rear panel COMPONENT VIDEO DOCK DTV/CBL MONITOR S VIDEO DIGITAL INPUT OPTICAL VIDEO MULTI CH INPUT FRONT SURROUND CENTER DTV/ COAXIAL SUBWOOFER 1 DOCK terminal See page 18 for connection information. 2 XM jack (U.S.A. and Canada models only) See page 41 for connection information. -
Page 15: Placing Speakers
Subwoofer (SW) The use of a subwoofer with a built-in amplifier, such as the Yamaha Active Servo Processing Subwoofer System, is effective not only for reinforcing bass frequencies from any or all channels, but also for high fidelity sound reproduction of the LFE (low-frequency effect) channel included in Dolby Digital and DTS sources. -
Page 16: Connecting Speakers
Connections Connecting speakers Be sure to connect the left channel (L), right channel (R), “+” (red) and “–” (black) properly. If the connections are faulty, this unit cannot reproduce the input sources accurately. Caution • Before connecting the speakers, make sure that this unit is turned off (see page 19). •... -
Page 17: Setting The Speaker Impedance (U.s.a. And Canada Models Only)
■ Before connecting to the SPEAKERS terminal A speaker cord is actually a pair of insulated cables running side by side. Cables are colored or shaped differently, perhaps with a stripe, groove or ridges. Connect the striped (grooved, etc.) cable to the “+” (red) terminals of this unit and your speaker. -
Page 18: Information On Jacks And Cable Plugs
Connections Information on jacks and cable plugs Audio jacks and cable plugs DIGITAL AUDIO AUDIO COAXIAL (White) (Red) (Orange) Left and right Coaxial analog audio digital audio cable plugs cable plug ■ Audio jacks This unit has three types of audio jacks. Connection depends on the availability of audio jacks on your other components. -
Page 19: Connecting Video Components
Connecting video components Connect the video components as follows. You can also connect a video monitor, DVD player, digital TV, and cable TV to this unit using the S VIDEO or COMPONENT VIDEO connections (see page 16). ■ Connecting a video monitor and a DVD player COMPONENT VIDEO DOCK... - Page 20 Connections ■ Connecting to the COMPONENT VIDEO or S VIDEO jacks You can enjoy high-quality pictures by connecting your video monitor and video source components to this unit using COMPONENT VIDEO or S VIDEO connections. Note Be sure to connect your video components in the same way you connect your video monitor to this unit. For example, if you connect your video monitor to this unit using a COMPONENT VIDEO connection, connect your video components to this unit using the COMPONENT VIDEO connection.
-
Page 21: Connecting Audio Components
Connecting audio components Connect the audio components as follows. ■ Connecting a CD player and a CD recorder/MD recorder Note When you connect your CD player via analog and digital connection, priority is given to the signal input at the DIGITAL INPUT jack. -
Page 22: Connecting A Yamaha Ipod Universal Dock
AC wall outlets. This unit is equipped with the DOCK terminal on the rear panel that allows you to connect a Yamaha iPod universal dock (YDS-10, sold separately) where you can station your iPod and control playback of your iPod using the supplied remote control. -
Page 23: Connecting The Fm And Am Antennas
• A properly installed outdoor antenna provides clearer reception than an indoor one. If you experience poor reception quality, install an outdoor antenna. Consult the nearest authorized Yamaha dealer or service center about outdoor antennas. • The AM loop antenna should always be connected, even if an outdoor AM antenna is connected to this unit. -
Page 24: Front Panel Display
(see page 36). 5 DOCK indicator Lights up when you station your iPod in a Yamaha iPod universal dock (YDS-10, sold separately) connected to the DOCK terminal of this unit (see page 18) and you select V-AUX as the input source. -
Page 25: Using The Remote Control
■ Using the remote control The remote control transmits a directional infrared ray. Be sure to aim the remote control directly at the remote control sensor on this unit during operation. VOLUME OPTIMIZER MIC STANDBY EDIT SEARCH MODE CATEGORY DISPLAY FM/AM A/B/C/D/E PRESET/TUNING/CH... -
Page 26: Optimizing The Speaker Setting For Your Listening Room
Optimizing the speaker setting for your listening room Optimizing the speaker setting for your listening room This unit employs the YPAO (Yamaha Parametric Room Acoustic Optimizer) technology which lets you avoid troublesome listening-based speaker setup and achieves highly accurate sound adjustments automatically. The supplied optimizer microphone collects and this unit analyzes the sound your speakers produce in your actual listening environment. - Page 27 Set the operation mode selector (K) to AMP and then press D l / h to select “AUTO”. Choices: AUTO, RELOAD, UNDO, DEFAULT • Select “AUTO” to automatically run the entire “AUTO SETUP” procedure. • Select “RELOAD” to reload the last “AUTO SETUP”...
- Page 28 Optimizing the speaker setting for your listening room Press D ENTER to display the setup results in detail. Press D l / h repeatedly to toggle between the setup result displays. Results of the speaker connection and wiring Results of the speaker distance from the listening position Results of the speaker...
- Page 29 ■ If an error screen appears Press D k / n / l / h to select “RETRY” or “EXIT” and then press D ENTER. The following display is an example where “E-5:USER CANCEL” appears in the OSD. AUTO:ERROR . E-5:USER CANCEL Don't operate any function >...
-
Page 30: Selecting The Scene Templates
SELECTING THE SCENE TEMPLATES Selecting the SCENE templates This unit is equipped with 16 preset SCENE templates for various situations of using this unit. As the initial factory setting, the following SCENE templates are assigned to each SCENE button: SCENE 1: DVD Viewing SCENE 2: Disc Listening SCENE 3: TV Viewing SCENE 4: Radio Listening... - Page 31 41). To enjoy listening to your iPod, you need to connect the Yamaha iPod universal dock (sold separately) to this unit (see page 18). You can create your original SCENE templates by editing the preset SCENE templates. See page 29 for details.
- Page 32 5ch Stereo Select this SCENE template when you play video games. You can select “V-AUX” as the input source even if iPod is stationed to the Yamaha Universal Dock connected to this unit. CD Listening 2ch Stereo CD Music Listening...
-
Page 33: Creating Your Original Scene Templates
Creating your original SCENE templates You can create your original SCENE templates for each SCENE button. You can refer to the preset 16 SCENE templates to create the original SCENE templates. ■ Customizing the preset SCENE templates Use this feature to customize the preset SCENE templates. Create the original SCENE Select a SCENE template SCENE template library... -
Page 34: Playback
PLAYBACK Caution Extreme caution should be exercised when you play back CDs encoded in DTS. If you play back a CD encoded in DTS on a DTS-incompatible CD player, you will only hear some unwanted noise that may damage your speakers. Check whether your CD player supports CDs encoded in DTS. -
Page 35: Additional Operations
Additional operations ■ Selecting the component connected to the MULTI CH INPUT jacks as the input source Press D INPUT l / h repeatedly (or press A MULTI CH IN) so that “MULTI CH” appears in the front panel display. Use “MULTI CH SET”... -
Page 36: Adjusting The Tonal Quality
Playback ■ Enjoying pure hi-fi stereo sound The DIRECT STEREO mode allows sources to bypass the decoders and DSP processors of this unit so that you can enjoy pure hi-fi sound from 2-channel PCM and analog sources. Press C DIRECT STEREO (or set the operation mode selector (K) to AMP and then press T DIRECT ST.) to select “DIRECT STEREO”. -
Page 37: Selecting The Night Listening Mode
■ Selecting the night listening mode The night listening modes are designed to improve listenability at lower volumes or at night. Set the operation mode selector ( K ) to AMP and then press R NIGHT repeatedly to select “NIGHT:CINEMA” or “NIGHT:MUSIC”. Choices: NIGHT:CINEMA, NIGHT:MUSIC, OFF •... -
Page 38: Muting The Audio Output
Playback ■ Playing video sources in the background You can combine a video image from a video source with sound from an audio source. For example, you can enjoy listening to classical music while viewing beautiful scenery from the video source on the video monitor. Press the input selector buttons on the remote control to select a video source and then an audio source. -
Page 39: Sound Field Programs
This unit is equipped with a variety of precise digital decoders that allow you to enjoy multi-channel playback from almost any stereo or multi-channel sound source. Press A PROGRAM l / h (or set the operation mode selector ( K ) to AMP and then press one of the sound field program selector buttons ( P ) repeatedly). -
Page 40: Enjoying Unprocessed Input Sources
Sound field programs ■ Enjoying 2-channel sources using the standard decoders Signals input from 2-channel sources can also be played back on multi-channels. Set the operation mode selector ( K ) to AMP and then press Q SUR. DECODE repeatedly to select a decoder. - Page 41 ■ Editing sound fields parameters You can enjoy good quality sound with the factory preset parameters. Although you do not have to change the initial settings, you can change some of the parameters to better suit the input source or your listening room. While listening to a source, set the operation mode selector (K) to AMP and then press Dk / n to select the desired parameter.
-
Page 42: Fm/Am Tuning
FM/AM TUNING There are 2 tuning methods: automatic and manual. Automatic tuning is effective when station signals are strong and there is no interference. If the signal from the station you want to select is weak, tune into it manually. You can also use the automatic and manual preset tuning features to store up to 40 stations. -
Page 43: Automatic Preset Tuning
Automatic preset tuning You can use the automatic preset tuning feature to store FM stations with strong signals up to 40 (A1 to E8: 8 preset station numbers in each of the 5 preset station groups) of those stations in order. You can then recall any preset station easily by selecting the preset station number. -
Page 44: Selecting Preset Stations
FM/AM tuning Selecting preset stations You can tune into any desired station simply by selecting the preset station group and number under which it was stored. When performing this operation with the remote control, set the operation mode selector ( K ) to SOURCE and then press A TUNER to select “TUNER”... -
Page 45: Xm Satellite Radio Tuning
XM Satellite Radio tuning XM Satellite Radio offers an extraordinary variety of commercial-free music, plus the best in sports, news, talk and entertainment. XM is broadcast in superior digital audio from coast to coast. From rock to reggae, from classical to hip hop, XM has something for every music fan. -
Page 46: Activating Xm Satellite Radio
XM Satellite Radio tuning Activating XM Satellite Radio Once you have installed the XM Mini-Tuner Dock, inserted the XM Mini-Tuner, connected the XM Dock to ® your XM Ready home audio system, and installed the antenna, you are ready to subscribe and begin receiving XM programming. -
Page 47: Category Search Mode
Before performing operations, set the operation mode selector (K) to SOURCE and then press A XM to select “XM” as the input source. ■ All Channel Search mode Press 2 SEARCH MODE (or N SRCH MODE) repeatedly to select “ALL CH SEARCH”. -
Page 48: Setting Xm Satellite Radio Preset Channels
XM Satellite Radio tuning Setting XM Satellite Radio preset channels You can use this feature to store up to 40 XM Satellite Radio channels (A1 to E8: 8 preset channel numbers in each of the 5 preset channel groups). You can then recall any preset channel easily by selecting the preset channel group and number as described in “Preset Search mode”... -
Page 49: Displaying The Xm Satellite Radio Information
Displaying the XM Satellite Radio information You can display the XM Satellite Radio information (such as channel number, channel name, category, artist name, or song title) for the currently selected channel in the front panel display or in the OSD. Note If a status message or an error message appears in the front panel display or in the OSD, see the “XM Satellite Radio (U.S.A. -
Page 50: Using Ipod
AUDIO OUT (REC) jacks for recording. • Your iPod battery is automatically charged when your iPod is stationed in a Yamaha iPod universal dock connected to the DOCK terminal of this unit as long as this unit is turned on. - Page 51 Set the operation mode selector (K) to SOURCE and then press O DISPLAY on the remote control. The following display appears in the OSD. iPod Playlists Artists Albums Songs Genres Composers Settings Press D k / n / l / h to navigate the iPod menu and then press D ENTER to begin playback of the selected song.
-
Page 52: Recording
RECORDING Recording adjustments and other operations are performed from the recording components. Refer to the operating instructions for those components. Notes • When this unit is set to the standby mode, you cannot record between other components connected to this unit. •... -
Page 53: Set Menu
You can use the following parameters in “SET MENU” to adjust a variety of system settings and customize the way this unit operates. Change the initial settings (indicated in bold under each parameter) to reflect the needs of your listening environment. -
Page 54: Using Set Menu
SET MENU Option menu 3 OPTION MENU Use this menu to manually adjust the optional system parameters. Parameter Adjusts the brightness of the front panel display and the way in which the XM and iPod A)DISPLAY SET information is displayed. B)MEMORY GUARD Locks sound field program parameters and other “SET MENU”... -
Page 55: Sound Menu
1 SOUND MENU Use this menu to manually adjust any speaker settings or compensate for video signal processing delays when using LCD monitors or projectors. ;MANUAL SETUP ;MANUAL SETUP 1 SOUND MENU 1 SOUND MENU . A)SPEAKER SET . F)D. RANGE B)SP LEVEL G)AUDIO SET C)SP DISTANCE... - Page 56 SET MENU Surround left/right speakers SUR. L/R SP Choices: NONE, SML, LRG 1 SOUND MENU A)SPEAKER SET SUR. L/R SP NONE >SML When the surround speakers are large Select “LRG” (large). When the surround speakers are small Select “SML” (small). When you do not use the surround speakers Select “NONE”...
- Page 57 ■ Speaker level B)SP LEVEL Use this feature to manually adjust the output level of each speaker. Control range: –10 to +10 dB Control step: 1 dB Initial setting: 0 dB 1 SOUND MENU B)SP LEVEL - __________ + [ ]/[ ]:Up/Down [ ]/[ ]:Adjust SP LEVEL Adjusted speaker...
- Page 58 SET MENU ■ Center speaker equalizer Use this feature to adjust the built-in 5-frequency band (100Hz, 300Hz, 1kHz, 3kHz and 10kHz) graphic equalizer for the center channel so that the tonal quality of the center speaker matches that of the front speakers. You can make adjustments while listening to the currently selected source component or a test tone.
-
Page 59: Input Menu
Maximum volume MAX VOL. Use this feature to set the maximum volume level. This feature is useful to avoid the unexpected loud sound by mistake. For example, the original volume range is 16 dB to –80 dB. However, when “MAX VOL.” is set to –5 dB, the volume range becomes –5 dB to –80 dB. - Page 60 Initial setting: 0.0 dB Note You can only adjust the value for DOCK when your iPod is stationed in the Yamaha Universal Dock connected to this unit. ■ Decoder mode Decoder select mode Use this feature to designate the default decoder mode for the input sources connected to the DIGITAL INPUT jacks when you turn on the power of this unit.
-
Page 61: Option Menu
■ Multi channel input setup E)MULTI CH SET 2 INPUT MENU E)MULTI CH SET BGV;;;;;;;;;LAST [ ]/[ ]:Select Background Video BGV Use this feature to select the video source played in the background of the sources input at the MULTI CH INPUT jacks. - Page 62 SET MENU ■ Memory guard B)MEMORY GUARD Use this feature to prevent accidental changes to DSP program parameter values and other system settings. Choices: OFF, ON 3 OPTION MENU B)MEMORY GUARD >OFF [ ]/[ ]:Select • Select “OFF” to turn off the “MEMORY GUARD” feature.
-
Page 63: Remote Control Features
In addition to controlling this unit, the remote control can also operate other audiovisual components made by Yamaha and other manufacturers. To control your TV or other components, you must set up the appropriate remote control code for each input source (see page 62). -
Page 64: Controlling This Unit, A Tv, Or Other Components
Remote control features Controlling this unit, a TV, or other components ■ Controlling this unit Set the operation mode selector (K) to AMP to control this unit. CODE SET TRANSMIT POWER POWER STANDBY POWER MULTI CH IN AUDIO SEL CD-R TUNER DOCK V-AUX... -
Page 65: Controlling Other Components
■ Controlling other components to SOURCE to Set the operation mode selector control other components selected with the input selector buttons. You must set the appropriate remote control code for each input source in advance (see page 62). The following table shows the function of each control button used to control other components assigned to each input selector button. -
Page 66: Setting Remote Control Codes
– – Note You may not be able to operate your Yamaha component even if a Yamaha remote control code is preset as listed above. In this case, try setting another Yamaha remote control code. Press one of the input selector buttons (A) on the remote control to select the input area you want to set up. -
Page 67: Resetting All Remote Control Codes
Resetting all remote control codes Use this feature to clear all the remote control codes previously set and reset all of them to the initial factory settings. Press U CODE SET using a ballpoint pen or a similar object. The TRANSMIT indicator on the remote control flashes twice. -
Page 68: Advanced Setup
Advanced setup This unit has additional menus that are displayed in the front panel display. The advanced setup menu offers additional operations to adjust and customize the way this unit operates. Change the initial settings (indicated in bold under each parameter) to reflect the needs of your listening environment. -
Page 69: Troubleshooting
Refer to the table below when this unit does not function properly. If the problem you are experiencing is not listed below or if the instruction below does not help, turn off this unit, disconnect the power cable, and contact the nearest authorized Yamaha dealer or service center. ■ General... - Page 70 Troubleshooting Problem The sound suddenly The protection circuitry has been activated goes off. because of a short circuit, etc. The sleep timer has turned off this unit. The sound is muted. Sound is heard from Incorrect cable connections. the speaker on one side only.
- Page 71 Problem Dolby Digital or DTS The connected component is not set to sources cannot be output Dolby Digital or DTS digital played. (Dolby Digital signals. or DTS indicator in Audio input jack select is set to the front panel “ANALOG”. display does not light up.) A humming sound is...
- Page 72 Troubleshooting ■ Tuner Problem FM stereo reception is The characteristics of FM stereo noisy. broadcasts may cause this problem when the transmitter is too far away or the antenna input is poor. There is distortion, and There is multi-path interference. clear reception cannot be obtained even with a good FM antenna.
-
Page 73: Auto Setup
■ AUTO SETUP Before AUTO SETUP Error message Connect MIC! Optimizer microphone is not connected. Unplug HP! Headphones are connected. During AUTO SETUP Error message E-1:NO FRONT SP Front L/R channel signals are not detected. E-2:NO SUR.SP A surround channel signal is not detected. E-3:NOISY Background noise is too loud. - Page 74 • If a warning message “W-1” appears, corrections are made, but they may not be optimal. • If a warning message “W-2” or “W-3” appears, no corrections are made. • If an error message “E-6” occurs repeatedly, please contact a qualified Yamaha service center. ■ iPod...
-
Page 75: Resetting The System
■ Remote control Problem The remote control Wrong distance or angle. does not work nor function properly. Direct sunlight or lighting (from an inverter type of fluorescent lamp, etc.) is striking the remote control sensor of this unit. The batteries are weak. The operation mode selector (K) is set incorrectly. -
Page 76: Glossary
Glossary ■ Audio information Dolby Digital Dolby Digital is a digital surround sound system that gives you completely independent multi-channel audio. With 3 front channels (front L/R and center), and 2 surround stereo channels, Dolby Digital provides 5 full-range audio channels. -
Page 77: Video Information
Based on a wealth of actually measured data, Yamaha CINEMA DSP uses Yamaha original DSP technology to combine Dolby Pro Logic, Dolby Digital and DTS systems to provide the audiovisual experience of movie theater in the listening room of your own home. -
Page 78: Specifications
Specifications AUDIO SECTION • Minimum RMS Output Power for Front, Center, Surround [U.S.A. and Canada models] 1 kHz, 0.9% THD, 8 Ω ... 100 W [Other models] 1 kHz, 0.9% THD, 6 Ω ... 100 W • Maximum Power for Front, Center, Surround (JEITA) [U.S.A. -
Page 79: Index
Connection, Satellite tuner ...15 Connection, Speaker ...12 Connection, Video components ...15 Connection, Video monitor ...15 Connection, Yamaha iPod universal dock ...18 Controlling a TV, Remote control ...60 Controlling other components, Remote control ...61 Controlling this unit, Remote control ...60 Creating original SCENE templates ...29 CROSSOVER, Speaker settings ...52... - Page 80 Index ■ F)D. RANGE, Sound menu ... 54 Factory presets, Advanced setup ... 64 FL SCROLL, Display settings ... 57 FLAG, Input source information ... 33 FM antenna, Connection ... 19 FM tuning ... 38 FORMAT, Input source information ... 33 FRONT B speaker setting, Speaker settings ...
- Page 81 XM Radio setting ... 58 XM Radio setting, Option menu ... 58 XM Satellite Radio tuning ... 41 XM Satellite Radio, Status message ... 68 ■ Yamaha iPod universal dock, Connection ... 18 Yamaha Parametric Room Acoustic Optimizer ... 22 YPAO ... 22 YPAO (Yamaha Parametric Room Acoustic Optimizer) ...
-
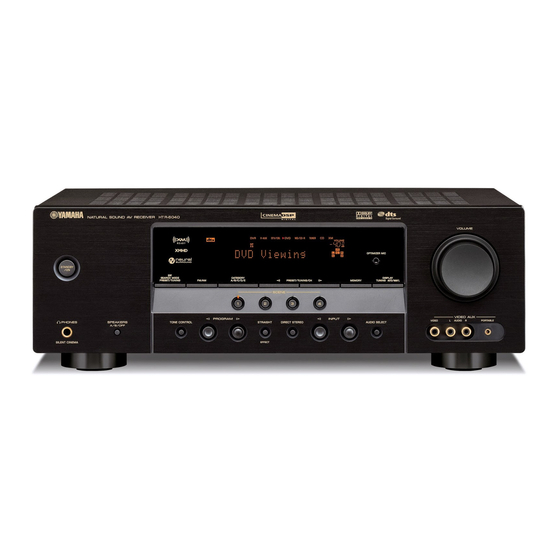
Page 82: Front Panel
■ Front panel STANDBY EDIT SEARCH MODE PRESET/TUNING PHONES SPEAKERS TONE CONTROL A/B/OFF SILENT CINEMA CATEGORY FM/AM A/B/C/D/E PRESET/TUNING/CH SCENE PROGRAM STRAIGHT DIRECT STEREO EFFECT VOLUME OPTIMIZER MIC DISPLAY MEMORY TUNING AUTO/MAN'L VIDEO AUX INPUT VIDEO AUDIO AUDIO SELECT PORTABLE... -
Page 83: Remote Control
■ Remote control CODE SET POWER POWER DOCK V-AUX TV VOL TV MUTE TV INPUT MUSIC ENTERTAIN ENHANCER SUR. DECODE LEVEL TITLE BAND RETURN XM MEMORY TRANSMIT STANDBY POWER MULTI CH IN AUDIO SEL CD-R TUNER SOURCE TV CH VOLUME MUTE MUSIC MOVIE... -
Page 84: List Of Remote Control Codes
List of remote control codes UNITED CABLE CABLE TV RECEIVER 10033 US ELECTRONICS A-MARK 10008, 10144 10237, 10003, 10008, 10033 VIDEOWAY ACCUPHASE 10003 ZENITH ACORN 10237 ACTION 10237 ACTIVE 10237 CABLE/PVR AMERICAST 10899 COMBINATION ARCHER 10237 10276 AMERICAST 10899 BELL SOUTH 10899... - Page 85 CELERA 20765 FISHER CHANGHONG 20156, 20765, 20767, 20783 FORTRESS CINERAL 20092, 20451 FUJITSU CITEK 20047 CITIZEN 20000, 20030, 20054, 20060, 20092, 20171, FUJITSU GENERAL 20180, 20186, 20451, 20463 FUNAI CLARION 20180 CLASSIC 20030, 20092 COLORTYME 20017, 20030, FUTURETECH 20180 20047, 20054, GATEWAY 20060, 20178 COMMERCIAL SOLUTIONS...
- Page 86 20451, 20463, 20623, 20889 WORLD 20180, 20236, 20250 20054, 20060, 20451, 20463 20092, 20150, XR-1000 20154, 20171, 20178, 20179, 20179, 20180 20180, 20186, YAMAHA 20030, 20650, 20463 20769, 21405, 21406, 21407, 21522 20186 YORX 20030 20037 ZENITH 20000, 20017, 20047, 20178...
- Page 87 ASTRA 30035, 30240 GOLDSTAR AUDIOVOX 30037, 30038 AVIS 30000 BEAUMARK 30240 GOODMANS 30037, 30081, BELL & HOWELL 30035, 30048, GRADIENTE 30000 30039, 30000, GRANADA 30104 GRUNDIG BROKSONIC 30184, 30121, 30209, 30348, HARLEY DAVIDSON 31479 CALIX 30037 HARMAN/KARDON CANDLE 30037, 30038 CANON 30035, 30034 HEWLETT PACKARD...
- Page 88 DISNEY 30041, 30038 DIVIDO WHITE WESTINGHOUSE DUAL 30000, 30209 DURABRAND 41127 WORLD 30209 DVD2000 XR-1000 30035, 30240, ELECTROHOME 30000 YAMAHA 30041, 30038 EMERSON ZENITH 30037, 30039, 30033, 30000, ENTERPRISE 40591 30209, 30041, ENTIVO 30034, 31479 ENZER ZT GROUP 31972 FIRSTLINE...
- Page 89 40503, 40539 US LOGIC 40839 SAMSUNG VENTURER 40790 SENSORY SCIENCE VICTOR 41241, 41597 WYSE 41652 SHARP XBOX 40522, 41708 YAMAHA 40490, 40539, 40545, 41282, SONY 42000, 42001 YAMAKAWA 40872 SYLVANIA ZENITH 40503, 40591, TOSHIBA 40741, 40869 VICTOR ZEUS 40784 YAMAHA...
- Page 90 70868, 71685 KAWASAKI OPTIMUS 71063 KENWOOD PANASONIC 71682 PIONEER 71063 SHARP 70861, 71684 SHERWOOD 71067 MAGNAVOX SONY 70490, 71790 YAMAHA 70490, 70888, MARANTZ 72001 MICROMEGA 81189 TAPE DECK MYRYAD AIWA 70197 ONKYO DENON 70076, 70371, 70412 GARRARD 70308, 70309 OPTIMUS...
- Page 91 YAMAHA ELECTRONICS (UK) LTD. YAMAHA HOUSE, 200 RICKMANSWORTH ROAD WATFORD, HERTS WD18 7GQ, ENGLAND YAMAHA SCANDINAVIA A.B. J A WETTERGRENS GATA 1, BOX 30053, 400 43 VÄSTRA FRÖLUNDA, SWEDEN YAMAHA MUSIC AUSTRALIA PTY, LTD. 17-33 MARKET ST., SOUTH MELBOURNE, 3205 VIC., AUSTRALIA...
- Page 92 ■ Front panel STANDBY EDIT SEARCH MODE PRESET/TUNING PHONES SPEAKERS TONE CONTROL A/B/OFF SILENT CINEMA CATEGORY FM/AM A/B/C/D/E PRESET/TUNING/CH SCENE PROGRAM STRAIGHT DIRECT STEREO EFFECT OPTIMIZER MIC DISPLAY MEMORY TUNING AUTO/MAN'L VIDEO AUX INPUT VIDEO AUDIO AUDIO SELECT HTR-6040 VOLUME PORTABLE...
- Page 93 ■ Remote control CODE SET POWER DOCK V-AUX TV VOL TV MUTE MUSIC SUR. DECODE LEVEL TITLE BAND RETURN XM MEMORY TRANSMIT POWER STANDBY POWER MULTI CH IN AUDIO SEL CD-R TUNER SOURCE TV CH VOLUME TV INPUT MUTE ENTERTAIN MOVIE STEREO ENHANCER...