Panasonic ER-CTW1 - Trimmer Head Manual
- Operating instructions manual (107 pages) ,
- Operating instructions (2 pages)
Advertisement
- 1 Parts identification
- 2 How to use
- 3 Removing and mounting the head
- 4 Removing and mounting the comb attachment
- 5 Estimated cutting height
- 6 Trimming beard
- 7 Trimming hair
- 8 Maintenance
- 9 How to clean
- 10 Removing and mounting the blade
- 11 Replacement parts
- 12 Lubrication
- 13 Troubleshooting
- 14 Safety precautions
- 15 Important information
- 16 Documents / Resources
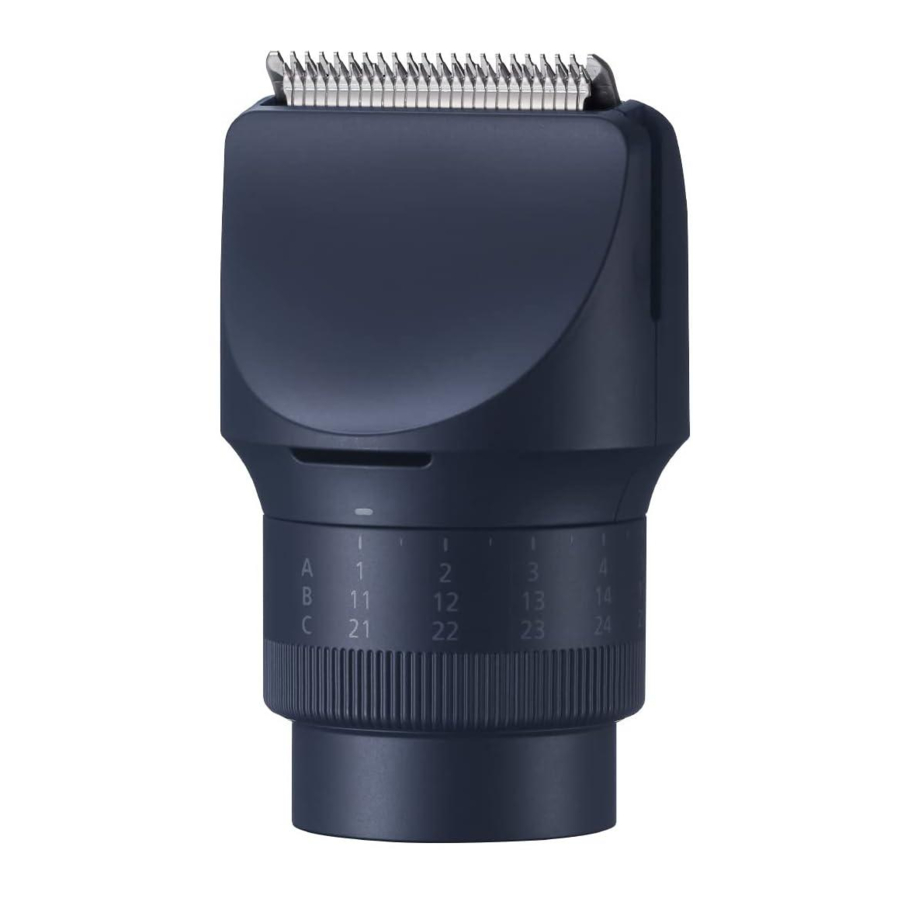
Parts identification

(Fig. 1)
- Head
- Water inlet
- Trimming height indication mark
- Dial (Height adjustment control)
- Water outlet
- Blade
Accessories
- Comb attachment [A] (1 mm [1/32˝] to 10 mm [13/32˝])
- Comb attachment [B] (11 mm [7/16˝] to 20 mm [51/64˝])
- Comb attachment [C] (21 mm [53/64˝ ] to 30 mm [13/16˝ ])
- Comb attachment for body hair [D]
How to use
- Clean the appliance after use.
- Mount the head to the main body until it clicks.
- Mount the desired comb attachment and adjust the trimming height as needed.
- It can also be used without the comb attachment. (Trimming height: approx. 0.5 mm [1/64˝])
- Do not use the comb attachment on wet hair. Wet hair might clump or stick to the skin as it will be difficult to trim.
- Setting of 10.5 mm (27/64˝) and 20.5 mm (13/16˝) is unavailable.
- The trimming height of the comb attachment for body hair cannot be adjusted. This comb attachment trims to a length of approximately 1.5 mm (1/16˝).
- Turn on the power.
 Note
Note
- The use time after a full charge is as follows.
ER-CBL1: 70 minutes
ER-CBN1: 45 minutes
(Based on dry using at 20°C – 30°C [68°F – 86°F])
The operating time may differ depending on the frequency of use and the operating method.
Quick charge (ER‑CBL1 only)
Even though the battery runs out, you can use for 5 minutes after 3-minute charge.
(This will differ depending on usage.)
Removing and mounting the head

(Fig. 2)
- Make sure that the main body is turned off.
Remove the head while pushing the head release button ( ).
).
- Stand the head when it is removed.
Mount the head to the main body until it clicks.
Removing and mounting the comb attachment

(Fig. 3)
- Be careful not to cut your hand with blade.
Remove the comb attachment from the head.
Mount the comb attachment to the head until it clicks.
Estimated cutting height
- Actual hair length will be a little longer than the height you set.
Comb attachment [A]

| Indicator | 1 |  | 2 | | 3 | | 4 | | 5 | | 6 | | 7 | | 8 | | 9 | | 10 | |||||||
| Trimming height (estimate) upper part: mm lower part: inch | 1 | 1.5 | 2 | 2.5 | 3 | 3.5 | 4 | 4.5 | 5 | 5.5 | 6 | 6.5 | 7 | 7.5 | 8 | 8.5 | 9 | 9.5 | 10 | |||||||
| 1/32 | 1/16 | 5/64 | 3/32 | 1/8 | 9/64 | 5/32 | 11/64 | 3/16 | 7/32 | 15/64 | 1/4 | 9/32 | 19/64 | 5/16 | 11/32 | 23/64 | 3/8 | 13/32 | ||||||||
Comb attachment [B]

| Indicator | 11 | | 12 | | 13 | | 14 | | 15 | | 16 | | 17 | | 18 | | 19 | | 20 | |||||||
| Trimming height (estimate) upper part: mm lower part: inch | 11 | 11.5 | 12 | 12.5 | 13 | 13.5 | 14 | 14.5 | 15 | 15.5 | 16 | 16.5 | 17 | 17.5 | 18 | 18.5 | 19 | 19.5 | 20 | |||||||
| 7/16 | 29/64 | 15/32 | 1/2 | 33/64 | 17/32 | 9/16 | 37/64 | 19/32 | 39/64 | 5/8 | 21/32 | 43/64 | 11/16 | 23/32 | 47/64 | 3/4 | 49/64 | 51/64 | ||||||||
Comb attachment [C]

| Indicator | 21 | | 22 | | 23 | | 24 | | 25 | | 26 | | 27 | | 28 | | 29 | | 30 | ||||||||||
| Trimming height (estimate) upper part: mm lower part: inch | 21 | 21.5 | 22 | 22.5 | 23 | 23.5 | 24 | 24.5 | 25 | 25.5 | 26 | 26.5 | 27 | 27.5 | 28 | 28.5 | 29 | 29.5 | 30 | ||||||||||
| 53/64 | 27/32 | 55/64 | 57/64 | 29/32 | 59/64 | 15/16 | 31/32 | 63/64 | 1 | 33/32 | 67/64 | 17/16 | 69/64 | 71/64 | 9/8 | 73/64 | 37/32 | 19/16 | |||||||||||
Trimming beard
Adjusting the beard length

Holding the trimmer with the power switch facing upward, trim by bringing the blade in contact with the skin and moving the trimmer against the flow of the beard.
(Fig. 4‑ )
)
- Hair trimmings may collect inside the comb attachment when a large volume of beard is cut, so discard hair trimmings after each use.
Trimming without the comb attachment/trimming the downy hair
Holding the trimmer with the power switch facing outwards, trim by bringing the blade in contact with the skin.
(Fig. 4‑ )
)
- The trimmer cannot trim hair to lengths less than 0.5 mm (1/64˝).
Beard shaping
Use the trimmer without any comb attachments to properly shape your beard.
- Above and below lips
(Fig. 4‑![]() ‑1)
‑1)
Holding the trimmer with the power switch at the bottom, cut across a line with the blade at a 90° angle to the skin. - Ends of mustache
(Fig. 4‑![]() ‑2)
‑2)
Holding the trimmer with the power switch facing outward, trim gradually from the ends by bringing the blade in contact with the skin. - Sideburns
(Fig. 4‑![]() ‑3)
‑3)
Holding the trimmer with the power switch at the bottom, trim by moving the trimmer downward with the blade at a 90° angle to the sideburns. - Beard
(Fig. 4‑![]() ‑4)
‑4)
Holding the trimmer with the power switch facing outward, trim by bringing the blade in contact with the skin and cutting along a line while moving the trimmer forward.
 ‑1)
‑1)Trimming hair
To maintain sharpness, remove hair trimmings between usages.
Trimming to an even length
(Fig. 4‑ )
)
- Holding the trimmer with the power switch upward, trim by moving the trimmer slowly against the flow of hair and toward the crown of your head.
- Trim slowly while crisscrossing from various directions to avoid missing any spots.
Adjusting the length around the ears and neckline
(Fig. 4‑ )
)
Holding the trimmer with the power switch upward, trim around the ears and neckline (  ) by lifting the tip of the comb attachment little by little from the hairline.
Trimming the downy hair around the neckline
(Fig. 4‑ )
)
Holding the trimmer with the power switch at the bottom, touching the blade perpendicular to the area of downy hair, and move the trimmer downward along the skin.
- It is recommended to ask someone else to trim around your own ears and neckline.
Trimming body hair
(Fig. 4‑ )
)
Trim armpits and bikini lines with the comb attachment for body hair.
- Attach the comb attachment for body hair to the head.
- Holding the trimmer with the power switch at the bottom, trim by bringing the blade in contact with the skin and slowly moving the trimmer in the direction as illustrated.
- The desired results may not be achieved if hair is too long. In this case, trim the hair to a length of about 10 mm (13/32˝) before using the trimmer.
Maintenance
- Make sure that the main body is turned off.
- Lubricate after cleaning and store the head with one of the comb attachments attached.
How to clean
With water
1a. To remove light dirt: Remove the comb attachment, run water down the water inlet.

(Fig. 5)
1b. To remove heavy dirt: Remove the head, comb attachment and blade and rinse them with running water
- Shake up and down several times to remove the water.
- Be careful not to hit the appliance on the sink or any other object while draining the water.
- Wipe off the water with a dry cloth and dry it well.
- It will dry faster with the blade removed.
With the cleaning brush

(Fig. 6)
- Remove the head, comb attachment and blade.
- Brush off any hair trimmings from the head, comb attachment and from around the blade.
- Brush any hair trimmings out from between the stationary blade and the moving blade while pressing down the cleaning lever (
![]() ) to raise the moving blade.
) to raise the moving blade.
 ) to raise the moving blade.
 Notes: Do not wipe with thinners, benzine, alcohol etc. Doing so may cause malfunction, or cracking or discoloration of the parts.
Removing and mounting the blade

Fig. 7
To remove the blade, hold the head, place your thumb against the blades and then push them away from the head. (Fig. 7‑)
To mount the blade, fit the mounting hook ( ) into the blade mounting on the head (
 ) and then push in until you hear a click. (Fig. 7‑
 )
)
Replacement parts
Blade: once every three years
Replacement part is available at your dealer or Service Center.
| Blade | WER9605 |
| Lubrication oil | WES003P |
Lubrication
- Apply the lubrication oil to the blade before and after each use.
- Remove the blade.
- Apply a drop of the lubrication oil to each indicated point.
![]()
(Fig. 8) - Attach the blade to the head, turn on the power and allow it to run for approximately 5 seconds.

Troubleshooting
| Problem | Action |
| The appliance has become blunt. Operating time is short. Appliance stopped functioning. | Until problems are solved, please follow each procedure as follows;
|
| Makes a loud sound. | Clean the blade and apply lubrication oil. |
| Confirm that the blade is properly attached. |
If the problems still cannot be resolved, contact your dealer or a service center authorized by Panasonic for repair.
Personal Care & Beauty Care Products
IN USA CONTACT:
Panasonic Corporation of North America
Two Riverfront Plaza, Newark, NJ 07102-5490
Service • Assistance • Accessories
Call 1‑800‑338‑0552 (In USA)
https://shop.panasonic.com/personal‑care
https://shop.panasonic.com/support
https://www.panasonic.com
Safety precautions
Follow these instructions.
To prevent accidents, injuries or damage to property, please follow the instructions below.
- The following chart indicates the degree of damage caused by improper operation.

Indicates potential hazard that could result in minor injury or property damage
- Protecting the skin
- Do not press the blade firmly against the skin.
- Do not use the appliance for any purpose other than trimming beard, hair and body hair.
- Do not directly apply the blades on ears or rough skin (such as swellings, injuries or blemishes).
- Doing so may cause injury to ears or uneven skin.
- Check the blades are not damaged or deformed before use.
- Failure to do so may cause injury to the skin.
Important information
- Apply the lubrication oil to the blade before and after each use. Failure to apply the lubrication oil may cause the following problems.
- The appliance has become blunt.
- Shorter operating time.
- Louder sound.

Documents / Resources
References
![shop.panasonic.com]() Products
Products![shop.panasonic.com]() Panasonic - Official Consumer Product Support
Panasonic - Official Consumer Product Support![www.panasonic.com]() Panasonic North America | Create Today, Enrich Tomorrow
Panasonic North America | Create Today, Enrich Tomorrow
Download manual
Here you can download full pdf version of manual, it may contain additional safety instructions, warranty information, FCC rules, etc.
Advertisement
Thank you! Your question has been received!


Need Assistance?
Do you have a question about the ER-CTW1 that isn't answered in the manual? Leave your question here.