Black & Decker BDH1600PL,BDH1800PL,BDH2000PL- Cordless Hand Vacuum Manual
- Instruction manual (29 pages) ,
- Instruction manual (29 pages) ,
- Instruction manual (10 pages)
Advertisement
- 1 SYMBOLS
- 2 PRODUCT FEATURES
- 3 ADJUSTING THE NOZZLE
- 4 USE
- 5 CHARGING THE BATTERY
- 6 TO CHARGE THE APPLIANCE
- 7 SWITCHING ON AND OFF
- 8 OPTIMIZING THE SUCTION FORCE
- 9 CLEANING THE FILTERS
- 10 TO REPLACE THE DUST CONTAINER
- 11 CLEANING THE DUST CONTAINER
- 12 TO REPLACE THE DUST CONTAINER
- 13 REPLACING THE FILTER
- 14 MAINTENANCE
- 15 Troubleshooting
- 16 ACCESSORIES
- 17 BATTERY REMOVAL AND DISPOSAL
- 18 SAFETY GUIDELINES - DEFINITIONS
- 19 IMPORTANT SAFETY INSTRUCTIONS
- 20 SAFETY WARNINGS AND INSTRUCTIONS
- 21 Documents / Resources
SYMBOLS
- The label on your tool may include the following symbols. The symbols and their definitions are as follows:

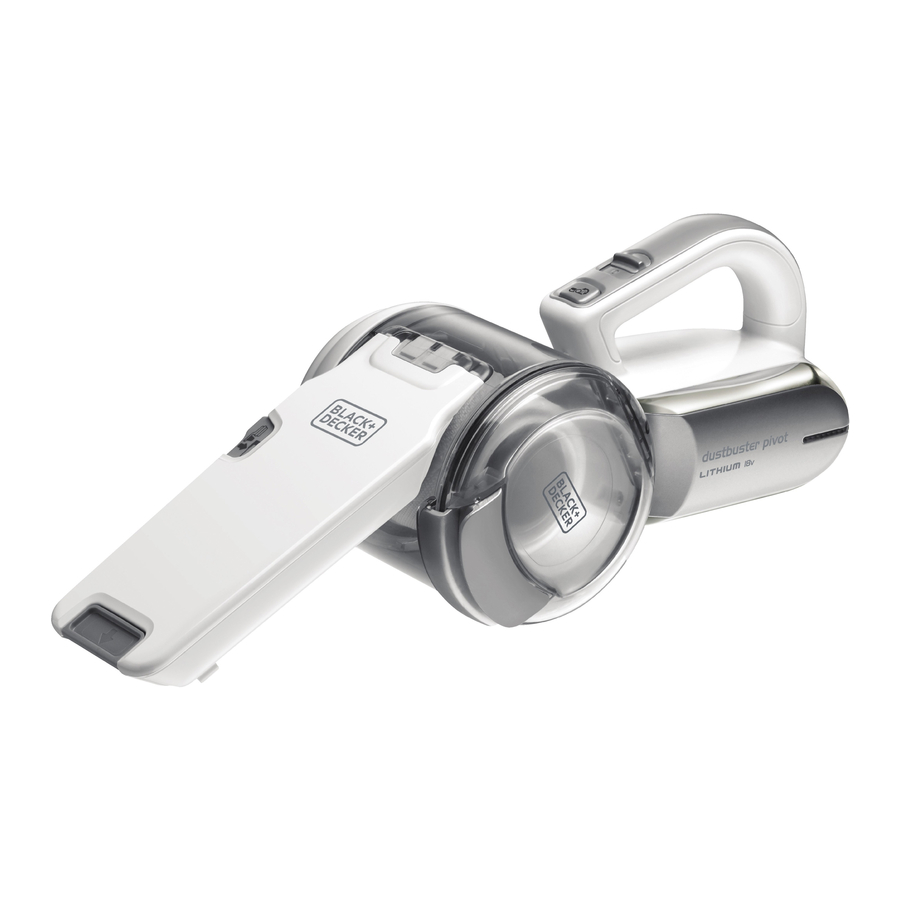
PRODUCT FEATURES

- On/off switch
- Pivot lock button
- Charging indicator
- Nozzle
- Bowl release button
- Crevice tool
- Brush tool
- Dust bowl door
- Dust bowl door release
- Removable dust bowl
- Charging base
ADJUSTING THE NOZZLE

The nozzle (4) has a brush (7) that can be folded forward for dusting and upholstery cleaning.
- The nozzle (4) is stored under the appliance.
- Press the pivot lock button (2) and rotate the nozzle (4) to the required position.
- Release the pivot lock button (2) to lock the nozzle in position
- The nozzle can be extended by pulling the crevice tool (6) until it locks into position.
- The crevice tool can be retracted by pressing the raised button on the crevice tool and pushing the crevice tool back into the nozzle.
- The nozzle should be returned to the storage position under the appliance after use and while charging the appliance.
USE
- Before first use, the battery must be charged for at least 24 hours.
- Plug the appliance into the charger whenever power gets low.
CHARGING THE BATTERY


Charge only at ambient temperatures between 50°F (10°C) and 104°F (40°C). The charger supplied with this product is intended to be plugged in such that it is correctly oriented in a vertical or floor mount position.
TO CHARGE THE APPLIANCE
- Make sure the appliance is switched off. The battery will not be charged with the on/ off On/Off switch (1) in the On position.
- Plug the charging base (11) into a standard 120 Volt 60 Hz electrical outlet.
- Lower the appliance onto the charging base. The blue LED (3) in the base of the appliance will blink to indicate that it is charging.
- When charging is complete, the LED will turn off.
- The charger may become warm during charging. This is normal and does not indicate a problem.
While it is safe to leave the appliance connected to the charger indefinitely, to reduce power consumption, we recommend unplugging the charger after 24 hours.
SWITCHING ON AND OFF

- To switch the appliance on, slide the on/off switch (1) forward to position I.
- To switch the appliance off, slide the on/off switch (1) back to position 0.
OPTIMIZING THE SUCTION FORCE
Rotating the bowl agitates the filter to remove dirt; however, in order to keep the suction force F optimized, the dust container and filters must be cleaned regularly during use.
CLEANING THE FILTERS
Projectile/ Respiratory Hazard: Never use the appliance without the filters. Optimum dust collection will only be achieved with clean filters.

Do not turn appliance on when dust container is removed. Both the plastic pre-filter (12) and the pleated filter (13) are re-usable and should be cleaned regularly.
- Pull the door latch (9), open the transparent door (8) as shown in figure F and empty contents into a waste basket.

- Push and hold the release bowl button (5) on the nozzle.
- Rotate the nozzle toward the bottom of the appliance as shown in figure G.

- Pull the dust container to the side, and away from the base of the appliance.
- Remove the pleated filter from the pre-filter by pulling firmly as shown in figure H.

- Tap the filters vigorously to remove loose dust.
- If necessary, wash the filter (13) in warm, soapy water as shown in figure I.

- Make sure that the filter is dry before refitting it to the appliance.
- Refit the pleated filter into the plastic pre-filter.
- Close the transparent door and make sure it clicks into place.


TO REPLACE THE DUST CONTAINER
- With the filters installed slide the container back onto the base and rotate the handle toward the front of the appliance until an audible click is heard. Ensure that the container is fully fastened back onto the base.
CLEANING THE DUST CONTAINER
Projectile/Respiratory Hazard:
Never use the appliance without the filters. Optimum dust collection will only be achieved with clean filters.
Do not turn appliance on when dust container is removed.
- Push and hold the release bowl button (5) on the nozzle.
- Rotate the nozzle toward the bottom of the appliance as shown in figure j.

- Pull the dust container to the side, and away from the base of the appliance.
- Pull the door latch (9) and open the transparent door (8).
- Remove the pre-filter (12) and filter (13) from the appliance by twisting the filter to the right and pulling it from the appliance as shown in figure K.

- Once filters are removed, wipe the dust container with a damp cloth, or rinse with warm soapy water as shown in figure L and allow to dry.


TO REPLACE THE DUST CONTAINER
- With the filters installed, slide the container back onto the base and rotate the handle toward the front of the appliance until an audible click is heard. Ensure that the container is fully fastened back onto the base.
REPLACING THE FILTER
The filter should be replaced every 6 to 9 months and whenever worn or damaged. A replacement filter is available from your BLACK+DECKER dealer (cat. no. PVF110):
- Remove the old filter as described above.
- Fit the new filter as described above.
MAINTENANCE
Use only mild soap and damp cloth to clean the tool. Never let any liquid get inside the tool; never immerse the main body of the appliance into a liquid.

To assure product SAFETY and RELIABILITY, repairs, maintenance and adjustment (other than those listed in this manual) should be performed by authorized service centers or other qualified service personnel, always using identical replacement parts.
Troubleshooting
| Problem | Possible Cause | Possible Solution |
|
|
|
|
|
|
|
|
For assistance with your product, visit our website www.blackanddecker.com for the location of the service center nearest you or call the BLACK+DECKER help line at 1-800-544-6986.
ACCESSORIES
Recommended accessories for use with your tool are available from your local dealer or authorized service center. If you need assistance regarding accessories, please call: 1-800-544-6986.
The use of any accessory not recommended for use with this tool could be hazardous.
BATTERY REMOVAL AND DISPOSAL
This product uses Lithium Ion rechargeable and recyclable batteries. When the batteries no longer hold a charge, they should be removed from the Vac and recycled. They must not be incinerated or composted.
The batteries can be taken for disposal to a BLACK+DECKER, Company-Owned or Authorized Service Center. Some local retailers are also participating in a national TM recycling program (see "RBRC Seal"). Call your local retailer for details. If you bring the batteries to a BLACK+DECKER Company-Owned or Authorized Service Center, the Center will arrange to recycle old batteries. Or, contact your local municipality for proper disposal instructions in your city/town.
To remove the battery pack for disposal:
- First, before attempting to disassemble the product, turn it on and leave it on until the motor completely stops insuring a complete discharge of the batteries.
- Remove nozzle.
- Using a phillips screwdriver, remove the two exposed screws near the front of handle securing the battery housing.
- Lift the housing cover away from the assembly, exposing the batteries.
- Lift out the battery assembly and detach the lead connection.
- Dispose of batteries as per recommended guidelines.
SAFETY GUIDELINES - DEFINITIONS
It is important for you to read and understand this manual.
The information it contains relates to protecting YOUR SAFETY and PREVENTING PROBLEMS. The symbols below are used to help you recognize this information.

Indicates an imminently hazardous situation which, if not avoided, will result in death or serious injury.
Indicates a potentially hazardous situation which, if not avoided, could result in death or serious injury.
Indicates a potentially haz ard ous situation which, if not avoided, may result in minor or mod er ate injury.
NOTICE: Used without the safety alert symbol indicates potentially hazardous situation which, if not avoided, may result in property damage.
IMPORTANT SAFETY INSTRUCTIONS
When using an electrical appliances, basic precautions should always be followed, including the following: READ ALL INSTRUCTIONS BEFORE USING THE APPLIANCE.
Read all safety warnings and all instructions. Failure to follow the warnings and instructions listed below may result in electric shock, fire and/or serious injury.
Some household dust contains chemicals known to the
State of California to cause cancer, birth defects or other reproductive harm such as asbestos and lead in lead based paint.

To reduce the risk of fire, electrical shock or injury:
- Close supervision is necessary when any appliance is used by or near children. Do not allow to be used as a toy.
![]()
To protect against risk of electrical shock, do not put unit or charging base in water or other liquid.- Do not use dry hand vacs to pick up liquids, toxic substances, flammable or combustible liquids such as gasoline or use in areas where they may be present.
- Do not use wet/dry hand vacs to pick up toxic substances, flammable or combustible liquids such as gasoline or use in areas where they may be present.
- Do not operate in the presence of explosives and/or flammable fumes or liquids.
![]()
Do not operate any appliance with a damaged cord or charger or after the appliance malfunctions, is left outdoors, dropped into water or is damaged in any manner. Return the appliance to any authorized service facility.- Do not use dry hand vacs outdoors or on wet surfaces.
- Do not abuse the cord. Never carry the charger or base by the cord or yank to disconnect from an outlet; instead grasp the charger and pull to disconnect. Keep cord away from heated surfaces. Do not pull cord around sharp edges or corners.
- Do not allow the cord to hang over the edge of a table or counter or touch hot surfaces. The unit should be placed or mounted away from sinks and hot surfaces.
- Do not use an extension cord. Plug the charger directly into an electrical outlet.
- Use the charger only in a standard electrical outlet (120V/60Hz).
- Do not attempt to use the charger with any other product; do not attempt to charge this product with any other charger. Use only the charger supplied by the manufacturer to recharge.
- Keep hair, loose clothing, and all parts of body away from openings and moving parts.
- Do not insert accessories when unit is running.
![]()
Do not handle plug or appliance with wet hands.- Do not put any object into unit openings. Do not use with any openings blocked; keep free of dust, lint, hair, and anything that may reduce air flow.
![]()
Do not vacuum burning or smoking materials, such as lit cigarette butts, matches or hot ashes.- Do not charge the unit outdoors
- Do not use on or near hot surfaces.
- Use extra caution when cleaning on stairs.
- This appliance is intended for household use only and not for commercial or industrial use.
- Use only as described in this manual. Use only manufacturer's recommended attachments.
- Unplug the charger from outlet before any routine cleaning or maintenance.
- This product includes rechargeable Lithium Ion batteries. Do not incinerate batteries as they will explode at high temperatures.
- If battery contents come into contact with the skin, immediately wash area with mild soap and water. If battery liquid gets into the eye, rinse water over the open eye for 15 minutes or until irritation ceases. If medical attention is needed, the battery electrolyte for Lithium Ion batteries is composed of a mixture of liquid organic carbonates and lithium salts.
![]()
Do not look into the air vents when the unit is switched on, as sometimes there is a possibility of small debris being discharged from the air vents, especially after cleaning / replacement of the filters as debris inside the unit can be disturbed. - The charger supplied with this product is intended to be plugged in such that it is correctly orientated in a vertical or floor mount position.

SAFETY WARNINGS AND INSTRUCTIONS
BATTERIES
- Do not disassemble or open, drop (mechanical abuse), crush, bend or deform, puncture, or shred.
- Do not modify or remanufacture, attempt to insert foreign objects into the battery, immerse or expose to water or other liquids, or expose to fire, excessive heat including soldering irons, or put in microwave oven.
- Only use the battery / tool with a charging system specified by the manufacturer/supplier.
- Do not short-circuit a battery or allow metallic or conductive objects to contact both battery terminals simultaneously.
- Dispose of used batteries promptly according to the manufacturer/supplier's instructions.
- Improper battery use may result in a fire, explosion, or other hazard.
- Battery / tool usage by children should be supervised.
CHARGING
- This manual contains important safety and operating instructions.
- Before using battery charger, read all instructions and cautionary warnings on battery charger and product using battery.
![]()
To reduce the risk of injury, use this charger only with this product. Batteries in other products may burst causing personal injury or damage. - Do not expose charger to rain or snow.
- Use of an attachment not recommended or sold by BLACK+DECKER may result in a risk of fire, electric shock, or injury to persons.
- To reduce risk of damage to electric plug and cord, pull by plug rather than cord when disconnecting charger.
- Make sure cord is located so that it will not be stepped on, tripped over, or otherwise subjected to damage or stress.
- An extension cord should not be used unless absolutely necessary. Use of improper extension cord could result in a risk of fire, electric shock or electrocution.
- Use only the supplied charger when charging your tool. The use of any other charger could damage the tool or create a hazardous condition.
- Use only one charger when charging.
- Do not attempt to open the charger. There are no customer serviceable parts inside. Return to any authorized BLACK+DECKER service center.
- DO NOT incinerate the tool or batteries even if they are severely damaged or completely worn out. The batteries can explode in a fire. Toxic fumes and materials are created when lithium ion battery packs are burned.
- Do not charge or use battery in explosive atmospheres, such as in the presence of flammable liquids, gases or dust. Inserting or removing the battery from the charger may ignite the dust or fumes.
- If battery contents come into contact with the skin, immediately wash area with mild soap and water. If battery liquid gets into the eye, rinse water over the open eye for three minutes or until irritation ceases. If medical attention is needed, the battery electrolyte is composed of a mixture of liquid organic carbonates and lithium salts.
SAVE THESE INSTRUCTIONS

Documents / Resources
References
Download manual
Here you can download full pdf version of manual, it may contain additional safety instructions, warranty information, FCC rules, etc.
Download Black & Decker BDH1600PL,BDH1800PL,BDH2000PL- Cordless Hand Vacuum Manual
Advertisement
Thank you! Your question has been received!


Need Assistance?
Do you have a question about the BDH1600PL that isn't answered in the manual? Leave your question here.