Advertisement
Description
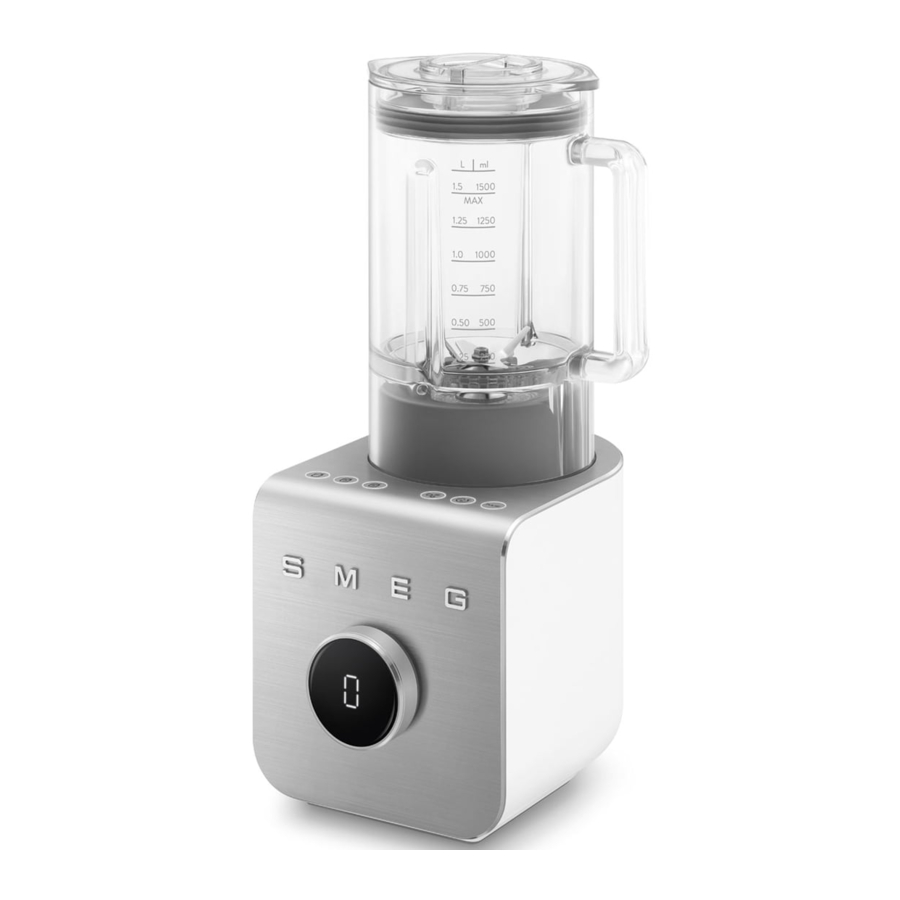
APPLIANCE DESCRIPTION

- Measuring cup.
- Lid with pouring hole.
- 1.5 litre jug.
- ON/OFF key.
- Control panel.
- Control knob and display.
- Motor body.
- Non-slip base.
- Vacuum pump.*
- Vacuum pump cap.*
- Tamper.
- Spatula.
- Cleaning brush.
BEFORE COMMISSIONING
- Remove any labels and stickers from all components and clean the motor base using a damp cloth.
- Remove the jug from the blender. Thoroughly wash and dry all the components (see "Cleaning the parts").
DESCRIPTION OF THE PARTS
- Measuring cup
The cup can be used to measure ingredients (max. 30 ml). - Lid with pouring hole
The lid has a gasket that closes the jug tightly and also a pouring hole in the centre to make the safe addition of ingredients easier along with use of the tamper during blender operation. - Tritan Renew 1.5 litre jug
Jug with a lip and marked in both litres and cups. Minimum capacity of 0.25 litres (1 cup) and maximum of 1.5 litres (6 cups).
- Jug blades
Stainless steel blade unit allows ice cubes to be crushed and the preparation of smoothies, milkshakes, cocktails, soups, etc.
DESCRIPTION OF ACCESSORIES
- Vacuum pump*
Use the vacuum pump to preserve the flavour and texture of the recipe.
Applying vacuum pressure inside the blender jug before mixing green smoothies and vegetable sauces can exalt flavours, texture and improve the overall taste experience.
- Tamper
The tamper can be used to convey the ingredients into the cutting area. Useful for denser and more consistent preparations (e.g. dried fruit butters or frozen desserts). - Spatula
Use the spatula supplied to collect any food residues inside the jug. - Cleaning brush
Use the brush supplied to remove any food residues remaining near to the blades area.
 The accessories that may come into contact with foodstuffs are made using materials that comply with the provisions of the legislation in force.
*Standard on certain models. Also available as optional accessory.
CONTROLS AND DISPLAY
The product has 5 pre-set programs (Smoothie, Green Smoothie, Frozen Dessert, Ice-Crush, Autoclean) and the PULSE function, accessible through the control panel (5).

| Icon | Program |
 (15) | Smoothie |
 (16) | Green Smoothie |
 (17) | Frozen Dessert |
 (18) | Ice-Crush |
 (19) | Autoclean |
| PULSE (20) | Pulse |
- Speed adjustment knob
The knob allows one of the nine manual speeds to be selected and via the display (6 ), to view the blender settings on the display. - For more information, see "Display description".
DISPLAY DESCRIPTION
The display (6) on the knob allows the user to view the functions set on the blender, in detail:
| Icon | Meaning |
 | Stand-by mode |
 | Manual Mode |
 | Timer |
| Count up: in manual mode | |
| Count down: in the pre-set programs | |
 | SINGLE SERVE mode |
 | FAMILY SERVE mode |
Use
- Position the blender on a flat surface and fix the jug (3) to the motor base (7).

- Introduce the ingredients into the jug (3) making sure not to exceed maximum capacity (1.5 litres/6 cups).
- Position the lid (2) with the measuring cup (1) onto the jug (3). Make sure the lid (2) is screwed on tightly.

- To supply or remove voltage to/from the appliance, connect the power cable on the rear of the blender to a current outlet.
- Press the ON button. The button LEDs have a fixed light and the blender is ready for use.


Electrocution hazard
Put the plug into a compliant earthed outlet.
- Do not tamper with the earth.
- Do not use an adapter.
- Do not use an extension.
![burn hazard]()
![shock hazard]()
Failure to comply with these warnings can cause death, a fire or electrocution.


Stand-by mode
Stand-by mode is activated automatically in the following cases:
- after 30 seconds of complete inactivity of the blender;
- if the blender is stopped manually for more than 10 seconds;
- at the end of every pre-set program.
The display shows the Stand-by icon (21) and the button LEDs are off.
- The display shows a flashing "0" by default.
- Select the desired speed using the control knob (6) or a pre-set program by selecting the relative button.
Do not operate at speeds 1-8 for more than 3 minutes continuously.
Additional ingredients can be added during blending by removing the measuring cup (1) and pouring ingredients through the hole in the lid (2).
The appliance has a safety lock system, which stops the motor when the jug is removed. It also features a motor protection device, which trips if the motor is overloaded.
Smooth Start System
Gradual Start System (Smooth Start)
On appliance start-up, the speed progressively increases until the set speed is reached. In this way damage is prevented to the appliance and improved blending is obtained.
The Smooth Start function only operates when a speed between 1 and 9 is selected and does not operate with the PULSE mode or the pre-set programs.
Manual Function
- Turn the knob clockwise to select the desired speed.
- The display shows the selected speed and the icon "M" steady on.
- Press the dial knob ring to start the blender.
- The display will show the time of use (count up) starting from 0:00.
- Turn the knob clockwise to increase speed or anti-clockwise to decrease it. The motor increases or decreases the speed consequently, the display shows the speed selected for 1 second, after which it goes back to showing the advancement of time (COUNT UP).
- To put the blender in PAUSE mode, press the dial knob button, the "COUNT UP" doesn't change. To resume processing, press the dial knob button again.
- To stop processing and return to manual mode, press any key or the knob for 2 seconds.
- After 10 seconds of inactivity, the blender goes automatically into Stand-by.
The speed can be changed at any time in manual mode during the blending process.

After 3 minutes of continuous operation in the speeds between 1 and 8, the blender stops and automatically goes into stand-by.
By activating the blender at speed 9 for a maximum of 6 minutes, soups can be heated from room temperature and after cooking.
For the denser preparations, use the tamper to convey the ingredients into the cutting area.
Single/Family serve mode and preset programs
The Single/Family modes allow the blender to be used with quantities for single portions (SINGLE serve) or multi-portions (FAMILY serve). The Single or Family mode can only be activated with the pre-set Smoothie, Green Smoothie and Frozen Dessert programs. For additional details, consult the "Suggestions for use/Speed settings" table.
Proceed as follows to activate one of the two modes:
- Press the button of 1 of the 3 programs desired. The LED of the button lights up with a fixed light, while the other buttons switch off.
- The display shows the FAMILY SERVE mode icon (25) by default and the pre-set preparation time.
- Turn the knob to select SINGLE SERVE mode. The display shows the icon (24) and the pre-set preparation time.
- Press the dial knob ring to start the program selected. The display shows the time remaining to the end of the cycle (COUNT DOWN).
- The LED of the button selected remains on with a fixed light during the activation cycle, while the other buttons are off.
- The cycle ends automatically and the blender goes into stand-by mode. The display shows the Stand-by icon (21) and the button LEDs are off.
- To PAUSE the blender, press the dial knob ring. The count-down doesn't change and all the keys have a fixed light. Press the dial knob ring again to resume processing.
- To stop the program, press one of the preset function keys or the knob for 2 seconds. The selected button switches on, while all the others are off.
- To change program, press the desired program button.
Proceed as follows to activate the ICE CRUSH program:
- Press the button of the program. The LED of the button lights up with a fixed light, while the other buttons switch off.
- The display shows the pre-set preparation time.
- Press the dial knob ring to start the program. The display shows the time remaining to the end of the cycle (COUNT DOWN).
- The LED of the button selected remains on with a fixed light during the activation cycle, while the other buttons are off.
- The cycle ends automatically and the blender goes into stand-by mode. The display shows the Stand-by icon (21) and the button LEDs are off.
- To PAUSE the blender, press the dial knob ring. The count-down doesn't change and the button of the program selected has a fixed light. Press the dial knob ring again to resume processing.
- To stop the program, press the key of the selected preset program or the knob for 2 seconds. The selected button switches on, while all the others are off.
- To change program, press the desired program button.
Pulse function
The PULSE function can only be activated when in manual mode (speed 1-8) or also autonomously. In manual mode, by pressing the PULSE button the product operates at maximum speed and the display shows speed 9. The blender goes back to the previously set speed when the button is released.
In case it is desired to activate autonomously, make sure the knob is in Manual mode. By pressing the PULSE button the product operates at maximum speed and the display shows speed 9. The motor stops but the display shows the speed on which the appliance stopped before pressing Pulse.
The PULSE key lights up only when you enter Manual mode (M icon).
The PULSE button only lights up when the knob is turned and the speed is different than 0.
The PULSE function does not work with pre-set programs.
How to use the vacuum pump accessory
The vacuum pump must be activated before any blending cycle.
 Always wait for the vacuum pump to stop before activating any cycle.
Do not blend any ingredients while the vacuum pump is operating, to prevent damage to the pump.
Also, if your food doesn't have a liquid element - herbs, spices, or nuts, for example - vacuum blending will not have a noticeable impact.
- Unscrew the base of the accessory to check for the presence of the 4 batteries inside (BATTERIES NOT INCLUDED).
- Introduce the ingredients into the jug and close with the lid.
- Replace the measuring cup (1) on the lid with the vacuum pump cap (10).
- Place the vacuum pump (9) above the cap (10).
![]()
- Activate the pump by pressing its upper button. The button LED lights up with a fixed light.
- The accessory stops automatically once the vacuum pressure inside the jug has been reached. The button LED switches off.
- Remove the vacuum pump (9) from the cap (10) of the blender.
![]()
- Activate the blender by selecting the manual speed or the desired pre-set program.
- When the cycle has ended, press the cap valve to release the pressure of the blender jug.
- Remove the jug cap.


*Standard on certain models. Also available as optional accessory.
Suggestions
SUGGESTIONS FOR USE/SPEED SETTING
| Function | Description | Preparations suggested | Quantity | Time | Accessory |
| Manual 1-9 | The variable speeds 1-9 allow maximum control of the blender. | Flours, batters, fruit or vegetable purées, smoothies, sauces and dressings, whipped cream, blended iced drinks, mousses, sorbets, creams and dried fruit butters, warmed soups*. | 1.5 L | 3 min max.* | Tamper |
SMOOTHIE | The blender operates at the correct speed to obtain dense and creamy results. | Fresh and frozen fruitbased smoothies/ milkshakes. |  500 ml | 30 sec | |
 1 L | 45 sec | ||||
GREEN SMOOTHIE | It makes healthy smoothies. | Green smoothies with spinach, cabbage and other green-leaved fruit and vegetables. |  500 ml | 35 sec | |
| 1 L | 50 sec | ||||
FROZEN DESSERT** | Allows you to make frozen desserts for all tastes. | Ice creams, sorbets, frozen yoghurt and frozen desserts. |  300 g | 50 sec | Tamper |
 800 g | 1 min 30 sec | Tamper | |||
ICE-CRUSH | The blender operates with short bursts of power to crush the ice to a powder. | Crushed ice cubes, chopped frozen fruit and vegetables, cocktails, slushies. | 100 g (min) 300 g (max) | 35 sec |
* It is possible to heat soups from room temperature and after cooking, by activating the blender at speed 9 for a maximum of 6 minutes.
** FROZEN DESSERT function:
- The texture of the final preparation can be affected by the type of recipe and ingredients used.
- If frozen food is used for preparation, it is advised to introduce small pieces and wait a few minutes before using them.
- For recipes in "Single Serve" mode, it is advised to increase the proportion of the liquid part with respect to the recipes used in "Family Serve" mode.
The blender has a specific automatic cleaning function:
| Function | Description | Preparations suggested | Quantity | Time | Accessory |
AUTOMATIC CLEANING | Short bursts of power and high speed allow the jug to be cleaned. | Consult the "Use of the automatic jug cleaning option" paragraph for detailed instructions. | 200 ml | 60 sec |
Advices for use of the unit
- To obtain the best results, it is advised to:
- cut the food to be mixed into cubes.
- Insert the liquids first, then the leafy greens, then soft ingredients followed by dried fruit/seeds/cereals and lastly ice/ frozen ingredients.
- It may be necessary to interrupt operation to let the ingredients slide along the walls of the blender jug with a spatula.
- When liquid and dry ingredients are mixed together, it is advised to insert liquid ingredients first, then to add dry ones.
- Remove possible hard elements from the foods to be mixed (ex. cores or kernels from fruit, bones from meat and similar).
- Do not let food residues dry inside the jug and on the blades for a long period of time, as it may result difficult to remove them. If it is not possible to remove them immediately, pour some warm water and leave soaking.
Cleaning and maintenance
Incorrect use. Risk of damage to the surfaces.
- Do not use steam jets to clean the appliance.
- Do not use cleaning products containing chlorine, ammonia or bleach on parts with metal surface finishes (e.g. anodised, nickel or chrome-plated).
- Do not use abrasive or corrosive detergents (e.g. powder products, stain removers and metal scourers).
- Do not use rough or abrasive materials or sharp metal scrapers.
Cleaning the motor base
To keep the external surfaces in good condition, they must be cleaned regularly after all use and when they have cooled down. Clean with a soft, damp cloth and neutral detergent.
Sharp blades. Cutting hazard.
- Do not touch the blades.
Cleaning the device
- The blender, the jug lid (2) and the measuring cup (1) are dishwasher safe or can be washed using the pre-set Autoclean program (See "Controls Description")

- Make sure that the parts are completely dry before fitting them back on the blender.

Cleaning the accessories
Never immerse the vacuum pump (9)* in water or any other liquid. It is not dishwasher safe.
- The vacuum pump (10)* internal cap is dishwasher safe. For thorough cleaning, remove the valve and wash it by hand.
- The vacuum pump (9)*body can be washed by hand in hot water and neutral detergent, NEVER in the dishwasher. Make sure it is completely dry before every use.
- The tamper (11) and the spatula (12) are dishwasher safe.
- The brush (13) can be washed by hand in hot water and neutral detergent, NEVER in the dishwasher.
Using the self-clean option
- Introduce 200 ml of warm water and a few drops of neutral detergent into the jug.
- Press the automatic cleaning program button (19). The LED of the button lights up with a fixed light, while the other buttons switch off.
- The display shows the cycle duration time.
- Press the dial knob button to start the program selected. The display shows COUNT DOWN.
- The LED of the button selected remains on with a fixed light during the activation cycle, while the other buttons are off.
- The cycle ends automatically and the blender goes into Stand-by. The display shows the Stand-by icon (21) and the button LEDs are off.
- To pause the program, press the dial knob button. The count-down doesn't change and the button of the program selected has a fixed light. Press the dial knob button again to resume processing.
- Press the button (19) to stop the program.
What To Do If
| Problem | Possible causes | Solution |
The engine does not start | The motor has overheated. | Unplug the blender and leave the motor to cool. |
| Plug not correctly inserted in the electrical outlet. | Insert the plug into the electrical outlet. Do not use adaptors or extensions. Check that the master switch is connected. | |
| The cable is faulty. | Contact the Authorised Aftersales Service Centre. | |
| No electricity. | Check that the master switch is connected. | |
The device vibrates | The blender is not resting on a stable surface. | Place the blender on a flat, stable surface. |
| The non-slip rubber base is worn. | Have it replaced at an authorised After-sales Centre. | |
| The speed set is too high or the load is excessive. | Set a lower speed and check the jug has not been overfilled. | |
| The blender switches on, but the blades do not turn. | The jug has not been correctly introduced into its base. | Remove the jug and introduce it correctly into the base. |
The device stops while operating | The motor has overheated. | Unplug the blender and leave the motor to cool. |
Error E:01 | The jug is not inserted. | Put the jug onto the base. |
Error E:02 | Thermal protection tripped or blades jammed. | Disconnect from the power supply and reset the blender. |
| VACUUM PUMP ACCESSORY* The accessory button red LED flashes for 5 seconds after suction. | Battery dead. The vacuum pump cannot reach the vacuum pressure. | Replace the four batteries. |
Contact local technical support if the problem is not solved or in case of other types of faults.
*Standard on certain models. Also available as optional accessory.
Recipe book
SMOOTHIES
Ingredients
- Milk 450 ml
- Natural yoghurt 150 ml
- Banana 400 g
Preparation
- Cut the bananas into pieces and introduce the ingredients into the jug.
- Introduce the ingredients into the jug in the order suggested above.
- Select the SMOOTHIES function with the "Family serve" mode.
- Wait until the program ends and serve immediately.
GREEN SMOOTHIES
Ingredients
- Water 240 ml
- Grapes or kiwi 300 g
- Pineapple 180 g
- Fresh spinach 120 g
- Banana 110 g
- Ice cubes 130 g
Preparation
- Clean the fruit and vegetables and cut them into pieces.
- Introduce the ingredients into the jug in the order suggested above.
- Select the GREEN SMOOTHIES function with the "Family serve" mode.
- Wait until the program ends and serve immediately.
FROZEN DESSERT
Ingredients
- Natural yoghurt 270 g
- Frozen woodland fruits 540 g
Preparation
- Introduce the ingredients into the jug in the order suggested and select the FROZEN DESSERT function and then the "Family serve" mode.
- During program operation, use the tamper to better convey the ingredients into the cutting area.
- When the program ends, serve immediately.
Important safety information
Warnings
This user manual is an integral part of the appliance and must therefore be kept in its entirety and on-hand for the whole working life of the appliance.
Important information for the user
| Safety instructions |
| Information |
| Advice |
Intended use
Failure to comply with the safety recommendations and not reading the instruction manual can lead to improper use of the appliance by the users and consequent personal injury.
- Do not use the appliance for uses different to that for which it has been designed. The appliance can be used to mix and blend various ingredients and crush ice. All other use is considered improper.
- The appliance is not designed to operate with external timers or with remote-control systems.
- Use the appliance indoors only.
- This appliance and its accessories are intended for use in the home and similar environments, such as:
- in the kitchen area for the staff of shops, offices and other work environments;
- in bed and breakfast and agritourism accommodation;
- by guests at hotels and motels, and in residential environments.
- Other uses, in restaurants, bars and cafés for example, are improper.
- Do not use the appliance for purposes different to those for which it is intended.
- This appliance may not be used by people of reduced physical, sensory or mental capacity, or without sufficient experience and knowledge (including children), unless they are supervised or instructed by adults who are responsible for their safety.
- Children must not be allowed to play with the machine. Keep the appliance and its cable out of children's reach.
General safety warnings
Follow all safety instructions for safe use of the appliance:
- Read this user manual carefully before using the appliance.
- Do not leave the appliance unattended during use.
- Do not immerse the appliance, the power cable or the plug in water or any other liquid.
- Do not use the appliance when the power cable or the plug are damaged or if the appliance has fallen on the floor or is damaged in any way whatsoever.
Contact the Technical After-sales Service for its replacement. - The cable is deliberately short to prevent accidents. Do not use an extension.
- Do not allow the electrical power cord to come into contact with sharp edges.
- Do not pull the cable to remove the plug from the outlet.
- Do not position the appliance above or near gas or electric hob burners when they are in use, inside an oven or near other heat sources.
- Do not try to make modifications or repair the appliance: in the event of a fault, have it repaired by a qualified technician or contact the technical after-sales service.
- Never try to put out a fire/flames using water: turn off the appliance, remove the plug from the outlet and smother the flame with a lid or fire blanket.
- Do not touch moving parts during operation. Keep hands, hair, clothing and utensils away from the blades during operation, to prevent personal injury and/ or damage to the appliance.
- Always disconnect the appliance from the power supply when it is not in use, if left unattended or in the case of a fault.
- Always disconnect the appliance from the power supply before assembling or removing components.
- Always disconnect the appliance from the power supply and allow it to cool down before all cleaning operations.
- Do not use the blender without the lid in place.
- Check that the lid is closed correctly before turning the blender on.
- Do not fill the blender excessively (maximum 1.5 litres).
- Do not use the blender with parts or accessories produced by other manufacturers.
![burn hazard]()
![shock hazard]()
Only use the manufacturer's original spare parts. The use of spare parts not recommended by the manufacturer could lead to fires, electric shocks or personal injury.- Only place the blender on level and dry surfaces.
- Do not use the blender when empty to prevent permanent damage to the blade unit.
- Do not use the blender to store objects. It must be empty before and after use.
Warnings for this appliance
- Do not introduce hot liquids in excess of 1 l. If hot liquids are introduced, do not process for over 1 minute.
- To reduce the risk of injury and not to damage the blender, do not put your hands or utensils such as cutlery into the blender jug while it is operating; with exception of the tamper supplied. Use the spatula and brush supplied only when the blender is off.
- Do not use harsh detergents or sharp objects to wash or remove residues from the blender jug.
- The blades are sharp: Cutting hazard!
Do not touch the blades or moving parts. - Do not operate the blender without the jug.
- The instructions for correct cleaning of the appliance are given in the "Cleaning and Maintenance" paragraph.
Specific warnings for the vacuum pump
- Do not position the vacuum pump above or near gas or electric hob burners when they are in use, inside an oven or near other heat sources.
- Do not blend any ingredients while the vacuum pump is operating. Always apply the vacuum before blending.
- Do not blend without having correctly positioned the vacuum pump cap on the lid.
- Make sure that the vacuum pump has four AA batteries, which are correctly introduced before use. The accessory will not work if it is not assembled correctly.
- Make sure the vacuum pump is not operating before removing or replacing the batteries.
- Use AA type batteries only, introduced with the polarity given on the vacuum pump.
- The batteries must be introduced with the correct polarity.
- Dead batteries must be removed from the accessory and disposed of safely.
- The power supply terminals must not be short circuited.
- Always remove the batteries from the vacuum pump if it has not been used for six months or more.
- Do not attempt to make the vacuum pump operate with any method different to that described in this manual.
- Do not place anything on the vacuum pump when it is put away for storage.
- Keep the vacuum pump clean.
- Follow the cleaning instructions provided in this manual.
- This vacuum pump may not be used by people of reduced physical, sensory or mental capacity, or without sufficient experience and knowledge (including children), unless they are supervised or instructed by adults who are responsible for their safety.
- Keep the accessory out of the reach of children.
- Do not try to make modifications or repair the vacuum pump: in the event of a fault, have it repaired by a qualified technician or contact the technical after-sales service.
- This accessory is for household use only. Do not use this accessory for purposes different to those for which it has been designed.
- Do not use outdoors. Improper use can cause injury.
- Do not use the vacuum pump cap during preparations with hot liquids.
- The vacuum pump is intended for use exclusively with the Smeg BLC01 and BCL02 blender.
*Standard on certain models. Also available as optional accessory.
Connect the appliance
Make sure that the mains voltage and the frequency correspond with those indicated on the data plate on the bottom of the appliance. In the event of incompatibility between the outlet and the plug on the appliance, contact the Technical After-Sales Service for replacement.
Manufacturer's liability
The manufacturer declines all liability for injury/damage undergone by persons and objects due to:
- use of the appliance different from that envisioned;
- the user manual not being read;
- tampering with individual parts of the appliance;
- use of non-original spare parts;
- failure to comply with safety warnings.
Keep these instructions carefully. Whenever the appliance is transferred to other persons, it must be accompanied by these user instructions.
The manufacturer reserves the right to make any changes deemed useful for improvement of its products without prior The manufacturer reserves the right to make any changes deemed useful for the improvement of its products without notice. The illustrations and descriptions contained in this manual are therefore not binding and are merely indicative. priornotice. The illustrations and descriptions contained in this manual are therefore not binding and are merely indicative.
For further information on the product: www.smeg.com

Documents / Resources
References
Download manual
Here you can download full pdf version of manual, it may contain additional safety instructions, warranty information, FCC rules, etc.
Download Smeg BLC01; BLC02 - HIGH PERFORMANCE BLENDER Manual
Advertisement
Thank you! Your question has been received!


Need Assistance?
Do you have a question about the BLC01 that isn't answered in the manual? Leave your question here.