Smeg BLF01 - Blender Manual
- Instruction manual (124 pages) ,
- User manual (24 pages) ,
- Manual (24 pages)
Advertisement
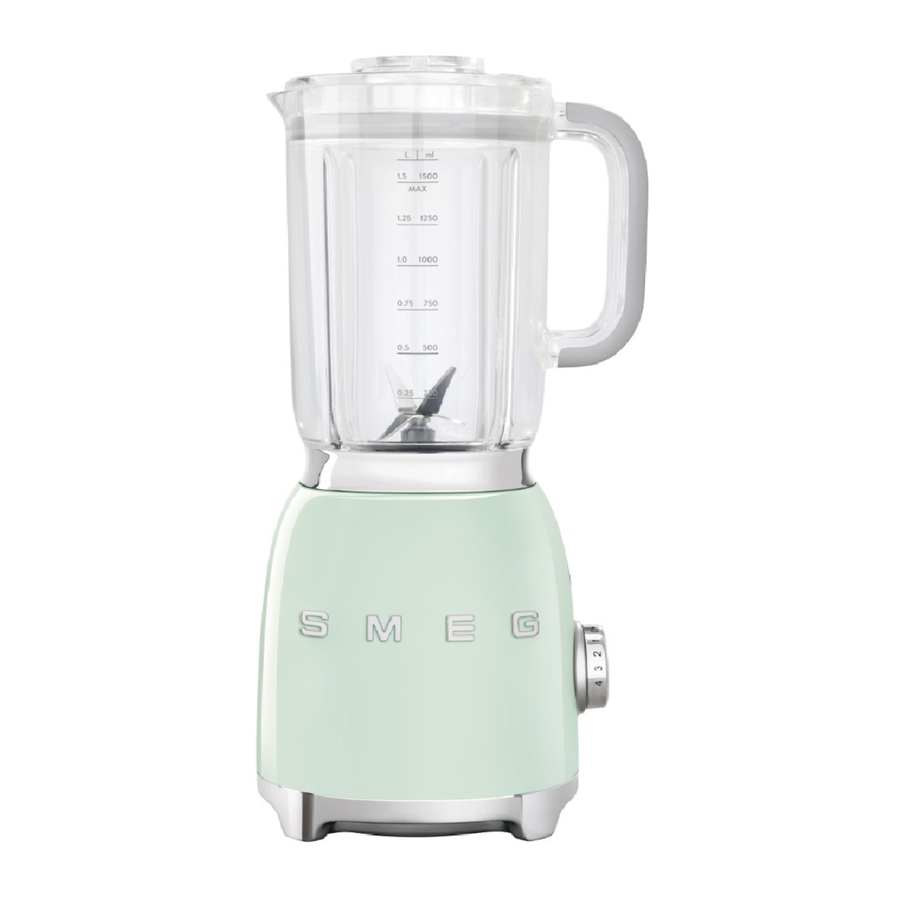
Appliance description (Fig. A)

- Measuring cup
- Lid with pouring hole
- 1.5 liter BPA-free jug
- Detachable blade assembly
- Motor base
- Pulse button
- Control knob
- START/STOP button
- Handle
- Built-in cord wrap
- Identification plate
Identification plate (Fig. A)
The identification plate (11) bears the technical data, serial number and brand name of the appliance. Do not remove the identification plate for any reason.
Before first use
 Danger of electrocution Danger of electrocutionPlug into an earthed 3-pin socket.
|
- Remove all stickers and labels from the blender and clean the motor base with a damp cloth.
- Remove the jug from the blender.
- Remove the blade assembly (see "How to remove the blade assembly (Fig. B)").
- Wash and dry thoroughly (see "Cleaning the jug and blade assembly").
Danger of sudden start-up
|
Description of parts (Fig. A)
Measuring cup (1)
It can be used for measuring ingredients and as a device to unscrew the blade assembly from the base of the jug. See "How to remove the blade assembly (Fig. B)".
Lid with pouring hole (2)
The lid has a seal that closes the blender jug tightly. It has a pouring hole in the center to make it easier to add ingredients safely during operation.
1.5 liter jug (3)
BPA-free jug with lip and graduated for liters and cups. Minimum capacity 0.25 liters (1 cup), maximum capacity 1.5 liters (6 cups).
Blade assembly (4)
Stainless steel detachable blade to crush ice cubes and prepare delicious smoothies, milkshakes, cocktails, etc.
| Sharp blades Danger of cuts
|

|
Description of controls
Pulse button (6)
This function allows you to use maximum blending speed.
Control knob (7)
The knob allows you to select one of the four speeds available or to start the two preset programs: smoothie and ice crush.
See "Speed setting suggestions" for further information on which speed to use.
START/STOP button (8)
The button is used to start/stop blender.
Use
How to remove the blade assembly (Fig. B)

- Take hold of the handle (9) and lift the blender jug. Remove the lid (2) from the blender jug and the measuring cup (1) from the lid.
- Turn the jug upside down and place it on a flat surface. Insert the open end of the measuring cup (1) into the base of the blade assembly.
- Unscrew the blade assembly (4) from the jug body, turning the measuring cup (1) counterclockwise. Remove the blade assembly (4) from the jug body using your hand.
- Wash the components as indicated in section "Cleaning and care".
- Thoroughly dry all the components as indicated in section "Cleaning and care" and put the blade assembly back into the jug body following the procedure indicated previously in the reverse order. Make sure to insert the blade assembly until it locks into place.
Using the blender (Fig. C)

- Insert the blender jug onto the motor base.
- Introduce the ingredients into the jug, paying attention not to exceed the maximum capacity (1.5 l - 6 cups).
- Position the lid (2) with the measuring cup (1) fitted onto the blender jug. Ensure the lid is secure.
- Insert the plug of the blender into the power outlet. The red LED will turn on to indicate the power is on.
- Use the control knob (7) to select the required speed or one of the preset programs. The product can also be operated manually by pressing the PULSE button.
| The PULSE button can be used alone or in combination with speeds 1 and 3 to reach the maximum speed. |
- Press the START button to start blending. See the "Speed setting suggestions" table for further information on which speed is more suitable.
|
The speed can be changed at any time during blending. |
 
|
- You can add further ingredients whilst blending by removing the measuring cup and pouring ingredients through the hole in the lid.
 The blender is not intended for blending or grinding dry foods. Only add dry ingredients together with a sufficient amount of liquid to prevent the blender from overheating, which could permanently damage the blade unit. |
- If you have selected a speed between 1 and 4, when you have finished blending, press the STOP button, turn the knob to '0' and unplug the blender. When one of the preset programs is selected, the appliance with stop automatically (See section "Functions" for further information).
|
The blending cycle can be canceled or stopped at any time pressing the START/STOP button. |
Functions
|
The blender is fitted with a safety lock system that automatically switches off the blender when the jug is removed. It also features a motor safety cutout which trips if the motor is overloaded. |
|
When the appliance is started, the speed is gradually increased until the set speed is reached. This prevents damage to the appliance and accessories, avoids ingredient spillage and improves mixing The Smooth Start only works when a speed between 1 and 4 is selected and does not work with the PULSE mode, ICE CRUSH or SMOOTHIE programs. |
PULSE function
Pressing the PULSE button operates the blender at maximum speed.
The appliance stops immediately when the button is released. It is recommended that you use a minimum of 100 g and not to blend for more than five seconds at a time.
| The PULSE function does not work in combination with the ICE CRUSH or SMOOTHIE programs. |
Ice Crush and Smoothie
Preset 'Ice Crush' and 'Smoothie' programs automatically alter speeds to optimize blending results for a factory set time, then they turn off automatically.
When one of the two above mentioned preset programs is selected, and after you have pressed the START button, the blender will automatically start to operate and the central knob LED lights up to indicate that the cycle is activated.
Use the ICE CRUSH program (preset time 50 seconds) that operates with short bursts of power, when blending drinks containing ice cubes or frozen fruit.
Use the SMOOTHIE program (preset time 60 seconds) to blend fruit, ice cream and yogurt into thick smoothies.
Speed setting suggestions
| Speed | Preparation |
 PULSE |
|
| 1 or 2 |
|
| 3 or 4 |
|
 SMOOTHIE |
|
 ICE CRUSH |
|
| The speeds indicated in the table are approximate and can vary depending on the recipe and on the interaction of the different ingredients used. | |
Tips for using your blender
- For best results, cut the food to be blended into cubes.
- Do not use the PULSE function for more than 5 seconds at a time. You might need to stop operation to push the ingredients down the sides of the blender jug with a spatula.
- When blending liquid and dry ingredients, blend liquids first and then add the dry ingredients
- Remove any hard parts from foods to be blended (e.g. cores or stones from fruit, bones from meat etc.).
- Do not allow food residues to dry inside the jug and blades for too long, as they could become very difficult to remove. If you cannot clean it right away, pour a little warm water and let it soak.
- Do not process hot food. Let it cool to room temperature before blending.
Cleaning and care
Improper use. Danger of electrocution
|
Improper use. Risk of damage to surfaces.
|
Cleaning the motor base
To keep the outer surface of the blender motor base in good condition, it should be cleaned regularly after use. Let the appliance cool down first. Use a damp and soft cloth with mild detergent.
Cleaning the jug and blade assembly
- Wash the jug and the measuring cup in warm soapy water or in the dishwasher.
The blender jug can be washed in a dishwasher only after having removed the blade assembly, without placing it upside down. The blade assembly can be washed in warm soapy water. DO NOT wash in a dishwasher. |
| Sharp blades Danger of cuts
|
Using the Self-clean option
The blender jug and blade assembly can be cleaned using the Self-clean option:
- Fill the jug with warm water and mild detergent.
- Turn the control knob to the setting 1.
- Press the START button.
- Press the PULSE button for 2 seconds at a time. Repeat the operation about 10 times.
- Remove the jug, empty and rinse it.
- Dry thoroughly.
Cleaning other blender parts
The blender lid and measuring cup can be washed in warm soapy water or in the dishwasher.
Make sure they have dried completely before fitting them back on the blender.
What to do if...
| Problem | Cause | Solution |
| The motor will not start. | The motor has overheated. | Unplug the blender and allow the motor to cool. |
| The plug is not properly inserted in the power outlet. | Insert the plug into the power outlet. Do not use adapters or extensions. Check that the house main breaker is on. | |
| The cable is defective. | Contact an Authorized Service Center. | |
| No power. | Check that the house main breaker is on. | |
| The blender vibrates. | The blender is not resting on a stable surface. | Place the blender on a flat, stable surface. |
| The anti-slip rubber feet are worn. | Have them replaced at an Authorized Service Center. | |
| The speed used is too high or the load is excessive | Set a lower speed and ensure the jug has not been overfilled. | |
| The blender switches on, but the blades do not turn. | The jug has not been correctly locked into its base. | Remove the jug from its base and lock it into place. |
| The blender stops while operating. | The motor has overheated. | Unplug the blender and allow the motor to cool. |
| The red LED flashes at regular intervals. | The jug is not correctly inserted in the base. | Check the position of the jug on the base. |
| The blender stops during operation and the white LED flashes. | The blades may have jammed. | Unplug and free the blades using a spatula. |
| If the problem has not been resolved or in the event of another type of fault, contact your local technical support center. | ||
Recipes
Mixed fruit smoothie
Ingredients:
2 nectarines, pitted (or tinned peaches in syrup) and cut into pieces
125 g frozen raspberries
125 g frozen strawberries
125 ml orange juice
125 ml apple juice
Method
- Put the nectarine pieces and the juices into the blender jug.
- Add the frozen fruit.
- Turn the control knob to the Smoothie program and start the blender by pressing the START button.
- Let it run for 40 seconds.
Soy milk
Ingredients for 1 liter of soy milk:
100 g yellow soybeans
1.4 liters water
Method
- Wash 100 g of yellow soybeans in cold water, cover in fresh cold water and leave to soak for 18-24 hours.
- After 24 hours, wash the soybeans, drain and then blend with 400 ml of water at speed 4 for 40 seconds, until you obtain a homogeneous paste.
- Pour 1 liter of water into a large pot and bring it almost to the boil.
- Add the blended soy; skim off any foam that might form. Cook for 20 minutes after it starts to boil.
- Turn off the heat; cover the pot and leave to rest for another 20 minutes.
- Strain the soy milk through a strainer and a piece of clean muslin into a bottle, a little at a time.
- You can sweeten and flavor the milk to taste using vanilla, honey, malt extract or various syrups.
Whipped cream
Ingredients:
500 g cold whipping cream
50 g icing sugar
Method
- Whip the cream in the blender at speed 3 for approximately 30 seconds.
- You can stop the blender by pressing the STOP button.
- Add the icing sugar.
- Select speed 4 and whip for a further 15 seconds, until the cream is fully whipped.
|
In this case, select speed 4 and whip for 40 seconds. |
Vegetable puree
Ingredients:
300 g zucchini
100 g water or vegetable stock
Method
- Steam the zucchini and cut them into rounds.
- Put the pieces in the blender and blend for 45 seconds at speed 4, adding a little water or vegetable stock at a time until you obtain a homogeneous puree.

Documents / ResourcesDownload manual
Here you can download full pdf version of manual, it may contain additional safety instructions, warranty information, FCC rules, etc.
Advertisement
Thank you! Your question has been received!


Need Assistance?
Do you have a question about the BLF01 that isn't answered in the manual? Leave your question here.