Advertisement
Quick Links
Advertisement

Related Manuals for Accent CONNECT


Summary of Contents for Accent CONNECT
- Page 1 CONNECT ASSEMBLY GUIDE...
- Page 2 Tools Required Battery Drill Pozi #2 Driver Bit 2.5mm Hex Key 18mm Wrench www.accentworkspaces.co.nz...
- Page 3 TABLE OF CONTENTS CONFIGURATION PAGE NUMBER IMAGE Freestanding Single Screen Inline Screen Connection Corner Post 9-10 Connection Wall Fixing 11-13 0800 126 826 | support@accentworkspaces.co.nz...
-
Page 4: Freestanding Single Screen
FREESTANDING SINGLE SCREEN PARTS LIST NAME QUANTITY IMAGE Connect 1pcs Fin Screen Connect 2pcs End Cap Connect 2pcs Freestanding Feet Connect 2pcs Large Plastic Cap www.accentworkspaces.co.nz... - Page 5 Slide the foot up in to the post. the 2.5mm hex key. STEP STEP Plan View End Cap End Post Install the Connect Fin end cap, by clipping it on to the end post. Install large plastic caps. 0800 126 826 | support@accentworkspaces.co.nz...
-
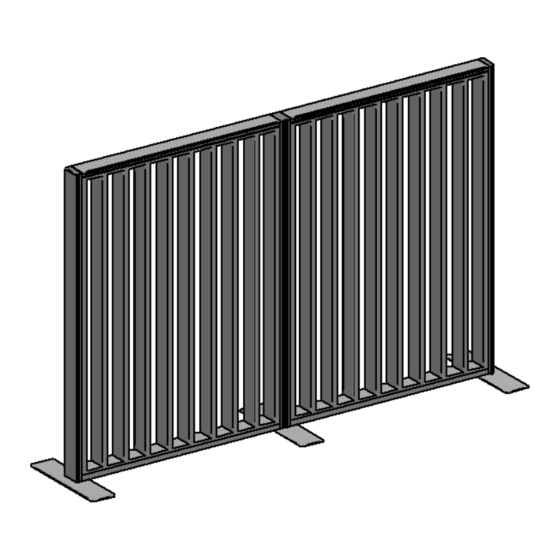
Page 6: Inline Screen Connection
INLINE SCREEN CONNECTION PARTS LIST NAME QUANTITY IMAGE Connect 2pcs Fin Screen Connect 2pcs End Cap Connect 3pcs Freestanding Feet Connect 2pcs Large Plastic Cap Connect Inline Plastic Cap 5g x 16mm Pozi 6pcs CSK Screw Ascon Joiner 2pcs www.accentworkspaces.co.nz... - Page 7 INLINE SCREEN CONNECTION ASSEMBLY INSTRUCTION STEP STEP Tighten the grub screws on the side of the foot using Slide the foot up in to the post. the 2.5mm hex key. STEP STEP Attached the Ascon joiner to the screen joiner on the top and bottom of the end of the screen.
- Page 8 End Post Connect the screen together by sliding the screen Install the Connect Fin end cap, by clipping it on to the down over the ascon joiner. Install screws to fix in end post. NOTE: Make sure the top of the end cap is place.
-
Page 9: Corner Post Connection
CORNER POST CONNECTION PARTS LIST NAME QUANTITY IMAGE Connect Fin Screen Connect Corner Post Connect Small Plastic Cap Connect Corner Post Top Cap 5g x 16mm Pozi 6pcs CSK Screw Power Inline Joiner 2pcs 0800 126 826 | support@accentworkspaces.co.nz... - Page 10 Make the top of the Screen Post is flush with the top of post where the screens coming off. the corner post. Install the 5g x 16mm locking screws. STEP STEP Connect Corner Connect Small Post Top Cap Plastic Cap Repeat step 1-2 on the other sides of the corner post where required.
-
Page 11: Wall Fixing
WALL FIXING CONNECTION ASSEMBLY INSTRUCTION NAME QUANTITY IMAGE Connect Screen Connect Post Connect Inline Plastic Cap 5g x 16mm Pozi 8pcs CSK Screw Screen Joiner 2pcs 0800 126 826 | support@accentworkspaces.co.nz... - Page 12 Bottom bottom Slide the screen joiner into the post. Note: Set the top of the Connect post at 5mm below the total height of the Connect screen. Attach the post to the wall using a 50mm or longer screw. STEP Using a Level, level the Connect post and attached the bottom of the post to the wall by inserting a screw through the holes in the joiner and the post.
- Page 13 WALL FIXING CONNECTION ASSEMBLY INSTRUCTION STEP Slide the screen onto the ascon joiners. STEP Both posts need to flush at the top Using a spanner adjust the adjustable glides on the bottom of the screen to make the post that is attached to the wall and the post on the screen flush at the top.
- Page 14 FACTSHEET CARE & MAINTENANCE GENERAL CARE – INFORMATION • Avoid scourers and abrasives as they will damage the surface. • Don’t place hot objects, electrical appliances or pots straight from the oven or cooker onto your laminate surface. • Don’t cut on the laminate surface. •...
- Page 15 CONNECT 0800 126 826 | support@accentworkspaces.co.nz...
- Page 16 Version #311022 0800 126 826 support@accentworkspaces.co.nz 22 Hood Street Wellsford, Auckland 0900 New Zealand...