Advertisement
Quick Links
Advertisement

Related Manuals for Accent BALANCE DESK


Summary of Contents for Accent BALANCE DESK
- Page 1 BALANCE DESK ASSEMBLY GUIDE...
- Page 2 Tools Required Battery Drill Phillips Driver Tip Soft Hammer www.accentworkspaces.co.nz...
-
Page 3: Table Of Contents
TABLE OF CONTENTS CONFIGURATION PAGE NUMBER IMAGE Straight Desk Inline 2pod Back to Back 2Pod Back to Back 4pod 10-11 Corner Workstation with 90degree 12-13 Corner Leg Corner Workstation 14-15 3 End Legs 3 Pod 120degree 16-17 0800 126 826 | support@accentworkspaces.co.nz... -
Page 4: Straight Desk
STRAIGHT DESK PARTS LIST NAME QUANTITY IMAGE Balance End Leg 2pcs Extendable Beam Bolts 4pcs Wooden Screw 16pc Desk Top www.accentworkspaces.co.nz... - Page 5 STRAIGHT DESK ASSEMBLY INSTRUCTION STEP Attach the extendable beam to the end legs. Make sure the beam is mounted closer to the back of the legs. Open side of the beam should face the front on a single desk. Use a nylon hammer to hit the beam down into place. STEP Place the table top on to the frame, attach the table top to the frame using the wood screws provided.
-
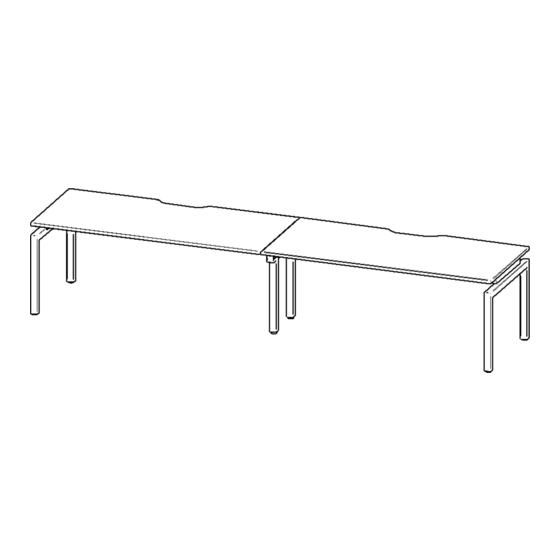
Page 6: Inline 2Pod
INLINE DESK 2POD PARTS LIST NAME QUANTITY IMAGE Balance End Leg 2pcs Middle Leg Extendable Beam 2pcs Bolts 8pcs Wooden Screw 24pcs Desk Top 2pcs www.accentworkspaces.co.nz... - Page 7 INLINE DESK 2POD ASSEMBLY INSTRUCTION STEP Attach the extendable beam to the end legs and the inline legs as per above. Make sure the beam is mounted closer to the back of the legs. Open side of the beam should face the back of the desk. Use a nylon hammer to hit the beam down into place.
-
Page 8: Back To Back 2Pod
BACK TO BACK 2POD PARTS LIST NAME QUANTITY IMAGE Balance End Leg 2pcs Extendable Beam 2pcs Bolts 8pcs Wooden Screw 16pcs Desk Top www.accentworkspaces.co.nz... - Page 9 BACK TO BACK 2POD ASSEMBLY INSTRUCTION STEP Attach the extendable beam to the end legs and the inline legs as per above. Make sure the beam is mounted closer to the back of the legs. Open Side of the beam should face the back of the desk. Use a nylon hammer to hit the beam down into place.
-
Page 10: Back To Back 4Pod
BACK TO BACK 4POD PARTS LIST NAME QUANTITY IMAGE Balance End Leg 2pcs Middle Leg Extendable Beam 4pcs Bolts 16pcs Wooden Screw 48pcs Desk Top 4pcs www.accentworkspaces.co.nz... - Page 11 BACK TO BACK 4POD ASSEMBLY INSTRUCTION STEP STEP Attach the extendable beam to the end and middle legs. Open side of the beam should face the middle of the leg. Use a nylon hammer to hit the beam down Place 2 table tops on one side of the frame as per into place.
-
Page 12: Corner Workstation With 90Degree Corner Leg
CORNER WORKSTATION with 90degree corner leg PARTS LIST NAME QUANTITY IMAGE Balance End Leg 2pcs 90degree Back Corner Leg 90degree Leg Bracket Extendable Beam 2pcs Bolts 10pcs Wooden Screw 26pcs Desk Top www.accentworkspaces.co.nz... -
Page 13: Corner Workstation
CORNER WORKSTATION with 90degree corner leg ASSEMBLY INSTRUCTION STEP Attach 90degree bracket to the 90degree back corner leg as per above, using bolts supplied with the bracket. STEP Attach extendable beams to the 90degree back corner leg and Balance end legs as per above, open side of the beam to face the back of the desk. - Page 14 CORNER WORKSTATION with 3 End Legs PARTS LIST NAME QUANTITY IMAGE Balance End Leg 3pcs Extendable Beam Beam to Beam Connecting Bracket Bolts 8pcs Wooden Screw 20pcs Desk Top www.accentworkspaces.co.nz...
-
Page 15: End Legs
CORNER WORKSTATION with 3 End Legs ASSEMBLY INSTRUCTION STEP STEP STEP Attach the extendable beam to the end legs. Make sure the beam is mounted closer to the back of the legs. Open side of the beam should Attach the beam to beam connecting face the front. -
Page 16: Pod 120Degree
3 POD 120DEGREE PARTS LIST NAME QUANTITY IMAGE Balance End Leg 3pcs 120degree Back 3pcs Corner Leg 120degree 3pcs Leg Bracket Extendable Beam 6pcs Bolts 30pcs Wooden Screw 48pc Desk Top 3pcs www.accentworkspaces.co.nz... - Page 17 3 POD 120DEGREE ASSEMBLY INSTRUCTION STEP STEP Attached Extendable beams to the 120degree back Attach 120degree bracket to the 120degree back corner leg and Balance end legs as per above, corner leg as per above, using Bolts supplied with open side of the beam to face the centre of the pod. the bracket.
- Page 18 FACTSHEET CARE & MAINTENANCE GENERAL CARE – INFORMATION • Avoid scourers and abrasives as they will damage the surface. • Don’t place hot objects, electrical appliances or pots straight from the oven or cooker onto your laminate surface. • Don’t cut on the laminate surface. •...
- Page 19 BALANCE 0800 126 826 | support@accentworkspaces.co.nz...
- Page 20 Version #260722 0800 126 826 support@accentworkspaces.co.nz 22 Hood Street Wellsford, Auckland 0900 New Zealand...