Advertisement
Important Safety Instructions
State of California Proposition 65 Warning

This product can expose you to chemicals including vinyl chloride, which is known to the State of California to cause cancer and birth defects or other reproductive harm. For more information go to www.P65Warnings.ca.gov.
How to read the user manual
This user manual uses the following reading conventions:
Instructions
 General information on this user manual, on safety and final disposal.
Description
 Description of the appliance and its accessories.
Use
Information on the use of the appliance and its accessories, cooking advice.
Cleaning and maintenance

Information for proper cleaning and maintenance of the appliance. Safety instructions
Safety instructions
Information
Advice
- Use instruction sequence.
- Single use instruction.
SAVE THESE INSTRUCTIONS
Description
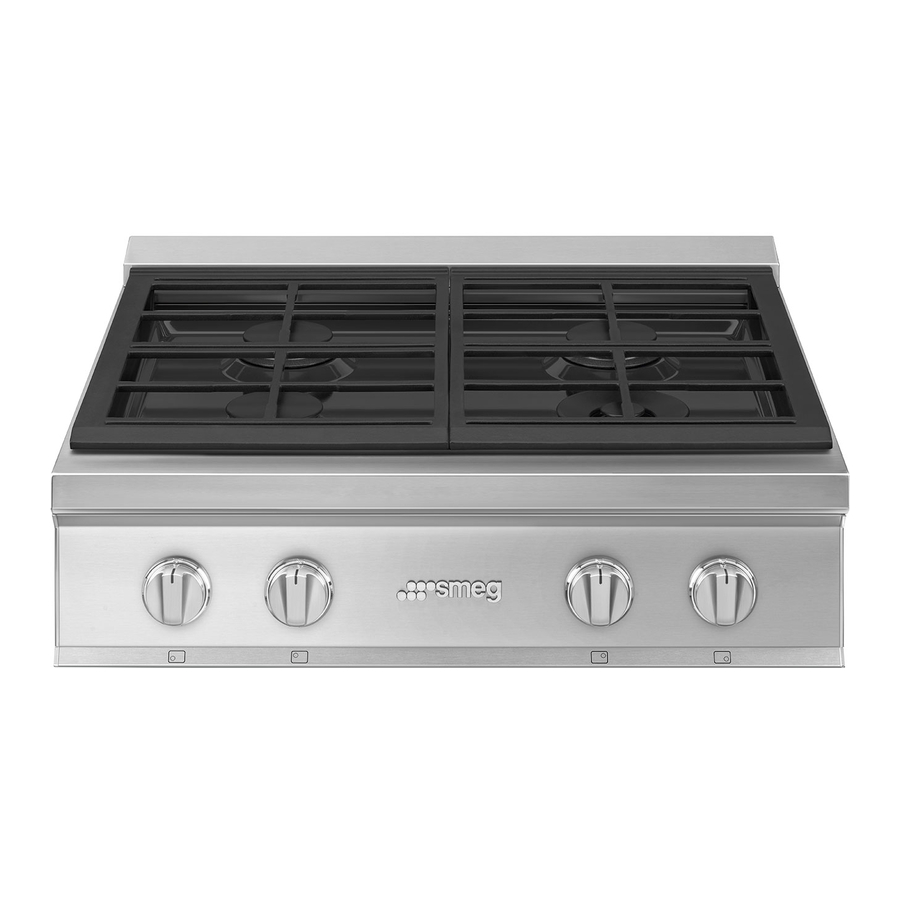
General Description

1 = Dual Flame burner
2 = Rapid burner
Control panel

- Front left burner knob
![]()
- Rear left burner knob
![]()
- Rear central burner knob
![]()
- Front central burner knob
![]()
- Rear right burner knob
![]()
- Front right burner knob
![]()


Use
Instructions
High temperature
Danger of burns
- Make sure that the flame-spreader crowns are correctly positioned in their seats with their respective burner caps.
- Oils and fats could catch fire if overheated. Be very careful.
- Do not leave the appliance unattended during cooking operations where fats or oils could be released.
- Do not spray any spray product near the appliance.
- Do not touch the appliance's burners when it is running. Leave them to cool before cleaning.
- Keep children under the age of 8 away from the appliance when it is in use.
Improper use
Risk of damage to surfaces
- Do not use aluminium foil to cover the burners or hob body.
- Make sure that the flame-spreader crowns are correctly positioned in their seats with their respective burner caps.
- Cooking vessels or griddle plates should be placed inside the perimeter of the hob.
- All pans must have smooth, flat bottoms.
- If any liquid does boil over or spill, remove the excess from the hob.
A gas leak can cause an explosion.
If you smell gas or there are faults in the gas system:
- Immediately turn off the gas supply or close the valve on the gas cylinder.
- Extinguish all naked flames and cigarettes.
- Do not turn on power switches or appliances and do not remove plugs from power sockets. Do not use phones or mobile phones inside the building.
- Open the window in order to ventilate the room.
- Call customer assistance services or your gas supplier.
Malfunctions
Any of the following indicate a malfunction and you should contact a service center.
- Yellowing of the burner plate.
- Damage to kitchen utensils.
- The burners do not ignite properly.
- It is difficult to keep the burners lit.
- The burners go out when the appliance is in use.
- It is difficult to turn the gas valves.
If the appliance does not work properly, contact your local Authorized Service Centre.
First use
- Remove any protective film from the outside or inside of the appliance, including accessories.
- Remove any labels (apart from the technical data plate) from the accessories and from the appliance body.
- Remove and wash all the appliance accessories (see 3 Cleaning and maintenance).
Using the cooktop
FIRE HAZARD
- For your safety: do not allow the burner flame to extend beyond the edge of the pan.

- Turn off all controls when the appliance is not in use.

All the appliance's control and monitoring devices are located together on the front panel. The burner controlled by each knob is shown next to the knob. The appliance is equipped with an electronic ignition device. Simply press the knob and turn it counterclockwise to the maximum flame symbol, until the burner lights. If the burner does not light in the first 15 seconds, turn the knob to ![]() and wait 5 minutes before trying again.
and wait 5 minutes before trying again.
After lighting, keep the knob pressed in for a few seconds to allow the thermocouple to heat up. The burner may go out when the knob is released: in this case, the thermocouple has not heated up sufficiently.
Wait a few moments and repeat the operation. Keep the knob pressed in longer.
In case of an accidental turning off, a safety device will be tripped, cutting off the gas supply, even if the gas tap is open. Return the knob to  and wait at least 5 minutes before lighting it again.
Setting flame size
A minimum and maximum flame size can be set for each burner.
Rapid burner

Dual Flame burner

When the outer ring is lit, regardless of the size of the flame, the inner ring is also lit. It is not possible to switch on the outer ring without the inner one.
Simmer function
This function is extremely useful for melting food like butter, chocolate or similar and for simmering small quantities of food.
1. Switch on the Dual Flame burner internal ring.
2. Set the flame to the minimum.
If the external cup switches on at full power, set half power at least for the internal cup.
Correct positioning of the flamespreader crowns and burner caps
Before lighting the hob burners, make sure that the flame-spreader crowns are correctly positioned in their seats with their respective burner caps. Make sure that the holes 1 of the flame-spreader crowns are aligned with the thermocouples 2 and igniters 3.

Correct positioning of the grates
For 36" models first position the right and left side grates (1) and then the central one (2). For 30" models the positioning order is not relevant.

Practical tips for using the hob
For better burner efficiency and to minimize gas consumption, use pans with lids and of suitable size for the burner, so that the flames do not reach up the sides of the pan. Once the contents come to the boil, turn down the flame far enough to ensure that the liquid does not boil over.
Recommended cookware diameters:
- Rapid burner: 18 - 26 cm.
- Dual Flame burner: 18 - 28 cm.
In case of power failure
In the event of a power failure, the burners may be lit witha match. Press the control knob for the selected burner and turn it counterclockwise to the highest power setting. Carefully hold a lit lighter or match against the burner.
Cookware
Ideally, cookware should have a flat bottom, straight sides, a tight-fitting lid and medium-to-heavy thickness.
Rough cookware finishes may scratch the appliance. Aluminum and copper may be used in cookware as a core material or base. However, when used as a base they can leave permanent marks on the appliance or grates.
Cookware properties are a factor in how quickly and evenly heat is distributed, which affects cooking results. A non-stick finish has the same characteristics as its base material. For example, a non- stick finish on aluminum cookware will take on the properties of aluminum.
Refer to the following chart as a guide to the physical properties of cookware.
Aluminum
- Heats quickly and evenly.
- Suitable for all types of cooking.
- Medium or heavy thickness is best for most cooking tasks.
Cast iron
- Heats slowly and evenly.
- Good for browning and frying.
- Maintains heat for slow cooking.
Ceramic or glass-ceramic
- Follow the manufacturer's instructions.
- Heats slowly but unevenly.
- Best results with low to medium heat settings.
Copper
- Heats very quickly and evenly.
Earthenware
- Follow the manufacturer's instructions.
- Use low heat settings. Porcelain enameled steel or cast iron
Porcelain enameled steel or cast iron
- See stainless steel or cast iron.
Stainless steel
- Heats quickly but unevenly.
- Stainless steel cookware with aluminum or copper as a core material or bottom provides even heating.
Cleaning and maintenance
Instructions

ELECTRICAL SHOCK HAZARD
- Before servicing, disconnect the appliance from the power supply.
Improper use
Risk of damage to surfaces
- Do not use steam jets to clean the appliance.
- Do not use cleaning products containing chlorine, ammonia or bleach on steel parts or parts with metallic finishes on the surface (e.g. anodizing, nickel- or chromium-plating).
- Do not use rough or abrasive materials or sharp metal scrapers.
- Do not wash the removable components such as the hob pan stands, flame spreaders and burner caps in a dishwasher.
- Keeping appliance area clear and free from combustible materials, gasoline and other flammable vapors and liquids.
- Not obstructing the flow of combustion and ventilation air.
Recommendations
We recommend the use of cleaning products distributed by the manufacturer.
To keep the surfaces in good condition, they should be cleaned regularly after use. Let them cool first.
Ordinary daily cleaning
Always use only specific products that do not contain abrasives or chlorine-based acids.
Pour the product onto a damp cloth and wipe the surface, rinse thoroughly and dry with a soft cloth or a microfiber cloth.
Food stains or residues
Do not use metallic sponges or sharp scrapers as they will damage the surfaces. Use ordinary non-abrasive products with the aid of wooden or plastic utensils if necessary. Rinse thoroughly and dry with a soft cloth or a microfiber cloth.
Cooktop grates
Remove the grates and clean them with lukewarm water and non-abrasive detergent. Make sure to remove any encrustations. Dry them thoroughly and return them to the cooktop.
Cleaning the hob
- Pour some non-abrasive detergent on a damp cloth and wipe the surfaces.
- Rinse thoroughly.
- Dry with a soft cloth or a microfiber cloth.
Cleaning cooktop grates, flamespreader crowns and burner caps
We recommend the use of cleaning products distributed by the manufacturer.
- Remove the components from the hob.
- Clean with lukewarm water and nonabrasive detergent. Make sure to remove any encrustations.
- Dry thoroughly with a soft cloth or a microfiber cloth.
- Replace the components on the hob.
Continuous contact between the grates and the flame can cause modifications to the enamel over time in those parts exposed to heat. This is a completely natural phenomenon which has no effect on the operation of this component.
Flame spreaders and burner caps
For easier cleaning, the flame spreaders and the burner caps can be removed.
Wash them in hot water and non-abrasive detergent. Carefully remove any encrustation, then wait until they are perfectly dry. Refit the flame spreaders making sure that they are correctly positioned in their housings with their respective burner caps.
Visually checking pilot(s) and burner flames.

Cleaning the igniters and thermocouples
- If necessary, clean the igniters and thermocouples with a damp cloth.
- If there is any dry residue, remove it with a toothpick or needle.


Documents / Resources
References

Download manual
Here you can download full pdf version of manual, it may contain additional safety instructions, warranty information, FCC rules, etc.
Download Smeg RTU304GX, RTU366GX - Gas Cooktop Hob Portofino Manual
Advertisement
Thank you! Your question has been received!


Need Assistance?
Do you have a question about the RTU304GX that isn't answered in the manual? Leave your question here.