Advertisement
- 1 INTRODUCTION
- 2 CONTROLS and FEATURES
- 3 INSTALLATION
-
4
ANSWERER OPERATION
- 4.1 Answer On/Off
- 4.2 Setting The Time/Day Stamp
- 4.3 Recording And Playback Of Outgoing Announcements (OGAs)
- 4.4 Selection Of Announcement 1 or 2
- 4.5 Typical Announcements That Refer Callers To Mailboxes
- 4.6 Message Counter Display Operation
- 4.7 Automatic Answering Operation
- 4.8 Setting The Answerer For Incoming Messages Time Limit
- 4.9 Volume Control
- 4.10 Screening Your Calls
- 4.11 Setting The Ring Select Switch
- 5 Documents / Resources
INTRODUCTION
Your new GE Model 2-9876 Answerer is designed to record messages using a digital memory. This system eliminates the need for tapes while it provides an expanded range of answering system features.
Please read this USE AND CARE GUIDE carefully to familiarise yourself with all the features of your new Answerer. Retain this guide for future reference.
FCC NUMBER IS LOCATED ON THE BOTTOM OF THE BASE. LOAD NUMBER IS LOCATED ON THE BOTTOM OF BASE. OTHER IMPORTANT INFORMATION ON LAST PAGE OF THIS GUIDE.
Parts Check List
Carefully remove the unit from the package. Check this list to be certain all components are included. Remember to save your sales receipt in case you ever need warranty service.

Operational Summary
Your new GE Model 2-9876 Answerer has digital memory. It eliminates the need for tapes and provides a full range of features. The answering system can hold up to 14 minutes of messages or a maximum of 40 individual messages.
Three individual Mailboxes in the unit allow the caller to leave a message for a specific party. If you do not wish to separate messages, you may use the Main Mailbox only. Two outgoing announcements may be recorded.
When you are at home, you can use your new system to:
- Answer calls when you cannot answer the telephone.
- Screen incoming calls when you do not want to be disturbed.
- Take messages from callers.
- Record memos directly using the unit's built-in microphone.
- Erase or save all messages. Erase or save selected messages.
Super VOX allows the Answerer to disconnect automatically if a calling party hangs up or stops talking. The unit also places a time and day stamp on each incoming message or memo.
When you are away, you can use any touch tone phone to:
- Listen to messages in any mailbox.
- Bypass the announcement and leave a message quickly.
- Erase selected messages from memory.
- Skip through or repeat your messages.
- Turn your answering system on or off.
- Change your announcements.
- Leave a memo.
A three-digit, factory set security code is written on the underside of the Answerer. Your security code must be entered to use any remote functions. This code prevents unauthorised use of remote operation.
A voice menu is programmed into your new Answerer to guide you through remote operations.
CONTROLS and FEATURES
Answerer Features
Fully Digital (Tapeless recording)
- Better reliability than tape.
- No moving parts to break, jam, or wear out.
- Instant playback of incoming messages — no need to wait for a tape to fast forward or rewind.
Fourteen minutes of total recording time or a maximum of 40 messages.
Voice Time/Day Stamp answerer will tell you the time and day each message was received.
Digital Message Counter tells you the number of messages you have received.
Auto Disconnect stops answerer when any phone extension is picked up.
Super VOX Time Out stops answerer when a caller hangs up; when a dial tone is heard; or when call progress signals (computer or FAX signals) are heard.
Two Outgoing Announcements for added convenience.
Three Mailboxes to allow the caller to leave a message for any one of three parties.
Skip messages, forward or backward, instantly with the tap of a button. Message counter will tell you what message number is playing.
Selective erase message function lets you save important messages, or messages for other people.
Instant Replay plays back the last 8 seconds of a message you're listening to.
Beeperless remote message retrieval with 10 functions and a voice menu to assist you. Messages are automatically saved unless you intentionally erase them.
Call Screening Speaker
Memo Recording — allows local message recording.
Toll Saver — for remote operation.
Message Control — allows you to set the Answerer to either accept messages up to two minutes or four minutes.
Battery Backup — holds messages, time/day clock and announcements during temporary power outages (9 volt battery required.)
Battery Lo Indicator digital display flashes "Lo" when battery needs to be replaced.
Two-Year Limited Wa
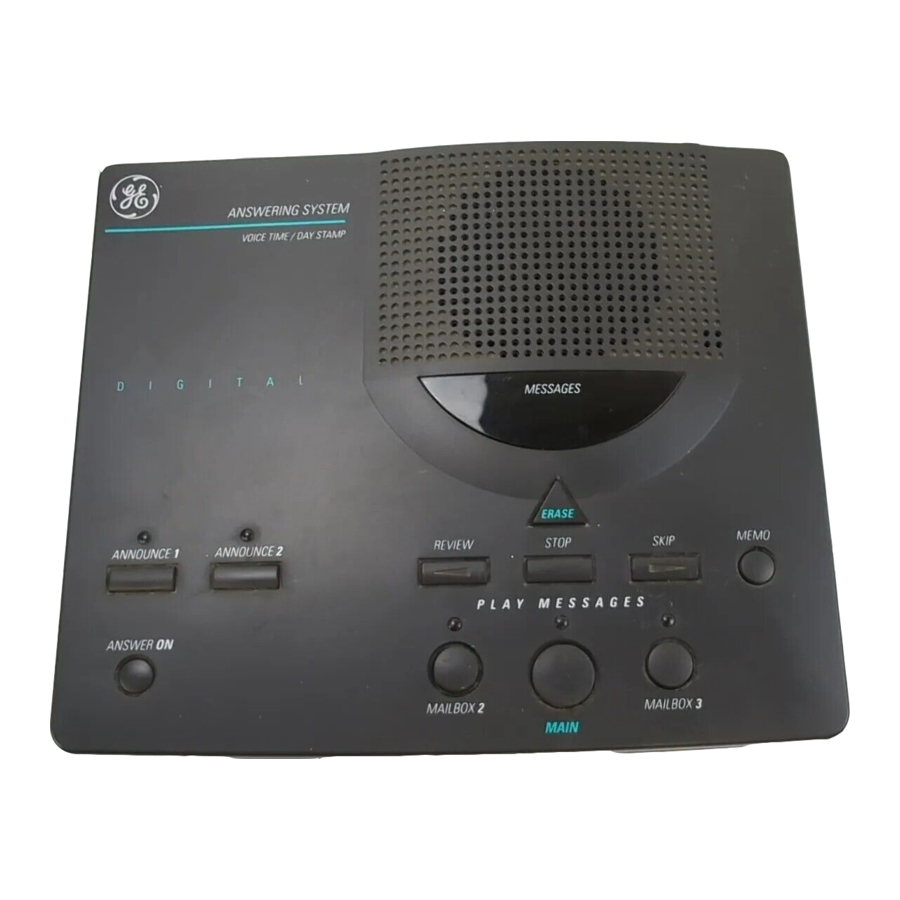
Answerer Controls

- Speaker — plays back messages and announcements.
- Mic — microphone picks up voice to record announcements or messages.
- Announce 1 — tapping selects and plays outgoing announcement (OGA) #1. Press and hold to record new greeting.
- Announce 2 — tapping selects and plays OGA # 2. Press and hold to record new greeting.
- Answer On — turns answer function on or off. (Message indicator displays '— —" for off.)
- Message Indicator Display
- Erase — allows you to erase selected messages or all messages.
- Review — during playback, replays an earlier recorded message in sequence.
- Stop Button — stops functions.
- Skip — during playback, skips message and moves to the next in sequence.
- Instant Replay — plays back the last 8 seconds of a message you're listening to.
- Mailbox 2 — Tap to play messages in mailbox #2.
- Main — Tap to play messages in main mailbox (Mailbox 1).
- Mailbox 3 — Tap to play messages in mailbox #3.
- Slide Out Tray — contains Quick Reference Guide.
- Incoming Messages — sets answerer to record messages up to 2 minutes or 4 minutes in length.
- Ring Select — selects number of rings (2, 4, or Toll Saver)for answer function pick-up. The machine will answer on the number ring selected.
- Power Jack — AC/DC Adapter input jack. Also provides Answerer reset.
- Line Jack — connects to telephone wall jack.
- Line Jack — connects answerer to telephone.
- Volume — sets volume for unit.
- Time/Day Set — allows setting of time/day stamp which is added after incoming messages.
- Hour button — sets the hour.
- Minute Button — sets the minute.
- Day/Time Check Button — sets day of the week. Also provides audible time/day setting report.
- Three-Digit Security Code — allows you to call your GE Model 2-9876 Answerer from another location. (Security Code can be found on the bottom of the answerer).
- 9-volt battery compartment — located on the bottom of the answerer.
INSTALLATION
Setting Up The Answerer
Follow these steps to set up your new Desktop GE Model 2-9876 Answerer for proper operation.
- Install the 9 Volt Battery
The 9 volt battery will provide back-up power during temporary power outages. Using a pointed object, insert in opening of battery compartment on bottom of BASE and pop up. Insert battery and snap into place. Replace battery cover.


- Connect the Line Cord
Plug one end of the telephone line cord into the "TO WALL OUTLET" jack at the rear of the unit. Plug the other end into the telephone outlet. An RJ11C outlet jack is required. If you don't have this type of outlet jack, an adapter can be purchased from any telephone store.


- Connect your Telephone
(If you do not want to connect a telephone to the Answerer, go to step 3.) Plug your telephone cord to the "FROM TELEPHONE" jack at the rear of the unit.


- Connect the Power Cord
Plug the right angle plug on the power cord into the " POWER " jack at the rear of the unit.


- Plug in the Power Supply
Plug the power supply into the 110 VAC power outlet. A powerup tone will be heard and the MESSAGES display will read "00". The ANNOUNCE 1 and ANNOUNCE 2 LED's will flash.
Note: If message display flashes "00" and "Lo", then the unit does not detect fresh 9V battery in place.


ANSWERER OPERATION
Answer On/Off

- Rotate the VOLUME control to a comfortable level (usually midway.)
- To turn off, press ANSWER ON. Voice will announce "Answer functions are off." The MESSAGES display will indicate "— —". Note: The messages and setting contained within the Answerer will not erase when the unit is off. The unit simply does not answer incoming calls.
- To turn on, press ANSWERER ON . (If you are plugging in the unit for the first time, it should turn 'on' automatically.) Voice will announce "Answer functions are on." The MESSAGES display will indicate the total number of messages stored in the unit.
Setting The Time/Day Stamp
The Time/Day is added to the end of each message or memo. Before using your new Answerer, the time/day stamp should be properly set.
- Rotate the VOLUME control to a comfortable level (usually midway.)
![]()
- The Time/Day Stamp controls are located on the side of the Answerer.
- Set hour
![]()
- Advance the hour by pressing and holding or tapping the HOUR button until the Voice indicates the appropriate hour, 1-12.
Note: Voice will announce "AM"or "PM" as it reaches one o'clock while advancing hours. - Release the button when the correct hour is voiced.
- Advance the hour by pressing and holding or tapping the HOUR button until the Voice indicates the appropriate hour, 1-12.
- Set Minute
![]()
- Advance the minute by a combination of pressing and holding or tapping the MINUTE button until the Voice indicates the correct minute, 0-59.
- Tapping the button advances minute by single digits 0, 1, 2, 3...59.
- Pressing and holding the button advances minute by increments of five, 0, 5, 10, 15...55.


- Set Day
- Advance the day by pressing and holding the DAY/TIME CHECK button until the Voice announces each day in sequence.
- Release the button at correct day.
- Checking the Time/Day Stamp:
- Tap the DAY/TIME CHECK button.
- The Voice will respond with the current time and day.
Note: A time check can be made at anytime answering system is not in use.

If the Time/Day Stamp has not been set, the voice system will announce the following during a time check and at the end of each message play "1:00 AM Monday."
Recording And Playback Of Outgoing Announcements (OGAs)
Your new Answerer is equipped with the capability of selecting one of two outgoing announcements (OGA). Before using you should record an OGA. This is the announcement the caller will hear when the unit answers a call.

- Announcement 1 recording/playback
- To record an announcement, press and hold ANNOUNCE 1 button. Wait for a beep. Speak clearly and close — about 9 inches — to the microphone. Recording will stop when button is released and another beep will sound.
- The LED above the button will stay ON.
- Tap ANNOUNCE 1 button and the unit will play back your OGA.
- Announcement 2 recording/playback
- To record an announcement press and hold ANNOUNCE 2 button. Wait for a beep. Speak clearly and close to the microphone. Recording will stop when the button is released and another beep will sound.
- The LED above the button will stay ON.
- Tap ANNOUNCE 2 button and the unit will play back your OGA.
- To record a new announcement, simply record over the old one.
Selection Of Announcement 1 or 2
- The selected OGA will have the LED ON over the button.
- Tap the ANNOUNCE 1 or ANNOUNCE 2 button to select which announcement you wish to greet caller. (The OGA will play back when selected.)
- If both announcement LED's are flashing, there are no valid recorded announcements, in which case the unit's built-in default outgoing announcement of "Please leave message after tone" will be used to answer the phone.
![]()

Typical Announcements That Refer Callers To Mailboxes
Since your new answerer has the advanced feature of being supplied with three Mailboxes (Main Mailbox, Mailbox 2 and Mailbox 3) a calling party using a touch tone telephone may choose to leave a message in a particular mailbox. (A party calling from a rotary phone can only leave a message in the main mailbox.)
For a calling party to leave a message into a particular mailbox, the party is required to press '1' for the main mailbox, '2' for mailbox 2, or '3' for mailbox 3, from the calling phone. If pressed during the OGA or within five seconds after the beep at the end of the OGA, the unit will announce "Leave Message," beep, and then start recording for that particular mailbox. If no key is pressed the message will go into the main mailbox.
Example Greetings
Example A: "Hello, we cannot come to the phone right now. If you are calling from a touch tone phone, press '2' to leave a message for Mary, press '3' to leave a message for Kathy, or wait for the tone and leave a message in our Main Mailbox. Thank you."
Example B: "Hello, this is XYZ company. We cannot take your call right now. If you are calling from a touch tone phone, press '1' to leave a message for the receptionist, press '2' to leave a message for accounting, or press '3' to leave a message for sales, or wait for the tone and leave a message in our Main Mailbox. Thank you."
Note: The fourteen-minute all-digital memory is shared between the announcements and all messages and memos. The briefer your announcements, the more memory there will be left for messages.
Message Counter Display Operation
The MESSAGES indicator will display the following in the two-digit display.
- If answerer is ON, the total number of messages in memory in all mailboxes will be displayed, 00 to 40.
![]()
- If answerer is OFF, the LED display show "— —".
![]()
- If answerer is not receiving AC power, the display will be blank.
- If a mailbox is selected to play, the total number of messages in that mailbox will be displayed momentarily. Then, the display will show the message number being played.
- If the battery needs to be replaced or there is no battery installed, the LED display will flash "Lo".
![]()
- If memory is full, the display will flash rapidly.


Automatic Answering Operation
If the message indicator reads "— —", tap ANSWER ON button to turn answerer on.

When the system answers a call, the caller hears the selected outgoing announcement followed by a beep. After the caller leaves a message, the answerer notes the time and day at the end of the message. The message is stored in the selected mailbox and the MESSAGES window displays the total number of messages currently stored in the answerer.

- The Auto Disconnect Feature
Lifting the HANDSET on any telephone on the same line while the answerer is recording a phone message will automatically interrupt and stop the answerer portion of the unit. This allows you to screen your calls. - The Super "VOX" Feature
Super VOX is a sound recognition feature built into the electronics of your answerer. This feature saves memory space by hanging up when: the caller hangs up; it hears a dial tone; or, call progress signals (computer or FAX signals) are heard.
Note: Message recording will be terminated in any one of the following conditions:- The STOP button is pressed.
- An extension phone is picked up.
- Super VOX times out.
- The maximum message length time is reached (2 minutes or 4 minutes).
- Recording memory is full (14 minutes total).
- Dial tone is detected.
Setting The Answerer For Incoming Messages Time Limit
- Setting the INCOMING MESSAGES switch on the back of the Answerer to 2 MINUTE position allows the caller to leave messages up to 2 minutes in length.
![]()
- Setting the INCOMING MESSAGES switch on the back of the Answerer to 4 MINUTE position allows the caller to leave messages up to 4 minutes in length.

Volume Control
You can use the volume control on the side of the Answerer to adjust the volume of the system's speaker. Rotate the knob until you find a comfortable volume level.

Screening Your Calls
Two settings are essential to using the Answerer's Call Screening feature
- Turn the Answerer ON.
- Set the VOLUME to a level that can be heard from wherever you are.
![]()
If a call comes in that you decide to take, lift the handset of any telephone on the line. The system will stop recording and you may speak to the caller. No further message space will be used by the call.

Setting The Ring Select Switch
Set the RING SELECT switch on the back of your Answerer to 2, 4, or Toll Saver to choose the number of rings before the system answers.

- Position '2' — the unit will answer on the second ring.
- Position '4' — the unit will answer on the fourth ring.
- Position TOLL SAVER — the unit will answer on the second ring if you have new messages and answer on the fourth ring if there are no new messages.
Use the TOLL SAVER setting when you will be calling from another location to check for messages. If you have new messages waiting the system will answer on the second ring. If there are no new messages, the phone will answer on the fourth ring. You can then hang up on the third ring to avoid paying long distance charges.
Digital Telephone Answerer MODEL 2-9876
- Dial telephone number and wait for system to answer.
- Press any key for OGA (Outgoing Announcement) bypass
- Enter 3-digit security code after transfer tone.
- Enter Touch Tone Command, or Press 9 for Voice Menu.
- Hang up.
Write 3-digit security code in boxes.

Documents / ResourcesDownload manual
Here you can download full pdf version of manual, it may contain additional safety instructions, warranty information, FCC rules, etc.
Advertisement
Thank you! Your question has been received!


Need Assistance?
Do you have a question about the 2-9876 that isn't answered in the manual? Leave your question here.