Advertisement
IMPORTANT SAFETY INSTRUCTIONS
When using electrical appliances, basic safety precautions should always be followed, including the following:
- READ all instructions. KEEP these instructions for future use.
- To protect against fire, electric shock and injury to persons, DO NOT immerse cord, plug, or the Stand Mixer in water or other liquids.
- Close supervision is necessary when any appliance is used by or near children
- UNPLUG Stand Mixer from outlet when not in use, before putting on or taking off parts and before cleaning.
- Avoid contacting moving parts. Keep hands, hair, clothing, as well as spatulas and other utensils away from beater during operation to reduce the risk of injury to persons and/or damage to the Mixer.
- DO NOT operate any appliance with a damaged cord or plug, or after the appliance malfunctions or has been dropped or damaged in any manner. Return appliance to the nearest authorized service facility for examination, repair or adjustment. Call Koolatron Customer Service.
- The use of accessory attachments not recommended by the appliance manufacturer may result in fire, electric shock or injury to persons.
- DO NOT use outdoors.
- NEVER let the cord hang over the edge of table or counter, or touch hot surfaces.
- Remove mixing bowl and flat beater, wire whip or dough hook from Stand Mixer before washing them.
- DO NOT use this appliance for anything other than its intended use.
- To protect against electrical shock, this appliance is equipped with a cord having a 3-prong grounding-type plug for insertion into a proper grounding-type receptacle. DO NOT alter the plug for use in a 2-prong receptacle. If the plug will not fit into a receptacle, have the proper receptacle installed by a qualified electrician.
- This product is designed for household use only.
- A short power supply cord (or detachable power supply cord) is to be provided to reduce risks resulting from becoming entangled in or tripping over a longer cord This unit is equipped with a proper cord.
- This appliance is not intended for use by persons (including children) with reduced physical sensory or capabilities, or lack of experience and knowledge, unless they have been given supervision or instruction concerning use of the appliance by a person responsible for their safety.
SAVE THESE INSTRUCTIONS!
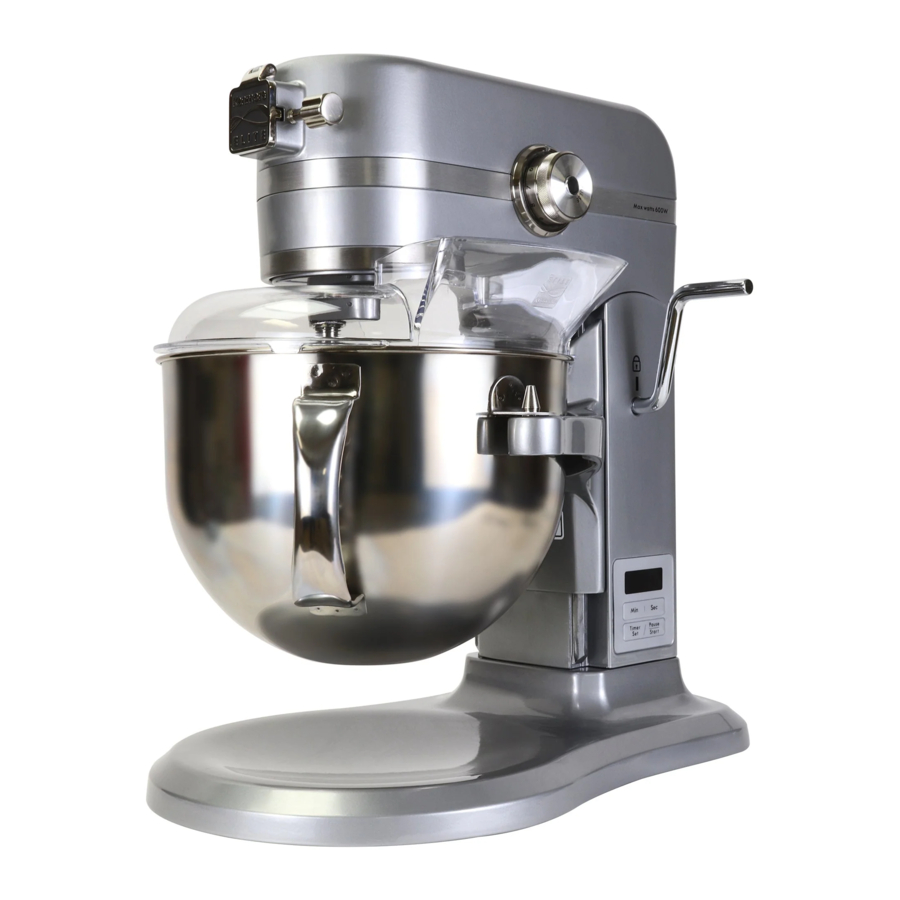
PARTS AND FEATURES

Fig. 1
PREPARING TO USE YOUR STAND MIXER
BEFORE FIRST USE
- Before using your Bowl Lift Stand Mixer, remove all packing material, plastic, labels, stickers or tags that may be attached to the Mixer, Bowls or Attachments.
- Before the first use of the Stand Mixer, wash the white Flat Beater, white Dough Hook, and Stainless Steel Bowls in warm, sudsy water or in the dishwasher. The Wire Whip should be washed by hand only. Rinse and Dry all thoroughly.
- The exterior of the Stand Mixer should only be cleaned with a soft damp cloth, then dried.
- Place Bowl Lift Stand Mixer on a dry, level, stable, surface such as a countertop or table. Keep Mixer away from countertop edge. Be sure to leave plenty of room around Air Vents at the rear of Mixer.
 NOTE NOTEDo not use abrasive cleansers or scouring pads when cleaning your Bowl Lift Stand Mixer, NEVER immerse the body of the Stand Mixerin water or any liquid. |
OPERATING YOUR STAND MIXER
TO ATTACH BOWLS TO MIXER
- Turn Speed Control Knob to OFE
- Unplug Stand Mixer or disconnect power.
- Place Bowl Lift Handle in down position (Fig. 2).
![]()
- Fit the Bowl Supports over Locating Pins (Fig. 3).
![]()
![warning]() NOTE : For both Bowls, fit the Detent Ball on the back of the Bowl into the Detent for it on the Mixer. (Fig. 4).
NOTE : For both Bowls, fit the Detent Ball on the back of the Bowl into the Detent for it on the Mixer. (Fig. 4).
![]()
- Raise the Bowl Lift Handle up into the Locked position (fig. 5).
![]()


 Never turn on Mixer with Beater, etc. attached unless the Bowl is in place. Failure to heed this advice could result in broken bones, cuts or bruises. |
TO ATTACH FLAT BEATER, WIRE WHIP OR DOUGH HOOK
- Turn Speed Control Knob to OFF.
- Unplug Stand Mixer or disconnect power.
- Place Bowl Lift Handle in down position.
- Align slot at the top of Beater/Attachment with pin on Mixer Head's shaft. Push Beater /Attachment up onto shaft and turn counterclockwise until pin moves all the way into the slot (see Fig. 6 and 6A).
![]()
- Before using Mixer, be sure to place Bowl Lift Handle in the up position.

TO REMOVE FLAT BEATER, WIRE WHIP OR DOUGH HOOK
- Turn Speed Control Knob to OFF.
- Unplug Stand Mixer or disconnect power.
- Place Bowl Lift Handle in down position.
- Turn Beater/Attachment clockwise on shaft until pin, on shaft lines up with slot on attachment. Pull down and off.
TO REMOVE BOWLS FROM MIXER
- Turn Speed Control Knob to OFF.
- Unplug Stand Mixer or disconnect power.
- Place Bowl Lift Handle in down position.
- Pull up on Bowl Supports and lift Bowl off of Locating Pins.
- Remove Bowl.
TO ATTACH SPLASH GUARD
Another feature of this Mixer is the Splash, Guard, which helps keep ingredients from splashing out of the bowl while Mixer is on. The Guard fits over the rim of either Bowl. The Splash Guard also has a funnel area for adding ingredients while the Mixer is on.
Attach Splash Guard after Bowl and Beater, Whip or Hook have been attached. The open part of the Splash Guard faces the Mixer, with the funnel on the right as you face the Mixer (Fig. 7). Rest the Splash Guard on the rim of the Bowl with the plastic tabs on the outside of the Bowl (Fig. 7A).

OPERATING THE CONTROL PANEL
SPEED CONTROL

The Speed Control Knob is located on the right side of the Mixer (with the front facing you}, has increments from P, and has the following settings: Pulse (1), Continuous (2 through 10), and OFF.
Always start the Mixer on the slowest possible speed. When ingredients start to mix, turn speed up as called for in recipe. See the "Speed Control Guide".
| When mixing is complete, turn Speed Control Knob to OFF and unplug Stand Mixer for safety. |
MIXING ACTION
- Make sure the Speed Control Knob is in the OFF position before plugging Mixer into a proper 120V power outlet. The LCD Display Panel illuminates blue to show the Mixer is plugged in.
- The Control Panel Display will show all zeros. If the Speed Control Knob is at any speed setting the LCD Display will flash El indicating an error. Turn the Speed Control Knob OFF to resume.
- When the Mixer is turned ON, a blue LED Light encircling the Speed Control Knob comes on. A Work Light also comes on the illuminate the work area above the bowl. Start with the slowest speed and work up. When ingredients start to mix, turn speed up as called for in recipe. See the "Speed Control Guide".
SING THE COUNT-DOWN TIMER MODE
The Count-Down Timer Mode is useful for any recipe that specifies a length of time ingredients should be mixed. To set the Count-Down Timer, press the Timer Set /Pause button. The LCD Display will flash all zeroes. Press the Min or Sec Button until the desired mixing time is displayed. If you make a mistake, press and hold the Pause button and the Timer is reset to zeroes. Once you have selected a time, turn Mixer on with the Speed Control Knob and Timer will count down.
Mixer will run the set amount of time and then turn Off.
OPERATING YOUR STAND MIXER
USING THE COUNT-UP TIMER MODE

The Count-Up Timer Mode can be especially useful to record mixing time. When the recipe does not specify a specific mixing time, you can monitor the time it takes to thoroughly mix the ingredients, so the next time you mix the same ingredients you can set the Count-down Timer for the specific time. The Count-up timer automatically begins counting as soon as the Speed.
Control Knob is turned on. When you turn the Mixer back to OFF, the Counter resets to zero. At any time you can press the Timer Set / Pause Button and the Mixer will enter Count-down Timer Mode.
USING THE PAUSE MODE
While the Mixer is running, you can push the Timer Set / Pause Button once and it will pause the Mixer. The time elapsed will flash in the LCD Display. With this feature you can assess the mixing process or add additional ingredients without affecting the timer. To resume mixing, just push the button again and the Timer will resume from where it stopped. If you want, you can reset the Timer at this point by turning Speed
THE TIMER SET / PAUSE BUTTON
Another way to cancel out the time on the Timer is to press and hold down on the Timer Set / Pause button until the LCD Display shows all zeroes.
THE PULSE FEATURE

A special feature of this Mixer is the Pulse Mode. Sometimes it is necessar to be able to stir in ingredients very slowly and gradually. The Pulse Mode is perfect for this. To use the Pulse Mode, put the Speed Control Knob on 1. This is the only speed in which the Pulse Mode will work. While on setting 1 (Pulse), press in on the center of The Speed Control Knob. This is the Pulse button. Each time you push the button, the Beater /Attachment will revolve about 2 times and stop.
When you have finished with the Pulse Mode, turn the Speed Control Knob back to OFF. If the Mixer stays in the pulse mode for too long without being used, a message of E3 will flash in the LCD Display. Turn the Speed Control Knob to OFF and the message will clear.
WORK LIGHT AND POWER INDICATOR LIGHT
When the Mixer is plugged in and turned ON, a blue LED Light encircling the Speed Knob comes on. A Work Light also comes on to illuminate the work area above the bowl. When you turn the Mixer OFF, the blue LED Light around the Speed Knob goes out. The Work Light stays on for 3 minutes, then shuts off.
NOTE: LCD Display stays on whenever the Stand Mixer is Plugged in.
ATTACHMENTS AND THEIR USES

FLAT BEATER - For normal to heavy mixtures:
- cakes
- cookies
- quick breads
- creamed frostings
- pie pastry
- meat loaf
- candies
- biscuits
- mashed potatoes

WIRE WHIP - For mixtures that need to have air incorporated:
- eggs
- sponge cakes
- egg whites
- angel food cakes
- heavy cream
- mayonnaise
- boiled frostings
- some candies

DOUGH HOOK - For mixing and kneading yeast doughs:
- breads
- coffee cakes
- rolls
- buns
| NOTE Do not scrape frequently the Bowl while the Stand Mixer is operating. The Bowl and Beater are designed to provide thorough mixing without frequent scraping. Scraping the Bowl once or twice during mixing is usually sufficient. Turn Off the Mixer before thoroughly scraping the bowl. |
MIXING TIME
Your Bowl Lift Stand Mixer will mix faster and more thoroughly than most other electric Mixers. It is designed so that all the motion takes place in the Beaters / Attachments with the bowl staying stationary. Therefore, the mixing time in most traditional and non-packaged recipes should be adjusted to avoid overbeating. Cakes, for example, may need only half as much beating time as with other mixers.
MIXING HUB
Your Bowl Lift Stand Mixer comes with a built-in multipurpose Attachment Hub located in the front of the Motor Head. There are many attachments available for use with your Bowl Lift Stand Mixer. For more details, see 'Attachments and Accessories'.
SPEED CONTROL GUIDE
| Number on Speed Knob | |
| Pulse | For slow, short stirring, combining, mashing, starting all mixing procedures. The 1 speed on the knob is the only speed in which the Pulse Mode will work. While on setting 1, press in on the center of the Speed Control Knob for Pulse mode. Use to add flour and dry ingredients to batter, add liquids to dry ingredients, and combine heavy mixtures. |
| 2 Slow Mixing | For slow mixing, mashing, faster stirring. Use to mix heavy batters and candies, start mashing potatoes or other vegetables, cut shortening into flour, mix thin or splashy batters, and mix and knead yeast dough. |
| 4 Mixing, Beating | For mixing semi-heavy batter, such as cookies. Use to combine sugar and shortening and to add sugar to egg whites for meringues. Medium speed for cake mixes. |
| 6 Beating, Creaming | For medium fast beating (creaming) or whipping. Use to finish mixing cake, doughnut, and other batters. High speed for cake mixes. |
| 8 Fast Beating, Whipping | For whipping cream, egg whites, and boiled frostings. |
| 10 Fast Whipping | For whipping small amounts of cream or egg whites. |
NOTE: Mixer may not maintain fast speeds under heavy load. This is normal.
NOTE: The Speed Control Knob can be set between the speeds listed in the above chart to obtain speeds 3, 5, 7 and 9, if a finer adjustment is required.
NOTE: Do not exceed Speed 2 when preparing yeast dough. This could damage the Mixer.
MIXER TIPS AND TECHNIQUES
To help determine the ideal mixing time for a recipe, observe the batter or dough and mix only until it has the desired appearance described in your recipe, such as "smooth and creamy".
Always add ingredients as close to the side of the bowl as possible, not directly into the moving beater. When using the splash guard, you can add ingredients into its funnel opening.
When adding Nuts, Raisins or Candied Fruits, follow individual recipes for guidelines about including these ingredients. In general, solid materials should be folded in during the last few seconds of mixing onSpeed 1 (Pulse). The batter should be thick enough to prevent the fruit or nuts from sinking to the bottom of the pan during baking. Sticky fruits should be dusted with flour for better distribution in the batter.
Mixtures containing large amounts of liquid ingredients should be mixed at lower speeds to avoid splashing. Increase mixer speed only after the mixture has thickened.
CARE AND CLEANING
 Injury Hazard: Unplug mixer before touching beaters or other accessories. Failure to do so can result in broken bones, cuts or bruises. |
Always unplug Stand Mixer before cleaning. Do not immerse Mixer in water. The exterior of the Mixer should only be cleaned with a soft damp cloth.
| NOTE: Do not use abrasive cleansers or scouring pads when cleaning your Stand Mixer. NEVER immerse the body of the Stand Mixer in water or any liquid. |
Beaters, Attachments and Bowls should be washed as soon as possible after use to keep food from drying on them.
Any other servicing should be performed by an authorized service representative.
ATTACHMENTS AND ACCESSORIES
The Kenmore Elite Bowl Lift Stand Mixer's accessories are designed to assure long life. The accessory attachment power shaft and hub socket are of a square design to eliminate any possibility of slipping during the transmission of power to the accessory. The hub and shaft housing are tapered to ensure a snug fit, even after prolonged use and wear. These accessories require no extra power unit to operate them. The power is built into the Mixer.

Documents / ResourcesDownload manual
Here you can download full pdf version of manual, it may contain additional safety instructions, warranty information, FCC rules, etc.
Advertisement
Thank you! Your question has been received!


Need Assistance?
Do you have a question about the KKESM600M that isn't answered in the manual? Leave your question here.