Advertisement
- 1 IMPORTANT SAFETY INSTRUCTIONS
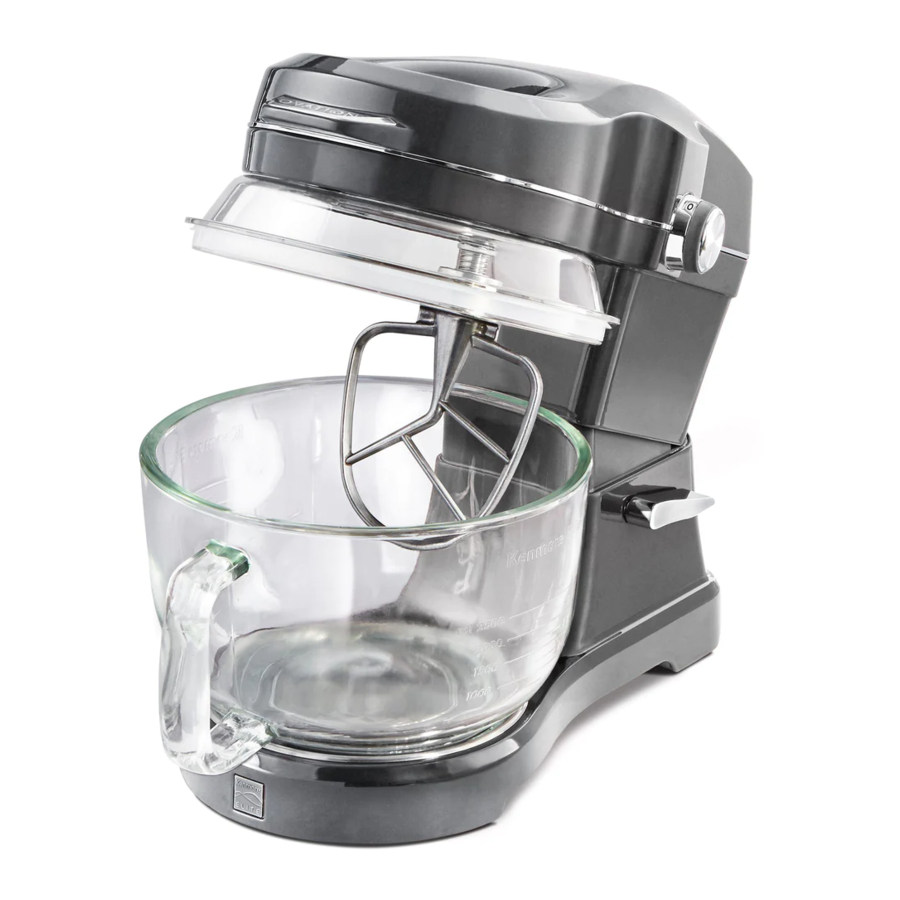
- 2 PARTS AND FEATURES
- 3 PREPARATION
-
4
OPERATION
- 4.1 TILT HEAD
- 4.2 TILT AND GLIDE
- 4.3 WORK LIGHT
- 4.4 CORD STORAGE
- 4.5 EASY POUR FUNNEL
- 4.6 ATTACHING BOWL TO MIXER
- 4.7 REMOVING BOWL FROM MIXER
- 4.8 ATTACHING 360° SPLASH GUARD
- 4.9 REMOVING 360° SPLASH GUARD
- 4.10 ATTACHING MIXING ACCESSORIES
- 4.11 REMOVING MIXING ACCESSORIES
- 4.12 SPEED CONTROL DIAL
- 4.13 OPERATION SAFETY FEATURES
- 4.14 SPEED SETTINGS
- 4.15 ACCESSORIES AND THEIR USES
- 4.16 WIRE WHISK ADJUSTMENT
- 4.17 MIXING TIPS
- 4.18 HOW TO USE THE MIXER FUNNEL
- 5 CLEANING
- 6 TROUBLESHOOTING
- 7 Documents / Resources
IMPORTANT SAFETY INSTRUCTIONS
When using electrical appliances, basic safety precautions should always be followed, including the following:
- READ all instructions. KEEP these instructions for future use.
- To protect against fire, electric shock and injury to persons, DO NOT immerse cord, plug, or the Stand Mixer in water or other liquids.
- NEVER pour boiling water into the glass mixer bowl or use the bowl for cooking or heating purposes. Extreme temperatures can cause the glass bowl to break or shatter.
- Close supervision is necessary when any appliance is used by or near children.
- UNPLUG Stand Mixer from outlet when not in use, before putting on or taking off parts and before cleaning.
- Avoid contacting moving parts. Keep hands, hair, clothing, as well as spatulas and other utensils away from beater during operation to reduce the risk of injury to persons or damage to the Mixer.
- DO NOT operate any appliance with a damaged cord or plug, or after the appliance malfunctions or has been dropped or damaged in any manner. Take appliance to a qualified service dealer for examination and possible repair.
- The use of accessories or attachments not recommended by the appliance manufacturer may result in fire, electric shock or injury to persons.
- DO NOT use accessories or attachments other than those referenced in this Use & Care Guide.
- DO NOT use outdoors.
- NEVER let the cord hang over the edge of table or counter, or touch hot surfaces.
- Remove mixing bowl, flat beater, wire whisk or dough hook from Stand Mixer before washing them.
- DO NOT use this appliance for anything other than its intended use.
- To protect against electrical shock, this appliance is equipped with a cord having a 3-prong grounding-type plug for insertion into a proper grounding-type receptacle. DO NOT alter the plug for use in a 2-prong receptacle. If the plug will not fit into a receptacle, have the proper receptacle installed by a qualified electrician.
- This product is designed for household use only.
SAVE THESE INSTRUCTIONS
CUSTOMER ASSISTANCE
If any parts are missing or damaged after unpacking product box, or to order replacement parts after product use, call the following number: 1-855-438-7899.
 NOTE: Your call will be answered only in English.
PARTS AND FEATURES

Fig. 1
| INCLUDED ACCESSORIES These pictured accessories are described in the Accessories and Their Uses table in the Operation section of this Use & Care Guide. | Flat Beater | Whisk |
Dpugh Hook | Easy Pour Funnel | Bowl Lid |
360° Splash Guard | Egg Separator | Grater |
PREPARATION
BEFORE FIRST USE
- Remove packing material, plastic, labels, stickers or tags that are attached to the mixer, bowl or accessories.
- Hand wash the Glass Bowl, Bowl Lid, Bowl Clamping Plate, Splash Guard, Easy Pour Funnel Insert, Flat Beater, Wire Whisk, Dough Hook, Egg Separator and Grater in warm, sudsy water. Thoroughly rinse and dry all items.
- Clean the outside of the Stand Mixer only with a soft damp cloth, then use dry soft cloth to wipe dry.
 NEVER submerge the Mixer in water. It will be permanently damaged. NEVER use abrasive cleaning agents or scouring pads to clean mixer surfaces. They will be permanently scratched. |
- Rest the Mixer on a level and stable dry countertop or table surface. Also, be sure that the Mixer is at a safe distance from the surface edge to prevent it from falling off. There must also be enough room around the back of the Mixer for sufficient air flow through the Mixer motor air vents.
OPERATION
TILT HEAD
(See Fig. 1)
- To attach and remove accessories and bowl you must tilt back the Mixer Head by means of the release lever on the right side of the mixer (with the front facing you).
- To unlock the Head from operation position, press lever down with one hand, then with other hand guide spring loaded Head up to lock into raised position.
- To unlock Head from raised position, press lever down with one hand and push Head down until it locks into operation position.

To avoid serious injury, keep ngers and hands away from hinge area when raising or lowering Tilt Head.
TILT AND GLIDE
Glides are built into the bottom of the Mixer to allow easy movement from one location to another across the same surface. To use, first lower Tilt Head into locked position. With one hand lift up on Tilt Head Lift Handle to tilt Mixer back onto glides. With other hand grasp Mixer base at front and push to new location. Lower Mixer back into operation position.
WORK LIGHT
The work light is an LED that shines continuously during mixer operation to help illuminate mixer bowl contents. It also flashes to alert you of operational errors or motor overheating. See Operation Safety Features section.
CORD STORAGE

The power cord is stored in the base of the mixer. Grasp cord by plug and raise out of slot. Carefully pull the cord out of the mixer and secure it by pressing it down into the slot.
- The cord is 3-1/2 feet long. Be careful not to overextend the cord.
- Push the cord all the way back into the base when finished using mixer.
EASY POUR FUNNEL
The Easy Pour Funnel allows you to add ingredients directly into the mixing bowl from the top of the mixer.
To prevent injury to persons or product damage, NEVER pour boiling water into the glass mixer bowl or use the bowl for heating or cooking purposes. Extreme temperatures can cause the glass bowl to break or shatter.
ATTACHING BOWL TO MIXER
(Fig. 2)

- Turn speed dial to 0.
- Unplug mixer from electrical outlet.
- Press down release lever to tilt head back.
- Place bowl in Bowl Clamping Plate.
- Turn bowl clockwise until snug.
REMOVING BOWL FROM MIXER
(Fig. 3)

- Turn speed dial to 0.
- Unplug mixer from electrical outlet.
- Press down release lever to tilt head back.
- Turn bowl counterclockwise until loosened and pull up and out of Bowl Clamping Plate.
ATTACHING 360° SPLASH GUARD
(Fig. 4)

- Turn speed dial to 0.
- Unplug mixer from electrical outlet.
- Press down release lever to tilt head back.
- Push the splash guard up to fit onto the seating ring on the underside of the Tilt Head.
NOTE
As an optional attachment method, lay the splash guard on top of the bowl and lower the Tilt Head onto it.
REMOVING 360° SPLASH GUARD
- Turn speed dial to 0.
- Unplug mixer from electrical outlet.
- Press down release lever to tilt head back.
- Pull off the splash guard.
Never turn on Mixer with accessories attached unless the Bowl is in place.
ATTACHING MIXING ACCESSORIES
(Fig. 5)

- Turn speed dial to 0.
- Unplug mixer from electrical outlet.
- Press down release lever to tilt head back.
- Align slot at the top of accessory with pin on Tilt Head shaft. Push accessory up onto shaft and turn counterclockwise until pin moves all the way into the slot.
REMOVING MIXING ACCESSORIES
- Turn speed dial to 0.
- Unplug mixer from electrical outlet.
- Press down release lever to tilt head back.
- Turn Accessory clockwise on shaft until pin on shaft lines up with slot on accessory. Pull accessory off shaft.
SPEED CONTROL DIAL
(Fig. 6)

- The Speed Control Dial is located on the right side of the Mixer, and is scaled in digits from 0 to 10 (0 equals OFF).
- To start the Mixer, turn the Speed Control Dial clockwise from 0.
- When using the Splash Guard, you may immediately turn the dial to the optimum speed of your recipe.
- If not using the Splash Guard, start the mixer on the slowest possible speed andgradually raise to optimum speed to avoid splashing ingredients out of the bowl.
OPERATION SAFETY FEATURES
- If the mixer is plugged into an outlet when the speed dial is turned to a speed setting, the mixer will not start and the work light will flash. Unplug the cord and turn the speed dial to 0 before plugging it back in.
- If you attempt to lift the tilt head while the mixer is running, the mixer will shut off and the work light will go out. When you lower the head back into place, the work light will flash. Turn speed dial to 0 and then to a speed setting to restart mixer.
- If the mixer motor becomes overheated, the mixer will shut off and the work light will flash. Turn the speed dial to 0 and allow mixer motor to cool down before restarting.
|
|
SPEED SETTINGS
| 1 | Slow Stirring |
|
| 2-3 | Slow Mixing, Faster Stirring |
|
| 4-5 | Medium Mixing, Medium Beating |
|
| 6-7 | Creaming (Medium Fast Beating) |
|
| 8-9 | Whipping (Rapid Beating) |
|
| 10 | Rapid Whipping |
|
NOTICE
- Under heavy load the Mixer may not maintain fast speeds.
- Excessive speed when preparing yeast dough may damage Mixer.
ACCESSORIES AND THEIR USES
 | FLAT BEATER – For normal to heavy mixtures such as cakes, cookies, quick breads, creamed frostings, pie pastry, meat loaf, candies, biscuits, mashed potatoes. |
 | WIRE WHISK – For mixtures that need to have air incorporated such as eggs, boiled frostings, egg whites, sponge cakes, heavy cream, angel food cakes. |
 | DOUGH HOOK – For mixing and kneading yeast doughs to make breads, coffee cakes cookies, rolls, buns. The recommended speed setting for kneading dough is 4 or below. |
 | EGG SEPARATOR – For separating egg yolks and whites. Lay the cupped base of the separator into the Easy Pour funnel. Steady separator by holding onto handle. Pour egg through separator to allow egg white to pass into mixer bowl. |
 | GRATER – For grating items like vegetables, spices or chocolate into mixer. Lay the cupped base of the grater into the Easy Pour funnel. Steady grater by holding handle. Grate carrot across top of grater into mixer bowl. |
 | BOWL LID – Fits snugly onto top of bowl to secure contents after mixing. |
 | 360° SPLASH GUARD – When used, completely encloses bowl rim to prevent ingredients from splashing out during mixer operation. |
 | EASY POUR FUNNEL – Inserts into the Mixer Funnel on the top of the mixer. The Easy Pour Funnel is removable for convenient cleaning, and using it helps keep the Mixer Funnel surfaces free of ingredient residue. |
WIRE WHISK ADJUSTMENT
(Fig. 7)

The Wire Whisk may be adjusted to a lower position to reach a low level of ingredients in the bowl. Adjust as follows:
- Turn speed dial to 0.
- Unplug Mixer from electrical outlet.
- Press down release lever to tilt head back and lock in place.
- Remove the whisk from the shaft.
- Use a flat blade screwdriver to turn the adjustment set screw in the top of the whisk
- To raise the whisk in the bowl, lower the set screw by turning clockwise.
- To lower the whisk in the bowl, raise the set screw by turning counterclockwise.
- Reattach the whisk to the mixer shaft.
Be careful not to turn set screw too far down or up or it may fall out. Also, if turned too far down, the screw may obstruct attaching whisk to shaft. |
MIXING TIPS
- Observe the batter or dough in bowl while mixing.
Mix only until contents achieve the appearance called for in recipe, such as "smooth" or "creamy." - Follow recipe guidelines when adding nuts, raisins or candied fruits to a mixture.
Fold such solid ingredients into the bowl in the last few seconds of slow stirring (speed 1), when batter is sufficiently thick to prevent them from sinking to the bottom of baking pan. Dust sticky, candied fruits with flour for equal distribution throughout the batter. - If not using Splash Guard, mixtures containing large amounts of liquid ingredients should be initially mixed at lower speeds to avoid splashing. Once mixture thickens increase speed.
HOW TO USE THE MIXER FUNNEL

NOTE
Regular use of the Easy Pour Funnel accessory is highly recommended. The accessory inserts into the Mixer Funnel, is removable for convenient cleaning, and using it helps keep Mixer Funnel surfaces free of ingredient residue.
Using one ingredient at a time, slowly add into pour funnel.
Mixer can be operating at low speed when ingredients are being added as long as the Splash Guard is in place.
Gradually continue to add remaining ingredients through the pour funnel.
If you need to scrape down sides of bowl, first turn speed dial to 0 and raise up tilt head.
When pouring liquids through funnel make sure to place speed setting on 0 or low number to keep ingredients from splashing.
Course ingredients such as nuts, dried fruits, or morsels should be folded into the mixture at the final stage of mixing.
 TIP: Lightly dust coarse ingredients with all-purpose flour to keep them from retreating to the bottom of the bowl.
Once all ingredients are well-combined, raise up tilt head and twist mixing bowl counterclockwise to remove bowl from clamping plate.
After finished using mixer, clean exterior surfaces by wiping with a damp cloth. Use dry cloth to wipe thoroughly free of moisture before putting mixer away.
CLEANING
Unplug Mixer before touching beaters or other accessories.
Failure to do so can result in broken bones, cuts or bruises
- Always unplug Mixer before cleaning. NEVER immerse Mixer in water. The exterior of the Mixer should only be cleaned with a soft damp cloth.
- Do not use abrasive cleansers or scouring pads when cleaning Mixer.
- Always remove accessories before cleaning Mixer. If washing accessories by hand, rinse and dry completely. Most accessories and the glass bowl are dishwasher safe. Only place the bowl lid in the upper dishwasher rack. Only hand wash the Wire Whisk.
- Wash accessories and bowl as soon as possible after use to keep food from drying on them.
TROUBLESHOOTING
| Mixer will not start |
|
| Position of wire whisk in bowl is too low or high |
|
| Work Light blinking |
|
| Surface area hot |
|
If above solutions do not work, call Customer Assistance.

Documents / ResourcesDownload manual
Here you can download full pdf version of manual, it may contain additional safety instructions, warranty information, FCC rules, etc.
Download Kenmore Elite KKEOVSMG,KKEOVSMR - 5-Quart Stand Mixer Manual
Advertisement
Thank you! Your question has been received!


Need Assistance?
Do you have a question about the KKEOVSMG that isn't answered in the manual? Leave your question here.