Advertisement
- 1 About This Manual
- 2 Things to check before using the watch
- 3 Mode Reference Guide
- 4 Timekeeping
- 5 Configuring Home City Settings
- 6 Adjusting the Digital Time and Date Settings
- 7 Using the Stopwatch
- 8 Countdown Timer
- 9 Checking the Current Time in a Different Time Zone
- 10 Using the Alarm
- 11 Illumination
- 12 Adjusting Hand Positions
- 13 Button Operation Tone
- 14 Troubleshooting
- 15 Main Indicators
- 16 City Code Table
- 17 Documents / Resources

About This Manual
- Depending on the model of your watch, display text appears either as dark figures on a light background, or light figures on a dark background. All sample displays in this manual are shown using dark figures on a light background.
- Button operations are indicated using the letters shown in the illustration.
- Note that the product illustrations in this manual are intended for reference only, and so the actual product may appear somewhat different than depicted by an illustration.

Things to check before using the watch
- Check the Home City and the daylight saving time (DST) setting.
Use the procedure under "To configure Home City settings" to configure your Home City and daylight saving time settings.

- Proper World Time Mode data depends on correct Home City, time, and date settings in the Timekeeping Mode. Make sure you configure these settings correctly.
- Set the current time.
- See "Adjusting the Digital Time and Date Settings".
The watch is now ready for use.
Mode Reference Guide
The mode you should select depends on what you want to do.
| To do this: | Enter this mode: |
| Timekeeping Mode |
| Stopwatch Mode |
| Use the countdown timer | Countdown Timer Mode |
| World Time Mode |
| Set an alarm time | Alarm Mode |
Selecting a Mode
- In the Timekeeping Mode, press D to enter the Stopwatch Mode.
- For more information about using the Stopwatch Mode, see "To enter the Stopwatch Mode".
- In any mode (except a setting mode), press L to illuminate the display.

- Press C to cycle between the modes as shown below.
- To return to the Timekeeping Mode from any other mode, hold down C for about two seconds.


General Functions (All Modes)
The functions and operations described in this section can be used in all modes.
Auto Return
If you do not perform any operation for about two or three minutes while configuring settings (setting flashing on the digital display) in any mode, the watch will exit the setting operation and return to normal display.
Scrolling
The B and D buttons are used on the setting mode to scroll through data on the display. In most cases, holding down these buttons during a scroll operation scrolls through the data at high speed.
Moving the Hands Out of the Way for Better Viewing
You can use the procedure below to temporarily move the hour and minute hands out of the way to better view what is on the display.
-
This operation can be performed in any mode. In the case of a setting mode (setting flashing on the screen), the hands will move out of the way automatically, even if you do not perform the below operation.
- While holding down L, press C
- This will cause the hour and minute hands to move to a location where they do not block your view of the digital display
Example: When the current time is 8:23

- Holding down L again as you press C will cause the hands to return to their normal positions (normal timekeeping)
 Note
Note
-
Watch button functions are the same regardless of whether the hands are moved out of the way or at their normal positions.
-
Changing to another mode will cause the hands to move back to their normal positions.
-
The hands also will move back to their normal positions automatically if no operation is performed for about one hour
Timekeeping
Use the Timekeeping Mode to set and view the current time and date.

Configuring Home City Settings
There are two Home City settings: actually selecting the Home City, and selecting either standard time or daylight saving time (DST).
To configure Home City settings
- In the Timekeeping Mode, hold down A until the flashing SET Hold indicator disappears from the display and the currently selected city code flashes on the display. This indicates the Home City setting mode.
- Use D (+) and B (–) to scroll through city codes until the one you want is displayed.
- For details about city codes, see the "City Code Table" at the back of this manual.
- Holding down either button scrolls at high speed.
- After the setting is the way you want, press A to return to the Timekeeping Mode.

Note
- You can check the city code and name (English) of your Home City by pressing A.
- After you specify a city code, the watch will use UTC* offsets in the World Time Mode to calculate the current time for other time zones based on the current time in your Home City.
* Coordinated Universal Time, the world-wide scientific standard of timekeeping.
The reference point for UTC is Greenwich, England.
To change the Daylight Saving Time (summer time) setting
- In the Timekeeping Mode, hold down A until the flashing SET Hold indicator disappears from the display and the currently selected city code flashes on the display.
- Press C to display the DST setting mode.
- Press D to toggle between Daylight Saving Time (ON) and Standard Time (OFF).
- Note that you cannot switch between daylight saving time and standard time while UTC is selected as your Home City.
- After the setting is the way you want, press A to return to the Timekeeping Mode.
- The DST indicator appears to indicate that Daylight Saving Time is turned on.
 setting")
Adjusting the Digital Time and Date Settings
Use the procedure below to adjust the digital time and date settings.
To configure the digital time and date settings
- In the Timekeeping Mode, hold down A until the flashing SET Hold indicator disappears from the display and the currently selected city code flashes on the display.


- Press C to move the flashing in the sequence shown below to select the other settings.

-
When the timekeeping setting you want to change is flashing, perform the operation described below.
Screen To do this: Do this: ![]()
Toggle between 12-hour (12H) and 24-hour (24H) timekeeping Press D. ![]()
Reset the seconds to 00 Press D. ![]()
Change the hour or minute Use D (+) and B (–) to
change these settings.- Holding down either button scrolls at high speed.
![]()
Change the year Change the month or day ![]()
Change the month or day -


- Press A to exit the setting mode.
Note
- Resetting the seconds to 00 while the current count is in the range of 30 to 59 causes the minutes to be increased by 1.
- The watch's built-in full automatic calendar makes allowances for different month lengths and leap years. Once you set the date, there should be no reason to change it except after you have the watch's battery replaced.
- The day of the week changes automatically when the date changes.
Using the Stopwatch
The stopwatch measures elapsed time, split times, and two finishes.
- The measurement range of the stopwatch is 23 hours, 59 minutes, 59.99 seconds. Elapsed time returns to zero automatically and timing continues from there when the maximum limit is reached.

To enter the Stopwatch Mode
You can enter the Stopwatch Mode using any one of the methods below.
Entering Directly from the Timekeeping Mode
If the stopwatch was reset to all zeros the last time you used it, a new elapsed time operation will start as soon as you enter the Stopwatch Mode.
- In the Timekeeping Mode, press D.
This will result in one of the following, depending on the status of the stopwatch the last time you exited the Stopwatch Mode.
- If reset (stopped at 0:00 00"00): Timing starts.
One-press timing start from the Timekeeping Mode (direct timing start from the Timekeeping Mode) - If an ongoing timing operation is paused: Timing remains paused.
- If an ongoing timing operation is in progress*: Timing continues to be performed. * An ongoing stopwatch timing operation continues even if you navigate to another mode from the Stopwatch Mode.
- Now you can perform the same operations.
Entering from Another Mode (including the Timekeeping Mode)
Press C as many times as necessary to navigate to the Stopwatch Mode.
- To enter from the Timekeeping Mode using this method, press C four times.
- This will display the stopwatch screen in the same status as it was the last time you exited the Stopwatch Mode. However, if you exited with a split time displayed, the split time operation will be released when you return.
")
Note
- Once started, elapsed time measurement continues until you press D to stop it, even if you change to a different mode and even if the stopwatch reaches the elapsed time maximum limit.
Using the Target Time Alarm
You can set a target time in the range of one minute to 24 hours, in units of one minute.
A beeper will sound for 10 seconds when the elapsed timing of the stopwatch reaches the target time.
To set a target time
- Reset the stopwatch to all zeros.
- Hold down A until the flashing SET Hold indicator disappears from the display and the hour digit starts to flash. Release A after the hour digit starts to flash.
- Use D (+) and B (–) to change the hour setting. Holding down either button scrolls at high speed. For a target time of 24 hours, set 00 hours 00 minutes.
- Press C to switch to the minutes setting.
- Use D (+) and B (–) to change the minutes setting. Holding down either button scrolls at high speed.
- Press C to display the target time alarm on/off setting
- Press D to toggle the target alarm between on (
![]() displayed) and off (
displayed) and off ( ![]() displayed).
displayed).
 displayed) and off (
  displayed).
- The indicator TGT will be displayed in the Stopwatch Mode while the target time is on.
- After all the settings are the way you want, press A to exit the setting screen.


To use the target time alarm
- Reset the stopwatch to all zeros and then press D. This will cause TGT to flash on the display.
- Now you can perform the operations.


-
You can get an idea of time elapsed until the target time from changes in the display.
- From start up to half of target time

-
Screen: As shown in the figure, top right indicator that indicates minutes flashes.
-
TGT starts to flash.
- From target time half until target time is reached
- Screen: As shown in the figure, all of the part that indicates minutes flashes.
- TGT flashes at high speed starting from one minute before the target time.

- Target time reached
- Beep for 10 seconds.
- Screen: Changes as shown in the figure.
- TGT becomes unlit.

- After target time is expired
- Screen: The top right indicator that indicates minutes flashes (at slow speed).
- Elapsed time is measured, with TGT remaining unlit.
- Resetting the elapsed stopwatch time automatically causes TGT to re-appear. You can re-use the same target time, if you want.
Note
- TGT flashes in the above operation even if the watch is in another mode.
To stop the alert beeper
- Pressing any button while the alert beeper is sounding will stop it.
- Pressing D or B operates the elapsed time operation
To perform stopwatch timing without using the Target Time Alarm
Use step 7 under "To set a target time" to disable the target time alarm.
Countdown Timer
The countdown timer can be set within a range of one minute to 60 minutes. An alarm sounds when the countdown reaches zero.
To enter the Countdown Timer Mode
Use C to select the Countdown Timer Mode

To configure the countdown timer
- If a countdown timer operation is in progress, press D to pause it and then press B to reset the target time to its start time.
- If a countdown timer operation is paused, press B to reset the timer to its start time.
- Hold down A until the flashing SET Hold indicator disappears from the display and the minutes digits start to flash. Release A after the digits start to flash.
- Use D (+) and B (–) to change the minutes setting. Holding down either button scrolls at high speed.
- After all the settings are the way you want, press A to exit the setting screen.

To perform a countdown timer operation

To stop the alarm
Press any button.
Checking the Current Time in a Different Time Zone
You can use the World Time Mode to view the current time in one of 31 time zones (48 cities) around the globe. The city that is currently selected in the World Time Mode is called the "World Time City".
- The hour and minute hands indicate information for the currently selected Home City.
- When you enter the World Time Mode, the currently selected city code and city name (English) scroll once across the digital display. After that, the city code remains displayed.
- You can view the name (English) of your Home City by pressing A.

To enter the World Time Mode
Use C to select the World Time Mode.
To view the time in another time zone
In the World Time Mode, press D to change the city code setting.
- Holding down D scrolls at high speed.
- To display the UTC city code (differential 0), press B and D at the same time.
To specify standard time or daylight saving time (DST) for a city
- In the World Time Mode, press D to display the city code (time zone) whose Standard Time/Daylight Saving Time setting you want to change.
- Hold down A for about two seconds.
- This toggles the city code you selected in step 1 between Daylight Saving Time (DST indicator displayed) and standard time (DST indicator not displayed).
- Note that you cannot switch between standard time/ daylight saving time (DST) while UTC is selected as the World Time City.
- The standard time/daylight saving time (DST) setting affects only the currently displayed city. Other cities are not affected.
 for a city")
To swap your Home City and World Time City
In the World Time Mode, hold down B for at least three seconds. This will cause SWAP Hold to flash on the display, and then your Home City and World Time City will be swapped.
Example: To swap the Home City (TYO) and World Time City (NYC)

Using the Alarm
You can set five independent daily alarms. When a daily alarm is turned on, an alarm tone will sound for about 10 seconds each day when the time in the Timekeeping Mode reaches the preset alarm time. One of the alarms is a snooze alarm that repeats every five minutes, up to seven times.
You can also turn on an Hourly Time Signal, which will cause the watch to beep twice every hour on the hour.
To enter the Alarm Mode
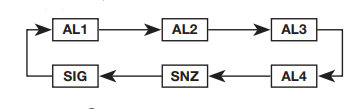
Use C to select the Alarm Mode.
- The snooze alarm screen is indicated by SNZ, while the other alarm screens are numbered AL1 through AL4.
The Hourly Time Signal screen is indicated by SIG. - When you enter the Alarm Mode, the data you were viewing when you last exited the mode appears first.
- If you do not perform any operation for about two or three minutes in the Alarm Mode, the watch will automatically return to the Timekeeping Mode.

To set an alarm time
- In the Alarm Mode, use D to display the alarm whose settings you want to change.
![]()
- Hold down A until the flashing SET Hold indicator disappears from the display and the alarm time hour digits start to flash. Release A after the digits start to flash.
- ALM appears on the display, indicating that alarm setting is enabled.
- Press C to move the flashing between the hour and the minute digits. The selected digits are those that are flashing.
- Use D (+) and B (–) to change the hour and minute settings. Holding down either button scrolls at high speed. When setting the alarm time using the 12-hour format, take care to set the time correctly as a.m. (no indicator) or p.m. (P indicator).
- Press A to exit the setting mode.

To test the alarm
In the Alarm Mode, hold down D to sound the alarm.
To turn an alarm and the Hourly Time Signal on and off
In the Alarm Mode, press D to select an alarm or the Hourly Time Signal.
- When the alarm you want or the Hourly Time Signal is displayed, press B to toggle it between on (ON displayed) and off (OFF displayed).
- The alarm on indicator (when any alarm is on), snooze alarm indicator (when the snooze alarm is on), and the Hourly Time Signal on indicator (when the Hourly Time Signal is on) are shown on the display in all modes.
- SNZ and ALM will be displayed while the snooze alarm is turned on.

To stop the alarm
Press any button.
Illumination
The display of the watch is illuminated for easy reading in the dark.
To turn on illumination
Press L in any mode to illuminate the display.
- You can use the procedure below to select either 1.5 seconds or three seconds as the illumination duration.
To change the illumination duration
- In the Timekeeping Mode, hold down A until the flashing SET Hold indicator disappears from the display and the currently selected city code flashes on the display.
- Press C ten times to display the illumination duration setting screen.
- The current illumination duration setting (1 or 3) will be flashing in the display.
- See the sequence in step 2 of the procedure under "To configure the digital time and date settings" for information about how to scroll through setting screens.
- Press D to toggle the illumination duration between three seconds (3 displayed) and 1.5 seconds (1 displayed).
- After all the settings are the way you want, press A to exit the setting screen.
Adjusting Hand Positions
The watch hands can go out of alignment with the time on the digital display if it is exposed to strong magnetism or impact. If this happens, you should adjust the hand positions.
- You do not need to perform the operation below as long as the analog hands indicate the same time as the digital display.
- In the Timekeeping Mode, hold down A for about five seconds until 0:00 starts to flash. Release A after 0:00 flashes.
- This enters the hour and minute hand adjustment mode.

- If the hour and minute hands are not at 12 o'clock, use D (+) and B (–) to adjust them until they are.
- Holding down either button moves the hands at high speed.
- Press A to return to the Timekeeping Mode. Check to make sure that the time indicated by the hands matches the time on the digital display. If the times don't match, perform the correction procedure above again.

Button Operation Tone
You can turn the button operation tone on or off as desired.
-
Even if you turn off the button operation tone, the Target Time Alarm, alarms, the Hourly Time Signal, and other beepers all operate normally.
To turn the button operation tone on and off
- In the Timekeeping Mode, hold down A until the flashing SET Hold indicator disappears from the display and the currently selected city code flashes on the left side of the lower display.
- Press C nine times to display the button operation tone On/Off screen. The screen will show either KEY or MUTE.
- Press D to toggle the setting between KEY (ON) and MUTE (OFF).
- After all the settings are the way you want, press A to exit the setting screen.

Troubleshooting
Hand Movement and Indications
- The time indicated by the hands is different from the digital time.
This could indicate that the watch has been exposed to magnetism or strong impact, which has caused problems with proper hand alignment. Adjust the watch's hand home position alignment.
Time Setting
-
The current time setting is off by hours.
Your Home City setting may be wrong. Check your Home City setting and correct it, if necessary. - The current time setting is off by one hour. You may need to change your Home City's standard time/daylight saving time (DST) setting. Use the procedure under "Adjusting the Digital Time and Date Settings" to change the standard time/daylight saving time (DST) setting.
World Time Mode
- The time for my World Time City is off in the World Time Mode.
This could be due to incorrect switching between standard time and daylight saving time. See "To specify standard time or daylight saving time (DST) for a city" for more information.
Main Indicators

| Number | Name |
| 1 | Graphic* |
| 2 | Target Time operation in progress |
| 3 | PM indicator |
| 4 | Snooze alarm on indicator |
| 5 | Alarm on indicator |
| 6 | Hourly time signal on indicator |
| 7 | DST indicator |
| 8 | Hands shifted indicator |
* Graphic display in each mode occurs as described below.
| Mode | Flashing |
| Timekeeping | Appears and disappears in time with the seconds of the current time. |
| Stopwatch | Flashes in time with the minutes. |
| Countdown Timer | Flashes in time with the minutes. |
| World Time | Appears and disappears in time with the seconds of the current time in the World Time zone. |
Accuracy at normal temperature: ±15 seconds a month
Digital Timekeeping: Hour, minutes, seconds, p.m. (P), month, day, day of the week
Time format: 12-hour and 24-hour
Calendar system: Full Auto-calendar pre-programmed from the year 2000 to 2099
Other: Home City code (can be assigned one of 48 city codes);
Standard Time/Daylight Saving Time (summer time)
Analog Timekeeping: Hour, minutes (hand moves every 20 seconds)
Stopwatch:
Measuring unit: 1/100 second
Measuring capacity: 23:59' 59.99"
Measuring modes: Elapsed time, split time, two finishes, Direct timing start from the Timekeeping Mode, Target Time Alarm
Countdown Timer:
Measuring unit: 1/10 second
Countdown range: 60 minutes
Countdown start time setting range: 1 to 60 minutes (1-minute increments)
World Time: 48 cities (31 time zones)
Other: Daylight Saving Time/Standard Time; Home City/World Time City switching
Alarms: 5 Daily alarms (with 1 snooze alarm); Hourly time signal
Illumination: LED (light-emitting diode); Selectable illumination duration (approximately 1.5 seconds or 3 seconds)
Other: Button operation tone on/off; Moving the Hands to View the Digital Display
Power Supply: One lithium battery (Type: CR2016)
Approximate battery operating time: 5 years under the following conditions:
- Alarm: 10 seconds/day
- 1 illumination operation (1.5 seconds) per day
Frequent use of illumination runs down the battery.
Specifications are subject to change without notice.
City Code Table


- This table shows the city codes of this watch (As of July 2016).
- The rules governing global times (GMT differential and UTC offset) and summer time are determined by each individual country.

Documents / ResourcesDownload manual
Here you can download full pdf version of manual, it may contain additional safety instructions, warranty information, FCC rules, etc.
Advertisement
Thank you! Your question has been received!


Need Assistance?
Do you have a question about the G-SHOCK GA-700 that isn't answered in the manual? Leave your question here.