Pioneer CDJ-900 Service Manual
Multi player
Hide thumbs
Also See for CDJ-900:
- Operating instructions manual (198 pages) ,
- Manual de instrucciones (32 pages) ,
- Connection manual (10 pages)
Table of Contents
Advertisement
Quick Links
MULTI PLAYER
CDJ-900
THIS MANUAL IS APPLICABLE TO THE FOLLOWING MODEL(S) AND TYPE(S).
Model
Type
CDJ-900
CUXJ
CDJ-900
SYXJ8
CDJ-900
FLXJ
CDJ-900
KXJ5
CDJ-900
AXJ5
For details, refer to "Important Check Points for good servicing".
PIONEER CORPORATION
PIONEER ELECTRONICS (USA) INC. P.O. Box 1760, Long Beach, CA 90801-1760, U.S.A.
PIONEER EUROPE NV Haven 1087, Keetberglaan 1, 9120 Melsele, Belgium
PIONEER ELECTRONICS ASIACENTRE PTE. LTD. 253 Alexandra Road, #04-01, Singapore 159936
PIONEER CORPORATION
Power Requirement
AC 120 V
AC 220 V to 240 V
AC 110 V to 240 V
AC 220 V to 240 V
AC 220 V
4-1, Meguro 1-chome, Meguro-ku, Tokyo 153-8654, Japan
2009
CDJ-900
K-IZE OCT.
ORDER NO.
RRV4000
Remarks
2009 Printed in Japan
Advertisement
Table of Contents

Related Manuals for Pioneer CDJ-900


Summary of Contents for Pioneer CDJ-900
- Page 1 PIONEER CORPORATION 4-1, Meguro 1-chome, Meguro-ku, Tokyo 153-8654, Japan PIONEER ELECTRONICS (USA) INC. P.O. Box 1760, Long Beach, CA 90801-1760, U.S.A. PIONEER EUROPE NV Haven 1087, Keetberglaan 1, 9120 Melsele, Belgium PIONEER ELECTRONICS ASIACENTRE PTE. LTD. 253 Alexandra Road, #04-01, Singapore 159936...
-
Page 2: Safety Information
Health & Safety Code Section 25249.6 - Proposition 65 IMPORTANT Laser Pickup specifications and Laser characteristics THIS PIONEER APPARATUS CONTAINS For CD Wave length (typ) : 790 nm LASER OF CLASS 1. Operation output : 4 mW CW, Class 1... - Page 3 LABEL CHECK (Printed on the bottom plate) (Printed on the bottom plate) (Printed on the bottom plate) CUXJ SYXJ8 FLXJ (Printed on the bottom plate) (Printed on the bottom plate) KXJ5 AXJ5 CDJ-900...
- Page 4 To protect products from damages or failures during transit, the shipping mode should be set or the shipping screws should be installed before shipment. Please be sure to follow this method especially if it is specified in this manual. CDJ-900...
-
Page 5: Table Of Contents
5.4 CONNECTION CHECK WITH THE PC........................40 6. SERVICE MODE ................................. 41 6.1 OUTLINE OF THE SERVICE MODE..........................41 6.2 ABOUT THE DEVICE OF CDJ-900..........................41 6.3 DETAILS ON SERVICE MODE ............................ 42 7. DISASSEMBLY ................................... 55 8. EACH SETTING AND ADJUSTMENT ..........................66 8.1 JOG DIAL ROTATION LOAD ADJUSTMENT ....................... -
Page 6: Service Precautions
For updating, proceed as follows: 1. Insert the USB flash memory device that contains the program. 2. While holding the USB STOP key pressed, turn on the unit. Hold the USB STOP key pressed until the “Pioneer” logo disappears. 3. Updating starts. CDJ-900... -
Page 7: Notes On Link Connector
(R8820–8823, 8839–8844, 8855, and 8856). In such a case, mount a new DCN1186 during replacement. (See the section 10.6 JACB ASSY.) This applies only to the initial-lot products for the destinations SYXJ8 and FLXJ. For products for other destinations, replace with the DCN1185 (330 ohms, Part description No. 331), as described in the circuit diagram. CDJ-900... -
Page 8: Specifications
Before installing or using rekordbox, carefully read the articles in Software end user license agreement. • The specifications and design of this product are subject to change without notice. CDJ-900... -
Page 9: Discs / Files Playable
2.2 DISCS / FILES PLAYABLE CDJ-900... - Page 10 CDJ-900...
-
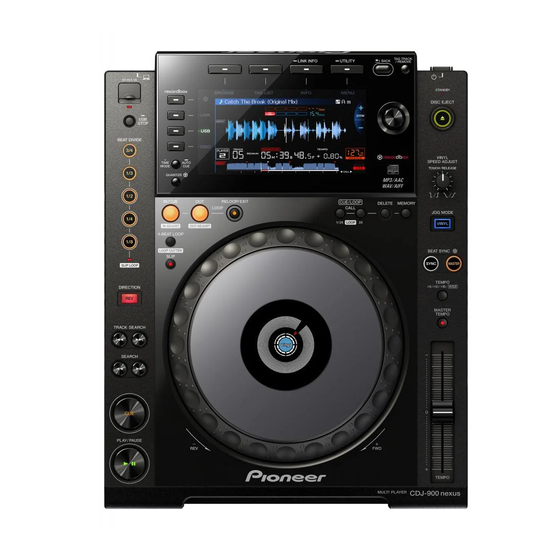
Page 11: Panel Facilities
2.3 PANEL FACILITIES CDJ-900... - Page 12 CDJ-900...
- Page 13 CDJ-900...
-
Page 14: Basic Items For Service
Before shipping out the product, be sure to clean the following positions by using the prescribed cleaning tools. Position to be cleaned Name Part No. Remarks Pickup lenses Cleaning liquid GEM1004 Refer to “9.5 SLOTIN MECHA SECTION”. Cleaning paper GED-008 CDJ-900... -
Page 15: Pcb Locations
ACIN ASSY ENCB MSWB BFLB ASSY ASSY ASSY ASSY ASSY USBA ASSY DFLB ASSY POWER SUPPLY ASSY SLDB ASSY KSWB JFLB ASSY ASSY JOGB ASSY • Bottom view SRV ASSY SLMB ASSY SLOTIN MECHA ASSY TM ASSY • Bottom view CDJ-900... - Page 16 Parts marked by “NSP” are generally unavailable because they are not in our Master Spare Parts List. The > mark found on some component parts indicates the importance of the safety factor of the part. Therefore, when replacing, be sure to use parts of identical designation. LIST OF ASSEMBLIES CDJ-900 CDJ-900 CDJ-900 CDJ-900...
-
Page 17: Jigs List
Lubricants and Glues List Name Part No. Remarks Refer to “9.4 JOG DIAL SECTION”, Lubricating oil GYA1001 “9.5 SLOTIN MECHA SECTION”. Refer to “9.2 EXTERIOR SECTION”, Lubricating oil ZLB-HFD1600 “9.4 JOG DIAL SECTION”. Dyfree GEM1036 Refer to “9.5 SLOTIN MECHA SECTION”. CDJ-900... -
Page 18: Block Diagram
(A TYPE) ADG7021: CUXJ DGND *STRIGHT TYPE ADG1154: SYXJ8, FLXJ DKP3822- ADG7097: FLXJ L=55mm XDG3054: KXJ5 ACIN ASSY ADG7079: AXJ5 D S A 1 0 3 5 - A LIVE (DWR1461: CUXJ) NEUTRAL (DWR1462: SYXJ8, FLXJ, KXJ5, AXJ5) POWER CABLE CDJ-900... - Page 19 The > mark found on some component parts indicates the importance of the safety factor of the part. Therefore, when replacing, be sure to use parts of identical designation. : The power supply is shown with the marked box. CDJ-900...
-
Page 20: Signal Block Diagram
CN7302 CN3001 POWER SUPPLY CN7301 16bit ASSY POWER SUPPLY ACIN ASSY 16bit JA8802 CN8801 CN501 CONTROL OUT 32bit Q506 JA8803 DIGITAL OUT SPDIF SPDIF_OUT IC8801 JA8801 32bit IC8802 IC501 R OUT ROUT IC3003 L OUT LOUT IC8803 JACB ASSY CDJ-900... - Page 21 DFLB ASSY ENCB ASSY 16bit IC109 SDRAM CN8003 256MB CN9403 SHEET SW (DSX1078-) 16bit JOG_SW IC114 JFLB ASSY FLASH CN9402 V9401 JOG FL JH9401 32bit CN9501 IC9401 JOG1 POWER (STEP-UP) JOG2 27V/33V/54V JOGB ASSY 32bit IC505 IC501 SDRAM 256MB CDJ-900...
-
Page 22: Power Supply Block Diagram
IC7007 SI-8005Q 1.5V_REG 5V_REG for SODC 5V -> 1.5V 7.5V -> 5V PQ1LAX95MSP BA00DD0WHFP Power supply setup sequence Show the power supply controlling the setup order by a circuit. V+3R3E V+12 V+3R3 V+7R5 V+27 V+12EUP V-11 V+7R2 V+54 V+33 CDJ-900... - Page 23 Jog Rotate V+3R3 Detect Brows FL V+7R2 CN9501 V+7R2 V+7R2 V+3R3 V+3R3 V+3R3 GUI CPU V+3R3 V+12 V+12 V+12 V+12 V+12 V+12 V+12 for LED CN8002 CN4001 JH4001 JH9701 for LED MSWB ASSY for LED CN8001 CN9201 KSWB ASSY CDJ-900...
-
Page 24: Diagnosis
Canceling USB_B CONTROLLER Data and Browse FL reset from pin A17 of Main CPU. Initialization of the USB_B Pin 46 of USB_B CONTROLLER Display a Pioneer logo (IC1101) becomes "H". on the Browse FL Built-in peripherals Initialization of the • USB_A built-in peripherals •... - Page 25 Set a gain by media judgement result, and take in the S-shaped signal. LD OFF Offset canceling for the 2nd time LD ON for the 2nd time, and focusing TB adjustment TEPP adjustment T close FB adjustment FG adjustment TOC read CLV servo on Searching for the 1st piece of music CDJ-900...
-
Page 26: Troubleshooting
If either of the signal logics is EUP mode.” not the same, check the mounting status of the IC8001 or IC8008 on the DFLB Assy, which corres- ponds to the wrong signal logic. If it is correctly mounted, then it may be defective. Replace it. CDJ-900... - Page 27 CPU_EUP_CONT X : Not Concerned [1-2] Startup stops with the “Pioneer” logo displayed on the screen. (See *1.) If startup stops in such a status, the upstream and downstream communications between the MAIN CPU and PANEL CPU/GUI CPU could not be established.
- Page 28 Check the connection of the LED control connection/ DFLB Assy/ properly made, the port on the MAIN CPU (IC101) signal. Signal errors KSWB Assy may be damaged. Replace it. If the symptom persists after the above corrections, The transistor is defective. Replace it. CDJ-900...
- Page 29 (VR8701) may be defective. Replace it. Check a mounting state of PANEL CPU(IC8005). If the symptom persists after the above Defective PANEL If the mounting is OK, the port may be damaged. DFLB Assy CPU (IC8005) corrections, Replace it. CDJ-900...
- Page 30 “Measuring method” in “8.1 JOG Dial washer, gear, or ment position of the Adjust Plate is reached, shavings Rotation Load Adjustment.” cam plate from the worn-out washer may have increased the friction. Replace the washer, gear, and cam plate with new ones, then reassemble. CDJ-900...
- Page 31 Defective The ETHER PHY CHIP (IC1304) may be defective. If the symptom persists after the above ETHER PHY Replace it. If the symptom persists, the MAIN CPU MAIN Assy corrections, CHIP or MAIN (IC101) may be defective. Replace it. CDJ-900...
- Page 32 Signal errors SRV Assy signal lines. (The LPS1 and LPS2 signals soldered or defective. If soldering is improper, 10.15 WAVE- becomes L when the SW is set to ON.) resolder them. If the symptom persists, replace the FORMS defective parts. CDJ-900...
- Page 33 If it is loosely connected, securely connect it. SRV Assy loose connection H during mode shift. If it is broken, replace it. of cables Defective SW SW power If the symptom persists after the above The SW power-supply is defective. Replace it. power supply supply corrections, CDJ-900...
- Page 34 Check that the SLIN1 signal to Pin 29 of If the signal is not input, check the connections. ASSY(1/2) Signal errors SRV Assy IC7002 is 3.3 V when disc rotation is at If soldering is improper, resolder it. 10.15 WAVE- full speed. FORMS CDJ-900...
- Page 35 Replace it. Replace the parts in the order of (1) FEP (IC7004), If the symptom persists after the above Defective parts SRV Assy (2) SODC (IC7008), (3) DRIVER IC (IC7002), corrections, (4) SRV Assy, then (5) traverse mechanism. CDJ-900...
- Page 36 If the waveform is not proper, check the mounting status of Check the connection of bus line between 10.4 MAIN Signal errors MAIN Assy the SDRAM (IC505) and the connections of the BUS lines. the DSP (IC501) and SDRAM (IC505). ASSY(2/3) If no problem is found, replace the parts. CDJ-900...
- Page 37 If the PNL_TXD or PNL_RXD waveform is not proper, PNL_RXD2 ENCB ASSY check the mounting statuses of the IC8003 and its peripheral parts. If the symptom persists after the above Defective parts DFLB Assy Replace the PANEL CPU (IC8005). corrections, CDJ-900...
- Page 38 Item to be Checked Corrective Action Reference Check the connections of communication 4.2 SIGNAL MAIN Assy line between the MAIN CPU (IC101) and If connection is improper, resolder it. BLOCK DIAGRAM /DFLB Assy PANEL CPU (IC8005) and GUI CPU (IC4002). CDJ-900...
-
Page 39: Failure Judgement Of The Pickup Assy
5. Divide the measured voltage value by 12 ohms (resistance value), and calculate current value. Failure judgment: If the calculated current value exceeds the maximum value, the LD has been degraded LDI (Reference probe pad) Fig. 1 SRV Assy CDJ-900... -
Page 40: Connection Check With The Pc
If the indication changes from 1 to 2 then 3, the link is properly established. If the cable is disconnected, the indication returns to 1. 5. After checking is completed, press the MENU/UTILITY key. The screen displayed before the MENU/UTILITY key was pressed will be restored CDJ-900... -
Page 41: Service Mode
6 Output of the alarm port Explanation of the meaning of output of status terminal on a MAIN Assy. 7 Firmware update. Explanation of the method of firmware update. 6.2 ABOUT THE DEVICE OF CDJ-900 Device Name Function Part No. -
Page 42: Details On Service Mode
[1] Confirmation of the button input and an indication function When it spends a power supply while pushing a TEMPO button and a MEMORY button simultaneously, It is displayed in the BROWSE_FL, "SERVICE MODE", and enters into this mode. (Please continue pushing until "Pioneer LOGO"screen disappears.) When it enters this mode, the TAG-TRACK button is pushed, and the screen is sent as follows, the following status displays are done. - Page 43 Display pattern changes(Refer to the display pattern of BROWSE_FL) TAG TRACK ROTARY SELECTOR (SW) ENCODER PUSH ROTARY SELECTOR (FWD ROTATE) ENCODER g MARK Right movement (Max 10 points) ROTARY SELECTOR (REV ROTATE) ENCODER g MARK Left movement (Max 10 points) CDJ-900...
- Page 44 BROWSE_FL as follows. If the BACK button is pushed, a display will return a previous page. (In DATA_FL, it becomes all putting out lights except the case of all-points light.) Lattice pattern All turning off All turning on CDJ-900...
- Page 45 7.12 8.17 the name "JOGLOAD_900.CSV." 8.68 In addition, data is added whenever it pushes MASTER 8.17 TEMPO button. 8.54 Moreover, the MAC address is filled in as solid identification. 7.82 8.24 137(NG) (judge : 150ms <= Time <= 190ms) CDJ-900...
- Page 46 FL display part as "SERVICE MODE", and will go into this mode. (Please continue pushing until "Pioneer LOGO" screen disappears.) It goes into this mode, and if a TAG-TRACK button is pushed and a screen is sent, the contents of a display will change as follows.
- Page 47 • JOG rotation (except for touching the Table top) • Turn the VINYL SPEED ADJUST VOLUME • Move the TEMPO slider It will return from the auto standby mode. Since a return is the same processing as power supply ON, the service mode is ended. CDJ-900...
- Page 48 GUI CPU displays an error code spontaneously. the communication between MAIN CPU E-8709 COMMUNICATION ERROR When MAIN CPU does not operate completely, can be done. it will be in this mode. Mechanism operation was not completed E-9101 MECHANICAL TIMEOUT within regulation time. ∗ New CDJ-900...
- Page 49 Mode Change (It shifts to the Test opalation mode.) If the MASTER TEMPO button is pushed into player operation mode, MASTER TEMPO LED will light up, and it will shift to the below-mentioned "test operation mode." It is indicated with [TEST MODE] in the indication part. CDJ-900...
- Page 50 Mode Change (The end of the test movement mode) If the MASTER TEMPO button is pushed into "test operation mode", MASTER TEMPO LED will light out, and it will shift to the above-mentioned "player operation mode." It is indicated with [PLAYER MODE] in the indication part. CDJ-900...
- Page 51 Auto device diagnosis of a "[3] Indication of various information", the test port output on a main board can also be checked. When a defect is detected by the device by power supply ON, an alarm port (STATUS TEST POINT) performs the following pulse outputs. CDJ-900...
- Page 52 0.5 s 0.5 s 0.5 s 0.5 s communication Defective failure with the ETHER AHY CHIP 2.5 s SODC Pulse ×3 Pulse ×7 0.5 s 0.5 s 0.5 s USB_B Normal operation CONTROLLER 2.5 s Pulse ×4 0.5 s CDJ-900...
- Page 53 2 Please turn on a power supply, pushing both the buttons of MEDIA SELECT/USB and RELOOP. (Please continue pushing until "Pioneer LOGO" screen disappears.) It is displayed the message of "Connect a USB storage device to the USB port." , USB memory is inserted in USB port of the front or the back.
- Page 54 (One files will be copied if it is one pieces. Two files will be copied if it is two pieces. ……) 2 Please turn on a power supply, pushing both the buttons of MEDIA SELECT/DISC and RELOOP. (Please continue pushing until "Pioneer LOGO" screen disappears.) Insert CD-ROM, if the message "Insert CD-ROM disc" is displayed.
-
Page 55: Disassembly
Diagnosis of SRV Assy (1) Remove the three screws. (BPZ30P080FNI) Bottom plate (2) Remove the eight screws. (BBZ30P060FTC) (3) Remove the bottom plate. ×3 Front • Bottom view Diagnosis SRV Assy Front • Bottom view CDJ-900... - Page 56 (1) Remove the two screws. (BBZ30P060FTB) (2) Remove the two screws. (BPZ30P200FTB) (3) Remove the five screws. (BPZ30P080FNI) • Rear view Front • Bottom view (4) Remove the control panel section. Control panel section (5) Disconnect the flexible cable. CN2001 CDJ-900...
- Page 57 (2) Remove the five screws. (BBZ30P060FTC) MAIN Assy JACB Assy (3) Stand the MAIN and JACB Assemblies. JACB Assy MAIN Assy Diagnosis Even if you do not lift the PC board, a diagnosis is possible on a part side. CDJ-900...
- Page 58 This boss is not installation position. [2] Slotin Mechanism Section SLMB Assy (1) Disconnect the one connector. (2) Unhook the four hooks. (3) Release the jumper wires, as required. (4) Remove the slotin mechanism section. CN8901 Slotin mechanism section CDJ-900...
- Page 59 (1) Short-circuit two positions of C and D soldering. (short) Pickup Note: After working, connect the flexible cable, then remove the soldered joint (open). • Rear view (2) Disconnect the three flexible cables. SRV Assy CN7003 CN7001 CN7002 Front • Bottom view CDJ-900...
- Page 60 (3) Remove the four DM screws. (DBA1260) (4) Remove the four float springs (G5). (5) Hook the four float springs (G5) to the four hooks of the float base 04 Assy. Float base 04 Assy Float base 04 Assy Float spring (G5) Float spring (G5) CDJ-900...
- Page 61 Damper [2] TM Assy-03S (1) Unhook the four hooks. (2) Release the flexible cables, as required. (3) Remove the TM Assy-03S. TM Assy-03S Note on the float rubber installation Pole of the float base 04 Assy Hook ×2 CDJ-900...
- Page 62 Cleaning the pickup lens Before shipment, be sure to clean the pickup lens, using the following cleaning materials: Cleaning liquid : GEM1004 Cleaning paper: GED-008 Pickup lens Arrangement of the flexible cable for pickup Flexible cable for pickup • Bottom view CDJ-900...
- Page 63 About details of Adjustment etc., refer to the Adjust plate “8.1 JOG DIAL ROTATION LOAD ADJUSTMENT”. Screw tightening order The other screws are random order. KSWB Assy DFLB Assy BFLB Assy JFLB Assy MSWB Assy SLDB Assy Front • Bottom view CDJ-900...
- Page 64 (5) Unhook the three hooks. (6) Remove the JOG section. JOG section (7) Remove the three screws. (DBA1265) (8) Remove the SW ring. SW ring ×3 Note: Be careful not to lost SW spring. SW spring CDJ-900...
- Page 65 5. When making a connection, be sure to first release the lock of the connector then securely relock the connector after making the connection. JOG holder M Pasting position of the SW cushion HH48/2 SW cushion HH48/2 (×9) Sheet SW CDJ-900...
-
Page 66: Each Setting And Adjustment
Remove the screw fixing the adjust plate, then screw it into the hole corresponding to the value (-1, -2, -3, -4, +1, +2 or +3) for a load to be added: -1, -2, -3, -4 : To decrease the load +1, +2, +3 : To increase the load CDJ-900... -
Page 67: Items For Whitch Users Setting Is Available
Flash ROM IC114 MAIN Statuses of keys JOG MODE CDJ/VINYL 8.3 UPDATING OF THE FIRMWARE AND RECOVERY For details on updating of firmware and recovery of the main unit, see [7] UPDATING OF FIRMWARE in “6.3 DETAILS ON SERVICE MODE.” CDJ-900... -
Page 68: Exploded Views And Parts List
Screws adjacent to b mark on product are used for disassembly. For the applying amount of lubricants or glue, follow the instructions in this manual. (In the case of no amount instructions, apply as you think it appropriate.) 9.1 PACKING SECTION FLXJ Only CUXJ, SYXJ8 Only KXJ5 Only CDJ-900... - Page 69 13 Information Sheet DRM1338 NSP 14 License Key Label DXA2190 15 Caution Card SB See Contrast table (2) (2) CONTRAST TABLE CDJ-900/CUXJ, SYXJ8, FLXJ, KXJ5 and AXJ5 are constructed the same except for the following: CDJ-900 CDJ-900 CDJ-900 CDJ-900 CDJ-900 Mark...
-
Page 70: Exterior Section
9.2 EXTERIOR SECTION Refer to “9.3 CONTROL PANEL SECTION”. DFLB CN8004 Lubricating oil (ZLB-HFD1600) AXJ5 Only Refer to “9.5 SLOTIN MECHA SECTION”. SLMB CN8901 Pickup Spindle Stepping Motor Motor CDJ-900... - Page 71 40 Screw BPZ30P200FTB 20 Cushion DEC3177 41 Screw BPZ30P080FTB 42 Screw BSZ30P060FTC (2) CONTRAST TABLE CDJ-900/CUXJ, SYXJ8, FLXJ, KXJ5 and AXJ5 are constructed the same except for the following: CDJ-900 CDJ-900 CDJ-900 CDJ-900 CDJ-900 Mark Symbol and Description /CUXJ /SYXJ8...
-
Page 72: Control Panel Section
9.3 CONTROL PANEL SECTION JFLB CN9403 MAIN CN2001 Refer to “9.4 JOG DIAL SECTION”. CDJ-900... - Page 73 37 Encoder Stay DNF1840 38 Earth Plate DNH2875 39 Earth Plate S DNH2906 40 Earth Plate L DNH2907 41 USB Lens DNK5353 42 EUP Lens DNK5408 > 43 Control Panel DNK5440 44 Display Panel DNK5442 45 Encoder Ring DNK5489 CDJ-900...
-
Page 74: Jog Dial Section
9.4 JOG DIAL SECTION Lubricating oil (ZLB-HFD1600) Lubricating oil (ZLB-HFD1600) Lubricating oil (ZLB-HFD1600) DFLB CN8003 Lubricating oil (GYA1001) Lubricating oil (GYA1001) CDJ-900... - Page 75 25 • • • • • 26 • • • • • 27 • • • • • 28 • • • • • 29 • • • • • 30 Screw (FE) DBA1265 31 Screw BPZ20P100FTC 32 Screw BPZ30P080FNI 33 Screw IPZ20P060FTC CDJ-900...
-
Page 76: Slotin Mecha Section
(GYA1001) CN7004 Dyfree (GEM1036) Dyfree (GEM1036) Dyfree (GEM1036) Lubricating oil (GYA1001) Lubricating oil (GYA1001) CN7001 Cleaning liquid (GEM1004) Cleaning paper (GED-008) CN7002 Note: The TM Assy 03-S is supplied only in assembly form, not as a single parts. CN7003 CDJ-900... - Page 77 32 Vessel Cushion C DEC2854 33 Front Sheet DED1132 34 Float Base 04 Assy DXB1838 35 Floating Rubber VEB1351 36 Binder (SKB090BK) ZCA-SKB90BK 37 • • • • • 38 • • • • • 39 Screw BPZ20P060FTC 40 Screw BPZ30P080FNI CDJ-900...
-
Page 78: Schematic Diagram
V i n V I N V O U T C 7 0 0 9 R 7 0 3 0 R 7 0 3 9 1.5V REG IC 3.3V REG IC 1 0 K 3 . 3 k GND_TOMAIN_1 GND_TOMAIN GNDD CDJ-900... - Page 79 : Tracking Servo Signal Route Therefore, when replacing, be sure to use parts of (SP) : Spindle Motor Signal Route identical designation. (ST) : Stepping Motor Signal Route (LO) : Loading Motor Signal Route CDJ-900...
-
Page 80: Srv Assy (2/2) And Slmb Assy
E P 0 5 Q 0 6 R 7 3 0 9 2 2 k V-11 GND_TOMAIN V+3R3 3.3V DC-DC GND2 V+12_5 V+3R3_2 GND_TOMAIN L 7 3 0 3 C T H 1 2 5 3 - A GND_TOMAIN CDJ-900... - Page 81 O U T 2 R 7 3 3 7 FCS_A I N + 1 I N - 2 R 7 3 4 1 R 7 3 2 9 from(1/2) to(1/2) V S S I N + 2 VHALF2 GNDD CDJ-900...
-
Page 82: Main Assy (1/3)
C S S 1 7 5 3 - A GNDD 48MHz GNDD GNDD GNDD CPU-USB-ETH-SD CPU-US CPU_BUS CPU_BU CPU-DS V+3R3_CPU V+3R3_CPU C P U _ D S P 7 1 0 _ B O O T to IC122 for STATUS CHECK GNDD ALARM PORT CDJ-900... - Page 83 ENDIAN R 2 9 2 0:BIG CPU_MODE7 CPU_MODE3 1:LITTLE 4 . 7 k CPU_ADDRESS_BUS CPU_MODE2 CPU_MODE8 MODE7 USB CLOCK CPU_MODE1 0:EXT CLOCK 1:XTAL CPU_DATA_BUS MODE8 SYSTEM CLOCK CPU_MODE5 0:EXT CLOCK 1:XTAL CPU_BUS CPU_MODE4 CPU-USB-ETH-SD CPU-USB-ETH-SD GNDD CPU_BUS CPU-DSP-DAC-PANEL V+3R3_CPU CDJ-900...
- Page 84 CDJ-900...
- Page 85 CDJ-900...
- Page 86 CDJ-900...
- Page 87 CDJ-900...
-
Page 88: Main Assy (2/3)
R 3 1 2 0 GNDD GNDD X 5 0 3 C S S 1 6 2 0 - A 16.934MHz R 3 0 7 6 D A C _ M C L K 1 0 0 to DAC GNDD CDJ-900... - Page 89 The > mark found on some component parts indicates Detailed page : Analog Audio Signal Route the importance of the safety factor of the part. Therefore, when replacing, be sure to use parts of : Digital Data Signal Route identical designation. CDJ-900...
- Page 90 CDJ-900...
- Page 91 CDJ-900...
- Page 92 CDJ-900...
- Page 93 CDJ-900...
-
Page 94: Main Assy (3/3) And Usba Assy
GNDD RS1/16SS****F Q1301 R 1 3 6 2 RS1/16SS****D RS1/2SP***J 1/2W RS1/4SA***J 1/4W F1303 RS1/10SR***J DTL1106-A 1/10W CKSSYB or CKSRYB UM6K1N from CPU(1/3) CCSSCH R 1 3 4 8 CEHVAW CIRCUIT GND GNDD GNDD ANALOG GND GNDA CPU-USB-ETH-SD GNDD CDJ-900... - Page 95 USB_RST R 1 1 0 7 from CPU(1/3) (USB RST) The > mark found on some component parts indicates the importance of the safety factor of the part. Therefore, when replacing, be sure to use parts of identical designation. CDJ-900...
-
Page 96: Jacb Assy
D C N 1 1 8 5 - A D C N 1 1 8 5 - A V-10A R 8 8 5 5 GNDA_3 NJM4580MD D C N 1 1 8 5 - A I C 8 8 0 3 CDJ-900... - Page 97 FRONT SHEILD TYPE V-10A GNDA_3 DKB1089-A JA8803 GNDA GNDA_3 R 8 8 1 8 R 8 8 8 0 SPDIF DIGITAL GNDD 80MD : Analog Audio Signal Route : Digital Data Signal Route : Mute Signal Route : Control Signal Route CDJ-900...
-
Page 98: Dflb And Encb Assys
5 2 4 9 2 - 1 9 2 0 IC8010 GNDD C 8 0 3 3 I N - G N D CN9403 NJM2392M C 8 0 3 4 4 7 u / 1 6 EUP POWER SUPPLY CDJ-900... - Page 99 V O U T G N D The > mark found on some component parts indicates BD45302G the importance of the safety factor of the part. Therefore, when replacing, be sure to use parts of GNDD RESET IC identical designation. GNDD GNDD CDJ-900...
-
Page 100: Kswb Assy
C 9 2 0 8 S 9 2 0 7 REV_SW GNDD D S G 1 0 7 9 - A C 9 2 0 7 GNDD LED DYNA UTILITY STATU NOTES NO MOUNT RS1/10SR CKSRYB CIRCUIT GND GNDD CDJ-900... - Page 101 Q 9 2 0 8 PLAY1 PLAY2 PLAY GNDD AS_IDCM3 Q 9 2 1 1 L T C 1 2 4 E U B GNDD LED DYNAMICS DRIVE AS_IDC1 UTILITY STATUS AS_IDC2 Duty ratio GNDD_2 AS_IDC3 AS_IDC4 GNDD_1 GNDD CDJ-900...
-
Page 102: Sldb Assy
R 8 7 0 4 D8711 G N D S NOTES NO MOUNT GNDS GNDS RS1/10SR CKSRYB Tempo Slider CEHAR C H A S S CHASSIS GND GNDS (6% to 100%) 3.3V CIRCUIT GND GNDD CENTER 1.65V (ADCT) (6% to 100%) CDJ-900... - Page 103 S 8 7 0 5 MT-SW V S G 1 0 2 4 - A C 8 7 0 6 G N D S GNDS GNDD C H A S S I S E A R T H P O I N T CDJ-900...
-
Page 104: Bflb Assy
TC7SH08FUS1 V+3R3 IC4001 R 4 0 1 2 GNDD GNDD I N B D S S 1 1 8 3 - A FLCON_RESET I N A O U T Y 4 . 7 k 19.660MHz GNDD X4001 GNDD GNDD CDJ-900... - Page 105 J H 4 0 0 1 GNDD GNDD V+12 GNDD KEY4 KEY4 BROWS-LED V+3R3 BROWS-LED TAG_LIST-LED TAG_LIST-LED INFO-LED GNDD INFO-LED MENU-LED MENU-LED GNDD 5 1 0 4 8 - 0 7 0 0 GNDD 8 3 - A 19.660MHz X4001 CDJ-900...
-
Page 106: Mswb Assy
R 9 7 2 0 R 9 7 2 1 R 9 7 2 2 3 . 3 k 3 . 9 k 5 . 6 k 1 0 k 2 2 k TAG TRACK BROWSE-SW TAG LIST-SW INFO-SW MENU-SW BACK-SW /REMOVE-SW GNDD CDJ-900... -
Page 107: Jogb Assy
1 0 0 VLED JOG2 JOG1 GND1 R 9 5 0 2 V+3R3 JH9401 1 0 0 GNDD SEDS-7573 5 2 1 5 1 - 0 4 1 0 GNDD GNDD CN9501 JOG ROTATE DETECT NOTES RS1/10SR***J CKSRYB CIRCUIT GND GNDD CDJ-900... -
Page 108: Jflb Assy
GNDD X K P 3 0 1 9 - A CAUTION FOR CONTINUED PROTECTION AGAINST RISK OF FIRE. REPLACE ONLY WITH SAME TYPE No. 491.500 CN8003 MFD. BY LITTELFUSE INC. FOR P9401,9405 49101.5 MFD. BY LITTELFUSE INC. FOR P9402 CDJ-900... - Page 109 A E K 7 0 6 5 - A 49101.5 GNDD The > mark found on some component parts indicates the importance of the safety factor of the part. Therefore, when replacing, be sure to use parts of identical designation. CDJ-900...
-
Page 110: Power Supply And Acin Assys
T3.15AL 250V 220p D3SBA60 SFPL-52 R114 D101 0.22 220p C101 SCK15057M 0.0022 EXT41641-687C B2P3-VH-LF RC101 470k FME-220A C102 0.001 330/25V /25V 470k SARS04 MTZJ24B FMV13N60ES BAS21-03W KTA1666 100k EG01C SSC6210A UDZS20B BAS21-03W BAS21-03W 0.33 0.01 0.001 0.001 MTZJ30B PS2571-1 0.0022 CDJ-900... - Page 111 FME-220A C102 R105 PS2571-1 C103 R111 L101 /25V D102 /25V UDZS5.1B R106 R103 2.2k TCB-064 C104 R104 3.3k Q102 0.22 CN7301 R108 KTC3875 100k R113 Z101 STANDBY-CONTROL IN R112 4.7k RX102 R107 Q101 KRC122S D103 L103 UDZS15B GNDD FBR07VA121 CDJ-900...
-
Page 112: Waveforms
V: 500 mV/div. H: 100 msec/div. V: 1.0 V/div. H: 20.0 msec/div. IC108-pin 38 (CPU_CLKOUT) V: 1.0 V/div. H: 4.0 msec/div. IC7002-pin 29 (SLIN1) V: 5.0 V/div. H: 20.0 msec/div. IC7002-pin 30 (SLIN2) V: 5.0 V/div. H: 20.0 msec/div. CDJ-900... - Page 113 V: 500 mV/div. H: 100 μsec/div. V: 1.0 V/div. H: 400 μsec/div. V: 500 mV/div. H: 80.0 nsec/div. V: 500 mV/div. H: 20.0 nsec/div. F1102-pin 1 (CPU_USB_D-) CN501-pin 5 (LOUT) V: 500 mV/div. H: 100 μsec/div. V: 1.0 V/div. H: 400 μsec/div. CDJ-900...
- Page 114 MODE: POWER ON Trigger: CH1, 5 V IC8005-pin 13 (XOUT) CN9403-pin 4 (V+12) V: 500 mV/div. H: 80.0 nsec/div. V: 10.0 V/div. H: 100 msec/div. TP-VFDP2R9_F1 (VFDP2R9_F1) V: 5.0 V/div. H: 100 msec/div. TP-VFDP2R9_F2 (VFDP2R9_F2) V: 10.0 V/div. H: 100 msec/div. CDJ-900...
- Page 115 CDJ-900...
-
Page 116: Pcb Connection Diagram
C7090 C7092 R7085 C7087 R7101 R7086 C7052 R7099 C7086 C7060 NRESET R7097 C7084 R7100 R7095 C7083 R7098 C7081 R7096 C7330 C7327 C7342 C7336 IC7003 D7306 IC7303 V+12 IC7302 IC7301 C7009 C7333 C7304 R7322 C7307 R7015 C7019 C7310 C7301 CN7301 CDJ-900... - Page 117 R7060 C7306 C7328 R7061 R7324 R7323 D7302 C7024 C7025 C7335 C7334 D7301 C7022 R7048 2. View point of PCB diagrams. R7309 R7305 D7307 R7131 R7065 Connector Capacitor R7066 R7129 R7127 R7074 SIDE A (DNP2492-B) SIDE B P.C.Board Chip Part CDJ-900...
- Page 118 SIDE B SLMB ASSY SRV ASSY (DNP2493-C) CDJ-900...
- Page 119 SIDE B (DNP2492-B) CDJ-900...
-
Page 120: Main Assy
R337 R335 C3011 C187 R109 C235 C245 R366 C1129 C3020 C235 C3017 C3090 R3012 C203 IC123 R3006 V+3R3 R3029 R365 R364 C3001 R3028 D3001 C3087 Q3002 C3035 D3001 V+1R2 V+12V L3002 C3044 GNDD Q1317 IC1304 IC119 IC123 IC1102 Q3002 CDJ-900... - Page 121 Q506 R635 R639 C580 C3002 R636 R365 R665 C3001 Q510 R663 R659 R662 R658 Q3001 Q512 Q511 Q509 R660 Q3002 R656 (DNP2592-A) 47 48 IC108 IC501 IC507 Q578 C123 IC109 Q1311 Q1312 Q3002 Q3001 Q511 Q506 Q512 Q510 Q509 CDJ-900...
- Page 122 C3095 Q1304 R3124 D3008 R3035 C3098 R3038 C3096 D3009 F103 Q1306 Q1305 F102 F1306 R3040 C3124 C3123 C3125 CONTACT SIDE CN1303 C571 C3100 CN1303 CN7005 IC505 IC114 Q1310 IC124 IC3003 Q1315 Q1316 Q1308 Q1302 Q1304 Q1305 Q1303 Q1307 Q1306 CDJ-900...
- Page 123 X104 C242 C1120 C124 F103 C122 R3069 C123 F102 C121 C125 C126 D3006 R3024 D3003 C3029 C3038 R3027 C3093 IC3002 C3026 C3124 C3125 R326 ONTACT SIDE CN3001 CN3001 (DNP2592-A) CN7302 IC1101 IC102 IC120 IC122 Q1301 IC124 IC101 IC3002 IC115 CDJ-900...
-
Page 124: Usba And Jackb Assys
J8803 [[ G ]] MUTE R8813 J8802 C8805 V-10A DWX3023- JACB C8841 J8808 C8806 C8842 C8844 J8804 1.V+10A V+10A 2.ROUT (DNP2493-C) 3.GNDA 4.GNDA 5.LOUT J8807 6.V-10A V-10A J8809 7.REF2R5 V-10A 8.MUTE 9.CONT1 10.CONT2 11.GNDD CN8801 12.SPDIF J8811 CN8801 CN501 CDJ-900... - Page 125 IC8802 C8849 IC8801 IC8801 R8823 V+10A [[ G ]] C8817 R8821 R8882 (DNP2493-C) V-10A V-10A R8833 Q8807 1.V+10A Q8805 Q8807 10.CONT2 2.ROUT 11.GNDD 3.GNDA 12.SPDIF R8822 4.GNDA Q8821 5.LOUT R8881 6.V-10A 7.REF2R5 Q8821 8.MUTE C8823 9.CONT1 CN8801 VA8800 CN8801 CDJ-900...
-
Page 126: Dflb And Encb Assys
J8067 J8040 D8006 J8005 V+7R2 V+3R3E J8001 V+7R2 J8071 V+12 J8010 S8004 DFLB J8073 J8022 LOOP OUT GNDD LOOP IN J8003 S8002 S8003 LOOP OUT J8032 J8049 ENCB ASSY J8063 CN8501 CN8501 4.ENC_1 J8501 3.ENC_2 2.ENC_SW 1.GNDD S8501 (DNP2493-C) CDJ-900... - Page 127 CALL > CALL < S8007 S8005 S8006 DWX3021 J8015 J8064 GNDD J8033 J8065 1.GNDS (DNP2493-C) J8025 2.ADIN 3.ADCT 4.V+3R3E J8038 5.MT_LED SLIP 6.V+12 7.VINYL_LED J8029 J8069 8.V+5 J8042 9.KEY0 10.GNDD D8007 11.TCH/REL 12.EJECT_LED GNDD 13.THC/REL Q8001 Q8008 CN8006 CN8006 CN8701 CDJ-900...
- Page 128 7.J_BK MEMORY 25.FLCON_CNVSS 18.GNDD 8.V+3R3 19.V+54 9.GNDD GNDD DWX3021- DELETE CALL < 13.EUP_LED (DNP2493-C) 10.GNDD 12.EJECT_LED 9.KEY0 11.TCH/REL 8.V+5 7.VINYL_LED SLIP 6.V+12 5.MT_LED 4.V+3R3E 3.ADCT 2.ADIN 1.GNDS Q8007 GNDD CONTACT SIDE CN4012 NOTE: The encircled numbers denote measuring point. CDJ-900...
- Page 129 GNDD GNDD GNDD Q8003 GNDD V+12 Q8006 V+3R3E Q8004 V+7R2 R8076 V+3R3E V+7R2 ADIN V+12 CN8001 Q8002 DFLB RELOOP GNDD 16.KEY2_B 17.CUE_SW 18.PLAY_SW 19.REV_SW 14.AS_IDCM2 20.GNDD 15.SHIFT_SW ENCB ASSY CN8501 1.GNDD GNDD 2.ENC_SW 3.ENC_2 4.ENC_1 C8501 D8502 S8501 (DNP2493-C) CDJ-900...
-
Page 130: Kswb And Sldb Assys
CN9201 S9205 S9203 S9204 S9202 S9207 CN9201 CN8001 SLDB ASSY GNDD DWS1417 J8704 SLDB J8703 V+3R3E 1.GNDS VR8702 2.ADIN 3.ADCT D8706 4.V+3R3E D8708 5.MT_LED 6.V+12 D8707 7.VINYL_LED 8.V+5 9.KEY0 S8702 10.GND 11.TCH/REL CN8701 12.EJECT_LED 13.EUP_LED S8705 S8701 CN8701 CN8006 CDJ-900... - Page 131 6.SHIFT_SW 7.AS_IDCM2 S9208 8.AS_IDCM3 9.AS_IDC1 D9213 D9209 10.AS_IDC2 11.AS_IDC3 S9209 12.AS_IDC4 13.AS_IDCM1 14.V+5 D9211 D9206 15.8KEY_SW S9212 S9210 16.4KEY_SW 17.2KEY_SW 18.1KEY_SW 19.USB_SW 20.USB_LED (DNP2493-C) WS1417 C8701 J8719 GNDS D8706 V+3R3E J8701 ADIN J8709 VR8701 S8705 S8704 TEMPO SLIDER (DNP2493-C) CDJ-900...
- Page 132 13.AS_IDCM1 14.V+5 15.8KEY_SW 16.4KEY_SW D9206 D9211 D9208 17.2KEY_SW 18.1KEY_SW S9207 19.USB_SW KSWB 20.USB_LED DWS1416 SLDB ASSY [[ G ]] BEND DWS1417 GNDD D8710 SLDB VR8701 D8706 ADD SOLDER ADD SOLDER V+3R3E BEND Q8703 GNDS S8705 ADIN D8711 S8704 Q8703 CDJ-900...
- Page 133 CN9201 Q9205 Q9207 Q9203 Q9209 Q9201 Q9208 Q9211 Q9210 Q9204 Q9202 Q9206 V+3R3E GNDD V+3R3E Q8704 KEY0 VR8702 D8707 C8709 V+12 D8708 MT-LED S8705 VINYL-VOL ADCT EJECT-LED ADIN V+3R3E S8701 EUP-LED GNDS CN8701 CONTACT SIDE (DNP2493-C) CN8701 Q8704 Q8701 CDJ-900...
-
Page 134: Bflb And Mswb Assys
MSWB ASSY J4028 V+12 LINK J9701 V+12 1.V+12 2.GNDD 3.KEY4 J4020 4.BROWS-LED KEY4 5.TAG_LIST-LED 6.INFO-LED J4017 7.MENU-LED GNDD J4012 J9703 V+12 J4008 J4024 J4015 J4022 J4021 J4023 J4006 J4003 J4004 J4005 J4009 J4010 J4027 Q4005 Q4005 Q4006 Q4006 (DNP2494-C) (DNP2494-C) CDJ-900... - Page 135 SIDE B NOTE: The encircled numbers denote measuring point. BFLB ASSY MSWB ASSY Q4002 Q4003 Q4004 Q9701 IC4002 Q9702 Q9703 IC4001 Q9704 IC4003 (DNP2494-C) (DNP2494-C) CDJ-900...
-
Page 136: Jogb And Jflb Assys
1.JOG_SW J9437 C9410 2.NC 3.GNDD J9438 J9434 J9422 J9413 GNDD J9421 J9448 J9416 C9421 J9403 T9401 J9418 J9423 V+DCHG J9420 J9447 C9408 C9404 JH9401 C9402 C9405 4.JOG2 3.JOG1 2.V+3R3 1.GNDD (DNP2494-C) IC9402 Q9416 Q9411 JOGB ASSY JOGB DWX3026- (DNP2494-C) CDJ-900... - Page 137 R9473 JH9401 C9405 4.JOG2 3.JOG1 2.V+3R3 1.GNDD (DNP2494-C) 73 69 C9402 Q9414 Q9412 Q9413 IC9401 Q9406 Q9409 Q9410 Q9404 Q9419 Q9420 Q9407 Q9415 Q9405 Q9403 Q9417 Q9401 Q9418 Q9408 Q9402 JOGB ASSY 4.JOG2 3.JOG1 2.V+3R3 DWX3026- 1.GNDD JOGB (DNP2494-C) CDJ-900...
-
Page 138: Power Supply And Acin Assys
11.8 POWER SUPPLY and ACIN ASSYS SIDE A POWER SUPPLY ASSY ACIN ASSY [[ G ]] PRIMARY JP1_1 ACIN NEUTRAL DWR1462 OTHERS DWR1461 LIVE (DNP2494-C) CDJ-900... - Page 139 SIDE B POWER SUPPLY ASSY ACIN ASSY (DNP2494-C) CDJ-900...
-
Page 140: Pcb Parts List
> IC 7007 PQ1LAX95MSPQ R 7317 RS1/10SR2701D IC 7008 MN103S71F R 7321 RS1/10SR1002D > IC 7301-7303 SI-8005Q Other Resistors RS1/10SR###J Q 7002 2SA1036K(PQR) Q 7003 HN1B04FU CAPACITORS C 7001-7007,7030,7078 CKSRYB103K50 Q 7005,7006 RT1N144M C 7008,7019,7024-7026 CKSRYB104K16 D 7301,7302 EP05Q06 CDJ-900... - Page 141 CN 8901 PLUG (5P) KM200NA5 CN 2001 26P CONNECTOR VKN1430 CN 3001 CONNECTOR AKM1284 ID LABEL ASSY AXW7015 > PROTECTOR (0.500 A) DEK1120 MAIN ASSY > PROTECTOR (1.250 A) DEK1123 SEMICONDUCTORS RESISTORS IC 101 R5S77641N300BG IC 102 BD45302G R 108 RS1/16SS5101F CDJ-900...
- Page 142 R 8836,8838,8853,8854 DCN1188 C 1342,1363 CEHVAW221M6R3 R 8839-8844,8855,8856 DCN1186 C 1362,3115-3118 CKSSYB102K50 R 8867,8876-8879,8881 RS1/8SQ0R0J R 8888 RS1/8SQ0R0J C 1365,1379 CCSSCH120J50 C 1387 CEHVAW101M6R3 Other Resistors RS1/10SR###J C 3002,3005-3008,3038 CKSRYB104K16 C 3003,3111-3113 ACG1142 CAPACITORS C 3011,3044 ACH1495 C 8805,8806 CCH1357 CDJ-900...
- Page 143 D 8701-8704 1SS352 Other Resistors RS1/10SR###J D 8705 SLR343BC4T(JKLM) D 8706,8707 SLI-343U8RC(HJKL) CAPACITORS D 8708 SLI-343M8C(FGHJ) C 8001-8003,8006,8023 CKSRYB104K16 C 8004,8007-8012,8015 CCSRCH102J50 MISCELLANEOUS C 8013 CKSRYB474K10 VR 8701 VR DCV1009 C 8016,8044-8051,8059 CCSRCH102J50 VR 8702 POTENTIOMETER DCS1062 C 8020,8022 CCSRCH100D50 CDJ-900...
- Page 144 R 9443 RS1/8SQ102J R 9444 RS1/8SQ101J MISCELLANEOUS R 9445 RS1/10SR3302F S 9701-9706 SWITCH VSG1024 R 9446 RS1/10SR1601F R 9449 RN1/16SE2201D RESISTORS R 9450 RN1/16SE1502D All Resistors RS1/10SR###J R 9451 RN1/16SE6802D MISCELLANEOUS R 9452 RS1/8SQ223J JH 9701 7P CABLE HOLDER 51048-0700 CDJ-900...
- Page 145 DSA1035 > JP 1 CONNECTOR ASSY 2P DKP3822 CAPACITORS > C 9999 ACG7033 ACIN ASSY (DWR1462) MISCELLANEOUS > JA 1 AC INLET 1P XKP3084 > SWITCH DSA1035 > JP 1 CONNECTOR ASSY 2P DKP3822 CAPACITORS > C 9999 ACG7033 CDJ-900...