Sharp DR-P320 - Portable Digital Radio Manual
- User manual (97 pages) ,
- Quick start manual (136 pages)
Advertisement
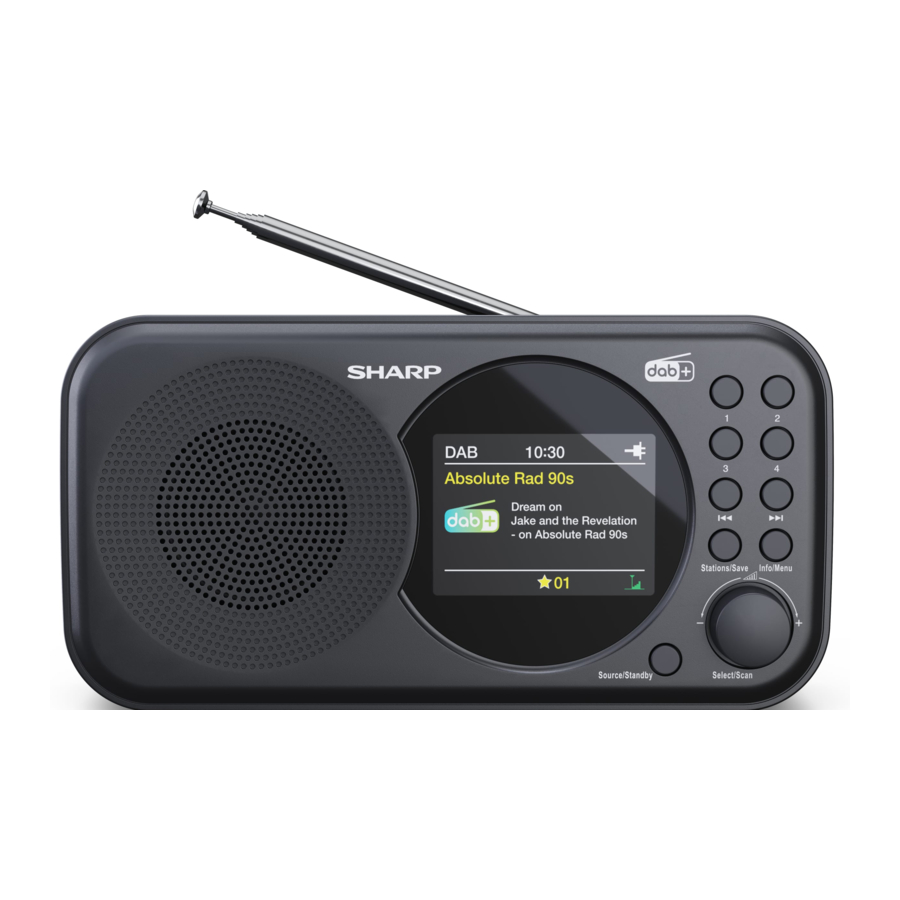
Panels/Controls
FRONT PANEL

- Display screen
- Source/Standby - Press to switch on the unit.
Press and hold to switch off the unit.
Press to switch between DAB and FM mode when the radio is on. - Stations/Save – short press takes you to "preset recall" i.e. saved stations. Long press takes to you "preset store" to choose location number where you save a station.
- Select/Scan, Volume (Scroll) – Press and hold the Select/Scan button to auto scan for available radio stations, press it again to stop the auto scan and enter the Menu.
Volume +/- knob - Turn to adjust the volume level or to scroll the cursor within Menu. - Info/Menu – Press the button to change display options. Press and hold the button to enter or exit the menu.
![]() - In FM mode pressing will manually change the frequency by +0.05MHz, press and hold to scan forward to the next available radio station on the frequency. In DAB mode pressing takes you to the list of available stations.
- In FM mode pressing will manually change the frequency by +0.05MHz, press and hold to scan forward to the next available radio station on the frequency. In DAB mode pressing takes you to the list of available stations.![]() - In FM mode a pressing will manually change the frequency by -0.05MHz, press and hold to scan back to the next available radio station on the frequency. In DAB mode pressing takes you to the list of available stations.
- In FM mode a pressing will manually change the frequency by -0.05MHz, press and hold to scan back to the next available radio station on the frequency. In DAB mode pressing takes you to the list of available stations.- Pre-set buttons (1/2/3/4) - Press the corresponding button to select saved/preset radio station 1-4. Long press the coresponding number to store current radio station in to preset number.
REAR PANEL

- Battery compartment cover
- DC IN (micro USB)
- Switch - DC power on / Battery power on
- Telescopic antenna/aerial
Battery installation
- Remove the battery compartment cover on the rear panel of the unit.
- Install 4 x AA/R6 (1,5V) batteries (not included) into the battery compartment making sure that the battery have been inserted with the correct polarities matching the symbols +/- as indicated inside the battery compartment.
- Replace the cover.
NOTE:
- Remove the battery when you do not intend to use the unit for a long time.
- Weak battery can leak and severely damage the unit.
- Batteries must not be exposed to any source of excessive heat e.g. direct sunlight, indoor heating, fire etc.
- Be environmentally friendly and dispose of batteries according to your government regulations.
- When using batteries ensure that the power source switch is turned to battery.

To preserve battery life, set power switch to DC IN when battery is not in use.
FM tuner Operation
- Short press Source/Standby to power on. Short press Source/Standby again to enter FM tuner mode.
- To automatically search for the next/previous available radio station, press and hold for 2 seconds the
![]() or
or ![]() button.
button. - Press and hold Select/Scan button when in FM mode and it will automatically scan the frequency range and save presets for radio stations discovered. To access "preset recall" press the Stations/Save button.
FM Menu
Press and hold the Info/Menu button while in FM mode to enter the FM menu. Inside the menu you can scroll between the following menu items and functions using the volume dial  . (Press the Select/Scan button to confirm a selection. To exit menu items and the menu press the Info/Menu button once or twice until the menus close.):
[Scan setting]: Select the scan sensitivity (strong stations only or all stations)
[System]:The system menu included sleep, Alarm, Time, Backlight (brightness), Language, Factory Reset and SW version options.
Sleep: The sleep function enables you to set a timer after which the unit will turn itself into standby mode automatically. The sleep times included are: Sleep off/15/30/45/60/90 minutes. To cancel the sleep function, select the Sleep off option.
Alarm: The Alarm timer allows you to configure 2 different alarms.
- The alarm setup is done through an assisted process (wizard). To begin choose Alarm setup 1 or 2, set the: on time, duration, source, cycle (days), volume and on/off - once the cycle is complete you will return to the System menu.
Alarm will only function when DC power supply is used (and not on battery).
Time: The Time setting includes set Time/Date, Auto update, Set 12/24 hour and Set date format options.
Backlight: The Backlight (brightness) setting has three options: Timeout, On level and Dim level, these options can be used to set the desired Backlight level.
Language: choose your preferred system language from: English, Dutch, Italian or French.
Factory Reset: reset the unit (No/Yes).
SW version: View software version.
Manually Store Radio Stations
This unit enables you to store up to 20 radio stations:
- Tune to a radio station which you would like to store.
- Press and hold for 2 seconds the Stations/Save button. The display will show "Preset Store".
- Select a desired preset (1 - 20) on which you want to store the current frequency using the volume dial
![]() to scroll.
to scroll. - Press the Select/Scan button to confirm your setting. "Preset xx stored" will be shown on the display.
- To recall a stored station/frequency, press the Station/Save button and use the volume dial
![]() to scroll the desired station/frequency, press Select/Scan button to confirm.
to scroll the desired station/frequency, press Select/Scan button to confirm.
 to scroll.
Automatically Store Radio Stations
Rather than manually storing stations, you can also let the unit automatically store found stations:
- Press and hold Select/Scan button to do auto scanning for the broadcasting radio channels, press it again to stop auto scanning.
RDS (Radio Data System)
This product is equipped with an RDS decoder. RDS allows text information to be transmitted by a radio station together with the audio broadcast. This text information can include name of the radio station, name of the current program or song, news headlines, etc. and may vary from station to station. To view RDS info press the Info/Menu button repeatedly.
DAB Operation
DAB (Digital Audio Broadcasting) provides a larger choice of radio programmes with improved sound quality and allows more data/information to be transmitted.
Press the Source/Standby button to select the DAB source, when in DAB mode, press and hold the Select/Scan button to complete an auto-scan of available stations. Select the desired radio station by pressing the ![]() or
or ![]() button to enter the Station List, scroll using the volume dial and then press the Select/Scan button to play the selected station.
button to enter the Station List, scroll using the volume dial and then press the Select/Scan button to play the selected station.
DAB Menu
Press and hold Info/Menu to enter the DAB Menu. Inside the menu you can select between the following menu items and functions via the volume dial .
- [Full scan]: scan and store all the available DAB radio stations.
- [Manual tune]: tune to a DAB station manually.
- [DRC]: select (dynamic range control) DRC /off.
- [Prune]: remove all the invalid stations from the station list.
- [TA]: select on/off for local traffic announcements.
- [System]: adjust system settings, for details please refer to the FM system.
Manually storing DAB Stations
This unit enables you to store up to 20 radio stations:
- Tune to a radio station which you would like to store.
- Press and hold for 2 seconds the Stations/Save button, this will take you to the "Preset Store".
- Select a desired preset location (1 - 20) in which you want to store the current station by using the volume dial
![]() to scroll.
to scroll. - Press the Select/Scan button to confirm your setting. "Preset xx stored" will be shown in the display. To recall a stored frequency, press the Station/Save button to access the "Preset Recall".
Info Display
To toggle the information shown on the display (which is broadcast by the radio station), repeatedly press the Info/Menu buton on the unit.
Troubleshooting
BEFORE CONTACTING THE SHARP HELPLINE FOR SUPPORT, CHECK THE TROUBLESHOOTING GUIDE BELOW IN THE UNLIKELY EVENT THAT THERE IS AN ISSUE WITH YOUR UNIT.
No Power
Reason
- USB power cable is not plugged in securely to the unit.
- Power switch is not in the right position to select the active power source.
Solution
- Please check that the USB cable is connected securely.
- Please check the power source switch on the back of the radio is set to the active power supply (Battery/DC). If using batteries, please also check a new set (or recharge them if they are rechargeable batteries).
There is no sound or the sound is distorted
Reason
- The volume is set to the minimum level.
Solution
- Turn up the volume.
The buttons on the unit do not work
Reason
- Unit is being used near to a source of static electricity.
Solution
- Switch off and unplug the unit.
- Then connect the plug to the power supply and switch it on again.
Poor signal reception
Reason
- Stations are being lost or reception is interment.
Solution
- Extend the aerial to its fullest extent,
- Change the position of the radio.
- Move the radio to another location.
Technical specification
| Model | DR-P320 |
| DIGITAL RADIO SYSTEM | |
| Power Consumption | <2W |
| Power Consumption StandBy | <0,8W |
| Output Power | 1W (RMS) |
| FM Frequency bands | 87,5~108MHz |
| DAB Frequency bands | 174,928~239,200MHz |
| Working environment | |
| Temperature | 0 ~ +35°C |
| Relative humidity | 5% ~ 90% |

Sharp Consumer Electronics Poland Sp. z o.o.
Ostaszewo 57B, 87-148 Łysomice, Poland
SHARP CORPORATION
OSAKA, JAPAN

Documents / Resources
References
Download manual
Here you can download full pdf version of manual, it may contain additional safety instructions, warranty information, FCC rules, etc.
Advertisement
Thank you! Your question has been received!


Need Assistance?
Do you have a question about the DR-P320 that isn't answered in the manual? Leave your question here.