AEG HD955100NB User Manual
Hide thumbs
Also See for HD955100NB:
- User manual (32 pages) ,
- User manual (60 pages) ,
- User manual (32 pages)

Related Manuals for AEG HD955100NB


Summary of Contents for AEG HD955100NB
- Page 1 HD955100NB User Manual Istruzioni per l’uso Piano cottura USER MANUAL...
-
Page 2: Table Of Contents
11. ENVIRONMENTAL CONCERNS..............28 FOR PERFECT RESULTS Thank you for choosing this AEG product. We have created it to give you impeccable performance for many years, with innovative technologies that help make life simpler – features you might not find on ordinary appliances. Please spend a few minutes reading to get the very best from it. - Page 3 ENGLISH instructions in a safe and accessible location for future reference. 1.1 Children and vulnerable people safety This appliance can be used by children aged from 8 • years and above and persons with reduced physical, sensory or mental capabilities or lack of experience and knowledge if they have been given supervision or instruction concerning the use of the appliance in a safe way and understand the hazards involved.
- Page 4 WARNING: Unattended cooking on a hob with fat or • oil can be dangerous and may result in fire. Never use water to extinguish the cooking fire. Switch • off the appliance and cover flames with e.g. a fire blanket or lid.
-
Page 5: Safety Instructions
ENGLISH Where the appliance is directly connected to the • power supply, an all-pole isolating switch with a contact gap is required. Complete disconnection in compliance with the conditions specified in overvoltage category III must be guaranteed. The earth cable is excluded from this. When you route the mains cable, make sure that the •... - Page 6 2.2 Electrical Connection fuses removed from the holder), earth leakage trips and contactors. WARNING! • The electrical installation must have Risk of fire and electric an isolation device which lets you shock. disconnect the appliance from the mains at all poles. The isolation •...
- Page 7 ENGLISH CAUTION! WARNING! The use of a gas cooking Risk of fire and explosion appliance results in the • Fats and oil when heated can release production of heat, moisture flammable vapours. Keep flames or and products of combustion heated objects away from fats and in the room in which it is oils when you cook with them.
-
Page 8: Installation
• Do not let acid liquids, for example • Concerning the lamp(s) inside this vinegar, lemon juice or limescale product and spare part lamps sold remover, touch the hob. This can separately: These lamps are intended cause matt patches. - Page 9 ENGLISH 3.3 Gas Connection B. Washer supplied with the appliance C. Elbow supplied with the appliance WARNING! Rigid connection: The following instructions Carry out connection by using metal rigid about installation, pipes (copper with mechanical end) maintenance and ventilation (UNI-CIG 7129). must be carried out by Flexible connection: qualified personnel in...
- Page 10 4. Assemble the parts, follow the same agree with the voltage and the power procedure backwards. of the local power supply. 5. Replace the rating plate (it is near the • Always use a correctly installed gas supply pipe) with the one for the shockproof socket.
- Page 11 ENGLISH 3.9 Assembly CAUTION! Do not drill or solder the wire ends. This is strictly forbidden! CAUTION! min. Do not connect the cable 650mm min. without cable end sleeve. 450mm Use only the special connection cable or its equivalent. The cable type is: H05V2V2-F T90.
- Page 12 CAUTION! Install the appliance only on a worktop with a flat surface. 3.10 Possibilities for insertion R 5 mm 600 mm Kitchen unit with oven The electrical connection of the hob and 490 mm 830 mm the oven must be installed separately for min.
-
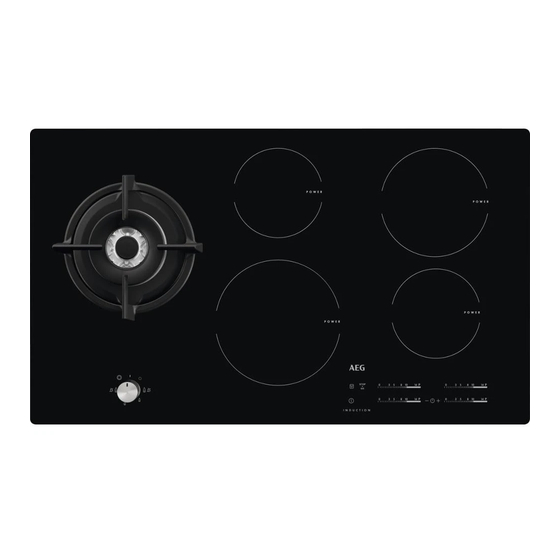
Page 13: Product Description
ENGLISH 4. PRODUCT DESCRIPTION 4.1 Cooking surface layout Dual burner Induction cooking zones 145 mm 180 mm Control panel Control knob 145 mm 210 mm 4.2 Control knob Symbol Description Symbol Description minimum gas supply no gas supply / off posi‐ internal crown tion ignition position / maxi‐... - Page 14 Sensor Function Comment field STOP+GO To activate and deactivate the function. Heat setting display To show the heat setting. Timer indicators of cook‐ To show for which zone you set the time. ing zones Timer display To show the time in minutes.
-
Page 15: Daily Use
ENGLISH The induction cooking zones produce the The glass ceramic is heated by the heat heat necessary for the cooking process of the cookware. directly in the bottom of the cookware. 5. DAILY USE lets the thermocouple warm up. If WARNING! not, the gas supply is interrupted. - Page 16 • the hob gets too hot (e.g. when a WARNING! saucepan boils dry). Let the cooking Always turn the flame down zone cool down before you use the or switch it off before you hob again. remove the pans from the •...
- Page 17 ENGLISH To activate the function for a cooking When the countdown ends, zone: touch comes on). an acoustic signal sounds Immediately touch a desired heat setting. and 00 flashes. The cooking zone deactivates. After 3 seconds comes on. To deactivate the function: change the To stop the sound: touch heat setting.
- Page 18 To activate the function: touch When the function is set to you can comes on. hear the sounds only when: • you touch To deactivate the function: touch • Minute Minder comes down The previous heat setting comes on.
-
Page 19: Hints And Tips
ENGLISH zones connected to a single phase When you set the Power limitation exceeds 3600 W. function to more than 4.5 kW, the power • The function decreases the power to of the hob is divided between its left and the other cooking zones connected to right side. - Page 20 Burner Diameter of • For both safety reasons and optimal cookware cooking results, do not use cookware (mm) larger than indicated in "Cooking zones specification". Avoid keeping Dual 220 - 300 cookware close to the control panel during the cooking session.
-
Page 21: Care And Cleaning
ENGLISH Heat setting Use to: Time Hints (min) Keep cooked food warm. as nec‐ Put a lid on the cookware. essary 1 - 3 Hollandaise sauce, melt: but‐ 5 - 25 Mix from time to time. ter, chocolate, gelatine. 1 - 3 Solidify: fluffy omelettes, baked 10 - 40 Cook with a lid on. -
Page 22: Troubleshooting
7.2 Pan supports Use a special hob scraper on the glass surface at an acute angle and The pan supports are not move the blade on the surface. resistant to washing in a • Remove when the hob is dishwasher. - Page 23 ENGLISH Problem Possible cause Remedy The fuse is blown. Make sure that the fuse is the cause of the malfunction. If the fuse is blown again and again, contact a quali‐ fied electrician. Activate the hob again and set the heat setting in less than 10 seconds.
- Page 24 Problem Possible cause Remedy The Child Safety Device or Refer to "Daily use" chapter. comes on. the Lock function operates. There is no cookware on the Put cookware on the zone. comes on. zone. The cookware is incorrect. Use the correct cookware.
-
Page 25: Technical Data
ENGLISH and conditions of guarantee are in the guarantee booklet. 8.3 Labels supplied with the accessories bag Stick the adhesive labels as indicated below: MOD. MOD. MOD. TYPE PROD.NO. IP20 PROD.NO. PROD.NO. SER.NO. 0049 SER.NO SER.NO 03 IT DATA DATA MADE IN ITALY A. - Page 26 Cooking zone Nominal power PowerBoost PowerBoost Cookware di‐ (maximum maximum dura‐ ameter [mm] heat setting) tion [min] Right front 1400 2500 125 - 145 Right rear 1800 2800 145 - 180 The power of the cooking zones can be...
-
Page 27: Energy Efficiency
Dual 46D + 2x72D 334 Dual (inter‐ nal crown) 10. ENERGY EFFICIENCY 10.1 Product information according to EU 66/2014 Model identification HD955100NB Type of hob Built-in hob Number of electric cooking zones Heating technology per electric cook‐ Induction ing zone... -
Page 28: Environmental Concerns
10.2 Energy saving • Before use, make sure that the burners and pan supports are assembled correctly. • Use cookware with diameters applicable to the size of burners. • Center the pot on the burner. • When you heat up water, use only the amount you need. -
Page 29: Informazioni Di Sicurezza
11. CONSIDERAZIONI SULL'AMBIENTE.............. 57 PER RISULTATI PERFETTI Grazie per aver scelto di acquistare questo prodotto AEG. Lo abbiamo creato per fornirvi prestazioni impeccabili per molti anni, grazie a tecnologie innovative che vi semplificheranno la vita - funzioni che non troverete sulle normali apparecchiature. - Page 30 Conservare sempre le istruzioni in un luogo sicuro e accessibile per poterle consultare in futuro. 1.1 Sicurezza dei bambini e delle persone vulnerabili Quest’apparecchiatura può essere usata da bambini a •...
- Page 31 ITALIANO in agriturismi e altre sistemazioni simili in cui tale utilizzo non superi i livelli di utilizzo domestico (medi). AVVERTENZA: L’elettrodomestico e le parti • accessibili si riscaldano molto durante l'uso. Fare attenzione a non toccare gli elementi riscaldanti. AVVERTENZA: Non lasciare mai il piano cottura •...
-
Page 32: Istruzioni Di Sicurezza
– scollegare l'apparecchiatura dalla rete elettrica, non usare o toccare la superficie – dell'apparecchiatura, non utilizzare l'apparecchiatura. – Se il cavo di alimentazione è danneggiato, deve • essere sostituito dal produttore, da un centro di assistenza autorizzato o da una persona qualificata per evitare situazioni di pericolo. - Page 33 ITALIANO • È necessario rispettare la distanza • Verificare che l’apparecchiatura sia minima dalle altre apparecchiature. installata correttamente. • Prestare sempre attenzione in fase di L'allentamento di un collegamento spostamento dell'apparecchiatura, elettrico o di una spina (ove previsti) dato che è pesante. Usare sempre i può...
- Page 34 2.3 Collegamento del gas ATTENZIONE! L'uso di un’apparecchiatura ATTENZIONE! di cottura a gas determina la Quando si utilizza una produzione di calore, umidità bombola del gas, tenerla e prodotti di combustione sempre su una superficie nella stanza in cui è...
- Page 35 ITALIANO induzione quando l'apparecchiatura è • Utilizzare solo tegami stabili con la in funzione. forma corretta e il diametro più grande • Quando si immergono gli alimenti rispetto alle dimensioni dei bruciatori. nell’olio bollente, questo potrebbe • Assicurarsi che le pentole siano schizzare.
-
Page 36: Installazione
• Contattare le autorità locali per separatamente: Queste lampade ricevere informazioni su come sono destinate a resistere a smaltire correttamente condizioni fisiche estreme negli l’apparecchiatura. elettrodomestici, come temperatura, • Staccare la spina dall'alimentazione vibrazioni, umidità, o sono destinate a... - Page 37 ITALIANO il gas liquido (GPL), l'utilizzo di un regolatore di pressione è consentito solo in conformità allo standard UNI EN 12864. Il collegamento regolabile è fissato alla rampa per mezzo di un dado filettato G 1/2". Avvitare le parti senza forzare, regolare il raccordo nella direzione voluta e serrare il tutto.
- Page 38 Accertarsi di collegare il cavo neutro blu al morsetto con la lettera "N". Collegare il cavo di fase marrone (o nero) al morsetto con la lettera "L". Tenere sempre il cavo di fase collegato. Per evitare il contatto tra il cavo e 5.
- Page 39 ITALIANO Sezione cavo 230V~ Collegamento a una fase - 230 V~ Verde-giallo Nero e marrone 3.8 Fissaggio della min. 2 mm guarnizione - Installazione in alto min.20 mm 1. Pulire il piano di lavoro attorno (max.150 mm) min. 60 mm all'area di incasso.
- Page 40 3.10 Possibilità di inserimento Mobile da incasso con forno Il collegamento elettrico del piano di cottura e del forno deve essere eseguito R 5 mm 600 mm separatamente per questioni di sicurezza oltre che per consentire una facile 490 mm 830 mm rimozione del forno dall'unità.
-
Page 41: Descrizione Del Prodotto
ITALIANO 4. DESCRIZIONE DEL PRODOTTO 4.1 Disposizione della superficie di cottura Bruciatore doppio Zone di cottura a induzione 145 mm 180 mm Pannello di controllo Manopola di controllo 145 mm 210 mm 4.2 Manopola di regolazione Simbolo Description Simbolo Description alimentazione minima del alimentazione gas assen‐... - Page 42 Tasto Funzione Commento sensore STOP+GO Per attivare e disattivare la funzione. Display livello di potenza Per mostrare il livello di potenza. Spie del timer delle zone Indica per quale zona è impostato il tempo. di cottura Display timer Indica il tempo in minuti.
-
Page 43: Utilizzo Quotidiano
ITALIANO 4.5 OptiHeat Control in uso. Le spie si potrebbero accendere anche per le zone cottura vicine, anche (indicatore di calore residuo se non sono in uso. su 3 livelli): Le zone di cottura a induzione generano il calore richiesto per la cottura AVVERTENZA! direttamente sul fondo della pentola. - Page 44 ATTENZIONE! In assenza di elettricità è possibile accendere il bruciatore senza utilizzare il dispositivo elettrico; in tal caso sarà sufficiente avvicinarsi al bruciatore con una fiamma, premere verso La forma dei supporti pentola può essere il basso la relativa manopola...
- Page 45 ITALIANO PowerBoost tempo si accende e il piano cottura si spegne. Questa funzione aumenta la potenza Rapporto tra impostazione di calore e fornita alle zone di cottura a induzione. tempo dopo il quale il piano cottura si Questa funzione si può attivare per la spegne: zona di cottura a induzione soltanto per un intervallo di tempo limitato.
- Page 46 STOP+GO Al termine del conto alla rovescia, verrà emesso un Questa funzione pone tutte le zone di segnale acustico e 00 cottura accese sull’impostazione di lampeggerà. La zona di calore più basso. cottura si disattiva. Quando la funzione è attiva, non sarà...
- Page 47 ITALIANO OffSound Control • P50 - 5.000 W • P60 - 6.000 W (Attivazione e disattivazione dei segnali acustici) ATTENZIONE! Assicurarsi che la potenza Disattivare il piano di cottura. Sfiorare il selezionata sia idonea ai fusibili installati nell'impianto tasto per 3 secondi. Il display si domestico.
-
Page 48: Consigli E Suggerimenti Utili
è distribuita fra il lato sinistro e il lato destro. 6. CONSIGLI E SUGGERIMENTI UTILI • una calamita si attacca al fondo della AVVERTENZA! pentola. Fare riferimento ai capitoli Dimensioni delle pentole sulla sicurezza. • Le zone di cottura a induzione si adattano automaticamente alle 6.1 Pentole... - Page 49 ITALIANO un segnale acustico. La differenza nel AVVERTENZA! tempo di funzionamento dipende dal Evitare di posare sul livello dell’impostazione di calore e dalla bruciatore pentole instabili o durata della cottura. deformate per prevenire versamenti e lesioni. 6.4 Rumori durante il funzionamento (per zone di ATTENZIONE! cottura a induzione)
-
Page 50: Pulizia E Cura
Impostazione Utilizzare per: Tempo Suggerimenti di calore (min.) 3 - 5 Cuocere a fuoco lento riso e 25 - 50 Aggiungere almeno una quan‐ pietanze a base di latte, riscal‐ tità di liquido pari al doppio del dare pietanze pronte. -
Page 51: Risoluzione Dei Problemi
ITALIANO • Quando il piano di cottura è Fare molta attenzione sufficientemente raffreddato, è quando si sostituiscono i possibile rimuovere: i segni di supporti pentole: il piano calcare e d'acqua, le macchie di di cottura si potrebbe grasso e le macchie opalescenti. danneggiare. - Page 52 Problema Causa possibile Rimedio È scattato il fusibile. Verificare che l'interruttore differenziale (salvavita) sia la causa del malfunzionamen‐ to. Nel caso in cui il fusibile continui a scattare, rivolgersi ad un elettricista qualificato. Accendere di nuovo il piano di cottura e impostare il livel‐...
- Page 53 ITALIANO Problema Causa possibile Rimedio Assenza di segnale quando I segnali acustici sono disat‐ Attivarli. si toccano i tasti sensore del tivati. Fare riferimento al capitolo pannello. "Utilizzo quotidiano". Lo spegnimento automatico Spegnere e riaccendere il si accende. è in funzione. piano di cottura.
- Page 54 Problema Causa possibile Rimedio L'anello della fiamma non è La corona del bruciatore è Controllare che l'iniettore omogeneo. bloccata da residui di cibo. principale non sia ostruito e che la corona del bruciatore sia pulita. 8.2 Se non è possibile trovare rivenditore potrà...
-
Page 55: Dati Tecnici
ITALIANO 9. DATI TECNICI 9.1 Dimensioni del piano di cottura Larghezza 880 mm Profondità 520 mm 9.2 Specifiche delle zone di cottura Zona di cottura Potenza nomi‐ PowerBoost PowerBoost Diametro delle nale (imposta‐ durata massi‐ pentole [mm] zione di calore ma [min.] massima) [W] Anteriore cen‐... -
Page 56: Efficienza Energetica
Doppio (co‐ rona interna) 10. EFFICIENZA ENERGETICA 10.1 Informazioni prodotto conformi alla norma UE 66/2014 Identificativo modello HD955100NB Tipo di piano di cottura Piano cottura a in‐ casso Numero di zone di cottura elettriche Tecnologia di calore per zona di cot‐... -
Page 57: Considerazioni Sull'ambiente
ITALIANO Consumo di energia per zona di cot‐ Posteriore centrale 178,1 Wh/kg tura (EC electric cooking) Posteriore destra 178,7 Wh/kg Anteriore centrale 176,9 Wh/kg Anteriore destra 178,1 Wh/kg Numero di bruciatori a gas Efficienza energetica per bruciatore a Sinistro in mezzo - Doppio 55,1% (EE gas burner) Efficienza energetica per il piano di... - Page 60 www.aeg.com/shop...