Panasonic DMC-TZ57, DMC-TZ58 - Digital Camera Basic Instructions
- Operating instructions manual (187 pages) ,
- User manual (8 pages) ,
- Basic operating instructions (2 pages)
Advertisement
- 1 Names of Main Parts
- 2 Preparations
- 3 Tips for taking good pictures
- 4 Selecting the Recording Mode
- 5 Taking pictures using the automatic function (Intelligent Auto Mode)
- 6 Using the Zoom
- 7 Changing Functions and Settings
- 8 Menus convenient for taking pictures
- 9 Recording Motion Pictures
- 10 Playback
- 11 Setting the Menu
- 12 What you can do with the Wi-Fi function
- 13 Connecting to a smartphone/tablet
- 14 Controlling the camera with the smartphone/tablet
- 15 Setting up a connection to a PC
- 16 Transferring images to a PC by using the USB connection cable (supplied)
- 17 Troubleshooting
- 18 Specifications
- 19 Documents / Resources
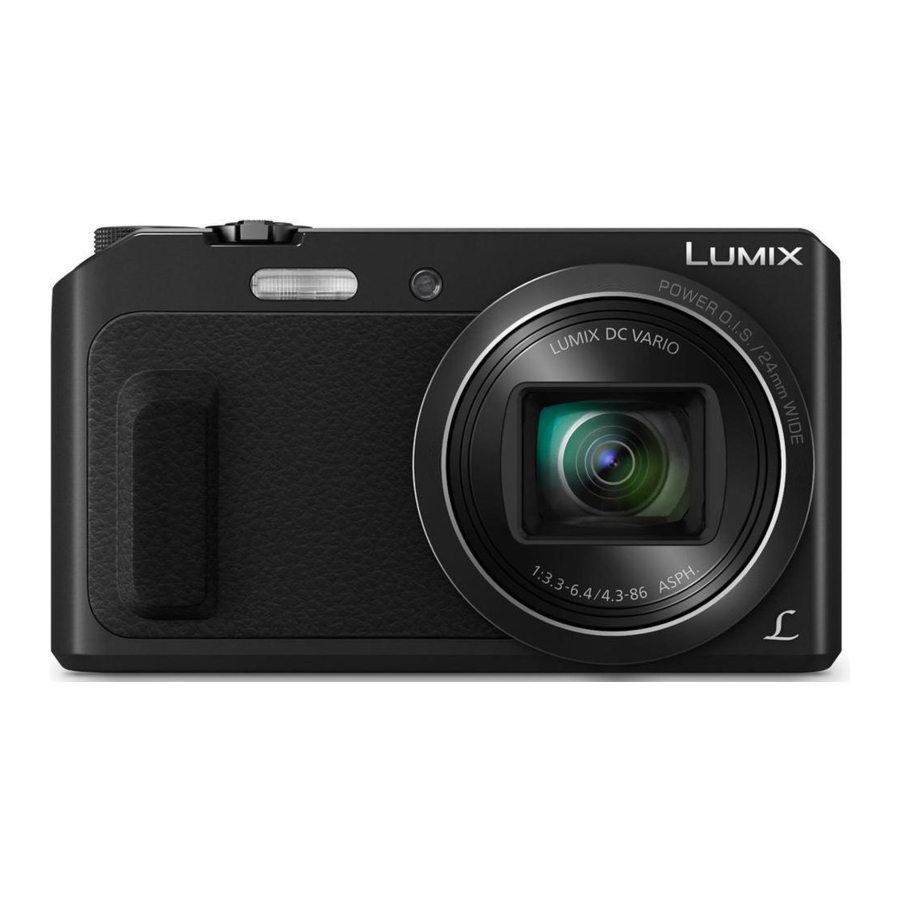
Names of Main Parts

- Shutter button
- Mode dial
- Zoom lever
- Flash
- Self-timer indicator AF Assist Lamp
- [Wi-Fi] button
- Camera [ON/OFF] button
- Microphone
- Speaker
- Lens
- Lens barrel
- Lens barrier

- Charging lamp
Wi-Fi ® connection lamp - Monitor
- [EXPOSURE] button
- [MENU/SET] button
- [DISP.] button
- Strap eyelet
- [HDMI] socket
- [AV OUT/DIGITAL] socket
- Motion picture button
![]() (Playback) button
(Playback) button - Cursor buttons
![]()
- [Q.MENU] button
![]() (Delete) button
(Delete) button
![]() (Cancel) button
(Cancel) button
 (Playback) button
 (Delete) button
 (Cancel) button
- Tripod mount
- Card/Battery door
- Release lever
Adjusting the monitor angle

- Flip up the bottom of the monitor lightly to open.
- Adjust the angle of the monitor.
When closing

- When not using this unit, close the monitor completely back to the original position.

- Be careful not to catch your finger, etc. in the monitor.
- When rotating the monitor, be careful not to apply too much force or drop the camera. This may cause scratches and malfunctions.
- If the monitor is rotated as shown in the illustration, the Self Shot Mode starts.
Preparations
- Check that the camera is turned off.

| Charging time | Approx. 210 min |
- When charging is complete, the charging lamp will go off - then you may disconnect the camera from the power outlet or computer.
Tips for taking good pictures

Hold the camera gently with both hands, keep your arms still at your side and stand with your feet slightly apart.
- Be careful not to put your fingers on the flash, AF assist lamp, microphone, speaker or lens etc.
 Tripod mount
It may not be possible to attach and securely fasten a tripod with a screw length of 5.5 mm (0.22 inch) or more to the camera. Doing so may also damage the camera.
It may not be possible to attach certain types of tripods properly.
Selecting the Recording Mode
Switching the mode by rotating the mode dial.
- Rotate the mode dial slowly to select the desired mode.


List of Recording Modes
 | Intelligent Auto Mode |
| The subjects are recorded using settings automatically selected by the camera. | |
 | Programme AE Mode |
| The subjects are recorded using your own settings. | |
 | Aperture-Priority AE Mode |
| The shutter speed is automatically determined by the aperture value you set. | |
 | Shutter-Priority AE Mode |
| The aperture value is automatically determined by the shutter speed you set. | |
 | Manual Exposure Mode |
| The exposure is adjusted by the aperture value and the shutter speed which are manually adjusted. | |
 | Custom Mode |
| Use this mode to take pictures with previously registered settings. | |
 | Panorama Shot Mode |
| This mode allows you to take panorama pictures. This mode allows you to select any of the 13 image effects including [Old Days], [High Key], and [Dynamic Monochrome]. | |
 | Scene Mode |
| This mode allows you to take pictures that match the scene being recorded. This mode allows you to select any of the 16 scenes including [Portrait], [Scenery], and [Starry Sky]. | |
 | Creative Control Mode |
| Record while checking the image effect. This mode allows you to select any of the 15 image effects including [Old Days], [High Key], and [Dynamic Monochrome]. |
Taking pictures using the automatic function (Intelligent Auto Mode)
We recommend this mode for beginners or those who want to leave the settings to the camera and record casually.

- Mode dial
- Set the mode dial to [
![]() ].
].
- Set the mode dial to [
- Shutter button
- Press the shutter button halfway to focus, and then press the shutter button fully (push it in further), and take the picture.
 ].
].Scene Detection
When the camera identifies the optimum scene, the icon of the scene concerned is displayed in blue for 2 seconds, after which its colour changes to the usual red.
 | [i-Portrait] |  | [i-Scenery] |
 | [i-Macro] |  | [i-Night Portrait] *1 |
 | [i-Night Scenery] |  | [iHandheld Night Shot] *2 |
 | [i-Sunset] | ||
*1 Only displayed when the flash is set to [ .
.
*2 Only displayed when [iHandheld Night Shot] is set to [ON].
Using the Zoom
| To make subjects appear further away use (Wide): Rotate the zoom lever towards Wide. |  |
| To make subjects appear closer use (Tele): Rotate the zoom lever towards Tele. |  |
Optical Zoom
Zooms in without deteriorating the image quality.
Maximum magnification: 20
Extra Optical Zoom (EZ)
This function works when any of the picture sizes indicated with  is selected.
You can zoom in further than you can with the Optical Zoom without deteriorating the image quality.
Maximum magnification: 45
(This includes the optical zoom magnification. The magnification level differs depending on [Picture Size] setting.)
Intelligent Zoom
Enabled when [i. Zoom] in the [Rec] menu is set to [ON].
You can zoom in up to twice the original zoom magnification while minimising the deterioration of the image quality.
Digital Zoom
This function works when [Digital Zoom] in the [Rec] menu is set to [ON].
(DMC-TZ57)
Although the image quality deteriorates every time you zoom in further, you can zoom in up to four times the original zoom magnification.
(DMC-TZ58)
Although the image quality deteriorates every time you zoom in further, you can zoom in up to twice the original zoom magnification.
Changing Functions and Settings
Functions and settings can be changed using  and [MENU/SET]. (Some functions and settings will not be available for selection depending on the Recording Mode.)

 | The exposure compensation or Auto Bracket setting screen is displayed. |
 | The macro setting screen is displayed. ([AF Macro])/ ([AF Macro])/ ([Macro Zoom])/[OFF] ([Macro Zoom])/[OFF] |
 | The Self-Timer setting screen is displayed. ([10sec.])/ ([10sec.])/ (2sec.])/[OFF] (2sec.])/[OFF] |
 | The flash setting screen is displayed. [Auto])/[ [Auto])/[ ]([iAuto])/[ ]([iAuto])/[ ]([Auto/Red-Eye])/[ ]([Auto/Red-Eye])/[ ]([Forced Flash On])/ ]([Forced Flash On])/[  ]([Slow Sync./Red-Eye])/[ ]([Slow Sync./Red-Eye])/[ ]([Forced Flash Off]) ]([Forced Flash Off]) |
 | The menu screen is displayed. This operation is also available during playback. |
Menus convenient for taking pictures
[Picture Size]
A picture taken with the camera is saved as picture data of up to approximately 16 million pixels. The smaller the number of pixels is, the greater the number of recordable pictures will be.
- Quality
![]()

| Save location | 16 M (4:3) | 3 M (4:3) | 0.3 M (4:3) |
| Built-in Memory (Approx. 78 MB) | 14 | 50 | 155 |
| Card (8 GB) | 1300 | 5700 | 15400 |
[Quality]
Set the compression rate at which the pictures are to be stored.
| Settings | Description of settings | |
 | ([Fine]) | When giving priority to the picture quality |
 | ([Standard]) | When using the standard picture quality and increasing the number of pictures to be recorded without changing the number of pixels |
[Sensitivity]
This allows the Sensitivity to light (ISO sensitivity) to be set. Setting to a higher figure enables pictures to be taken even in dark places without the resulting pictures coming out dark.
[100]  [3200] [3200] | ||
| Recording location (recommended) | When it is light (outdoors) | When it is dark |
| Shutter speed | Slow | Fast |
| Noise | Less | Increased |
| Jitter of the subject | Increased | Less |
[Date Stamp]
You can take a picture with date and time of recording.
| Settings | Description of settings |
| [W/O TIME] | Stamp the year, month, and day. |
| [WITH TIME] | Stamp the year, month, day, hour, and minutes. |
| [OFF] | — |
Recording Motion Pictures
This unit can record motion pictures in MP4 format.

- Mode dial
- You can record motion pictures fitting each Recording Mode. (Motion pictures cannot be recorded in Panorama Shot Mode.)
- Motion picture button
- The recording state indicator (red) will flash while recording motion pictures.
- Stop the recording by pressing the motion picture button again.
- Still pictures can be taken during motion picture recording by pressing the shutter button.
(Simultaneous recording)*
*Simultaneous recording is not possible in the following cases:- When [Rec Quality] is set to [VGA]
- [Miniature Effect] (Creative Control Mode)
About the recording quality setting
The recording quality for motion pictures can be changed in [Rec Quality] of the [Motion Picture] menu.
| Settings | Size | Frame rate | Bit rate | Aspect ratio |
| [FHD] | 1920k1080 | 25p | 20 Mbps | 16:9 |
| [HD] | 1280k720 | 10 Mbps | ||
| [VGA] | 640k480 | 4 Mbps | 4:3 |
- When recording to the built-in memory, [Rec Quality] is fixed to [VGA].
- The maximum continuous recordable time of a motion picture is 29 minutes and 59 seconds, which is equivalent to a file size of approximately 4 GB. You can check the recordable time on the screen. (With [FHD], the file size becomes larger, causing the recordable time to become shorter than 29 minutes and 59 seconds)
About zooming while recording motion pictures
- The Extra Optical Zoom and Intelligent Zoom cannot be used during the motion picture recording.
- If you use Extra Optical Zoom or Intelligent Zoom, the angle of view may change drastically when you start or finish recording a motion picture.
Playback

![]() (Playback) button
(Playback) button - Use this to play back pictures.
- Cursor buttons
![]() : to select the picture [ ]
: to select the picture [ ]
![]() (Delete/Cancel) button
(Delete/Cancel) button ![]() : to delete the displayed picture
: to delete the displayed picture
 (Playback) button
  : to select the picture [ ]
 (Delete/Cancel) button
 Setting the Menu
The camera comes with menus that allow you to choose the settings for taking pictures and playing them back just as you like and menus that enable you to have more fun with the camera and use it more easily.
- Press [MENU/SET].
- Press
![]() to select menu and then press [MENU/SET].
to select menu and then press [MENU/SET].
| Menu | Description of settings |
| [Rec] | The menu lets you set the Colouring, Sensitivity or Number of pixels, etc. of pictures you are recording. |
| [Motion Picture] | This menu lets you set the setting for motion pictures such as recording quality. |
| [Playback Mode] | This menu lets you select the playback method. The options include slideshow playback. |
| [Playback] | This menu lets you make changes to the pictures taken. For example, you can set protection for the pictures taken, or crop them. |
| [Setup] | This menu lets you perform the clock settings, beep tone settings and other settings which make it easier for you to operate the camera. |
| [Wi-Fi] | This menu lets you make the settings necessary to connect to Wi-Fi or use the Wi-Fi function. |
- Press
![]() to select the menu item and then press [MENU/SET].
to select the menu item and then press [MENU/SET]. - It will switch to the next page when you reach the bottom.
(It will also switch by rotating the zoom lever)
- It will switch to the next page when you reach the bottom.
- Press
![]() to select the setting and then press [MENU/SET].
to select the setting and then press [MENU/SET]. - Depending on the menu item, its setting may not appear or it may be displayed in a different way.
 to select the menu item and then press [MENU/SET].
 Close the menu
Press  repeatedly until the recording/playback screen is displayed.
- When recording images, you can also close the menu by pressing the shutter button halfway.
- There are functions that cannot be set or used depending on the modes or menu settings being used on the camera due to the specifications.
What you can do with the Wi-Fi® function
- Set the date and time settings in advance.
- The camera is not capable of connecting to a wireless network via public wireless LAN.
Controlling with a Smartphone/Tablet
Recording images remotely with a smartphone

Playing back pictures in the camera
Saving images stored in the camera

Install the dedicated smartphone/tablet app "Panasonic Image App"* smartphone/tablet.
- OS
App for Android TM: Android 2.3.3 or higher
→ Search the Google Play TM Store for "Panasonic Image App" or "LUMIX", and install the app.
App for iOS: iOS 6.0 or higher (Please note that the iPhone 3GS is not supported.)
→ Search the App Store SM for "Panasonic Image App" or "LUMIX", and install the app. - Use the latest version.
- Supported OSs are current as of January 2015 and are subject to change.
- Read the [Help] in the "Image App" menu for further details on how to operate.
- The screen differs depending on the OS.
- The screens and procedures described from this point on are those at the time when the model first became available for purchase. The screens and procedures may change with version updates.
- Some smartphones/tablets may not work correctly. For information on the "Image App", refer to the support site below.
http://panasonic.jp/support/global/cs/dsc/
* In this manual, the app is referred to as "Image App".
- These operating instructions refer to both smartphones and tablets as "smartphones" from this point on unless noted otherwise.
When sending images to PC
Sending an image each time a recording is made

Sending selected images

Connecting to a smartphone/tablet
Using the QR code to set up a connection
(If you are using an iOS device [iPhone/iPod touch/iPad])
- Press and hold [Wi-Fi].
- The QR code will be displayed on the camera screen.

- The QR code will be displayed on the camera screen.
- Start "Image App" on your smartphone.
- Select [QR code], and then select [OK].
- Using "Image App", scan the QR code displayed on the screen of the camera.
- Install the profile.
- A message will be displayed on the browser.
- If the smartphone is locked with a passcode, enter the passcode to unlock the smartphone.
- Press the home button to close the browser.
- Turn on the Wi-Fi function in the setting menu of the smartphone.

- Select the SSID displayed on the screen of the camera.
- Return to the home screen, and then start "Image App".
- Steps
![]() through
through ![]() are not required from the second time on.
are not required from the second time on.
- Steps


 through
  are not required from the second time on.
Using the QR code to set up a connection (If you are using an Android device)
- Press and hold [Wi-Fi].
- The QR code will be displayed on the camera screen.

- The QR code will be displayed on the camera screen.
- On the smartphone, start "Image App".
- Select [QR code].
- Using "Image App", scan the QR code displayed on the screen of the camera.

Entering a password to set up a connection
- Press and hold [Wi-Fi].
- The Password will be displayed on the camera screen.

- The Password will be displayed on the camera screen.
- Turn on the Wi-Fi function in the setting menu of the smartphone.
- Select the SSID displayed on the screen of the camera.
- Enter the password displayed on the screen of the camera.
![]()
- If you are using an Android device, marking the box for password display will allow the device to display the password as you enter it.
- On the smartphone, start "Image App".


Controlling the camera with the smartphone/tablet
Recording images with the smartphone/tablet (remote recording)
- Connect to a smartphone.
- Select [
![]() ] on the screen of "Image App".
] on the screen of "Image App".
![]()
- The recorded images are saved in the camera.
- Motion pictures cannot be recorded.
 ] on the screen of "Image App".
Playing back the camera's images on the smartphone/tablet
- Connect to a smartphone.
- Select [
![]() ] on the screen of "Image App".
] on the screen of "Image App".
![]()
- You can switch the images to be displayed by selecting the icon
![]() on the top left of the screen. To display images stored in the camera, select [LUMIX].
on the top left of the screen. To display images stored in the camera, select [LUMIX].
- You can switch the images to be displayed by selecting the icon
-
Touch an image to enlarge it.
-
Motion pictures cannot be played back.
-
 ] on the screen of "Image App".
 on the top left of the screen. To display images stored in the camera, select [LUMIX].
Saving the camera's images in the smartphone/tablet

- Connect to a smartphone.
- Select [
![]() ] on the screen of "Image App".
] on the screen of "Image App". - Touch and hold an image, and drag it to save it.
Setting up a connection to a PC
Creating a destination folder for images
You can connect the camera to a PC via a wireless access point and send pictures and motion pictures recorded with the camera to the PC.
- Create a PC user account [account name (up to 254 characters) and password (up to 32 characters)] consisting of alphanumeric characters.
An attempt to create a receive folder may fail if the account includes non-alphanumeric characters.
(For Windows)
Supported OS: Windows VistaR/WindowsR 7/WindowsR 8/WindowsR 8.1 Example: Windows 7
- Select a destination folder, then right-click.
- Select [Properties], then enable sharing of the folder.
- For details, refer to the operating instructions of your PC or Help on the OS.
(For Mac)
Supported OS: OS X v10.5 to v10.9
Example: OS X v10.8
- Select a destination folder, then click the following items: [File] > [Get Info]
- Enable sharing of the folder.
- For details, refer to the operating instructions of your PC or Help on the OS.
Sending images to the PC
You can send pictures and motion pictures recorded with this unit to a PC.
The connection methods described in this manual are examples. For details on other connection methods, refer to "Operating Instructions for advanced features (PDF format)".
Preparations:
- If the workgroup of the destination PC has been changed from the standard setting, you also need to change the setting of this unit in [PC Connection].
- Press [Wi-Fi].
![]()
- Press
![]() to select [New Connection], and then press [MENU/SET].
to select [New Connection], and then press [MENU/SET]. - Press
![]() to select the sending method.
to select the sending method.
Sending an image each time you record it ([Send Images While Recording]) Available file format: JPEG
Sending selected images ([Send Images Stored in the Camera]) Available file format: JPEG/MP4
![]()
- Press
![]() to select [PC], and then press [MENU/SET].
to select [PC], and then press [MENU/SET]. - Select the connection method.
Example: Selecting [WPS (Push-Button)] to set up a connection


- Press [MENU/SET].
- Select [WPS (Push-Button)].
![]()
- Press and hold the WPS button of the wireless access point until it switches to WPS mode.
![]()


- On the camera, perform the operation that matches your purpose.
[Send Images While Recording]- Select the PC you want to connect to and the destination folder.
- Take a picture with the camera.
[Send Images Stored in the Camera]
- Select the PC you want to connect to and the destination folder.
- Select [SINGLE] or [MULTI], and then select the images you want to send.
- When the PC you want to connect to is not displayed, select [Manual Input], and enter the computer name of the PC (NetBIOS name for Apple Mac computers).
- Folders sorted by the sent date are created in the specified folder, and pictures are saved in those folders.
- If the screen for a user account and password entry appears, enter the one you set on your PC.
- When the computer name (NetBIOS name for Apple Mac computers) contains a space (blank character), etc., it may not be recognised correctly. If a connection attempt fails, we recommend that you change the computer name (or NetBIOS name) to the one consisting of only alphanumeric characters, with a maximum of 15 characters.
Transferring images to a PC by using the USB connection cable (supplied)
- Connect the computer and camera with the USB connection cable (supplied).

(This socket is also used when charging the battery.) - Press
![]() to select [PC], and then press [MENU/SET].
to select [PC], and then press [MENU/SET]. - Drag and drop files and folders in the camera to the PC.
- When the image transfer is complete, disconnect the USB connection cable safely.

 to select [PC], and then press [MENU/SET].
∫ Playback and editing on a PC
Software for image playback or editing is not supplied with this product.
- To play back or edit still pictures, use standard software.
- To play back motion pictures, use the following software: QuickTime/iTunes, provided by Apple (Software supporting MP4 format is required.)
- If software is not installed on your PC, download it from the website of the software provider.
- For information on how to use software, contact the software provider.
Troubleshooting
If the problem is not resolved, it may be improved by selecting [Reset] on the [Setup] menu.
The charging lamp blinks
- This phenomenon occurs when charging in a location where the temperature is very high or very low.
→ Reconnect the USB connection cable (supplied) in a location where the ambient temperature (and the temperature of battery) is in a 10 oC to 30 oC (50 oF to 86 oF) range, and try charging again.
Striping or flicker may appear under lighting such as fluorescent lighting and LED lighting fixture.
- This is characteristic of MOS sensors which serve as the camera's pickup sensors. This is not a malfunction.
Reddish horizontal streaks appear on the monitor during recording
- This is characteristic of MOS sensors which serve as the camera's pickup sensors. It appears when the subject has a bright part. Some unevenness may occur in the surrounding areas, but this is not a malfunction. It is recorded in still pictures or motion pictures.
A Wi-Fi connection cannot be established.
Radio waves get disconnected.
Wireless access point is not displayed.
(General tips for using a Wi-Fi connection)
- Try [Reset Wi-Fi Settings] in the [Setup] menu.
- Use within the communication range of the device to be connected.
- Is any device, such as microwave oven, cordless phone, etc., that uses 2.4 GHz frequency operated nearby? > Radio waves may get interrupted when used simultaneously. Use them sufficiently away from the device.
- When the battery indicator is flashing red, the connection with other equipment may not start or the connection may be disrupted. (A message such as [Communication error] is displayed.)
- If you place the camera on a metal table or shelf, the radio waves may be adversely affected. In such cases, you may not be able to establish a connection. Move the camera away from the metal surface.
(About a wireless access point)
- Check if the wireless access point to connect is in operating state.
- The camera may not display or connect to a wireless access point depending on the radio wave condition.
- Move this unit closer to the wireless access point.
- Remove the obstacles between this unit and the wireless access point.
- Change the direction of this unit.
- Change the location and orientation of the wireless access point.
- Perform the [Manual Input].
- It may not display even if the radio waves exist depending on the setting of the wireless access point.
→ Check the settings of the wireless access point.
→ When the network SSID of the wireless access point is set not to broadcast, the wireless access point may not be detected. Enter the network SSID to start the connection or enable the SSID broadcast of the wireless access point. - Connection types and security setting methods are different depending on the wireless access point. (Refer to the operating instructions of the wireless access point.)
- Is the 5 GHz/2.4 GHz switchable wireless access point connected to other equipment using the 5 GHz band?
→ The use of a wireless access point that can use 5 GHz/2.4 GHz simultaneously is recommended. It cannot be used simultaneously with this camera if it is not compatible.
It takes long time every time to connect to a smartphone.
- It may take longer time to connect depending on the Wi-Fi connection setting of the smartphone, but it is not a malfunction.
Transmission of the image fails midway
- Is the size of the image too large?
→ Reduce the size of the still picture, then transmit.
→ Image cannot be transmitted when the battery indicator is flashing red.
Specifications
Specifications are subject to change without notice.
Digital Camera: Information for your safety


This product incorporates the following software:
- the software developed independently by or for Panasonic Corporation,
- the software owned by third party and licensed to Panasonic Corporation and/or,
- open source software
The software categorised as (3) is distributed in the hope that it will be useful, but WITHOUT ANY WARRANTY, without even the implied warranty of MERCHANTABILITY or FITNESS FOR A PARTICULAR PURPOSE.
Please refer to the detailed terms and conditions thereof displayed by selecting [MENU/SET]
→ [Setup] → [Version Disp.] → [MENU/SET].
- SDXC Logo is a trademark of SD-3C, LLC.
![]()
- HDMI, the HDMI Logo, and High-Definition Multimedia Interface are trademarks or registered trademarks of HDMI Licensing LLC in the United States and other countries.
- QuickTime and the QuickTime logo are trademarks or registered trademarks of Apple Inc., used under license therefrom.
![]()
- iPhoto, iTunes, Mac and Mac OS are trademarks of Apple Inc., registered in the U.S. and other countries.
- iPad, iPhone, iPod, and iPod touch are trademarks of Apple Inc., registered in the U.S. and other countries.
- Windows and Windows Vista are either registered trademarks or trademarks of Microsoft Corporation in the United States and/or other countries.
- App Store is a service mark of Apple Inc.
- Android and Google Play are trademarks or registered trademarks of Google Inc.
- The Wi-Fi CERTIFIED™ Logo is a certification mark of Wi-Fi Alliance
![]()
- The Wi-Fi Protected Setup™ Identifier mark is a certification mark of Wi-Fi Alliance R.
![]()
- "Wi-Fi ® " is a registered trademark of Wi-Fi Alliance ®.
- "Wi-Fi Protected Setup™", "WPA™", and "WPA2™" are trademarks of Wi-Fi Alliance R.
- QR Code is a registered trademark of DENSO WAVE INCORPORATED.


This product is licensed under the AVC patent portfolio license for the personal and non-commercial use of a consumer to
- encode video in compliance with the AVC Standard ("AVC Video") and/or
- decode AVC Video that was encoded by a consumer engaged in a personal and non-commercial activity and/or was obtained from a video provider licensed to provide AVC Video. No license is granted or shall be implied for any other use. Additional information may be obtained from MPEG LA, LLC. See http://www.mpegla.com .

Documents / Resources
References
![www.mpegla.com]() Licenses for Standards and Other Technology Platforms | MPEG LA : MPEG LA
Licenses for Standards and Other Technology Platforms | MPEG LA : MPEG LADigital Camera | Digital AV | Support | Panasonic Global
Download manual
Here you can download full pdf version of manual, it may contain additional safety instructions, warranty information, FCC rules, etc.
Download Panasonic DMC-TZ57, DMC-TZ58 - Digital Camera Basic Instructions
Advertisement
Thank you! Your question has been received!


Need Assistance?
Do you have a question about the DMC-TZ57 that isn't answered in the manual? Leave your question here.