Table of Contents
Advertisement
Quick Links
Advertisement
Table of Contents

Related Manuals for Panasonic PAN9420


Summary of Contents for Panasonic PAN9420
- Page 1 PAN9420 Quick Start Guide Rev. 1.0 Wireless Modules...
- Page 2 By purchasing any of the products described in this document, the customer accepts the document's validity and declares their agreement and understanding of its contents and recommendations. Panasonic Industrial Devices Europe GmbH (Panasonic) reserves the right to make changes as required at any time without notification.
-
Page 3: Table Of Contents
Powering the Evaluation Kit ..................... 11 First Time Set Up ..........................14 Powering ..........................14 Connecting the Evaluation Kit ....................15 Navigating the PAN9420 Web Server ....................22 Web Server Default Home Page ..................... 22 Web-App Page ........................23 Further Information ........................... 26 Contact Us .......................... -
Page 4: About This Document
The purpose of this document is to allow new users to promptly orient themselves with the PAN9420 Evaluation Kit, as well as speedily being able to start evaluating and using it. In this document the PAN9420 Wi-Fi module is synonymously referred to as “PAN9420” or “the module”... -
Page 5: Related Documents
Indicates a key on the keyboard, e.g. [ F10 ]. 1.4 Related Documents [1] Panasonic. PAN9420 Communication Specification Firmware V1.1.X.X [2] Panasonic. PAN9420 Product Specification Please refer to the Panasonic website for the most updated and more related documents and tools. Quick Start Guide Rev. 1.0 Page 5... -
Page 6: Introduction
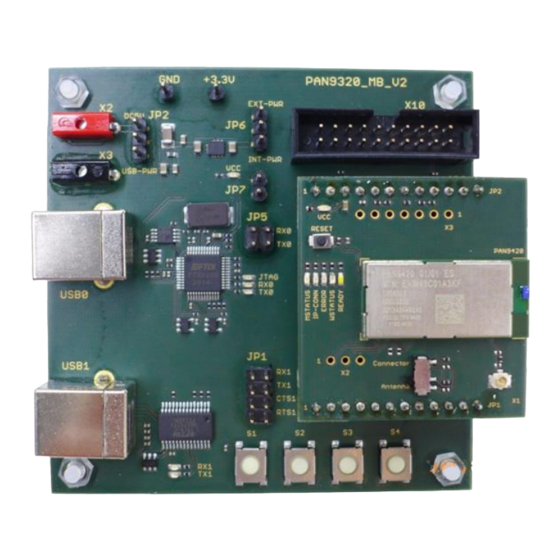
PAN9420 Quick Start Guide 2 Introduction 2.1 What is in the Box The PAN9420 Evaluation Kit comes with the following three components: The Mother Board (MB) The PAN9420ETU (Easy To Use) – Mounted on the MB ... - Page 7 PAN9420 Quick Start Guide 2.1.1 The Mother Board (MB) The MB consists of the following features and parts: Two USB Type-B receptacles USB0: Provides 5V power via USB and the command UART0 USB1: Data UART1 (Netcat, Webcat, UDP etc.) ...
- Page 8 PAN9420 Quick Start Guide 2.1.2 The PAN9420 ETU The PAN9420ETU is a daughter board with the module mounted on it. It offers access to: GPIOs, LEDs, U.Fl connector (for external antenna) and an Antenna Selector Switch. Please Figure 2: The Evaluation Kit ETU below.
-
Page 9: Additional Equipment
For the most comprehensive evaluation capabilities, you will need to use a PC. 2.2.1 The WIFIgurator The WIFIgurator is a handy evaluation tool for Windows OS only, provided by Panasonic. To use the WIFIgurator, please follow the next steps: 1. Download the ZIP file from the download section. -
Page 10: Pan9420 Overview
Alone-Wi-Fi-Module.html North America: https://na.industrial.panasonic.com/products/wireless-connectivity/wi-fi-modules/embedded-wi-fi 3.2 Interacting with the Evaluation Kit The PAN9420 Eval Kit is an evaluation and design platform for the PAN9420 Module. There are two optional methods to interact with the PAN9420 using the Evaluation Kit: 3.2.1 Wired This method uses the provided USB ports with USB0 for commands and USB1 for data. -
Page 11: Powering The Evaluation Kit
Using USB0 to power up the Eval Kit is the recommended method. On the PAN9420 Evaluation Kit: USB0 is connected to the PAN9420’s UART0. UART0 is primarily utilized to send commands to, and receive acknowledgments between the PAN9420 and the Host. - Page 12 PAN9420 Quick Start Guide 3.3.2 Proper Jumpers Setup Prior to applying power to the evaluation kit, please make sure that all the jumpers on the Motherboard are set properly. In the picture below (circled in Red) are all related jumpers.
- Page 13 PAN9420 Quick Start Guide UART0 Jumpers: 1 connected across 2 connected across UART1 Jumpers: 1 connected across 2 connected across 3 connected across 4 connected across Quick Start Guide Rev. 1.0 Page 13...
-
Page 14: First Time Set Up
4 First Time Set Up 4.1 Powering As mentioned above, to connect to and communicate with the Evaluation Kit and the PAN9420, you will need a PC with your choice of OS. Additionally, you will need the following tools to be installed on it: ... -
Page 15: Connecting The Evaluation Kit
3.2 Interacting with the Evaluation Kit As mentioned above in there are two optional methods to connect and interact with the PAN9420, please choose your preferred method, and use the following to interact with the PAN9420. Wired – Connecting through USB0 and a Terminal Program 4.2.1... - Page 16 PAN9420 Quick Start Guide Default configuration for UART0 and UART1: Baud rate: 115200 Data bits: Parity bit: none Stop bits: UART0 does not utilize any flow control. UART1 utilizes HW flow control (RTS/CTS). To achieve maximal throughput, flow control for UART1 is required.
- Page 17 PAN9420 Quick Start Guide The response from the PAN9420 should be received like in the received window of the HTerm- based example below: Figure 9: Terminal Set Up and Response Quick Start Guide Rev. 1.0 Page 17...
- Page 18 Wired – Connecting through USB0 and the WIFIgurator 4.2.2 An alternative to using a Terminal Program is using the WIFIgurator provided by Panasonic. The WIFIgurator incorporates Terminal like capabilities, along with an easy-to-use GUI. 4.2.1 Wired – Connecting through USB0 and a Terminal Program, connect the MB’s...
- Page 19 PAN9420 Quick Start Guide To start the program, read the general Terms and Conditions, then click on the Accept and Start button. In order to read out the modules firmware, MAC address, serial number, radio version, bootloader version and hardware revision, perform the following steps: ...
- Page 20 Load the firmware onto the module Wireless – Connecting through Wi-Fi 4.2.3 To connect to the PAN9420 through Wi-Fi, all you need to do, is to apply power to the 3.3 Powering the Evaluation Evaluation Kit (see Kit).
- Page 21 Open any internet browser (i.e. Firefox, Chrome, etc.). Enter the default IP-Address of the PAN9420 in the URL line: 192.168.1.1 As the PAN9420 supports mDNS, you could alternatively use pan9420.local or pan9420 in the URL line instead of the IP Address.
-
Page 22: Navigating The Pan9420 Web Server
HTML and related resources. The webserver is a SW module, and it is provided as part of the PAN9420’s stack. The PAN9420 modules that are provided with the ETU also include Panasonic’s default web pages. -
Page 23: Web-App Page
The Web-App page allows you to choose between the on-module tutorials and the Web- Desktop. Again, all of which are hosted on the PAN9420. By clicking on one of the icons, you will be taken to the corresponding landing page. - Page 24 PAN9420 Quick Start Guide 5.2.1 Web-Desktop Page The Web-Desktop is an example for a landing page that allows the designer to provide the end- user with an easy web based UI (User Interface). By combining HTML and JSON, information can be retrieved in real time, rendered and streamed to the user’s browser.
- Page 25 PAN9420 Quick Start Guide 5.2.2 Tutorial Page The tutorial page provides a collection of simple to follow tutorials. Each designed to demonstrate a different feature or SW Modules of the stack. From interaction with other web servers, to controlling GPIOs.
-
Page 26: Further Information
For Panasonic Sales assistance in the EU, visit https://eu.industrial.panasonic.com/about-us/contact-us Email: wireless@eu.panasonic.com For Panasonic Sales assistance in North America, visit the Panasonic Sales & Support Tool to find assistance near you at https://na.industrial.panasonic.com/distributors Email: wireless@us.panasonic.com For questions and to look to share your experience, please visit the Panasonic Wireless Technical Forum to submit a question at https://forum.na.industrial.panasonic.com...