Black & Decker BDL220S - Laser Level Manual
- Instruction manual (4 pages) ,
- Instructions (2 pages)
Advertisement
Safety Instructions


Read and understand all instructions. Failure to follow all instructions listed below may result in electric shock, fire and/or serious personal injury.
SAVE THESE INSTRUCTIONS

Laser Radiation, avoid direct eye exposure, serious eye injury can result.
- Do not use optical tools such as a telescope or transit to view the laser beam.
- Do not place the laser in a position which may cause anyone to intentionally or unintentionally stare into the laser beam. Serious eye injury could result
- Do not operate the laser around children or allow children to operate the laser.
![]()
DO NOT DISASSEMBLE THE LASER. There are no user serviceable parts inside. Disassembling the Laser will void all warranties on the product. Do not modify the product in any way. Modifying the tool may result in Hazardous Laser Radiation Exposure.
![]()
Use of controls or adjustments or performance of procedures other than those specified in this manual may result in hazardous laser radiation exposure.- Do not operate in explosive atmospheres, such as in the presence of flammable liquids, gases, or dust.
![burn hazard]() Use only with the specifically designated batteries. Use of any other batteries may create a risk of fire.
Use only with the specifically designated batteries. Use of any other batteries may create a risk of fire.- Store idle product out of reach of children and other untrained persons. Lasers are dangerous in the hands of untrained users.
- Use only accessories that are recommended by the manufacturer for your model. Accessories that may be suitable for one laser, may create a risk of injury when used on another laser.
- Repairs and servicing MUST be performed by a qualified repair facility. Repairs performed by unqualified personnel could result in serious injury.
- Do not remove or deface warning labels. Removing labels increases the risk of exposure to radiation.
- Turn the laser off when it is not in use. Leaving the laser on increases the risk of staring into the laser beam.
- Position the laser securely. Damage to the laser or injury could result if the laser falls.
- For indoor use only.
- This product is intended for use in a temperature range of 50°F (10°C) - 104°F (40°C)."

Use caution when drilling, nailing or cutting into walls, floors and ceilings which may contain electrical wiring or pipes. Always turn off the power when working near electrical wires.
First Aid Measures for Bubble Vial Content
In case of skin contact, flush with soap and water. In case of eye contact, flush with flowing water. If swallowed, get medical help. Material Safety Data Sheet (MSDS) available from 1-800-262-2161.
The label on your tool may include the following symbols:
| V | volts |
| nm | weavelength in nanometers |
| mW | milliwatts |
| Class2 | Class 2 Laser |
 | Avoid exposure-Laser radiation emitted from this aperture. |
 | Do not stare directly into the laser beam. |
NOTE: For your convenience and safety, the following labels are on your laser.

Avoid exposure-Laser radiation emitted from this aperture.

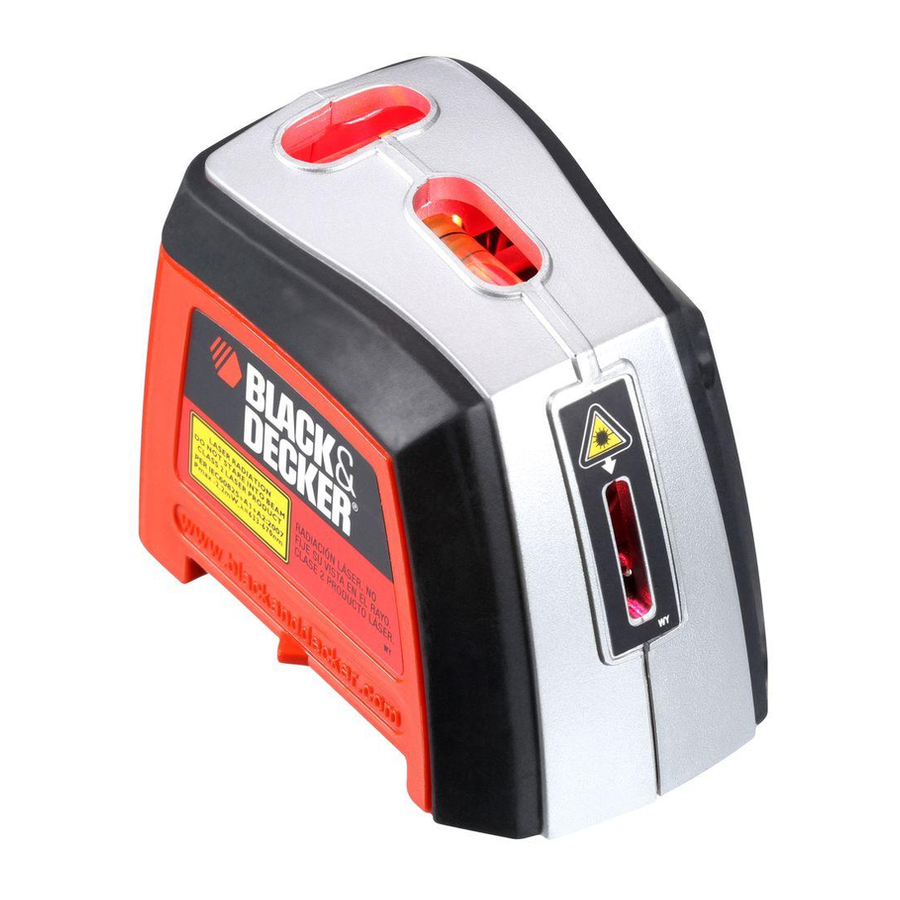
FEATURES


- Drywall Pin
- Protractor Ring
- Laser On/Off Switch
- Battery Compartment Cover
- Magnetic Base
- Vertical Bubble Vial
- Horizontal Bubble Vial
- Laser Line
- Alignment Indicator
Installing the Batteries
Ensure laser on/off switch (C) is in the full off position by moving switch actuator to "Off" position. Remove the battery compartment cover (D). Insert 2 fresh 1.5 volt AA alkaline or heavy duty batteries making sure to match (+) and (-) terminals correctly. Replace battery compartment cover.

Batteries can explode, or leak, and can cause injury or fire.
To reduce this risk:
- Carefully follow all instructions and warnings on the battery label and package.
- Always insert battery correctly with regard to polarity (+ and -), marked on the battery and the equipment.
- Do not mix old and new batteries.
- Do not mix Alkaline, Standard, or rechargeable batteries.
- Do not short battery terminals.
- Do not charge battery.
- Remove dead battery immediately and dispose of per local codes.
- Do not dispose of battery in fire.
- Keep batteries out of reach of children.
- Remove battery if the device will not be used for several months.
"Transporting batteries can possibly cause fires if the battery terminals inadvertently come in contact with conductive materials such as keys, coins, hand tools and the like. The US Department of Transportation Hazardous Material Regulations (HMR) actually prohibit transporting batteries in commerce or on airplanes (i.e. packed in suitcases and carryon luggage) UNLESS they are properly protected from short circuits. So when transporting individual batteries, make sure that the battery terminals are protected and well insulated from materials that could contact them and cause a short circuit."
Operating Instructions
Drywall Pin
Pin is sharp and should be handled with care.
NOTE: The drywall pin (A) can only be used for drywall, NOT other surfaces including plaster.
- To press pin into drywall, first expose pin by rotating pin base from opposite side.
- While maintaining pressure on pin base, insert pin straight and seat firmly against drywall surface as shown in Figure 1. The drywall pin should always be pushed in by hand and never driven by a hammer.
![]()
- To remove drywall pin from the wall, pull out straight.

Always be sure drywall pin is closed when not in use.
HORIZONTAL OR VERTICAL LINE PROJECTION ON A WALL
Hands free operation of the laser
- Attach drywall pin to the wall per instructions under "Drywall Pin" section. Always make sure drywall pin is securely attached to the wall.
- Attach the magnetic base (E) of the laser to drywall pin.
- Move on/ off switch (C) actuator to the "On" position to project the laser line.
- Rotate the laser to center horizontal (G) or vertical (F) bubble vials. Be sure the laser is firmly attached to the drywall pin before removing support.
Operation of the laser
- Hold the laser firmly against the wall.
- Move on/ off switch (C) actuator to the "On" position to project the laser lines.
- Align laser line with appropriate mark on your work surface, rotate the laser to center horizontal (G) or vertical (F) bubble vials. Realign laser with mark if necessary.
- Figure 2 illustrates a typical application for the Laser Level when it is wall mounted.


ANGULAR LINE PROJECTION ON A WALL
Operation of the laser
- Attach drywall pin to the wall per instructions under "Drywall Pin" section. Always make sure drywall pin is securely attached to the wall.
- Attach the magnetic base (E) of the laser to drywall pin.
- Rotate the laser to center horizontal (G) or vertical (F) bubble vials.
- Turn protractor ring to align "0" mark with Alignment Indicator (I).
- Rotate laser until indicator (I) is at desired angle.
- Move on/ off switch (C) actuator to the "On" position to project the laser line.
STRAIGHT LINE PROJECTION ON ANY FLAT SURFACE
Free hand operation of the laser:
- Hold the laser firmly against a flat surface.
- Move on/off switch (C) actuator to the "On" position to project the laser line.
- Align laser line with appropriate marks on your work surface (common use is laying tiles or marking plywood for cutting purpose).
Laser Radiation, avoid direct eye exposure.
Helpful Hints
- If the laser light becomes dim or is no longer visible when the switch is in the on position check or change the battery.
- The laser lines are only level on the wall against which the unit is held or hung. The short line visible on any adjacent wall is not level. The same is true for straight line projection on a floor or wall, the short line on any adjacent wall is not level.
![warning]() The laser unit should never be used as a spirit (bubble) level. The levels are only calibrated to the laser line when held or hung against a vertical surface.
The laser unit should never be used as a spirit (bubble) level. The levels are only calibrated to the laser line when held or hung against a vertical surface.- The laser unit only generates level lines when held or hung against a vertical surface.
- Make sure laser is as square as possible to flat surface to ensure proper line projection.
 The laser unit should never be used as a spirit (bubble) level. The levels are only calibrated to the laser line when held or hung against a vertical surface.
Storage
Always store the laser level indoors.
Maintenance
Use only mild soap and damp cloth to clean the tool. Never let any liquid get inside the tool; never immerse any part of the tool into a liquid.

To assure product SAFETY and RELIABILITY, repairs, maintenance and adjustment (other than those listed in this manual) should be performed by authorized service centers or other qualified service organizations, always using identical replacement parts.
Accessories
The use of any accessory not recommended for use with this tool could be hazardous.
SERVICE INFORMATION
All black & decker service centers are staffed with trained personnel to provide customers with efficient and reliable power tool service. Whether you need technical advice, repair, or genuine factory replacement parts, contact the black & decker location nearest you. To find your local service location, refer to the yellow page directory under "tools—electric" or call: 1-800-544-6986 OR VISIT WWW.BLACKANDDECKER.COM

Documents / Resources
References
Download manual
Here you can download full pdf version of manual, it may contain additional safety instructions, warranty information, FCC rules, etc.
Advertisement
Thank you! Your question has been received!


Need Assistance?
Do you have a question about the BDL220S that isn't answered in the manual? Leave your question here.