D-Link DKVM-4U - 4-Port USB KVM Switch Quick Install Guide
- Quick installation manual (33 pages) ,
- Technical specifications (2 pages) ,
- Specifications (2 pages)
Advertisement
Package Contents
Thank you for purchasing the DKVM-4U 4-Port USB KVM Switch. Follow the easy steps in this guide to properly set up your KVM switch. Please verify that all the package contents listed below are available.
 DKVM-4U 4-Port USB KVM Switch
 (2) 6-ft 2-in-1 KVM Cables
If any of the above items are missing, please contact your reseller.
System Requirements
- Windows® 2000/XP/Vista®/7
- Mac OS 9.0 or higher
- Linux
- USB Keyboard
- USB Mouse
- VGA Monitor
- Computers with available USB ports
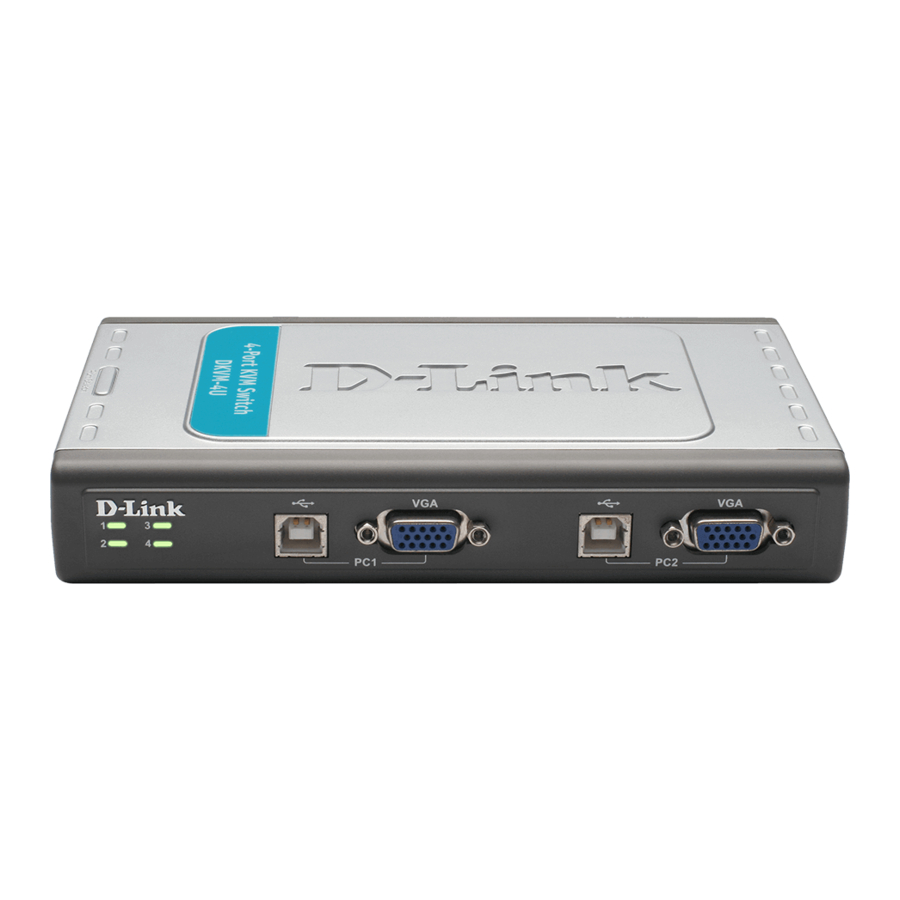
Product Overview

| Item | Feature | Description |
| 1 | Select Button | Press to toggle between your computers. |
| 2 | LEDs | The current selected computer LED will be lit. |
| 3 | USB B Type Port | Connect the USB connector from the KVM cable to this port. |
| 4 | VGA Port | Connect the VGA connector from the KVM cable to this port. |
| 5 | USB B Type Port | Connect the USB connector from the KVM cable to this port. |
| 6 | VGA Port | Connect the VGA connector from the KVM cable to this port. |
| 7 | Keyboard Port | Connect your USB keyboard to this port. |
| 8 | Mouse Port | Connect your USB mouse to this port. |
| 9 | Monitor Port | Connect your monitor to this port. |
Installation
The DKVM-4U is a hot-swappable KVM switch. You do not need to turn your computers off before installing the device.
Steps:
- Connect your USB keyboard to the DKVM-4U USB keyboard port.
- Connect your USB mouse to the DKVM-4U USB Mouse Port.
- Attach your monitor's VGA connector to the DKVM-4U monitor port.
- Using the included KVM cable, attach the USB B type connector to the USB B type port of the DKVM-4U.
- Using the included KVM cable, attach the VGA connector to the VGA port of the DKVM-4U.
Additional cables sold separately. - Using the connectors on the other end of the included KVM cables that you connected to the DKVM-4U in steps 4 and 5, attach the VGA connector to the VGA port located on the back of your computer case.
- Attach the USB A type connector to an available USB port located on the back of your computer case.
Repeat steps 4-7 to connect each of the computers to the DKVM-4U.
Installation of the DKVM-4U is now complete.

Note: If you power on the PC2, PC3, or PC4 without turning on the PC1 first, you need to use a HOT KEY or the Select button to switch the PC to it's corresponding LED.
The USB ports are designed only for Keyboard and Mouse respectively. DO NOT connect the USB HUB to any of the USB ports on console side.
Switching Between Computers

Hot Key Menu
You can also use keyboard Hot Keys to switch between your computers. Press the Scroll Lock key twice to enter Hot Key switching mode. A beep confirms that the Hot Key mode is activated.
- Scroll Lock + Scroll Lock + 1: Switches to PC 1
- Scroll Lock + Scroll Lock + 2: Switches to PC 2
- Scroll Lock + Scroll Lock + 3: Switches to PC 3
- Scroll Lock + Scroll Lock + 4: Switches to PC 4
- Scroll Lock + Scroll Lock + -->: Switches to next PC
- Scroll Lock + Scroll Lock + <--: Switches to previous PC
- Scroll Lock + Scroll Lock + B: Turns beep ON/OFF
- Scroll Lock + Scroll Lock + M: Resets the mouse and keyboard
- Scroll Lock + Scroll Lock + S: Activates Auto Scan Mode. Each computer will be scanned every 10 seconds. Press the space bar to exit Auto Scan Mode.
Troubleshooting Tips
When turning the computer on, the keyboard/mouse is not detected, or a keyboard/mouse error message is displayed.
- Make sure that the keyboard/Mouse is properly connected to the KVM. Check that the keyboard cable is securely plugged into the correct USB keyboard port and not the USB mouse port. Check that the USB mouse cable is plugged into the correct USB mouse port and not the USB keyboard port.
- Verify that the keyboard/mouse works when plugged into the computer directly.
- If the computer's BIOS does not support USB boot-up, the system may be unable to detect the mouse and keyboard during startup. Please ensure that your PC BIOS supports USB boot-up, and upgrade your PC's firmware if necessary.
- Try using a different USB keyboard/mouse
- If you are having trouble with mouse movement, try resetting the DKVM-4U by pressing Scroll Lock + Scroll Lock + M.
- Do not move the mouse or press any mouse buttons when switching from one PC to another.
The computer's BIOS is correctly configured but the computer is still unable to detect the mouse and keyboard.
- Be sure to directly connect the USB KVM switch to USB port on the PC's motherboard rather than through a port on a PCI card, Card Bus, or USB Hub.
If the image on your monitor is not clear.
- Verify that all video monitor cables are inserted properly.
- Try lowering the resolution and refresh rate of your monitor.
- Try using a shorter video cable.
When switching to another PC, the computer still displays the original PC.
- The KVM switch may not function correctly while a computer is powered off or still booting up. Ensure that the other PC or PCs are powered on and use the hot key or button to switch between computers.
Technical Support
Having trouble installing your new product? D-Link's website contains the latest user documentation and software updates for D-Link products. U.S. and Canadian customers can contact D-Link Technical Support through our website or by phone.
United States
Telephone: (877) 453-5465
Internet: http://support.dlink.com;
Canada
Telephone: (800) 361-5265
Internet: http://support.dlink.ca
©2011 D-Link Corporation/D-Link Systems, Inc. All rights reserved. D-Link and the D-Link logo are registered trademarks of D-Link Corporation or its subsidiaries in the United States and/or other countries. Other trademarks or registered trademarks are the property of their respective owners. Product specifications, size and shape are subject to change without notice, and actual product appearance may differ from that depicted on the package. Visit dlink.com (US) or dlink.ca (Canada) for more details.

Documents / Resources
References

Download manual
Here you can download full pdf version of manual, it may contain additional safety instructions, warranty information, FCC rules, etc.
Download D-Link DKVM-4U - 4-Port USB KVM Switch Quick Install Guide
Advertisement
Thank you! Your question has been received!


Need Assistance?
Do you have a question about the DKVM-4U that isn't answered in the manual? Leave your question here.