Bosch TPA 300 Original Instructions Manual
Diagnostic device for tire pressure monitoring systems
Hide thumbs
Also See for TPA 300:
- Quick start manual (25 pages) ,
- User manual (63 pages) ,
- User manual (58 pages)

Related Manuals for Bosch TPA 300


Summary of Contents for Bosch TPA 300
- Page 1 TPA 300 Diagnostic device for tire pressure monitoring systems en Original instructions Diagnostic device for tire pressure monitoring systems...
-
Page 2: Table Of Contents
| 2 | TPA 300 | en – Contents TPA 300 – Introduction Miscellaneous Specifications Charging the TPA 300 Scope of delivery Replacing the battery Special accessories Updating the TPA 300 Safety instructions Spare and wearing parts Intended use Information on battery safety and the... -
Page 3: Tpa 300 - Introduction
TPA 300 – Introduction | TPA 300 | 3 | TPA 300 – Introduction Specifications Battery type: 3000 mAh rechargeable lithium polymer storage battery Approx. 300 activations per full charge Battery service life: Dimensions: 178.9 mm x 99.7 mm x 35.8 mm (max. L x W x D) (7.04"... -
Page 4: Scope Of Delivery
| 4 | TPA 300 | TPA 300 – Introduction Scope of delivery Item Component Picture Quantity Order number TPA 300 incl. SD memory card and rechargeable storage battery Quick start guide 1 689 989 544 Battery charger 1 681 335 142... -
Page 5: Safety Instructions
Keep the safety and operating instruction for future reference. } Cleaning Clean the TPA 300 with a soft, dry cloth or use a soft, damp cloth if necessary. Do not use harsh chemical solvents such as acetone, thinners, brake cleaners, alcohol, etc. as these may damage the plastic surface. -
Page 6: Intended Use
The TPA 300 may only be used by qualified and trained motor vehicle technicians or in a light industrial workshop environment. Before use, read all instructions listed below. -
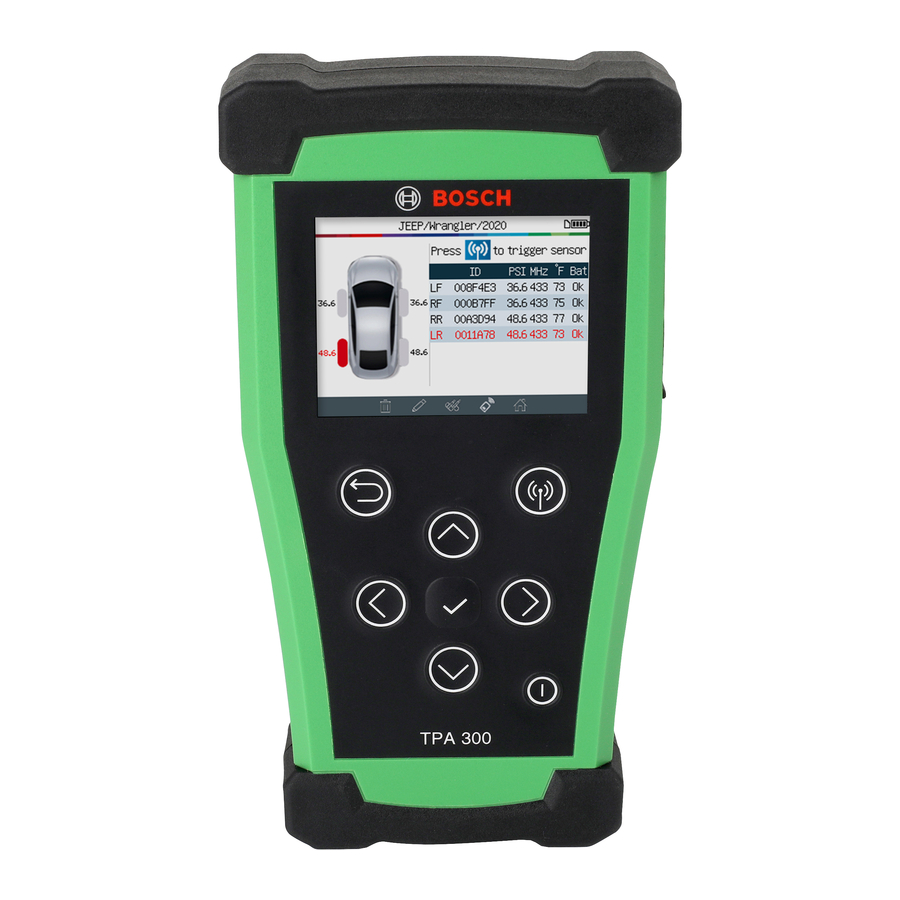
Page 7: Product Description
TPA 300 – Introduction | TPA 300 | 7 | Product description LF antenna To trigger the sensor optimally, hold the TPA 300 against the side wall of the tire next to the sensor. Page Front SD memory card slot Used to store order data on SD memory cards. -
Page 8: Function Keys
Left Right Header symbols The TPA 300 is connected to the PC via a USB connecting cable. The TPA 300 is connected via Bluetooth (not on this model). The TPA 300 is connected to an OBDII module. The SD memory card is inserted. -
Page 9: Footer Symbols
10 Switching on the system Press the key to switch on the TPA 300. The TPA 300 has an automatic switch-off function – its duration can be adjusted in the settings. To manually switch off the TPA 300, press and hold the key for 3 seconds. -
Page 10: 11 Quick Start
| 10 | TPA 300 | TPA 300 – Introduction 11 Quick start 1. Check the region Check if the region is set to "Europe" (see page 38). 2. Set the language Set the required language (see page 39). 3. Install the PC software Download the "TPMS Tool"... -
Page 11: 12 Operation
TPA 300 – Introduction | TPA 300 | 11 | 12 Operation Reading out the sensor Before tire/wheel maintenance or replacement, read out all vehicle sensors with the TPA 300 to make sure that they function properly. This eliminates the liability associated with replacing previously damaged or defective sensors. -
Page 12: Tpms Service
| 12 | TPA 300 | TPMS service TPMS service IMPORTANT: The TPA 300 is used to - read, program and copy TMPS sensors, - relearn the TPMS, - test the radio remote control (RKE), - store and retrieve recorded orders. - Page 13 Previous 1.3 Selecting the year of manufacture Continue Previous 1.4 Selecting the number of wheels For some vehicles, the TPA 300 asks for the number of wheels equipped with TPMS sensors. Continue Previous Robert Bosch GmbH 1 689 989 549_en...
-
Page 14: Checking The Vehicle
| 14 | TPA 300 | TPMS service Checking the vehicle 2.1 Selecting the vehicle check After selecting a vehicle, the screen with service functions is displayed. This section explains the "Vehicle check" function. Continue Previous 2.2 Reading out/triggering the sensors... - Page 15 TPMS service | TPA 300 | 15 | The first sensor has been read out successfully. Continue reading the Select if remaining necessary sensors. Right front Right rear Exit and save the order Left rear When all sensors have been read, navigate to other functions using the toolbar at the very bottom of the screen.
- Page 16 Schrader valves may look the same as TPMS valves. ▶ Check whether TPMS sensors exist on the vehicle. Use the TPA 300 to check the type of TPMS (direct or indirect) fitted on the vehicle. Note: Indirect TPMS function without sensors mounted in the tire.
- Page 17 5) The TPA 300 may need a software update. ▶ If the vehicle is not listed in the TPA 300, update the TPA 300 with the "TPMS Tool" PC software. See the corresponding section on page 54 of these operating instructions.
-
Page 18: Relearning
| 18 | TPA 300 | TPMS service Relearning After selecting a vehicle, the TPMS service screen is displayed. This section explains the "Relearn" function. Continue Previous 3.1 Manual First select Manual. Continue Previous Call up the relearning instructions on the... - Page 19 TPMS service | TPA 300 | 19 | TPA 300 displays the instructions for relearning. First follow the Back to the instructions to put vehicle screen the vehicle into "relearning mode". Note: The instructions displayed serve as an example. The relearning instructions vary depending on the vehicle selected.
- Page 20 | 20 | TPA 300 | TPMS service 3.2 OBDII Note: OBDII module and OBD connection cable are required (both are optional accessories). Start with selecting Continue OBDII. Previous Call up the relearning instructions on the vehicle screen by clicking on the icon at the bottom of the screen.
- Page 21 TPMS service | TPA 300 | 21 | Start by reading the first sensor Trigger sensor listed in the instructions. TPA 300 automatically switches to the next wheel. Select if necessary Continue reading the Trigger sensor remaining sensors. Then select the OBDII transfer icon at the bottom of the screen.
- Page 22 | 22 | TPA 300 | TPMS service First, connect the RJ45 network cable to the bottom of the TPA 300 and the other end to the OBDII module. Connect the OBDII module to the OBD port of the vehicle while the ignition is ON.
-
Page 23: Programming
TPMS service | TPA 300 | 23 | Programming TPA 300 works with most known universal programmable sensors on the aftermarket, with the possibility of creating new sensor IDs and/or cloning sensor IDs from the original sensors. To access the "Program sensor" function, select "Start TPMS Service" in the main menu and then select the vehicle make/model/year. - Page 24 This section is used to create a vehicle make/model/year-specific sensor if the "old" sensor cannot be cloned. The new sensor ID(s) are generated by the TPA 300 and do not match the original ID. Relearning is necessary if new sensors are replaced. See section 3 "Relearning"...
- Page 25 TPMS service | TPA 300 | 25 | Wait a few seconds while the programming process is running. TPA 300 confirms that creation of the Continue new sensor ID was successful. TPA 300 is Program a now ready to create...
- Page 26 | 26 | TPA 300 | TPMS service 4.2 Copying a sensor ID This section describes how to copy a sensor ID from an old/existing sensor. Continue Select Copy to copy a sensor ID. Previous Position the old sensor in front of...
- Page 27 TPMS service | TPA 300 | 27 | Wait a few seconds while the programming process is running. TPA 300 confirms that creation of the new sensor ID was successful. Continue Program a TPA 300 is new sensor ready to copy another new sensor (if necessary).
- Page 28 | 28 | TPA 300 | TPMS service 4.3 Copying a tire set This section describes how to copy and transfer a complete set of sensor Ids to empty sensors. This option can be used to create a set of winter tires, for example.
- Page 29 TPMS service | TPA 300 | 29 | Position the empty sensor in front of the device antenna to transfer the Program a existing ID to the new sensor new sensor. Wait a few seconds while the programming process is running.
- Page 30 | 30 | TPA 300 | TPMS service Program another sensor Repeat the process for the remaining sensors. Problem during programming: If there Try again is a transfer problem, the following message appears, please try again. Previous 4.4 Manual ID This function is only available for certain makes of programmable sensors.
- Page 31 TPMS service | TPA 300 | 31 | Use the on-screen keyboard to enter the sensor ID of the damaged sensor. Confirm Make sure to only the new enter a valid sensor sensor ID ID in the correct format (decimal or hexadecimal).
- Page 32 | 32 | TPA 300 | TPMS service TPA 300 is now ready to program further new sensors (if necessary). Problem during programming: If there Try again is a transfer problem, the following message appears, please try again. Previous 1 689 989 549_en...
-
Page 33: Keyfob
Keyfob | TPA 300 | 33 | Keyfob This function checks the strength of the radio signal of the keyfob. Go to the main-menu bar of the TPA 300 and select "Keyfob". The keyfob function can also Continue be accessed from the "Vehicle check"... - Page 34 | 34 | TPA 300 | Keyfob Press the lock/ release button on the key. GREEN: The Reset the keyfob works TPA 300 and within its range start a new test. to the TPA 300. Reset the TPA 300 and start RED: Low signal a new test.
-
Page 35: Recent Vehicles
Recent vehicles | TPA 300 | 35 | Recent vehicles This function lists all TPMS activities stored in the TPA 300. The recent vehicle history can be called up via the main menu of the TPA 300. Continue Previous Recent... -
Page 36: Statistics
| 36 | TPA 300 | Recent vehicles Statistics Show vehicle- specific activity statistics. Continue Select Statistics. Previous Usage Show general statistics on the usage of the TPA 300. Continue Select Usage. Previous 1 689 989 549_en 2022-09-01 Robert Bosch GmbH... -
Page 37: Settings
°F or °C). Change the format of the sensor ID display. Buzzer Set the buzzer to on (Yes) or off (No). Set a time period after which the TPA 300 is switched off Auto off automatically when not in use. -
Page 38: Changing The Region
| 38 | TPA 300 | Settings Changing the region Region: Select the time zone, Europe or USA & Canada. Continue Select Region & Previous language Continue Select Region Previous Continue Select a region. Previous After selecting a new region, wait until the new vehicle database has been loaded. -
Page 39: Changing The Language
Settings | TPA 300 | 39 | Changing the language Language: Select a language, default setting: English. Continue Select Region & Previous language Continue Select Language Previous Continue Select the required Previous language. After selecting a new language, wait until it has been loaded before continuing. -
Page 40: Changing Units (Format)
| 40 | TPA 300 | Settings Changing units (Format) Format: Change the air pressure and temperature display (kPa, bar or PSI, and °F or °C). Continue Select Previous Format Continue Select Units Previous Continue Select pressure and temperature Previous units. -
Page 41: Changing The Id Format
Settings | TPA 300 | 41 | Changing the ID format Format: Change the format of the sensor ID display. Continue Select Previous Format Continue Select ID format Previous Continue Select the Previous preferred format. Auto: Identifies the sensor ID automatically as decimal or hexadecimal. -
Page 42: Buzzer (Buzzing Sound) On/Off
| 42 | TPA 300 | Settings Buzzer (buzzing sound) on/off Buzzer: Switch the buzzer on (Yes) or off (No). If the buzzer is set to Yes, a buzzing sound is triggered when the sensor ID is detected. Continue Select Previous Buzzer. -
Page 43: Changing The Auto Off
Settings | TPA 300 | 43 | Changing the auto off Auto off: Time period after which the TPA 300 is switched off automatically when not in use. Select the Auto off option. Continue Press the up (+) and down (-) buttons to change the time. -
Page 44: About - Hardware And Software Information
| 44 | TPA 300 | Settings About – hardware and software information Shows the current software version and information about the TPA 300 an. Continue Previous The TPA 300 shows the software version and validity of the license. Previous 1 689 989 549_en... -
Page 45: User Manuals
Settings | TPA 300 | 45 | User manuals Shows a QR code that can be scanned to open the current user manuals. Continue Previous Scan the QR code with a mobile device to view the operating instructions in various languages. -
Page 46: Miscellaneous
TPA 300 switches off after 10 seconds. Do NOT use the TPA 300 when the battery level is low, as this may make transmission and emission unreliable. USB A / USB B... -
Page 47: Replacing The Battery
Recycle the used battery, see section "Disposal and scrapping" in these operating instructions (page 60). 1. Remove the two screws on the back of the TPA 300. 2. Remove the cover of the battery compartment. 3. Disconnect the battery and replace it with a new battery (see page 56 "Spare and wearing parts"). -
Page 48: Updating The Tpa
| 48 | TPA 300 | Miscellaneous Updating the TPA 300 If there is an updated vehicle coverage, the TPA 300 has to be updated. Perform the following steps: Important: To ensure the update is successful, temporarily disable all antivirus and spam blocker software on your computer. - Page 49 Miscellaneous | TPA 300 | 49 | Step 3: Read the license agreement for the software product, select "I accept the terms of the license agreement" and click "Next". Step 4: Click "Install" to begin the installation. Step 5: Wait until the software has completed the installation.
- Page 50 | 50 | TPA 300 | Miscellaneous Step 6: Once installation is complete, click "Finish". Step 7: Click "Next" to continue with "Welcome to the InstallShield Wizard for USB TPMS Tool Drivers". Step 8: Click "Install" to install the USB driver.
- Page 51 Miscellaneous | TPA 300 | 51 | Step 10: Installation is complete, the TPA 300 is ready to use, click "Finish". Step 11: Click "Finish" to close the installation screen. Note: If prompted by Windows© security, click "Continue anyway". Robert Bosch GmbH...
- Page 52 | 52 | TPA 300 | Miscellaneous 3.2 PC software for TPA 300 updates Step 1: Connect the USB connecting cable of the TPA 300 to the PC and switch on the TPA 300. Step 2: Start the "TPMS Tool" PC software.
- Page 53 Step 6: In the main window, select your devices in the relevant tab. The software searches for the connected TPA 300. As soon as is has found it, the software establishes a connection to the Internet server and confirms whether the connection has been established.
- Page 54 Full update: To update the TPA 300to the latest version. Synchronize jobs: To upload all data recorded in the TPA 300 to a PC for printing. Step 8: TMPS device information The license field shows the status of the software license of the TPA 300.
- Page 55 Miscellaneous | TPA 300 | 55 | Step 9: Main window in the "My jobs" tab. Shows the sensors triggered by the vehicle. To print these results, click on the Print symbol. Printing sample The results are printed as shown in the following example.
-
Page 56: Spare And Wearing Parts
| 56 | TPA 300 | Miscellaneous Spare and wearing parts Item Component Picture Quantity Order number TPA 300 incl. SD memory card and rechargeable storage battery 1 687 335 057 Rechargeable battery <) Battery charger 1 681 335 142 <) -
Page 57: Information On Battery Safety And The Charging Process
Use the specified battery charger supplied by BOSCH for this TPA 300. Follow all local regulations and always switch off the TPA 300 if its use is forbidden or if it could cause Safe use of lithium polymer batteries malfunctions or hazards. - Page 58 It is recommended to return the TPA 300 so that it can be passed on to a The use of a lithium polymer battery carries a high specialist recycler.
-
Page 59: Important Notes
Regardless of the case, liability on the part of The product may only be used by trained and Bosch is limited to the amount actually paid by the instructed personnel. Personnel scheduled to be customer for the product concerned. This exemption... -
Page 60: Disposal And Scrapping
Disposal and scrapping RED (Radio Equipment Directive) Hereby, the Robert Bosch GmbH declares that (the The TPA 300 is subject to the European radio equipment type) TPA 300 conforms to the directive 2012/19/EU (WEEE). directive 2014/53/EU. The complete text of the... - Page 62 Robert Bosch GmbH Automotive Service Solutions www.boschaftermarket.com Franz-Oechsle-Straße 4 73207 Plochingen DEUTSCHLAND bosch.prueftechnik@bosch.com www.downloads.bosch-automotive.com 1 689 989 549_en | 2022-09-01...