Bosch DIVAR IP 6000 2U Installation Manual
Hide thumbs
Also See for DIVAR IP 6000 2U:
- Quick installation manual (28 pages) ,
- Quick installation manual (28 pages) ,
- Instruction manual (48 pages)
Table of Contents
Advertisement
Quick Links
Advertisement
Table of Contents

Related Manuals for Bosch DIVAR IP 6000 2U


Summary of Contents for Bosch DIVAR IP 6000 2U
- Page 1 DIVAR IP 6000 2U DIP-6080-00N, DIP-6082-8HD, DIP-6083-8HD Installation Manual...
-
Page 3: Table Of Contents
DIVAR IP 6000 2U Table of Contents | en Table of contents Safety precautions General safety precautions Electrical safety precautions ESD precautions Operating precautions Important notices FCC and ICES compliance System overview Chassis features Chassis components 2.2.1 Chassis 2.2.2 Backplane 2.2.3... - Page 4 | Table of Contents DIVAR IP 6000 2U 4.3.5 Installing the chassis into a Telco rack Turning on the system Appendix Motherboard 5.1.1 Motherboard layout 5.1.2 Motherboard component overview 5.1.3 Motherboard features 5.1.4 Block diagram Chipset overview PC health monitoring...
-
Page 5: Safety Precautions
DIVAR IP 6000 2U Safety precautions | en Safety precautions Observe the safety precautions in this chapter. General safety precautions Follow these rules to ensure general safety: – Keep the area around the system clean and free of clutter. –... -
Page 6: Electrical Safety Precautions
Installation should only be carried out by qualified customer service personnel in accordance with the applicable electrical regulations. Disposal Your Bosch product has been developed and manufactured using high- quality materials and components that can be reused. This symbol means that electronic and electrical devices that have reached the end of their working life must be disposed of separately from household waste. -
Page 7: Esd Precautions
DIVAR IP 6000 2U Safety precautions | en – Use only one hand when working with powered-on electrical equipment. This is to avoid making a complete circuit, which will cause electrical shock. Use extreme caution when using metal tools, which can easily damage any electrical components or circuit boards they come into contact with. -
Page 8: Important Notices
| Safety precautions DIVAR IP 6000 2U Note: Please handle used batteries carefully. Do not damage the battery in any way. A damaged battery may release hazardous materials into the environment. Do not discard a used battery in the garbage or a public landfill. Please comply with the regulations set up by your local hazardous waste management agency to dispose of your used battery properly. -
Page 9: System Overview
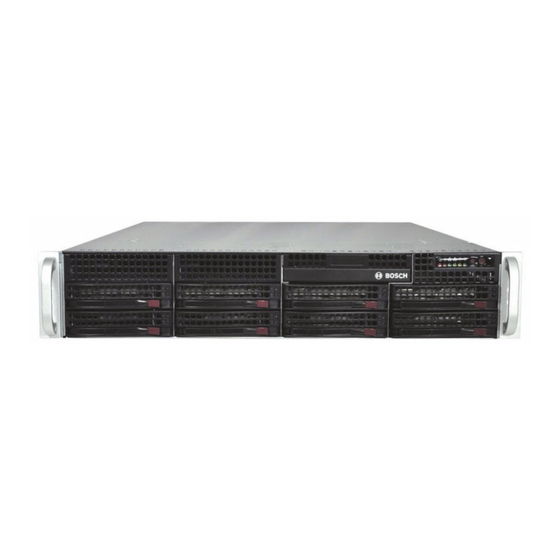
IP recording appliance for IT- minded customers seeking for a state-of-the-art “second generation” NVR recording solution. The DIVAR IP 6000 2U chassis features a unique and highly-optimized design. The chassis is equipped with high efficiency power supply. -
Page 10: Chassis
| System overview DIVAR IP 6000 2U 2.2.1 Chassis The chassis includes 8 hard drive bays. The chassis accepts a 2U backplane, 3 fans and 2 power supplies. 2.2.2 Backplane Each chassis comes with a 2U backplane. The backplane accepts SAS/SATA hard drives. -
Page 11: Control Panel Buttons
DIVAR IP 6000 2U System overview | en Front view: Power Failure Power Overheat/Fan Fail Reset NIC1/NIC2 Power on/off Rear view: 2x mains connection 100 – 240 VAC, Serial interface COM1 50 - 60 Hz 2x PS/2 Monitor (VGA) 2x USB 2x Ethernet (RJ45) 2.3.1... -
Page 12: Control Panel Leds
| System overview DIVAR IP 6000 2U 2.3.2 Control panel LEDs The control panel located on the front of the chassis has LEDs to provide you with critical information related to different parts of the system. This section explains what each LED indicates. -
Page 13: Chassis Setup And Maintenance
DIVAR IP 6000 2U Chassis setup and maintenance | en Chassis setup and maintenance This chapter covers the steps required to install components and perform maintenance on the chassis. Caution! Review the warnings and precautions listed in the manual before setting up or servicing this chassis. -
Page 14: Installing Hard Drives
| Chassis setup and maintenance DIVAR IP 6000 2U Installing hard drives This chapter describes the removing and installing of hard drives. 3.2.1 Removing hard drive trays The drives are mounted in drive carriers to simplify their installation and removal from the chassis. -
Page 15: Installing A Hard Drive
DIVAR IP 6000 2U Chassis setup and maintenance | en 3.2.2 Installing a hard drive The drives are mounted in drive carriers. To install a hard drive to the hard drive carrier: Remove the screws securing the dummy drive to the carrier. -
Page 16: Installing An Optional Floppy Or Fixed Hard Drive
DIVAR IP 6000 2U Notice! We recommend using the respective Bosch hard disk drives. The hard disk drives as one of the critical component are carefully selected by Bosch based on available failure rates. HDD – not delivered from Bosch – are not supported. Information on supported HDDs can be found in the datasheet in the Bosch Online Product Catalog. -
Page 17: Installing Or Replacing A Dvd-Rom Drive
The chassis model includes an internal USB transcoder device. Notice! To replace or install the transcoder device, please apply to one of the Bosch RMA helpdesks. Replacing or installing the front port panel If you must install a new or replace a damaged front port panel, observe the following instructions. -
Page 18: Installing The Motherboard
| Chassis setup and maintenance DIVAR IP 6000 2U DVD-ROM Front port panel To replace or install the front port panel: Turn off and unplug the unit. Remove the chassis cover. Disconnect the power and data cables from the front port panel to other chassis components including the motherboard and backplane. -
Page 19: System Fans
DIVAR IP 6000 2U Chassis setup and maintenance | en To install the air shroud: Place air shroud in the chassis. The air shroud fits behind the two fans closest to the power supply. Note: If a 16 DIMM (13.68" x 13") motherboard is used, it is necessary to use the optional MCP-310-82502-0N air shroud. -
Page 20: Power Supply
| Chassis setup and maintenance DIVAR IP 6000 2U Warning! The fans might still be turning when you remove the fan assembly from the chassis. Keep fingers, screwdrivers, and other objects away from the openings in the fan assembly's housing.