AEG HE634070XB User Manual
Ceramic glass hob
Hide thumbs
Also See for HE634070XB:
- User manual (116 pages) ,
- User manual (88 pages) ,
- User manual (56 pages)
Table of Contents
Advertisement
Available languages
Available languages
Quick Links
Advertisement
Chapters
Table of Contents

Related Manuals for AEG HE634070XB


Summary of Contents for AEG HE634070XB
- Page 1 NL GLASKERAMISCHE KOOKPLAAT HE634070XB GEBRUIKSAANWIJZING EN CERAMIC GLASS HOB USER MANUAL FR TABLE DE CUISSON NOTICE D'UTILISATION VITROCÉRAMIQUE DE GLASKERAMIKKOCHFELD BENUTZERINFORMATION ES PLACA DE COCCIÓN MANUAL DE INSTRUCCIONES VITROCERÁMICA...
- Page 2 ACCESSOIRES EN VERBRUIKSARTIKELEN In de AEG webshop vindt u alles wat u nodig heeft om al uw apparaten van AEG mooi te houden en perfect te laten functioneren. Ook vindt u hier een groot aantal...
- Page 3 Inhoud INHOUD 4 Veiligheidsinformatie 5 Montage-instructies 7 Beschrijving van het product 9 Bedieningsinstructies 12 Nuttige aanwijzingen en tips 13 Onderhoud en reiniging 13 Problemen oplossen 14 Milieubescherming In deze gebruiksaanwijzing worden de volgende symbolen gebruikt: Belangrijke informatie over uw persoonlijke veiligheid en informatie over het voorkomen van schade aan het apparaat.
- Page 4 Veiligheidsinformatie VEILIGHEIDSINFORMATIE Lees voor uw eigen veiligheid en correcte werking van het apparaat eerst deze handlei- ding aandachtig door, alvorens het apparaat te installeren. Bewaar deze instructies altijd bij het apparaat, zelfs wanneer u deze verplaatst of verkoopt. Gebruikers moeten volledig op de hoogte zijn van de bediening en veiligheidsfuncties van het apparaat.
- Page 5 MONTAGE-INSTRUCTIES Noteer voor de installatie , het serienummer (ser. nr.) op het typeplaatje. Het typepla- tje van het apparaat bevindt zich aan de onderkant van de behuizing. HE634070XB 949 595 055 00 58 HAD C6 AO 220-240 V 50-60-Hz 7,1 kW...
- Page 6 Montage-instructies Veiligheidsinstructies WAARSCHUWING! Lees deze zorgvuldig! De wetten, voorschriften, richtlijnen en normen die van kracht zijn in het land waar het apparaat wordt gebruikt dienen in acht genomen te worden (veiligheidsvoorschriften, correcte recycling overeenkomstig de voorschriften, veiligheidsvoorschriften met betrek- king tot elektrische installaties, enz.)! Laat alleen een gekwalificeerd elektricien het apparaat installeren! Houd de minimumafstanden naar andere apparaten en units in acht! Tijdens de installatie moet een antistootbescherming zijn aangebracht, bijv.
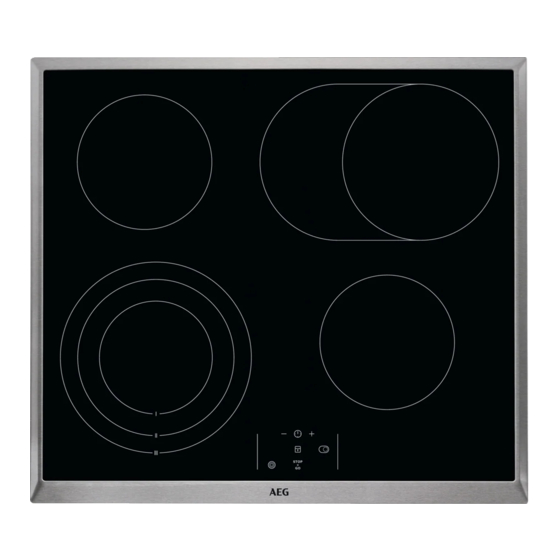
- Page 7 Beschrijving van het product Montage 600 mm min. 500 mm min. 50 mm min. 50 mm min. 28 mm BESCHRIJVING VAN HET PRODUCT Indeling kookplaat Enkele kookzone 1200 W 170 mm Braadzone 1500/2400 W 265 mm Enkele kookzone 1200 W Bedieningspaneel Drievoudige kookzone 800/1600/2300...
- Page 8 Beschrijving van het product Indeling bedieningspaneel Gebruik de sensorvelden om het apparaat te bedienen. Sensorveld Functie timerdisplay toont de tijd in minuten kookzone selecteren tijdsduur verlengen of verkorten schakelt de ovale zone in en uit met indicatielampje schakelt de toetsblokkering of het kinderslot in een vergrendeling en uit display met de temperatuurinstelling toont de temperatuurinstelling...
- Page 9 Bedieningsinstructies OptiHeat Control (3-staps restwarmte-indicatie) WAARSCHUWING! Gevaar van brandwonden door restwarmte! OptiHeat Control geeft het niveau restwarmte aan. BEDIENINGSINSTRUCTIES U bedient de kookplaat met behulp van de knoppen van het apparaat dat u samen met de kookplaat geïnstalleerd heeft. De Bedieningsinstructies van dit apparaat ver- tellen u hoe u de kookplaat moet bedienen.
- Page 10 Bedieningsinstructies 2 2. 3 3. 4 4. 5 5. 6 6. 7 Timer gebruiken Timer met aftelfunctie Gebruik de timer met aftelfunctie om in te stellen hoe lang de kookzone wordt gebruikt voor één kooksessie. Stel de timer met aftelfunctie in nadat de kookzone is geselecteerd. U kunt de temperatuur instellen voordat of nadat u de timer hebt ingesteld.
- Page 11 Bedieningsinstructies • Stoppen van CountUp Timer: selecteer de kookzone met en raak aan om de timer uit te schakelen. Het lampje van de kookzone gaat uit. Kookwekker U kunt de timer als kookwekker gebruiken als de kookzones uitgeschakeld zijn. Raak aan .
- Page 12 Nuttige aanwijzingen en tips OffSound Control (In- en uitschakelen van de geluiden) Uitschakelen van de geluiden Schakel het apparaat uit. Raak 3 seconden aan, het geluid klinkt. Raak aan, het geluid klinkt. Raak 3 se- conden aan. gaat aan, het geluid is aan. Raak aan, gaat aan, het geluid is uit.
- Page 13 Onderhoud en reiniging ONDERHOUD EN REINIGING Reinig het apparaat na elk gebruik. Gebruik altijd kookgerei met een schone bodem. WAARSCHUWING! Scherpe voorwerpen en schurende reinigingsmiddelen beschadigen het apparaat. Het reinigen van het apparaat met een stoomstraal- of hogedrukreiniger is om veilig- heidsredenen verboden.
- Page 14 Milieubescherming Probleem Mogelijke oorzaak en oplossing De automatische • De kookzone geeft nog steeds restwarmte af. Laat de kookzone voldoende opwarmfunctie afkoelen. start niet. • De hoogste kookstand is ingesteld. De hoogste kookstand heeft hetzelfde vermogen als de automatische opwarmfunctie. U kunt de bui- Schakel eerst de binnenste ring in.
- Page 15 Milieubescherming Verpakkingsmateriaal De verpakkingsmaterialen zijn milieuvriendelijk en herbruikbaar. De kunststof onderdelen zijn gemarkeerd, bijv.: >PE<,>PS<, etc. Gooi het verpakkingsmateriaal weg in de juiste afvalcontainer bij uw plaatselijke afvalverwerkingsdienst.
- Page 16 Please spend a few minutes reading to get the very best from it. ACCESSORIES AND CONSUMABLES In the AEG webshop, you’ll find everything you need to keep all your AEG appliances looking spotless and working perfectly. Along with a wide range of...
-
Page 17: Table Of Contents
Contents CONTENTS 18 Safety information 19 Installation instructions 21 Product description 22 Operating instructions 25 Helpful hints and tips 25 Care and cleaning 26 What to do if… 27 Environment concerns The following symbols are used in this user manual: Important information concerning your personal safety and information on how to avoid damaging the appliance. -
Page 18: Safety Information
Safety information SAFETY INFORMATION For your safety and correct operation of the appliance, read this manual carefully before installation and use. Always keep these instructions with the appliance even if you move or sell it. Users must fully know the operation and safety features of the appliance. Correct operation •... -
Page 19: Installation Instructions
INSTALLATION INSTRUCTIONS Before the installation , note down the serial number (Ser. Nr.) from the rating plate. The rating plate of the appliance is on its lower casing. HE634070XB 949 595 055 00 58 HAD C6 AO 220-240 V 50-60-Hz... - Page 20 Installation instructions WARNING! Risk of injury from electrical current. The combination appliance is live. • Observe electrical safety rules. • Rated voltage of the combined appliances must match. • Fit plug and socket connections together properly. • Install correctly to give anti-shock protection. •...
-
Page 21: Product Description
Product description PRODUCT DESCRIPTION Cooking surface layout Single cooking zone 1200 W 170 mm 265 mm Multi-purpose zone 1500/2400 W Single cooking zone 1200 W Control panel Triple cooking zone 800/1600/2300 W Control panel layout Use the sensor fields to operate the appliance. sensor field function the timer display... -
Page 22: Operating Instructions
Operating instructions Heat setting displays Display Description The cooking zone is off The cooking zone operates Keep Warm The automatic heat-up function is on There is a malfunction + digit OptiHeat Control (3 step Residual heat indicator): still cooking / keep warm / residual heat Lock/Child safety function is on The automatic switch off is on... - Page 23 Operating instructions To switch on the outer ring touch the sensor field . The indicator comes on. For more outer rings touch the same sensor field again. The next indicator comes on. Do the procedure again to switch off the outer ring. The indicator goes out. The automatic heat up Automatic heat up function sets the highest heat setting for some time, and then de- creases to the necessary level.
- Page 24 Operating instructions • Selection of the cooking zone (if more than 1 cooking zone operate): touch again and again until the indicator of a necessary cooking zone comes on. • Starting the CountUp Timer: touch of the timer comes on. When the indicator of the cooking zone flashes slower, the time counts up, display switches between and time elapsed (minutes) •...
-
Page 25: Helpful Hints And Tips
Helpful hints and tips • The child safety stays active after switch off the hob. OffSound Control (Deactivation and activation of the sounds) Deactivation of the sounds Deactivate the appliance. Touch for 3 seconds, sound operates. Touch , sound operates. Touch for 3 sec- onds. -
Page 26: What To Do If
What to do if… Always use cookware with clean bottom. WARNING! Sharp objects and abrasive cleaning agents will damage the appliance. For your safety, do not clean the appliance with steam blasters or high-pressure cleaners. Scratches or dark stains on the glass ceramic have no effect on how the appliance oper- ates. -
Page 27: Environment Concerns
Environment concerns Problem Possible cause and remedy You cannot ac- Activate the inner ring first. tivate the outer ring. The sensor fields The cookware is too large or you out it too near to the controls. Put large become hot. cookware on the rear cooking zones if it is necessary. - Page 28 Veuillez prendre quelques instants pour lire cette notice afin d'utiliser au mieux votre appareil. ACCESSOIRES ET CONSOMMABLES Dans la boutique en ligne d'AEG, vous trouverez tout ce qu'il vous faut pour que vos appareils AEG fonctionnent parfaitement. Sans oublier une vaste gamme d'accessoires conçus et fabriqués selon les critères de...
- Page 29 Sommaire SOMMAIRE 30 Consignes de sécurité 31 Instructions d'installation 33 Description de l'appareil 35 Notice d'utilisation 38 Conseils utiles 39 Entretien et nettoyage 39 En cas d'anomalie de fonctionnement 40 En matière de protection de l'environnement Les symboles suivants sont utilisés dans ce manuel: Informations importantes pour votre sécurité...
-
Page 30: Consignes De Sécurité
Consignes de sécurité CONSIGNES DE SÉCURITÉ Pour votre sécurité et le bon fonctionnement de l'appareil, lisez attentivement ce manuel avant l'installation et l'utilisation. Conservez ces instructions à proximité de l'appareil. Les utilisateurs doivent connaître parfaitement le fonctionnement et les fonctions de sécu- rité... -
Page 31: Instructions D'installation
INSTRUCTIONS D'INSTALLATION Avant d'installer l'appareil , notez le numéro de série qui figure sur la plaque signaléti- que. La plaque signalétique se trouve sur la partie inférieure de l'appareil. HE634070XB 949 595 055 00 58 HAD C6 AO 220-240 V 50-60-Hz... - Page 32 Instructions d'installation Consignes de sécurité AVERTISSEMENT Veuillez lire attentivement cette notice d'utilisation ainsi que les recommandations et les avertissements qu'elle contient avant de procéder à l'installation et à la première utilisa- tion de l'appareil. L'installation doit être conforme à la législation, la réglementation, les lignes directrices et les normes en vigueur dans le pays de résidence (consignes de sécurité...
-
Page 33: Description De L'appareil
Description de l'appareil Montage 600 mm min. 500 mm min. 50 mm min. 50 mm min. 28 mm DESCRIPTION DE L'APPAREIL Description de la table de cuisson Zone de cuisson 1 200 W 170 mm Zone de rôtissage 1 500/2 400 W 265 mm Zone de cuisson 1 200 W Bandeau de commande... - Page 34 Description de l'appareil Description du bandeau de commandes Les touches sensitives permettent de commander l'appareil. Touche sensitive Fonction Affichage du minuteur Affichage de la durée en minutes Sélection d'une zone de cuisson Augmentation ou diminution de la durée Mise en fonctionnement et mise à l'arrêt de la avec voyant zone de cuisson ovale Activation et désactivation de la fonction de ver-...
-
Page 35: Notice D'utilisation
Notice d'utilisation OptiHeat Control (Indicateur de chaleur résiduelle à 3 paliers) AVERTISSEMENT La chaleur résiduelle peut être source de brûlures ! OptiHeat Control indique le niveau de chaleur résiduelle. NOTICE D'UTILISATION La table de cuisson se commande à l'aide des manettes de commande de l'appareil installé... - Page 36 Notice d'utilisation 2 2. 3 3. 4 4. 5 5. 6 6. 7 Utilisation du minuteur Minuteur progressif Utilisez le minuteur progressif pour régler la durée de fonctionnement de la zone de cuisson pendant une cuisson. Réglez le minuteur après avoir sélectionné la zone de cuisson. Vous pouvez régler le niveau de cuisson avant ou après le réglage du minuteur.
- Page 37 Notice d'utilisation • Contrôle du temps écoulé : sélectionnez la zone de cuisson avec . Le voyant de la zone de cuisson clignote plus rapidement. L'affichage indique le temps écoulé. • Désactivation du CountUp Timer: sélectionnez la zone de cuisson avec et appuyez pour désactiver le minuteur.
-
Page 38: Conseils Utiles
Conseils utiles OffSound Control (Désactivation et activation des signaux sonores) Désactivation des signaux sonores Désactivez l'appareil. Effleurez pendant 3 secondes, le son se met en marche. Effleurez , le son se met en marche. Effleurez pendant 3 secondes. s'allume et le son est en marche. Effleurez s'affiche et le signal sonore s'arrête. -
Page 39: Entretien Et Nettoyage
Entretien et nettoyage ENTRETIEN ET NETTOYAGE Nettoyez l'appareil après chaque utilisation. Utilisez toujours des récipients de cuisson dont le fond est propre et sec, lisse et plat. AVERTISSEMENT Les objets tranchants et les produits de nettoyage agressifs ou abrasifs endommagent l'appareil. -
Page 40: En Matière De Protection De L'environnement
En matière de protection de l'environnement Problème Cause possible et solution Le voyant de La zone de cuisson n'est pas chaude car elle n'a été activée que pendant un chaleur résiduelle court laps de temps. Si la zone de cuisson est censée être chaude, faites ap- ne s'allume pas. - Page 41 En matière de protection de l'environnement En procédant à la mise au rebut de l'appareil dans les règles de l’art, nous préservons l'environnement et notre sécurité, s’assurant ainsi que les déchets seront traités dans des conditions optimum. Pour obtenir plus de détails sur le recyclage de ce produit, veuillez prendre contact avec les services de votre commune ou le magasin où...
- Page 42 Nehmen Sie sich ein paar Minuten Zeit zum Lesen, um seine Vorzüge kennen zu lernen. ZUBEHÖR UND VERBRAUCHSMATERIALIEN Im AEG Webshop finden Sie alles, was Sie für ein makelloses Aussehen und perfektes Funktionieren Ihrer AEG Geräte benötigen. Wir bieten auch ein umfangreiches Zubehörsortiment, das Ihre höchsten...
- Page 43 Inhalt INHALT 44 Sicherheitshinweise 45 Montageanleitung 47 Gerätebeschreibung 49 Gebrauchsanweisung 52 Praktische Tipps und Hinweise 53 Reinigung und Pflege 53 Was tun, wenn … 55 Umwelttipps In dieser Benutzerinformation werden folgende Symbole verwendet: Wichtige Hinweise zur Sicherheit von Personen und Informationen zur Vermeidung von Geräteschäden Allgemeine Hinweise und Ratschläge Hinweise zum Umweltschutz...
-
Page 44: Sicherheitshinweise
Sicherheitshinweise SICHERHEITSHINWEISE Lesen Sie diese Bedienungsanleitung bitte sorgfältig durch, bevor Sie das Gerät anschlie- ßen und benutzen, um Gefahren zu vermeiden und einen korrekten Betrieb des Geräts zu gewährleisten. Bewahren Sie diese Bedienungsanleitung in der Nähe des Geräts auf, auch wenn Sie dieses anderswo aufstellen. Wenn Sie das Gerät verkaufen, geben Sie dem Käufer die Bedienungsanleitung mit. -
Page 45: Montageanleitung
MONTAGEANLEITUNG Notieren Sie vor der Montage des Geräts die Seriennummer (Ser. Nr.), die Sie auf dem Typenschild finden. Das Typenschild befindet sich unten am Gehäuse des Geräts. HE634070XB 949 595 055 00 58 HAD C6 AO 220-240 V 50-60-Hz 7,1 kW... - Page 46 Montageanleitung Sicherheitshinweise WARNUNG! Bitte Folgendes unbedingt lesen! Halten Sie unbedingt alle Gesetze, Verordnungen, Vorschriften und Normen (Sicherheits- vorschriften, Vorschriften zum Recycling, Vorschriften zur elektrischen Sicherheit usw.) des Landes ein, in dem Sie das Gerät verwenden! Nur eine Elektrofachkraft darf den Elektroanschluss des Geräts vornehmen! Halten Sie die Mindestabstände zu anderen Geräten ein! Der Berührungsschutz muss durch den Einbau gewährleistet sein.
-
Page 47: Gerätebeschreibung
Gerätebeschreibung Montage 600 mm min. 500 mm min. 50 mm min. 50 mm min. 28 mm GERÄTEBESCHREIBUNG Ausstattung des Kochfelds Einkreis-Kochzone 1.200 W 170 mm Mehrzweckkochzone 1.500/2.400 W 265 mm Einkreis-Kochzone 1.200 W Bedienfeld Dreikreis-Kochzone 800/1.600/2.300... - Page 48 Gerätebeschreibung Ausstattung des Bedienfelds Bedienen Sie das Gerät über die Sensorfelder. Sensorfeld Funktion Timer-Anzeige Anzeige der Zeit in Minuten Auswählen der Kochzone Erhöhen oder Verringern der Zeit Ein- und Ausschalten der Bräterzone mit Anzeige Ein- und Ausschalten der Tastensperre oder der Verriegelung Kindersicherung Anzeige der Kochstufen...
-
Page 49: Gebrauchsanweisung
Gebrauchsanweisung OptiHeat Control(Restwärmeanzeige, 3-stufig) WARNUNG! Es besteht Verbrennungsgefahr durch Restwärme! OptiHeat Controlgibt den Grad der Restwärme an. GEBRAUCHSANWEISUNG Das Kochfeld wird mithilfe der Knöpfe an dem Gerät bedient, das zusammen mit dem Kochfeld installiert wurde. In der Gebrauchsanweisung können Sie nachlesen, wie das Kochfeld bedient wird. - Page 50 Gebrauchsanweisung 2 2. 3 3. 4 4. 5 5. 6 6. 7 Verwenden des Timers Kurzzeitmesser Mit dem Kurzzeitmesser stellen Sie ein, wie lange eine Kochzone für einen einzelnen Kochvorgang eingeschaltet bleiben soll. Wählen Sie erst die Kochzone aus und stellen Sie dann den Kurzzeitmesser ein. Sie können die Kochstufe einstellen, bevor Sie den Timer einstellen oder umgekehrt.
- Page 51 Gebrauchsanweisung • Überprüfen der abgelaufenen Zeit: Wählen Sie die Kochzone mit aus. Die Anzeige der Kochzone blinkt schneller. Die abgelaufene Zeit erscheint in der Anzeige. • Ausschalten der Funktion CountUp Timer: Wählen Sie die Kochzone mit aus und berühren Sie oder , um den Timer auszuschalten.
-
Page 52: Praktische Tipps Und Hinweise
Praktische Tipps und Hinweise Überwinden der Kindersicherung für einen Kochvorgang • Stellen Sie die Kochstufen ein . Das Symbol leuchtet auf. Berühren Sie so lan- aufleuchtet. Stellen Sie innerhalb von höchstens 10 Sekunden ge, bis das Symbol die Kochstufe ein. Nun können Sie das Kochfeld bedienen. •... -
Page 53: Reinigung Und Pflege
Reinigung und Pflege Hinweis zu Acrylamid Nach neuesten wissenschaftlichen Erkenntnissen kann die Bräunung von Lebensmitteln, speziell bei stärkehaltigen Produkten, eine gesundheitliche Gefährdung durch Acrylamid verursachen. Daher empfehlen wir, bei möglichst niedrigen Temperaturen zu garen und die Speisen nicht zu stark zu bräunen. REINIGUNG UND PFLEGE Reinigen Sie das Gerät nach jedem Gebrauch. - Page 54 Was tun, wenn … Problem Mögliche Ursache und Abhilfe Es wird ein Ein oder mehrere Sensorfelder wurden bedeckt. Entfernen Sie den Gegen- akustisches Sig- stand vom Sensorfeld. nal ausgegeben und das Gerät wird ausge- schaltet. Bei ausgeschal- tetem Gerät ist ein Signalton zu hören.
-
Page 55: Umwelttipps
Umwelttipps UMWELTTIPPS Das Symbol auf dem Produkt oder seiner Verpackung weist darauf hin, dass dieses Produkt nicht als normaler Haushaltsabfall zu behandeln ist, sondern an einem Sammelpunkt für das Recycling von elektrischen und elektronischen Geräten abgegeben werden muss. Durch Ihren Beitrag zum korrekten Entsorgen dieses Produkts schützen Sie die Umwelt und die Gesundheit Ihrer Mitmenschen. - Page 56 ACCESORIOS Y CONSUMIBLES En la página web de AEG, encontrará todo lo necesario para la perfecta limpieza y funcionamiento de todos sus electrodomésticos AEG. Junto con una amplia gama de accesorios diseñados y fabricados conforme a los...
- Page 57 Índice de materias ÍNDICE DE MATERIAS 58 Información sobre seguridad 59 Instrucciones de instalación 61 Descripción del producto 62 Instrucciones de uso 66 Consejos útiles 66 Mantenimiento y limpieza 67 Qué hacer si… 68 Aspectos medioambientales En este manual de usuario se utilizan los símbolos siguientes: Datos importantes referentes a su seguridad personal e información sobre la...
- Page 58 Información sobre seguridad INFORMACIÓN SOBRE SEGURIDAD Por su seguridad y para garantizar el funcionamiento correcto del aparato, antes de ins- talarlo y utilizarlo por primera vez lea atentamente este manual. Conserve siempre estas instrucciones con el aparato, aunque lo cambie de lugar o lo venda. Los usuarios deben conocer a la perfección el funcionamiento y las características de seguridad del aparato.
- Page 59 Antes del montaje , anote el número de serie (Ser. Nr.) de la placa de datos técnicos. La placa de datos técnicos está en la carcasa inferior del aparato. HE634070XB 949 595 055 00 58 HAD C6 AO 220-240 V 50-60-Hz...
- Page 60 Instrucciones de instalación Instrucciones de seguridad ADVERTENCIA Por favor, lea atentamente estas instrucciones. Siga rigurosamente las leyes, ordenanzas, directivas y normas (por ejemplo, de seguridad, eliminación de residuos, instalaciones eléctricas, etc.) vigentes en el país donde se vaya a utilizar el aparato. Deje la conexión eléctrica en manos de un electricista homologado.
- Page 61 Descripción del producto min. 28 mm DESCRIPCIÓN DEL PRODUCTO Disposición de las zonas de cocción Zona de cocción de un circuito (1.200 170 mm Zona de cocción variable (1.500/2.400 265 mm Zona de cocción de un circuito (1.200 Panel de mandos Zona de cocción triple (800/1600/2300 W) Disposición del panel de mandos...
- Page 62 Instrucciones de uso Sensor Función Selecciona la zona de cocción Aumenta o reduce el tiempo Conecta y desconecta la zona oval Símbolo con indicador Activa y desactiva el dispositivo de seguridad pa- Símbolo con un candado ra niños Indicador del nivel de calor Muestra el ajuste de calor Enciende y apaga el aparato (STOP+GO) Conecta y desconecta los circuitos exteriores...
- Page 63 Instrucciones de uso Desconexión automática La función desconecta automáticamente la placa siempre que: • todas las zonas de cocción están apagadas • el sensor ha estado cubierto por un objeto (recipiente, paño, etc.) durante más de 10 segundos. El aparato emite varias señales acústicas y la placa se desconecta. Retire el objeto o limpie el panel de mandos.
- Page 64 Instrucciones de uso Ajuste el temporizador después de seleccionar la zona de cocción. Elija el nivel de calor antes o después de ajustar el temporizador. • Selecciona la zona de cocción: toque el sensor varias veces hasta que se encienda el indicador de la zona de cocción que desea.
- Page 65 Instrucciones de uso • Para activar esta función, toque . Se encenderá el símbolo • Para desactivar esta función, toque . Se activará la temperatura que se haya selec- cionado anteriormente. Cuando se cambia el nivel de temperatura, la función se detiene y la pantalla muestra el nuevo ajuste.
- Page 66 Consejos útiles Pulse durante 3 segundos. Pulse . Pulse durante 3 segundos. . se encenderá porque la señal acústica se ha desactivado. Pulse se encenderá. Las señales acús- ticas están activadas. CONSEJOS ÚTILES Recipientes • La base de los recipientes debe ser lo más gruesa y plana posible. •...
- Page 67 Qué hacer si… rascador especial para el cristal. Coloque el rascador sobre la superficie formando un ángulo agudo y arrastre la hoja para eliminar la suciedad. – Elimine cuando el aparato se haya enfriado: restos de cal, marcas de agua, man- chas de grasa y decoloraciones metálicas.
- Page 68 Aspectos medioambientales Problema Causa probable y solución Se enciende el La función de desconexión automática está activada. Apague la zona de coc- ción y vuelva a encenderla después de 60 segundos. símbolo Si vuelve a aparecer el símbolo después de 60 segundos, póngase en con- tacto con el Centro de servicio técnico.
- Page 72 892933703-E-342010...