Table of Contents
Advertisement
Quick Links
VB-VIS-003
4K Document Camera
User Guide
IMPORTANT: Please read this User Guide to obtain important information on installing and using your product in
a safe manner, as well as registering your product for future service. Warranty information contained in this User
Guide will describe your limited coverage from ViewSonic® Corporation, which is also found on our web site at
http://www.viewsonic.com in English, or in specific languages using the Regional selection box in the upper right
corner of our website.
Model No. VS19273
P/N: VB-VIS-003
Advertisement
Chapters
Table of Contents

Related Manuals for ViewSonic VB-VIS-003


Summary of Contents for ViewSonic VB-VIS-003
- Page 1 Warranty information contained in this User Guide will describe your limited coverage from ViewSonic® Corporation, which is also found on our web site at http://www.viewsonic.com in English, or in specific languages using the Regional selection box in the upper right corner of our website.
- Page 2 As a world-leading provider of visual solutions, ViewSonic® is dedicated to exceeding the world’s expectations for technological evolution, innovation, and simplicity. At ViewSonic®, we believe that our products have the potential to make a positive impact in the world, and we are confident that the ViewSonic® product you have chosen will serve you well.
-
Page 3: Safety Precautions
Safety Precautions Please read the following Safety Precautions before you start using the device. • Keep this user guide in a safe place for later reference. • Read all warnings and follow all instructions. • To prevent damage, avoid any physical pressure, vibration, or immersion during transportation, possession, or installation of the product. -
Page 4: Table Of Contents
Contents Safety Precautions ............3 Introduction ..............6 Package Contents ....................6 Product Overview ....................7 Initial Setup ..............8 Setting up the Document Camera ................8 Making Connections ..........10 Connecting the Document Camera ..............10 Using the Device ............11 Using the Document Camera as a PC Camera ............11 vDocCam+ ......................12 Installing vDocCam+ Software................ - Page 5 Appendix ..............24 Specifications ......................24 Troubleshooting ....................27 Maintenance......................30 General Precautions ....................30 Cleaning the Camera Lens ..................30 Cleaning the Case ....................30 Regulatory and Service Information ......31 Compliance Information ..................31 FCC Compliance Statement ................... 31 CE Conformity for European Countries ..............32 Declaration of RoHS2 Compliance.................
-
Page 6: Introduction
Introduction Package Contents VB-VIS-003 ViewSonic VB-VIS-003 4K Document Cam Quick Start Guide Contents VB-VIS-003 ViewSonic VB-VIS-003 4K Document Cam Quick Start Guide Contents VB-VIS-003 ViewSonic VB-VIS-003 4K Document Cam Quick Start Guide Contents USB Cable VB-VIS-003 Micro USB to Type A Cable Fixture x 2 (1.5 m ±... -
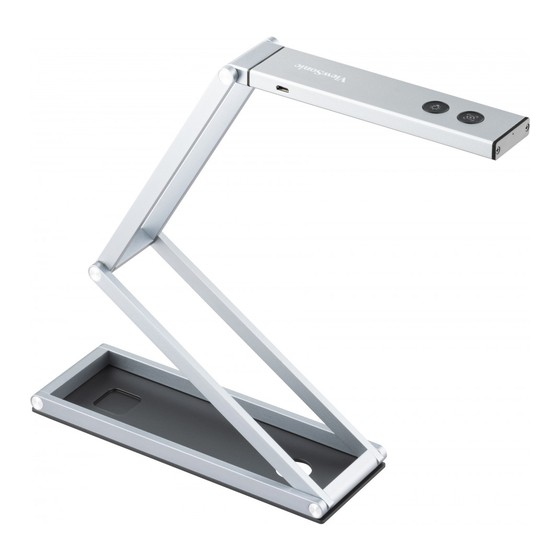
Page 7: Product Overview
Product Overview Number Description Note Autofocus: Press once Autofocus / Flip Button Flip Image 0°/180°: Press and hold LED Light Button Press to turn on; 3-level brightness control Micro USB Port Power LED Indicator A blue light will show when connected. Flip Camera Head 0°/180°... -
Page 8: Initial Setup
Initial Setup Setting up the Document Camera 1. Lift the device by pushing through the opening at the Base Plate. 2. Press against the Base Plate and pull up on the Camera Arm to extend it. Then, rotate the Camera Head. NOTE: ... - Page 9 Area 3. Adjust the Camera Arm to change the height and position of the camera. Fully extend the Camera Arm to capture the maximum shooting area of A3 at output, Output 2048 x 1536 (4:3) 2048 x 1536 4:3 mode. Maximum Height Maximum Height 33 cm (13”)
-
Page 10: Making Connections
Making Connections Connecting the Document Camera 1. Plug the Micro USB end of the USB Cable into the Document Camera. 2. Add the Cable Fixtures to secure the USB Cable to the Camera Body. 3. Connect the other end of the USB Cable, Type A, to a computer’s USB port (PC, Mac, Chromebook). -
Page 11: Using The Device
Using the Device Using the Document Camera as a PC Camera After the Document Camera is connected correctly and detected by your PC, the PC Camera function is ready to use. -
Page 12: Vdoccam
VB-VIS-003 Document Camera. Installing vDocCam+ Software 1. Go to: https://www.viewsonicglobal.com/q/vb-vis-003#downloads 2. Download the vDocCam+ software. 3. Double click the vDocCam+ file to install the software. 4. Follow the on-screen instructions to complete the installation. -
Page 13: Using Vdoccam
Using vDocCam+ Overview 1. Function Tabs vDocCam+ integrates three (3) major functions. Click on the tab to switch function. Mode Description Visualizer Live video from the Document Camera. Connect two (2) Document Cameras to a computer and Split-Screen present them in split-screen. Whiteboard Draw and annotate on an interactive whiteboard. -
Page 14: Select Connection
Direct Wi-Fi (AP Mode) connection. Reserved function; This mode allows you to connect the Document not supported by Camera directly without an internet connection. VB-VIS-003 NOTE: This connection is only available for the Wi-Fi model. Wi-Fi STA (Client Mode) connection. Reserved function;... - Page 15 Icon Description Shapes Add various shapes. Rectangle Tool Draw a rectangle. Rectangle Tool (solid) Draw a rectangle in a solid style. Triangle Tool Draw a triangle. Triangle Tool (solid) Draw a triangle in a solid style. Ellipse Tool Draw an ellipse. Ellipse Tool (solid) Draw an ellipse in a solid style.
- Page 16 Icon Description Line Option Set the line thickness of the annotation. Color Option Choose the color of the annotation, shape, and text tools. Text Tool Add text. Eraser Remove specific annotations. Clear All Clear all annotations on screen. Show/Hide Show and hide toolbar.
-
Page 17: Image Adjustment
4. Image Adjustment ) to expand the Image Adjustment menu and adjust the live Click the icon ( video. Icon Description Device Select the device and switch the power frequency (50/60 Hz). Resolution Set the resolution. Brightness Adjust the brightness level. Show a 1:1 image;... -
Page 18: Thumbnail List (Side Toolbar)
6. Thumbnail List (Side Toolbar) Right click on a thumbnail on the right-side and the following options will be available: Option Description Open Open the file. Copy Duplicate the file. Rename Rename the file. Delete Delete the file. Properties Show the file’s information. 7. - Page 19 Snapshot Number Description Set the image file output format (JPG, BMP, PNG, TIF). Set the file name format by serial number or by date and time. Set the prefix file name. Record Number Description Set the video file output format (AVI, MP4, FLV). Set the video compression quality: ͫ...
-
Page 20: Set The File Name Format By Serial Number Or By Date And Time
Stop Motion Number Description Set the video file output format (AVI, MP4, FLV). Set the video compression quality: ͫ Standard Compression ͫ Low Compression Rate (higher image quality, bigger file size). ͫ High Compression Rate (lower image quality, smaller file size). Set the file name format by serial number or by date and time. -
Page 21: Split-Screen
9. Split-Screen With the Split-Screen function, you can connect two Document Cameras to your computer and present them by splitting two live screens and you can even compare still image with live video. Split-Screen Action Buttons Number Description Shuffle Change the display layout. Screen Capture Take a screenshot. -
Page 22: Whiteboard
10. Whiteboard The whiteboard mode allows you to draw and annotate anything on the interactive whiteboard, in this whiteboard function you can drag and drop selected images from the right-side file list to the whiteboard and add annotations. Whiteboard Toolbar Icon Description Page Up and Down... - Page 23 Icon Description Shapes Add shapes. Freehand Tool Select a brush style and write on the whiteboard. Line Option Set the line thickness of the annotation. Text Tool Add text. Color Option Choose the color of the annotation, shape, and text tools. Eraser Remove specific annotations.
-
Page 24: Appendix
Appendix Specifications Item Specifications 440 x 330 mm (at 2048 x 1536 4:3 Working Surface mode output) Optical System Zoom Digital zoom 10x by software Focus Auto Dark-room (0 Lux) testing condition Shooting height: 17 cm (Lamp Center Illumination System Upper 100 Lux) Shooting height: 34.5 cm (Lamp... - Page 25 Item Specifications MJPEG 3840 x 2880 @ 15 fps 3840 x 2160 @ 30 fps 2560 x 1440 @ 30 fps 2048 x 1536 @ 30 fps 1600 x 1200 @ 30 fps 1920 x 1080 @ 60 fps 1280 x 720 @ 60 fps 1024 x 768 @ 30 fps 960 x 540 @ 60 fps USB Live Streaming...
- Page 26 Item Specifications • Windows® 7 (1080p and under only), Windows 8.1, Windows 10, Windows 11 Operating System • macOS™ 10.15 or higher • Google™ Chromebook™ System Compatibility • Intel® i5 processor or higher • 8GB RAM or more Hardware Platform •...
-
Page 27: Troubleshooting
Troubleshooting When Using the Document Camera Problem or Potential Cause Possible Solutions Issue Re-connect the USB cable with the Document Camera. The USB cable is not correctly Cannot be connected to the computer or the powered on computer may have crashed. Restart the computer. - Page 28 Problem or Potential Cause Possible Solutions Issue vDocCam+ application only supports the VB-VIS-003 model Make sure you are using a camera device. If you are using a supported VB-VIS-003 model 3rd party document camera some camera device. of the functions in this software may NOT work.
- Page 29 Problem or Potential Cause Possible Solutions Issue Camera flickering problems usually occur when there is a difference between the camera refresh rate setting and the artificial lighting refresh rate of the environment. NOTE: Learn more about each country’s mains electricity https://en.wikipedia.org/ wiki/Mains_electricity_by_ country...
-
Page 30: Maintenance
• ViewSonic® does not recommend the use of any ammonia or alcohol-based cleaners on the device or case. Some chemical cleaners have been reported to damage the device and/or case. • ViewSonic® will not be liable for damage resulting from use of any ammonia or alcohol-based cleaners. -
Page 31: Regulatory And Service Information
Regulatory and Service Information Compliance Information This section addresses all connected requirements and statements regarding regulations. Confirmed corresponding applications shall refer to nameplate labels and relevant markings on the unit. FCC Compliance Statement This device complies with part 15 of FCC Rules. Operation is subject to the following two conditions: (1) this device may not cause harmful interference, and (2) this device must accept any interference received, including interference that may cause undesired operation. -
Page 32: Ce Conformity For European Countries
For Canada • This Class B digital apparatus complies with Canadian ICES-003(B). • Cet appareil numérique de la classe B est conforme à la norme NMB-003 du Canada. CE Conformity for European Countries The device complies with the EMC Directive 2014/30/EU and General Product Safety Directive 2001/95/EC. -
Page 33: Declaration Of Rohs2 Compliance
Declaration of RoHS2 Compliance This product has been designed and manufactured in compliance with Directive 2011/65/EU of the European Parliament and the Council on restriction of the use of certain hazardous substances in electrical and electronic equipment (RoHS2 Directive) and is deemed to comply with the maximum concentration values issued by the European Technical Adaptation Committee (TAC) as shown below: Proposed Maximum Actual... -
Page 34: Indian Restriction Of Hazardous Substances
Schedule 2 of the Rule. Product Disposal at End of Product Life ViewSonic® respects the environment and is committed to working and living green. Thank you for being part of Smarter, Greener Computing. Please visit the ViewSonic®... -
Page 35: Copyright Information
VESA is a registered trademark of the Video Electronics Standards Association. DPMS, DisplayPort, and DDC are trademarks of VESA. Disclaimer: ViewSonic® Corporation shall not be liable for technical or editorial errors or omissions contained herein; nor for incidental or consequential damages resulting from furnishing this material, or the performance or use of this product. -
Page 36: Customer Service
For technical support or product service, see the table below or contact your reseller. NOTE: You will need the product’s serial number. Country/ Region Website Country/ Region Website Asia Pacific & Africa Australia Bangladesh www.viewsonic.com/au/ www.viewsonic.com/bd/ 中国 (China) www.viewsonic.com.cn 香港 (繁體中文) www.viewsonic.com/hk/ Hong Kong (English) India www.viewsonic.com/hk-en/ www.viewsonic.com/in/... -
Page 37: Limited Warranty
ViewSonic® Document Camera What the warranty covers: ViewSonic® warrants its products to be free from defects in material and workmanship during the warranty period. If a product proves to be defective in material or workmanship during the warranty period, ViewSonic® will, at its sole option, and as your sole remedy, repair or replace the product with a similar product. - Page 38 (e) the serial number of the product. • Take or ship the product, freight prepaid, in the original container to an authorized ViewSonic® service center or ViewSonic®. • For additional information or the name of the nearest ViewSonic® service center, contact ViewSonic®. Limitation of implied warranties:...
- Page 39 Exclusion of damages: ViewSonic’s liability is limited to the cost of repair or replacement of the product. ViewSonic® shall not be liable for: • Damage to other property caused by any defects in the product, damages based upon inconvenience, loss of use of the product, loss of time, loss of...
-
Page 40: Mexico Limited Warranty
If a product proves to be defective in material or workmanship during the warranty period, ViewSonic® will, at its sole option, repair or replace the product with a like product. Replacement product or parts may include remanufactured or refurbished parts or components &... - Page 41 Exclusion of damages: ViewSonic®’s liability is limited to the cost of repair or replacement of the product. ViewSonic® shall not be liable for: • Damage to other property caused by any defects in the product, damages...
- Page 42 Name, address, of manufacturer and importers: México, Av. de la Palma #8 Piso 2 Despacho 203, Corporativo Interpalmas, Col. San Fernando Huixquilucan, Estado de México Tel: (55) 3605-1099 http://www.viewsonic.com/la/soporte/index.htm NÚMERO GRATIS DE ASISTENCIA TÉCNICA PARA TODO MÉXICO: 001.866.823.2004 Hermosillo: Villahermosa: Distribuciones y Servicios Computacionales SA de CV.
- Page 43 C0 M91 Y72 K24 Process Color C0 M0 Y0 K100 Process Color C0 M91 Y72 K24 Process Color Pantone Black C Spot Color Pantone 187 C Spot Color...