Table of Contents
Advertisement
Advertisement
Table of Contents

Related Manuals for ViewSonic VB-VIS-002


Summary of Contents for ViewSonic VB-VIS-002
- Page 1 VB-VIS-002 ViewSonic VB-VIS-002 Document Cam User Guide...
- Page 2 As a world-leading provider of visual solutions, ViewSonic® is dedicated to exceeding the world’s expectations for technological evolution, innovation, and simplicity. At ViewSonic®, we believe that our products have the potential to make a positive impact in the world, and we are confident that the ViewSonic® product you have chosen will serve you well.
-
Page 3: Table Of Contents
Contents Product Overview ............4 Package Contents ....................4 ViewSonic VB-VIS-002 Document Cam Components Overview ......5 Setting Up .......................6 Working Area ......................6 Illumination Lamp ....................7 Adjusting the Focus ....................7 Adjusting the Brightness ..................7 Image Orientation ....................7 Anti-glare ......................... -
Page 4: Product Overview
Please take a moment to check if all the necessary items are included in the package. If anything is missing or damaged, please contact your dealer immediately. Installa�on S-002 Document Cam VB-VIS-002 VB-VIS-002 ViewSonic VB-VIS-002 Document Cam Quick Start Guide Contents VB-VIS-002 VB-VIS-002 ViewSonic VB-VIS-002 Document Cam... -
Page 5: Viewsonic Vb-Vis-002 Document Cam Components Overview
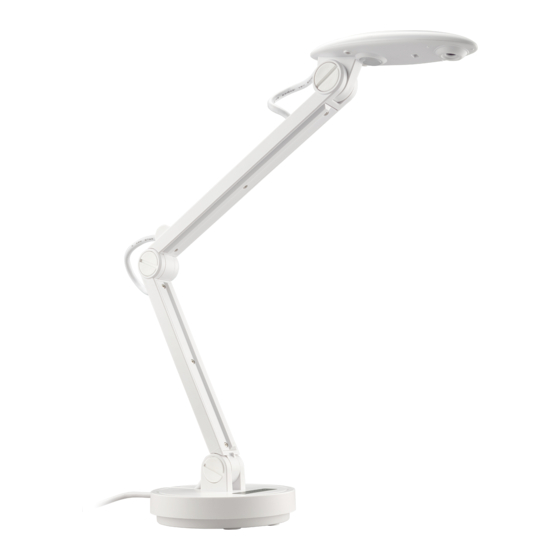
ViewSonic VB-VIS-002 Document Cam Components Overview Components LED Lamp Microphone Camera Head Lamp Button Focus Button Brightness Adjusting Button USB Cable Arm Screw... -
Page 6: Setting Up
Setting Up This section provides useful tips on how to adjust the document camera smoothly for your needs. Working Area 12” 16” Height 13” for Max. working area (16”x 12”) Minimum height 3.94”... -
Page 7: Illumination Lamp
Appli Windo Mac: Illumination Lamp Chrom If you are in a dark environment, please turn the LED lamp on to improve the exposure. Adjusting the Focus Press the Focus button to do an one-time auto focus. Adjusting the Brightness Maximum Height 13” Press the Brightness button to increase or decrease the brightness level. -
Page 8: Getting Started
Getting Started Using the Document Camera as a PC cam Starting the Application 1. Connect the document camera to your computer • Turn on your computer then connect the accessory USB cable to the USB port of your computer. • Make sure the connector and the port are aligned correctly. 2. -
Page 9: Connecting To A Microscope
Connecting to a Microscope Connecting to a microscope enables you to examine microscopic objects on a big screen. 1. Adjust the microscope and focus objects. 2. Choose an appropriate microscope adapter. 3. Microscope adapter accessories are applicable to: Ø28mm ,Ø31mm, Ø33mm, and Ø34mm eyepieces. - Page 10 5. Connect the lens and microscope adapter to the microscope. Note: • If the image is not clear. Please adjust the focus of the microscope. • Press the Focus button to fine-tune the focus.
-
Page 11: Storing
Storing 1. Close the application software. 2. Remove the USB cable from the document camera and computer. 3. Fold the camera head and arms in the direction shown in the figure below. -
Page 12: Operating Vdoccam
Operating vDocCam Application Software : vDocCam Windows: https://www.viewsonicglobal.com/q/sw/vdoccam-win Windows Mac: https://www.viewsonicglobal.com/q/sw/vdoccam-mac ChromeOS : https://www.viewsonicglobal.com/q/sw/vdoccam-chrome Please refer to Page 22~ Page 25 for How to install Chrome app manually ChromeOS... -
Page 13: Chapter 1: Introduction
Chapter 1: Introduction When the document camera is connected with the computer/laptop, it automatically goes to the live mode, in which the view captured by the document camera is shown. There are a variety of function icons listed on the right, the left and the lower sides of the window. -
Page 14: Chapter 2: Live Mode
Chapter 2: Live Mode The live mode presents the live view captured by the document camera. Many functions are listed on the left, the right and the lower bar. All of them can enhance your presentation. Undo Redo Erase all or erase the selected area Snapshot Capture the image and save it as a JPG file... - Page 15 Import an image file Import a JPG or PNG file from your computer Export your drawing Export the things (without the background view), such as annotations, texts, and drawings you create in this mode. (1) You can select the area, export and save it as a PNG file onto your computer.
- Page 16 Setting Once you click this icon, a small window pops up for you to choose the device (the default is Document camera), the format of the video and audio files, and the place where you would like to save the files Start recording Stop recording Auto focus...
- Page 17 Freehand Draw and write at will Eraser Erase the notes or drawings you have added Line Draw a line Arrow Draw an arrow Rectangle Draw a rectangle Ellipse Draw an ellipse Text Add text Selection Select the area for exporting, cutting, and copying Cut Out Cut out the selected area and save it to the clipboard Duplicate...
-
Page 18: Chapter 3: Playback Mode
Chapter 3: Playback Mode Images captured by the document camera, saved from the drawing board mode (see Chapter 4) and images in your computer can be opened in the Playback mode. Additionally, the images opened here can be further edited with the functions listed on the left, lower and right bar. - Page 19 Open file Width Choose the width for using freehand and other drawing functions Ink color Choose the color for using freehand and other drawing functions Fill color Choose the color for the drawing function (except for using freehand and drawing a line) Fonts Choose the font for the text you add Freehand...
-
Page 20: Chapter 4: Drawing Mode
Chapter 4: Drawing Mode The drawing mode provides you a white or black plane with all the drawing tools you will need. Undo Redo Erase all or erase the selected area Snapshot with your drawing Capture the image and save it as a JPG file Import an image file Import a JPG or PNG file from your computer Export your drawing... - Page 21 Aspect ratio Choose the aspect ratio: 16:9 or 4:3 White board In this mode, you can change the plane from black to white Black board In this mode, you can change the plane from white to black Width Choose the width for using freehand and other drawing functions Ink color Choose the color for using freehand and other drawing functions Fill color...
-
Page 22: How To Install Chrome App Manually
How to install Chrome app manually Step 1 Prepare your app file a. If the App file is stored in the USB flash drive, please save the file to the computer’s hard drive. b. Unzip the App file and you will get a “vDocCam” folder. Step 2 Manually install “vDocCam”... - Page 23 f. Select the “vDocCam” folder that you prepared. g. Press “Choose Folder” h. The vDocCam app has been successfully installed.
- Page 24 Step 3 Launch your app a. Open a new tab on Chrome browser b. Option 1: Press “Show Apps” or type “chrome://apps/” into the address bar. c. Option 2: Press “Launcher” & find the “vDocCam” icon.
- Page 25 d. Press “vDocCam” icon to launch the app.
-
Page 26: Troubleshooting
Troubleshooting When using the document camera : Problem Cause Solution Re-connect the USB cable with the The USB cable is not correctly document camera. Cannot be powered on normally. connected to the computer or the computer may have crashed. Restart the computer. The document camera is not correctly Re-connect the USB cable with the connected to the computer. -
Page 27: Specifications
Specifications Working Surface 400mm x 300mm Optical System Zoom 8X digital zoom ( software ) Focus Auto (10cm~200cm) Illumination System Upper LED Illumination System 3264 x 2448 up to 30 fps 2592 x 1944 up to 30 fps 2048 x 1536 up to 30 fps USB Live Streaming 1600 x 1200 up to 30 fps 1920 x 1080 up to 30 fps... - Page 28 Physical(W*H*D) 10.04*3.35*2.76(inch) / 255*85*70(mm) DIMENSIONS Gift box(W*H*D) 11.38*4.53*3.27(inch) / 289*115*83 (mm) Outer carton(W*H*D) 19.3*12.2*11.42(inch) / 490*310*290 (mm) Physical 0.88lbs/0.4 Kg WEIGHT Gift box 1.32lbs/0.6 Kg Outer carton 18.52lbs/8.4 Kg 1. Quick start guide INCLUDED 2. Anti-Glare Sheet x1 ACCESSORIES 3. Microscope_adapter_accessories_x1set (adaptorØ33/34mm*1,Ru bberØ28mm*1 , RubberØ31mm*1) Unit / Gift box Gift box/Outer carton...
-
Page 29: Compliance Information
Compliance Information FCC Statement This device complies with part 15 of FCC Rules. Operation is subject to the following two conditions: (1) this device may not cause harmful interference, and (2) this device must accept any interference received, including interference that may cause undesired operation. -
Page 30: Ce Conformity For European Countries
CE Conformity for European Countries The device complies with the EMC Directive 2014/30/EU and General Product Safety Directive 2001/95/EC. Following information is only for EU-member states: The mark is in compliance with the Waste Electrical and Electronic Equipment Directive 2012/19/EU (WEEE). The mark indicates the requirement NOT to dispose the equipment including any spent or discarded batteries or accumulators as unsorted municipal waste, but use the return and collection systems available. -
Page 31: Declaration Of Rohs2 Compliance
Declaration of RoHS2 Compliance This product has been designed and manufactured in compliance with Directive 2011/65/EU of the European Parliament and the Council on restriction of the use of certain hazardous substances in electrical and electronic equipment (RoHS2 Directive), and is deemed to comply with the maximum concentration values issued by the European Technical Adaptation Committee (TAC) as shown below: Proposed Maximum Actual... -
Page 32: Other Information
For technical support or product service, see the table below or contact your reseller. NOTE: You will need the product’s serial number. Country/ Region Website Country/ Region Website Asia Pacific & Africa Australia Bangladesh www.viewsonic.com/au/ www.viewsonic.com/bd/ 中国 (China) www.viewsonic.com.cn 香港 (繁體中文) www.viewsonic.com/hk/ Hong Kong (English) India www.viewsonic.com/hk-en/ www.viewsonic.com/in/... -
Page 33: Limited Warranty
If a product proves to be defective in material or workmanship during the warranty period, ViewSonic will, at its sole option, repair or replace the product with a like product. Replacement product or parts may include remanufactured or refurbished parts or components. - Page 34 Exclusion of damages: ViewSonic’s liability is limited to the cost of repair or replacement of the product. ViewSonic shall not be liable for: 1. Damage to other property caused by any defects in the product, damages...
- Page 35 Name, address, of manufacturer and importers: México, Av. de la Palma #8 Piso 2 Despacho 203, Corporativo Interpalmas, Col. San Fernando Huixquilucan, Estado de México Tel: (55) 3605-1099 http://www.viewsonic.com/la/soporte/index.htm NÚMERO GRATIS DE ASISTENCIA TÉCNICA PARA TODO MÉXICO: 001.866.823.2004 Hermosillo: Villahermosa: Distribuciones y Servicios Computacionales SA de CV.
- Page 36 C0 M91 Y72 K24 Process Color C0 M0 Y0 K100 Process Color C0 M91 Y72 K24 Process Color Pantone Black C Spot Color Pantone 187 C Spot Color...