Table of Contents
Advertisement
Quick Links
Network Processing Engine and Network
Services Engine Installation and
Configuration
Product Number: NPE-100=, NPE-150=, NPE-175=, NPE-200=, NPE-225=,
NPE-300=, NPE-400=, NSE-1=, NPE-G1=, UBR7200-NPE-G1=, NPE-G2=,
UBR7200-NPE-G2=
See the product chapters for the platforms supported.
Americas Headquarters
Cisco Systems, Inc.
170 West Tasman Drive
San Jose, CA 95134-1706
USA
http://www.cisco.com
Tel: 408 526-4000
800 553-NETS (6387)
Fax: 408 527-0883
Customer Order Number:
Text Part Number: OL-4448-12
Advertisement
Table of Contents
Troubleshooting

Related Manuals for Cisco NPE-175


Summary of Contents for Cisco NPE-175
- Page 1 Network Processing Engine and Network Services Engine Installation and Configuration Product Number: NPE-100=, NPE-150=, NPE-175=, NPE-200=, NPE-225=, NPE-300=, NPE-400=, NSE-1=, NPE-G1=, UBR7200-NPE-G1=, NPE-G2=, UBR7200-NPE-G2= See the product chapters for the platforms supported. Americas Headquarters Cisco Systems, Inc. 170 West Tasman Drive San Jose, CA 95134-1706 http://www.cisco.com...
- Page 2 Modifications to this product not authorized by Cisco Systems, Inc. could void the FCC approval and negate your authority to operate the product. The Cisco implementation of TCP header compression is an adaptation of a program developed by the University of California, Berkeley (UCB) as part of UCB’s public domain version of the UNIX operating system.
-
Page 3: Table Of Contents
NPE-200 Memory Information NPE-175 and NPE-225 Overview C H A P T E R Supported Platforms Software Requirements NPE-175 and NPE-225 Description and Overview Components System Management Functions Terms and Acronyms NPE-175 and NPE-225 Memory Information NPE-300 and NPE-400 Overview... - Page 4 Contents System Management Functions Terms and Acronyms NPE-300 and NPE-400 Memory Information NSE-1 Overview C H A P T E R Supported Platforms Software Requirements NSE-1 Description and Overview Components System Management Functions Terms and Acronyms NSE-1 Memory Information NPE-G1 Overview C H A P T E R Supported Platforms Software Requirements...
- Page 5 Bandwidth Requirements Components Interfaces LEDs CompactFlash Disk USB Ports Summary of Important NPE-G2 Information System Management Functions Terms and Acronyms NPE-G2 Memory Information and Specifications Connection Equipment and Specifications Gigabit Ethernet SFP Connection Equipment Console and Auxiliary Port Connection Equipment Fiber Optic Cleaning Information NPE-G1 and NPE-G2 Installation and Configuration Information C H A P T E R...
- Page 6 Contents Installing an SFP Module—NPE-G2 Installing a GBIC—NPE-G1 Replacing the DIMM on the NPE-G2 Upgrading the SDRAM SODIMMs on the NPE-G1 (Optional) Removing a SODIMM Installing a SDRAM SODIMM Inserting the NPE-G1 or NPE-G2 into the Router Attaching the Rear Cable-Management Brackets and Cables (Optional) Installing the NPE-G1 or NPE-G2 Cable-Management Brackets Installing the Rear Cable-Management Brackets on a Front-Mounted Router (Optional) Installing the Rear Cable-Management Brackets on a Rear-Mounted Router (Optional)
- Page 7 Configuring the Interface Transmission and Speed Modes Sample Configuration for the Gigabit Ethernet Interfaces Debugging Resetting the Interface Clearing Counters Using show Commands to Check the Installation Upgrading the Cisco IOS Image and the Boot Helper (Boot Loader) Image Upgrading ROMmon on the NPE-G1 or NPE-G2 Using the show rom-monitor Command and ROMmon CLI showmon Commands Using the upgrade rom-monitor file Command Changing Preferences to Choose the Other ROMmon Image...
- Page 8 Contents Removing the NPE or NSE Removing and Installing Memory Installing the NPE or NSE Reconnecting Input Power and Powering Up the Router Configuration Tasks and Troubleshooting Information C H A P T E R NPE Configuration Tasks NSE Configuration Tasks Boot Changes in Cisco IOS Release 12.2 Troubleshooting the NPE-G1 or NPE-G2 .Troubleshooting the NPE-100 Through NPE-400...
- Page 9 Contents Replacing a Power Supply in a Cisco 7200 Series Router 10-15 Fiber Optic Cleaning Information 10-17 N D E X Network Processing Engine and Network Services Engine Installation and Configuration OL-4448-12...
- Page 10 Contents Network Processing Engine and Network Services Engine Installation and Configuration OL-4448-12...
-
Page 11: Document Revision History
Preface This preface describes the objectives and organization of this document and explains how to find additional information on related products and services. This preface contains the following sections: Document Revision History, page i • Objectives, page ii • • Organization, page ii •... - Page 12 Chapter 3 Chapter 4 Network Processing Engine and Network Services Engine Installation and Configuration Title NPE-100, NPE-150, and NPE-200 Overview NPE-175 and NPE-225 Overview NPE-300 and NPE-400 Overview NSE-1 Overview Description Describes the NPE-100, NPE-150, and NPE-200—components, system management functions, and memory specifications and configuration.
-
Page 13: Related Documentation
Preface Section Chapter 5 Chapter 6 Chapter 7 Chapter 8 Chapter 9 Chapter 10 Related Documentation Your router and the Cisco IOS software running on it contain extensive features and functionality, which are documented in the following resources: Cisco IOS software: •... -
Page 14: Obtaining Documentation And Submitting A Service Request
Obtaining Documentation and Submitting a Service Request Cisco 7200 Series Routers Documentation Roadmap • http://www.cisco.com/en/US/docs/routers/7200/roadmaps/7200_series_doc_roadmap/3512.html for a list of all Cisco 7200 series routers documentation and troubleshooting tools and information. Cisco 7200 Series Routers Port Adapter Documentation Roadmap • http://www.cisco.com/en/US/docs/routers/7200/roadmaps/7200_series_port_adapter_doc_roadma p/3530.html for a list of all Cisco 7200 series routers-supported port adapter documentation. -
Page 15: Supported Platforms
NPE-100, NPE-150, and NPE-200 Overview This chapter describes the network processing engine (NPE) models NPE-100, NPE-150, and NPE-200 and contains the following sections: Supported Platforms, page 1-1 • Software Requirements, page 1-1 • • NPE-100, NPE-150, and NPE-200 Description and Overview, page 1-1 •... -
Page 16: C H A P T E R 1 Npe-100, Npe-150, And Npe-200 Overview
NPE-100, NPE-150, and NPE-200 Description and Overview The network processing engine maintains and executes the system management functions for the • Cisco uBR7200 series routers. The NPE also shares the system memory and environmental monitoring functions with the I/O controller. Components Figure 1-1 System controller... - Page 17 Chapter 1 NPE-100, NPE-150, and NPE-200 Overview Figure 1-2 System controller R4700 microprocessor 1-MB SRAM (U700 through U703 and U800 through U803) Captive installation screw Handle Temperature sensor OL-4448-12 NPE-150 10 Bank 1 11 Bank 0 Network Processing Engine and Network Services Engine Installation and Configuration NPE-100, NPE-150, and NPE-200 Description and Overview Midplane connectors Temperature sensor...
- Page 18 NPE-100, NPE-150, and NPE-200 Description and Overview Figure 1-3 System controller R5000 microprocessor 4-MB SRAM (U6, U10, U13, U14, U28, U29, U38, and U39) Captive installation screw Handle Temperature sensor The NPE-100, NPE-150, and NPE-200 consist of the following components: Reduced instruction set computing (RISC) microprocessor •...
-
Page 19: System Management Functions
Chapter 1 NPE-100, NPE-150, and NPE-200 Overview Upgradable memory modules • The NPE-100, NPE-150, and NPE-200 use DRAM for storing routing tables, network accounting applications, packets of information in preparation for process switching, and packet buffering for SRAM overflow (except in the NPE-100, which contains no packet SRAM). The standard configuration is 32 MB, with up to 128 MB available through single in-line memory module (SIMM) upgrades. -
Page 20: Npe-100, Npe-150, And Npe-200 Memory Information
The following example shows an NPE-150 installed in a Cisco 7206 router: router(boot)# show version Cisco Internetwork Operating System Software IOS (tm) 7200 Software (C7200-J-M), Released Version 11.1(17)CA Copyright (c) 1986-1999 by cisco Systems, Inc. Compiled Sun 21-Apr-96 04:10 Image text-base:0x60010890, data-base:0x605F0000 (display text omitted) cisco 7206 (NPE150) processor with 12288K/4096K bytes of memory. -
Page 21: Npe-100 Memory Information
Chapter 1 NPE-100, NPE-150, and NPE-200 Overview NPE-100 Memory Information Table 1-1 provides information about memory specifications. for the NPE-100. Table 1-1 NPE-100 Memory Specifications Memory Type Size DRAM 32 to 128 MB Primary cache — Secondary cache 512 KB Table 1-2 NPE-100 DRAM SIMM Configurations—Configurable Memory Only Total DRAM... -
Page 22: Npe-200 Memory Information
NPE-100, NPE-150, and NPE-200 Memory Information Table 1-4 NPE-150 DRAM SIMM Configurations—Configurable Memory Only Total DRAM Bank 0 32 MB U18 and U25 64 MB U18 and U25 128 MB U18 and U25 1. Refer to the Cisco AS5800 Universal Access Server documentation listed in the Universal Access Server DRAM options. - Page 23 NPE-175 and NPE-225 Overview This chapter describes the network processing engine (NPE) models NPE-175 and NPE-225 and contains the following sections: Supported Platforms, page 2-1 • Software Requirements, page 2-1 • • NPE-175 and NPE-225 Description and Overview, page 2-1 •...
-
Page 24: Chapter 2 Npe-175 And Npe-225 Overview
NPE-175 and NPE-225 Description and Overview Components Figure 2-1 Network controller board System controller Processor engine board Captive installation screw RM5270 microprocessor Network Processing Engine and Network Services Engine Installation and Configuration NPE-175 10 SDRAM DIMM (U15) Chapter 2 NPE-175 and NPE-225 Overview... -
Page 25: Components
Cache memory • The NPE-175 and NPE-225 have unified cache SRAM that functions as the secondary cache for the microprocessor. (The primary cache is within the microprocessor.) Two environmental sensors for monitoring the cooling air as it leaves the chassis •... -
Page 26: Terms And Acronyms
NPE-175 and NPE-225 Description and Overview Boot ROM for storing sufficient code for booting the Cisco IOS software; the NPE-175 and • NPE-225 have boot ROM Note Neither the NPE-175 nor the NPE-225 has packet SRAM. System Management Functions The network processing engines perform the following system management functions: Sending and receiving routing protocol updates •... - Page 27 Cisco Internetwork Operating System Software IOS (tm) 7200 Software (C7200-BOOT-M), Released Version 12.0(19990124:222541) [biff-nightly 115] Copyright (c) 1986-1999 by cisco Systems, Inc. Compiled Mon 15-Feb-99 21:50 by biff Image text-base:0x600088F8, data-base:0x6064C000 (display text omitted) cisco 7206VXR (NPE225) processor with 57344K/8192K bytes of memory.
-
Page 28: Npe-175 And Npe-225 Memory Information
NPE-175 and NPE-225 Memory Information Table 2-2 NPE-175 SDRAM DIMM Configurations—Configurable Memory Only Total SDRAM Bank 64 MB 128 MB Table 2-3 NPE-225 SDRAM DIMM Configurations—Configurable Memory Only Total SDRAM Bank 64 MB 128 MB 256 MB Network Processing Engine and Network Services Engine Installation and Configuration... -
Page 29: Software Requirements
NPE-300 and NPE-400 Overview This chapter describes the network processing engine (NPE) models NPE-300 and NPE-400 and contains the following sections: Supported Platforms, page 3-1 • Software Requirements, page 3-1 • • NPE-300 and NPE-400 Description and Overview, page 3-2 •... -
Page 30: Chapter 3 Npe-300 And Npe-400 Overview
NPE-300 and NPE-400 Description and Overview NPE-300 and NPE-400 Description and Overview This section contains information about the network processing engine components and the system management functions. The network processing engine maintains and executes the system management functions for the routers. It also shares the system memory and environmental monitoring functions with the I/O controller. -
Page 31: Npe-300 And Npe-400 Description And Overview
Chapter 3 NPE-300 and NPE-400 Overview Figure 3-2 Temperature sensor (U31) Keying post RM7000 microprocessor System controller Captive installation screw Handle The network processing engines consist of the following components: Reduced instruction set computing (RISC) microprocessor • The NPE-300 uses an RM7000 microprocessor that operates at an internal clock speed of –... -
Page 32: System Management Functions
NPE-300 and NPE-400 Description and Overview Upgradable memory modules • The NPE-300 and NPE-400 use SDRAM for storing all packets received or sent from network interfaces. The SDRAM also stores routing tables and network accounting applications. – On the NPE-300, two independent SDRAM memory arrays in the system allow concurrent access by port adapters and the processor;... - Page 33 Router# show version Cisco Internetwork Operating System Software IOS (tm) 7200 Software (C7200-JS-M), Released Version 12.0(19980705:021501) Copyright (c) 1986-1998 by cisco Systems, Inc. Compiled Tue 25-Aug-98 04:01 by biff Image text-base: 0x600088C4, data-base: 0x60FA6000 (display text omitted) cisco 7206VXR (NPE300) processor with 44x1024K/20480K bytes of memory.
-
Page 34: Npe-300 And Npe-400 Memory Information
NPE-300 and NPE-400 Memory Information cisco 7206VXR (NPE400) processor (revision 0xFF) with 122880K/8192K bytes of memory. Processor board ID 8771013 R7000 CPU at 350Mhz, Implementation 39, Rev 2.1, 256KB L2, 4096KB L3 Cache 6 slot VXR midplane, Version 2.1 (display text omitted) Table 3-1 provides memory specifications, and configurations for the NPE-300. - Page 35 Chapter 3 NPE-300 and NPE-400 Overview Table 3-2 NPE-300 SDRAM DIMM Configurations—Configurable Memory Only (continued) Total SDRAM Bank 1 32 MB U45 and U44 128 MB 32 MB U45 and U44 256 MB 1. Refer to the Cisco AS5800 Universal Access Server documentation listed in the Universal Access Server SDRAM options.
- Page 36 Chapter 3 NPE-300 and NPE-400 Overview NPE-300 and NPE-400 Memory Information Network Processing Engine and Network Services Engine Installation and Configuration OL-4448-12...
-
Page 37: Nse-1 Overview
NSE-1 Overview This chapter describes the network services engine (NSE-1) and contains the following sections: • Supported Platforms, page 4-1 Software Requirements, page 4-1 • NSE-1 Description and Overview, page 4-1 • NSE-1 Memory Information, page 4-4 • For NSE-1 configuration and PXF troubleshooting information including NSE-1-specific show and debug commands, see Supported Platforms The NSE-1 is supported only in the Cisco 7200 VXR routers. -
Page 38: Components
NSE-1 Description and Overview The NSE-1 is not supported in the Cisco uBR7200 VXR series routers, even though it is physically Note capable of being inserted into the routers. Components Figure 4-1 Network controller board Keying post System controller Processor engine board Captive installation screw RM7000 microprocessor Handle... -
Page 39: System Management Functions
Chapter 4 NSE-1 Overview System controller • The system controller provides hardware logic to interconnect the processor, DRAM, and the PCI-based system backplane bus. The NSE-1 has one system controller that provides processor access to the two midplane and single I/O controller PCI buses. The system controller also allows port adapters—on either of the two midplane PCI buses—access to SDRAM. -
Page 40: Components
The following example shows an NSE-1 installed in a Cisco 7206VXR router: Router# show version Cisco Internetwork Operating System Software IOS (tm) 7200 Software (C7200-P-M), Released Version 12.0 Copyright (c) 1986-1999 by cisco Systems, Inc. Compiled Wed 22-Dec-99 08:37 by Image text-base:0x60008900, data-base:0x60B58000 (display text omitted) cisco 7206VXR NSE-1 processor with 57344K/8192K bytes of memory. - Page 41 Chapter 4 NSE-1 Overview Table 4-1 NSE-1 Memory Specifications (continued) Memory Type Size Secondary cache 256 KB Tertiary cache 2 MB (fixed) 1. OTP = one time programmable 2. Located on the processor engine board. Table 4-2 NSE-1 SDRAM DIMM Configurations—Configurable Memory Only Total SDRAM SDRAM Bank 128 MB...
-
Page 42: Nse-1 Memory Information
Chapter 4 NSE-1 Overview NSE-1 Memory Information Network Processing Engine and Network Services Engine Installation and Configuration OL-4448-12... -
Page 43: Supported Platforms
NPE-G1 Overview This chapter describes the NPE-G1 and contains the following sections: • Supported Platforms, page 5-1 Software Requirements, page 5-1 • NPE-G1 Description and Overview, page 5-2 • NPE-G1 Memory Information, page 5-9 • Connection Equipment and Specifications, page 5-10 •... -
Page 44: Chapter 5 Npe-G1 Overview
NPE-G1 Description and Overview NPE-G1 Description and Overview This section contains information about the NPE-G1 components and the system management functions. The NPE-G1 is the first net processing engine for the Cisco 7200 VXR routers and Cisco uBR7200 series routers to provide the functionality of both a network processing engine and I/O controller. -
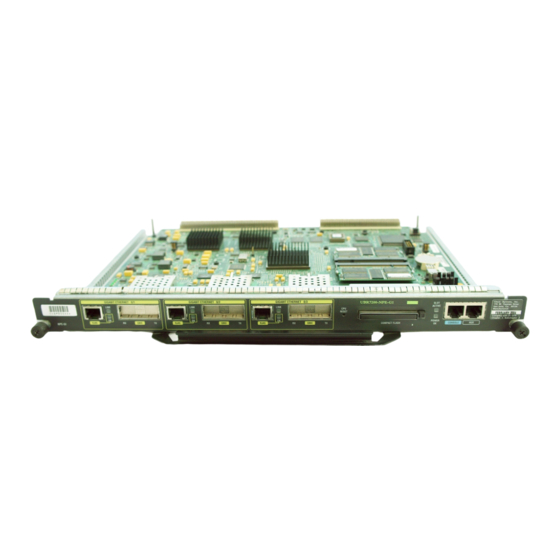
Page 45: Components
Chapter 5 NPE-G1 Overview Components Figure 5-1 illustrates the NPE-G1 and its major components. Figure 5-1 Midplane connectors Flash memory Temperature sensor BCM1250 system Keying post The NPE-G1 consists of the following components: BCM1250 system • Microprocessor operates at an internal clock speed of 700 MHz. –... -
Page 46: Interfaces And Leds
NPE-G1 Description and Overview Three Gigabit Ethernet interfaces (six ports: three GBIC [optical] and three RJ-45s [copper]). – Any three ports are available at the same time and are linked directly to the BCM1250 system; therefore the interfaces are not charged bandwidth points. CompactFlash Disk for storing the default Cisco IOS software image. -
Page 47: Compactflash Disk
Chapter 5 NPE-G1 Overview Only one port per interface can be used at any one time. For example, for interface • Gigabit Ethernet 0/1, either the RJ-45 port can be used or the GBIC port, but not both. A total of three ports on any of the three interfaces (0/1, 0/2, or 0/3) can be used at any one time; for •... - Page 48 NPE-G1 Description and Overview CompactFlash Disks are smaller in size than Type 2 Flash Disks but provide the same Attachment (ATA) interface and equivalent functionality. This interface complies with the ANSI ATA Interface Document X3T13.1153 D Rev. 9 specification. CompactFlash Disks provide from 64 MB to 256 MB of storage space.
-
Page 49: Summary Of Important Npe-G1 Information
Chapter 5 NPE-G1 Overview To remove a CompactFlash Disk from the CompactFlash Disk slot, complete the following steps: Press the ejector button on the slot. (See 3 in Step 1 Grasp the CompactFlash Disk and pull it from the slot. Step 2 Place the CompactFlash Disk in an antistatic bag. -
Page 50: System Management Functions
NPE-G1 Description and Overview The NPE-G1 uses no bandwidth points, and when used with any I/O controller, the I/O controller • also uses no bandwidth points. None of the Gigabit Ethernet interfaces on the NPE-G1 use bandwidth points. The CompactFlash Disk on the NPE-G1 is available at all times, with or without an I/O controller •... -
Page 51: Npe-G1 Memory Information
Router# show version Cisco Internetwork Operating System Software IOS (tm) 7200 Software (C7200-P-M), Experimental Version 12.2(20011112:161132) Copyright (c) 1986-2001 by cisco Systems, Inc. Compiled Tue 13-Nov-01 03:58 by Image text-base:0x600089B8, data-base:0x6130A000 (display text omitted) cisco 7206VXR (NPE-G1) processor (revision 0x00) with 245760K/16384K bytes of memory. -
Page 52: Connection Equipment And Specifications
Connection Equipment and Specifications Table 5-1 NPE-G1 Memory Specifications (continued) Memory Type Size NVRAM 512 KB Primary cache 32 KB (16 KB instruction, 16 KB data) Secondary cache 512 KB 1. The NPE-G1 requires that locations J3 and J4 always contain two SODIMMs of the same size. Table 5-2 Total SDRAM 256 MB... - Page 53 Chapter 5 NPE-G1 Overview To comply with EMI EN55022 Class B regulations, shielded Ethernet cables must be used with the Note UBR7200-NPE-G1 in the Cisco uBR7246VXR router. Three shielded cables are included with the UBR7200-NPE-G1. Figure 5-5 shows an RJ-45 port and connector. Figure 5-5 RJ-45 connector To avoid electric shock, do not connect safety extra-low voltage (SELV) circuits to telephone-network...
- Page 54 Connection Equipment and Specifications Figure 5-6 1 TPO+ 2 TPO- 3 TP1+ 6 TP1- 4 TP2+ 5 TP2- 7 TP3+ 8 TP3- Router Figure 5-7 1 TPO+ 2 TPO- 3 TP1+ 6 TP1- 4 TP2+ 5 TP2- 7 TP3+ 8 TP3- Router Network Processing Engine and Network Services Engine Installation and Configuration 5-12...
-
Page 55: Gigabit Ethernet Gbic Connection Equipment
Chapter 5 NPE-G1 Overview Figure 5-8 1 TxD+ 2 TxD– 3 RxD+ 6 RxD– Straight-through cable pinout, Ethernet port to a hub or repeater Crossover cable pinout, Ethernet port to a Ethernet port For straight-through and crossover cable information, see the Equipment”... - Page 56 Connection Equipment and Specifications Figure 5-10 shows the simplex and duplex SC-type connectors on your multimode or single-mode optical fiber cables. For simplex connectors, two cables are required, one cable for transmit (TX) and a second cable for receive (RX). For duplex connectors, only one cable that has both TX and RX connectors is required.
- Page 57 Chapter 5 NPE-G1 Overview Table 5-6 lists the available CWDM GBIC options. Table 5-6 Product Number CWDM-GBIC-1470= CWDM-GBIC-1490= CWDM-GBIC-1510= CWDM-GBIC-1530= CWDM-GBIC-1550= CWDM-GBIC-1570= CWDM-GBIC-1590= CWDM-GBIC-1610= Table 5-7 provides cabling specifications for the GBICs that you install in Gigabit Ethernet devices. Note that all GBIC ports have SC-type connectors. Also, the minimum cable distance for the WS-G5484 or GBIC-SX and WS-G5486 or GBIC-LX/LH (multimode fiber [MMF] and single-mode fiber [SMF]) is 6.5 feet (2 m), and the minimum link distance for the WS-G5487 or GBIC-ZX is 6.2 miles (10 km) with an 8-dB attenuator installed at each end of the link.
-
Page 58: Mode-Conditioning Patch Cord Description
Connection Equipment and Specifications 2. A mode-conditioning patch cord is required. When using the WS-G5486 or GBIC-LX/LH with 62.5-micron diameter MMF, you must install a mode-conditioning patch cord between the GBIC and the MMF cable on both the transmit and the receive ends of the link when link distances are greater than 984 ft (300 m). -
Page 59: Console And Auxiliary Port Connection Equipment
Chapter 5 NPE-G1 Overview Figure 5-11 Beige color identifier To Gigabit Ethernet interface Blue color identifier The mode-conditioning patch cord assembly is composed of duplex optical fibers, including a single-mode-to-multimode offset launch fiber connected to the transmitter, and a second conventional graded-index multimode optical fiber connected to the receiver. - Page 60 Connection Equipment and Specifications When connecting to an auxiliary port on a Cisco 7200 VXR router, the port will not function at baud Note rates higher than 19.2k. If the baud rate on the connecting device is set higher than 19.2k, either garbled text or nothing will be displayed on the screen.
-
Page 61: Rj-45 Console Port Signals And Pinouts
Chapter 5 NPE-G1 Overview The Cisco 7200 series routers ship with a roll-over cable. Connection to a terminal or a modem requires an RJ-45-to-DB-25 adapter, and possibly a DB-25-to-DB9 adapter. Refer to adapter configurations that can be used to connect terminals and modems to the Cisco 7200 series routers. -
Page 62: Rj-45 Auxiliary Port Signals And Pinouts
Fiber Optic Cleaning Information Table 5-11 Signal 1. Any pin not referenced is not connected. RJ-45 Auxiliary Port Signals and Pinouts Table 5-12 lists the RJ-45 auxiliary port signals for the NPE-G1. Table 5-12 Signal RING DSR/DCD(RLSD) In 1. Any pin not referenced is not connected. 2. -
Page 63: Npe-G2 Overview
NPE-G2 Overview This chapter describes the NPE-G2 and contains the following sections: • Supported Platforms, page 6-1 Software Requirements, page 6-2 • NPE-G2 Description and Overview, page 6-2 • NPE-G2 Memory Information and Specifications, page 6-11 • Fiber Optic Cleaning Information, page 6-23 •... -
Page 64: Software Requirements
Software Requirements Software Requirements For minimum software release information, see the The NPE-G2 has its own Cisco IOS software image with the prefix “c7200p-” in the software images Note filenames, including the boot image. The NPE-G2 does not boot up with a software image with the prefix “c7200-”. -
Page 65: Bandwidth Requirements
Chapter 6 NPE-G2 Overview Bandwidth Requirements The Gigabit Ethernet ports on the NPE-G2 do not use bandwidth points, nor does the Fast Ethernet management port. When used with any I/O controller, the Ethernet ports, Fast Ethernet ports, or Gigabit Ethernet ports on the I/O controller also do not use bandwidth points. Components Figure 6-1 illustrates the NPE-G2 and its major components. -
Page 66: Interfaces
NPE-G2 Description and Overview Cache memory • The NPE-G2 has two levels of cache: primary and secondary cache that are internal to the microprocessor with secondary unified cache for data and instruction. • The NPE-G2 uses DDR SDRAM for providing code, data, and packet storage. Two environmental sensors for monitoring the cooling air as it enters and leaves the chassis. -
Page 67: Leds
Chapter 6 NPE-G2 Overview The port numbering for the interfaces on the NPE-G2 starts with 0/1 and not with 0/0, as is typical • for other interface cards. This is to avoid conflicts with the Ethernet and Fast Ethernet ports on an I/O controller, if it is also installed. -
Page 68: Compactflash Disk
NPE-G2 Description and Overview Figure 6-3 G IG A B IT E T H E R N E T 0 / L IN K A C T V R J 4 5 Table 6-1 LED Label LINK ACTV (Interfaces 0/1, 0/2, 0/3) EN (Enable) (Interfaces 0/1, 0/2,... - Page 69 Chapter 6 NPE-G2 Overview CompactFlash Disks are smaller in size than Type 2 Flash Disks but provide the same Attachment (ATA) interface and equivalent functionality. This interface complies with the ANSI ATA Interface Document X3T13.1153 D Rev. 9 specification. The CompactFlash Disk provides 256 MB of storage space. The CompactFlash Disk has controller circuitry that allows it to emulate a hard disk and automatically maps out bad blocks and performs automatic block erasure.
-
Page 70: Usb Ports
NPE-G2 Description and Overview To remove a CompactFlash Disk from the CompactFlash Disk slot, complete the following steps: Press the ejector button on the slot. (See 3 in Step 1 Grasp the CompactFlash Disk and pull it from the slot. Step 2 Place the CompactFlash Disk in an antistatic bag. -
Page 71: Summary Of Important Npe-G2 Information
Chapter 6 NPE-G2 Overview Summary of Important NPE-G2 Information The NPE-G2 requires that you copy and save your running configuration file to a CompactFlash Disk, Caution PC Card, or TFTP server before you install the NPE-G2. For instructions on copying and saving your configuration file, see the and NPE-G2 Installation and Configuration Information.”... -
Page 72: System Management Functions
NPE-G2 Description and Overview The Gigabit Ethernet interfaces on the NPE-G2 do not support the Inter-Switch Link (ISL) VLAN Note encapsulation protocol. We recommend that customers use the IEEE 802.1Q VLAN encapsulation protocol as an alternative. Where an application requires the use of ISL, this can be provided by the Fast Ethernet or Gigabit Ethernet port adapters or I/O controllers. -
Page 73: Npe-G2 Memory Information And Specifications
Router# show version Cisco IOS Software, 7200 Software (C7200-JS-M), Version 12.4(PC_D.051028) CISCO DEVELOPMENT TEST VERSION Copyright (c) 1986-2005 by Cisco Systems, Inc. Compiled Fri 28-Oct-05 00:30 by ROM: System Bootstrap, Version 12.3(20050910:182137) [xxxx 103], DEVELOPMENT SOFTWARE 7448-1 uptime is 2 days, 17 hours, 52 minutes System returned to ROM by power-on System image file is "disk2:c7200p-js-mz"... - Page 74 NPE-G2 Memory Information and Specifications 2045K bytes of NVRAM. 250603K bytes of USB Flash usbflash0 (Read/Write) 125163K bytes of USB Flash usbflash1 (Read/Write) 250368K bytes of ATA PCMCIA card at slot 2 (Sector size 512 bytes). 65536K bytes of Flash internal SIMM (Sector size 512K). Configuration register is 0x0 Table 6-2 provides memory specifications and...
-
Page 75: Connection Equipment And Specifications
Chapter 6 NPE-G2 Overview Table 6-5 Token Size 64-MB USB Flash Token 12-MB USB Flash Token for Cisco 1800/2800/3800/7200 1. Also known as flash memory modules. Table 6-6 Description I/O Controller slot blank panel Connection Equipment and Specifications This section contains connection equipment and pinout information for the Gigabit Ethernet RJ-45 ports, Gigabit Ethernet SFP ports and SFP modules, Fast Ethernet Management port, console port, and auxiliary port that are located on the NPE-G2. - Page 76 NPE-G2 Memory Information and Specifications Table 6-7 10/100 Signal Tx Data+ Tx Data– Rx Data+ Rx Data– 1. Tx Data = Transmit Data 2. Rx Data = Receive Data Note With reference to the RJ-45 pinout in for the unused Category 5 UTP cable pairs 4/5 and 7/8. Common-mode termination reduces electromagnetic interference (EMI).
- Page 77 Chapter 6 NPE-G2 Overview Figure 6-7 1 TPO+ 2 TPO- 3 TP1+ 6 TP1- 4 TP2+ 5 TP2- 7 TP3+ 8 TP3- Router Figure 6-8 1 TxD+ 2 TxD– 3 RxD+ 6 RxD– Straight-through cable pinout, Ethernet port to a hub or repeater Crossover cable pinout, Ethernet port to a Ethernet port For information about straight-through and crossover cables, see the...
-
Page 78: Gigabit Ethernet Sfp Connection Equipment
NPE-G2 Memory Information and Specifications Gigabit Ethernet SFP Connection Equipment The small for-factor pluggable (SFP) port is a 1000-Mbps optical interface in the form of an LC-type duplex port that supports IEEE 802.3z interfaces compliant with the 1000BASEX standard. (See The SFP module you ordered is shipped installed in the NPE-G2. -
Page 79: Fiber Optic Cleaning Information
Chapter 6 NPE-G2 Overview Table 6-8 provides SFP module specifications. Table 6-8 Specification Dimensions (H x W x D) Connectors The NPE-G2 supports single Gigabit Ethernet interfaces based on SFP technology. The following SFP modules are supported by the NPE-G2: •... - Page 80 NPE-G2 Memory Information and Specifications Table 6-9 provides SFP port cabling specifications. Table 6-9 SFP Module 100BASE-FX SFP-GE-F= 1000BASE-LX/LH SFP-GE-L= 1000BASE-SX SFP-GE-S= 1000BASE-ZX SFP-GE-Z= 1. A mode-conditioning patch cord is required. Using an ordinary patch cord with MMF, 1000BASE-LX/LH SFP modules, and a short link distance (tens of meters) can cause transceiver saturation resulting in an elevated bit error rate (BER).
-
Page 81: Mode-Conditioning Patch Cord Description
Chapter 6 NPE-G2 Overview Table 6-11 provides CWDM SFP module option information for the NPE-G2. Table 6-11 Product Number CWDM-SFP-1470 CWDM-SFP-1490 CWDM-SFP-1510 CWDM-SFP-1530 CWDM-SFP-1550 CWDM-SFP-1570 CWDM-SFP-1590 CWDM-SFP-1610 Mode-Conditioning Patch Cord Description A mode-conditioning patch cord can be used with the SFP-GE-L= (SFP module) to allow reliable laser transmission between the single-mode laser source on the SFP module and a multimode optical fiber cable. -
Page 82: Console And Auxiliary Port Connection Equipment
NPE-G2 Memory Information and Specifications Figure 6-11 Gray color identifier To Gigabit Ethernet interface Blue color identifier Multimode fiber The mode-conditioning patch cord assembly is composed of duplex optical fibers, including a single-mode-to-multimode offset launch fiber connected to the transmitter, and a second conventional graded-index multimode optical fiber connected to the receiver. - Page 83 Chapter 6 NPE-G2 Overview When connecting to an auxiliary port on a Cisco 7200 VXR router, the port will not function at baud Note rates higher than 19.2k. If the baud rate on the connecting device is set higher than 19.2k, either garbled text or nothing will be displayed on the screen.
-
Page 84: Rj-45 Console Port Signals And Pinouts
NPE-G2 Memory Information and Specifications The Cisco 7200 series routers ship with a roll-over cable. Connection to a terminal or a modem requires an RJ-45-to-DB-25 adapter, and possibly a DB-25-to-DB9 adapter. Refer to adapter configurations that can be used to connect terminals and modems to the Cisco 7200 series routers. -
Page 85: Rj-45 Auxiliary Port Signals And Pinouts
Chapter 6 NPE-G2 Overview Table 6-14 Signal 1. Any pin not referenced is not connected. RJ-45 Auxiliary Port Signals and Pinouts Table 6-15 lists the RJ-45 auxiliary port signals for the NPE-G2. Table 6-15 Signal RING DSR/DCD(RLSD) In 1. Any pin not referenced is not connected. 2. -
Page 86: Fiber Optic Cleaning Information
Chapter 6 NPE-G2 Overview Fiber Optic Cleaning Information Network Processing Engine and Network Services Engine Installation and Configuration 6-24 OL-4448-12... -
Page 87: Npe-G1 And Npe-G2 Installation And Configuration Information
NPE-G1 and NPE-G2 Installation and Configuration Information This chapter provides information on installing and configuring the NPE-G1 and NPE-G2 and contains the following sections: • Preparing for an Upgrade, page 7-2 Copying the Configuration File, page 7-4 • Removing the Network Processing Engine, page 7-7 •... -
Page 88: C H A P T E R 7 Npe-G1 And Npe-G2 Installation And Configuration Information
Preparing for an Upgrade Before you begin any removal or installation procedure, read Also, for the NPE-G1, see the http://www.cisco.com/en/US/products/hw/routers/ps341/prod_installation_guide09186a00805e396a.ht For the Cisco uBR7200-NPE-G1, see the following URL: http://www.cisco.com/en/US/products/hw/cable/ps2217/prod_pre_installation_guide09186a008017bde 6.html Preparing for an Upgrade Cisco IOS Release 12.2 changed the behavior of the ROM monitor (ROMmon) during the bootup Note sequence. - Page 89 Chapter 7 NPE-G1 and NPE-G2 Installation and Configuration Information Before you install an NPE-G1 or NPE-G2 in an existing router and remove the existing processor and I/O controller, do the following: Copy the configuration file from the existing router to a TFTP server, Flash Disk, or PC Card. See the Step 1 “Copying the Configuration File”...
-
Page 90: Copying The Configuration File
Copying the Configuration File Copying the Configuration File Caution Before powering down the router to install the NPE-G1 or NPE-G2, you must save the current configuration to a Flash Disk, PC Card, Trivial File Transfer Protocol (TFTP) file server, or PC before you install the NPE-G1 or NPE-G2, or the configuration will be lost and you will have to manually re-enter your configuration. -
Page 91: Copying The Configuration File To A Tftp Server
Chapter 7 NPE-G1 and NPE-G2 Installation and Configuration Information Make sure you are at the privileged level of the EXEC command interpreter (check the system prompt Step 3 for a pound sign [#]). If the system prompt does not have a pound sign (#), enter enable, and then your password. - Page 92 Copying the Configuration File Enter the copy startup-config tftp command. The EXEC command interpreter prompts you for the Step 4 name or IP address of the remote host that is to receive the configuration file. (The prompt might include the name or address of a default file server.) Router# copy startup-config tftp Remote host []? Enter the name or IP address of the remote host.
-
Page 93: Copying The Configuration File Using A Pc
Chapter 7 NPE-G1 and NPE-G2 Installation and Configuration Information Copying the Configuration File Using a PC Complete the following steps to copy the router’s configuration file to a text file on a PC connected to the router’s console port. Connect a serial port on the PC to the router’s console port. Start a terminal program on the PC and Step 1 configure it for the same baud rate, parity, and stop-bits that the console port is using. -
Page 94: Ensuring Easy Access To The Router
Removing the Network Processing Engine Ensuring Easy Access to the Router If your Cisco 7200 VXR router or Cisco uBR7200 series router is installed in a standard 19-inch, 4-post or telco-type rack, cables from other equipment in the rack might obstruct access to the rear of the router. Also, rack power strips or other permanent fixtures may obstruct access to the router. -
Page 95: Disconnecting Ac-Input Power From A Cisco 7200 Vxr Router
Chapter 7 NPE-G1 and NPE-G2 Installation and Configuration Information When powering off the router, wait a minimum of 30 seconds before powering it on again. Note Step 2 Observe the following items: The green OK LED on the power supply turns off. •... -
Page 96: Disconnecting Ac-Input Power From A Cisco Ubr7246Vxr Router
Removing the Network Processing Engine Figure 7-1 AC-input receptacle Internal fans Repeat Step 1 through Step 3 if a second power supply is installed. Step 4 This completes the procedure for disconnecting AC-input power from a Cisco 7200 VXR router. Go to “Removing the NPE or NSE-1”... -
Page 97: Disconnecting Ac-Input Power From A Cisco Ubr7225Vxr Router
Chapter 7 NPE-G1 and NPE-G2 Installation and Configuration Information Figure 7-2 AC-input receptacle Power switch Handle Step 4 Repeat Step 1 through Step 3 if a second power supply is installed. This completes the procedure for disconnecting AC-input power from a Cisco uBR7246VXR router. Go to the “Removing the NPE or NSE-1”... - Page 98 Removing the Network Processing Engine Warning Before completing any of the following steps, and to prevent short-circuit or shock hazards, ensure that power is removed from the DC circuit. To ensure that all power is OFF, locate the circuit breaker on the panel board that services the DC circuit, switch the circuit breaker to the OFF position, and tape the switch handle of the circuit breaker in the OFF position.
-
Page 99: Disconnecting Dc-Input Power From A Cisco Ubr7246Vxr Router
Chapter 7 NPE-G1 and NPE-G2 Installation and Configuration Information Repeat this step for the –V lead and the ground lead. Step 5 The color coding of the DC-input power supply leads depends on the color coding of the DC Note power source at your site. - Page 100 Removing the Network Processing Engine Figure 7-4 Power switch Power receptacle Captive screw M5 grounding receptacles M5 grounding lug Using a 3/16-inch flat-blade screwdriver, loosen the screw below the +V lead receptacle and pull the lead Step 4 from the connector. Repeat this step for the –V lead only. See Network Processing Engine and Network Services Engine Installation and Configuration 7-14 Chapter 7...
- Page 101 Chapter 7 NPE-G1 and NPE-G2 Installation and Configuration Information Figure 7-5 Power switch Power receptacle DC Power supply M5 grounding receptacles M5 grounding lug Using an 8-mm wrench or nut driver (or adjustable wrench), loosen and remove the two M5 nuts that Step 5 secure the two-hole grounding lug to the grounding receptacle, and pull the grounding lug and lead from the receptacle.
-
Page 102: Removing The Npe Or Nse-1
Removing the Network Processing Engine Removing the NPE or NSE-1 To remove the NPE or NSE-1 from a Cisco 7200 VXR router, a Cisco uBR7246VXR or a Cisco UBR7225VXR router complete the following steps. The weight of installed power supplies in your Cisco 7200 VXR or Cisco uBR7246VXR router might Note make it difficult to remove the network processing engine. - Page 103 Chapter 7 NPE-G1 and NPE-G2 Installation and Configuration Information Figure 7-6 Captive installation screw Handle Step 4 Using a 3/16-inch flat-blade screwdriver, loosen the screws that secure the router to the front mounting strips of the rack. Position at least one person in front of the rack to support the front underside of the router. Step 5 Step 6 From the rear of the rack, carefully push the front of the router out of the rack until there is enough...
-
Page 104: Installing The Npe-G1 Or Npe-G2
Installing the NPE-G1 or NPE-G2 Installing the NPE-G1 or NPE-G2 To install the NPE-G1 or NPE-G2 in the router, use the following procedures: Basic Guidelines, page 7-18 • Installing a CompactFlash Disk, page 7-19 • Installing a USB Flash Memory Module or eToken—NPE-G2, page 7-19 •... -
Page 105: Installing A Compactflash Disk
Chapter 7 NPE-G1 and NPE-G2 Installation and Configuration Information Installing a CompactFlash Disk Use the following instructions to install the CompactFlash Disk. Figure 7-7 Inserting the CompactFlash Disk Pressing the ejector button to release the CompactFlash Disk Step 1 Turn the CompactFlash Disk so that the label is facing down. Step 2 Slide the CompactFlash Disk into the CompactFlash Disk slot. -
Page 106: Installing An Sfp Module-Npe-G2
Installing the NPE-G1 or NPE-G2 Do not remove a USB Flash memory module when a read or write operation to the USB Flash memory Caution module is in progress. The router might reload, or the USB Flash memory module can be damaged. Note Only Cisco USB Flash memory modules and the Aladdin USB eToken Pro key are supported by Cisco routers. - Page 107 Chapter 7 NPE-G1 and NPE-G2 Installation and Configuration Information Figure 7-9 Types of SFP Module Latches Sliding latch Swing and slide latch The SFP module must be installed before you connect the cables to it. Note The SPF module has three types of latches, which are also the removal mechanism. See is no correlation of the type of latch to the model (such as SX or LH) or technology type (such as Gigabit Ethernet) of SFP modules.
- Page 108 Installing the NPE-G1 or NPE-G2 Figure 7-10 Inserting an SFP Module into the NPE-G2 Gigabit Ethernet Port 0/1 A C T V SFP port 0/1 Use the following procedure to install an SFP module in the NPE-G2: Attach an ESD-preventive wrist strap between you and an unpainted chassis surface. Step 1 Locate the label on the SFP module and turn the SFP module so the label is on top and the alignment Step 2...
-
Page 109: Installing A Gbic-Npe-G1
Chapter 7 NPE-G1 and NPE-G2 Installation and Configuration Information Installing a GBIC—NPE-G1 Use the instructions in this section to install a GBIC in the NPE-G1. Figure 7-11 GBIC Alignment groove GBIC port 0/1 Step 1 Turn the GBIC so the label side is up and the alignment groove is down. The GBIC is keyed so that it cannot be inserted incorrectly. -
Page 110: Replacing The Dimm On The Npe-G2
Installing the NPE-G1 or NPE-G2 Replacing the DIMM on the NPE-G2 To replace the DIMM on the NPE-G2, use the following instructions: Step 1 Locate the DIMM on the NPE-G2. See Figure 7-12 DIMM Remove the DIMM by pressing against the DIMM latches until the DIMM releases. Step 2 Step 3 Gently remove it from the DIMM socket. - Page 111 Chapter 7 NPE-G1 and NPE-G2 Installation and Configuration Information Figure 7-13 Step 4 Gently insert a DIMM into the DIMM socket. Push the release latches until they slip into the notch on the edge of the DIMM, holding it securely in Step 5 place.
-
Page 112: Upgrading The Sdram Sodimms On The Npe-G1 (Optional)
Installing the NPE-G1 or NPE-G2 Upgrading the SDRAM SODIMMs on the NPE-G1 (Optional) If you have purchased an SDRAM memory upgrade for the NPE-G1, replace the SDRAM SODIMMs on the NPE-G1 using the following instructions. Removing a SODIMM Locate the SODIMMs on the NPE-G1. Step 1 Figure 7-14 SODIMM 2... -
Page 113: Installing A Sdram Sodimm
Chapter 7 NPE-G1 and NPE-G2 Installation and Configuration Information Figure 7-15 SODIMM Remove the SODIMM from the socket. Avoid touching the SODIMM as much as possible, particularly Step 3 the traces, the metal fingers on the connector side of the SODIMM. Step 4 Place the SODIMM in an antistatic shielding bag. -
Page 114: Inserting The Npe-G1 Or Npe-G2 Into The Router
Installing the NPE-G1 or NPE-G2 If the SODIMM appears misaligned, carefully remove it and reseat it in the socket. Push the SODIMM Step 5 gently back into the socket until the spring latches snap into place. You have finished replacing the SDRAM SODIMM. To install the NPE-G1 in the chassis, go to the “Inserting the NPE-G1 or NPE-G2 into the Router”... -
Page 115: Attaching The Rear Cable-Management Brackets And Cables (Optional)
Chapter 7 NPE-G1 and NPE-G2 Installation and Configuration Information The NPE-G1 or NPE-G2 is not fully seated in the router midplane until you tighten its captive Note installation screws. If you removed power supplies from the router, replace the power supplies. (See the Step 4 Replacing an AC-Input or DC-Input Power Supply”... - Page 116 Installing the NPE-G1 or NPE-G2 Do not use the cable-management bracket as a handle for inserting and removing the NPE-G1 or Note NPE-G2 in the chassis. You must always first unfasten the NPE-G1 or NPE-G2 captive installation screws and remove the cable-management bracket before removing or inserting the NPE-G1 or NPE-G2 in the chassis.
-
Page 117: Installing The Rear Cable-Management Brackets On A Front-Mounted Router (Optional)
Chapter 7 NPE-G1 and NPE-G2 Installation and Configuration Information Loosen the left and right captive installation screws on the NPE-G1 or NPE-G2. Step 1 Hold the cable-management bracket so that it is positioned above the NPE-G1 or NPE-G2 captive Step 2 installation screws as shown in the horizontally-faced notch is at the left, the vertically-faced notch is at the right, and the bracket’s outer edge is flush with the edge on the NPE-G1 or NPE-G2. -
Page 118: Installing The Rear Cable-Management Brackets On A Rear-Mounted Router (Optional)
Installing the NPE-G1 or NPE-G2 Figure 7-19 Screws If the back of the router protrudes from the rack, place the cable-management brackets against the router Step 1 as shown in Figure Insert two screws into each bracket, and tighten them to the router. Step 2 Step 3 Insert the GBIC, SFP module, or RJ-45 cables into the interface ports on the NPE-G1 or NPE-G2. - Page 119 Chapter 7 NPE-G1 and NPE-G2 Installation and Configuration Information Figure 7-20 Screws Align the cable-management brackets with the rack-mount brackets as shown in Step 1 Insert and tighten two screws for each bracket. The screws come with the cable-management brackets. Step 2 Figure 7-21 N E T W O R...
-
Page 120: Installing The Default Cable-Management Bracket On A Cisco Ubr7246Vxr Router (Optional)
Chapter 7 NPE-G1 and NPE-G2 Installation and Configuration Information Installing the NPE-G1 or NPE-G2 You have finished installing the cable-management brackets. Go to the “Reconnecting Input Power and Powering Up the Router” section on page 7-35. Installing the Default Cable-Management Bracket on a Cisco uBR7246VXR Router (Optional) If you are not using the NPE-G1 cable-management bracket, you can alternatively use two cable-management bracket configurations for the Cisco uBR7246VXR router. -
Page 121: Reconnecting Input Power And Powering Up The Router
Chapter 7 NPE-G1 and NPE-G2 Installation and Configuration Information Figure 7-23 Rack-mount bracket Reconnecting Input Power and Powering Up the Router The following procedures explain how to reconnect input power to a Cisco 7200 VXR router, Cisco UBR7225VXR, or Cisco uBR7246VXR router, power up the router, and verify a successful system boot. Read the installation instructions before you connect the system to its power source. - Page 122 Installing the NPE-G1 or NPE-G2 Figure 7-24 Power switch AC power cable POWER OK LED Plug the AC power supply cable into the AC power source. Step 4 For Cisco 7200 VXR routers, each AC-input power supply operating at 120 VAC requires a Note minimum of 5A service.
-
Page 123: Reconnecting Ac-Input Power To The Cisco Ubr7246Vxr Router
Chapter 7 NPE-G1 and NPE-G2 Installation and Configuration Information Reconnecting AC-Input Power to the Cisco uBR7246VXR Router Figure 7-25 Cable-retention clip Power receptacle Captive installation screw To reconnect AC-input power to a Cisco uBR7246VXR router, complete the following steps: At the rear of the router, check that the power switch on the power supply is in the off (O) position. Step 1 Slide the cable-retention clip to the left away from the AC receptacle, and plug in the power cable. -
Page 124: Reconnecting Ac-Input Power To The Cisco Ubr7225Vxr Router
Installing the NPE-G1 or NPE-G2 Reconnecting AC-Input Power to the Cisco uBR7225VXR Router To connect AC-input power to the Cisco uBR7225VXR router, complete the following steps: At the rear of the router, ensure that the power switch on the power supply is in the off position. Step 1 Figure 7-26 Power switch... - Page 125 Chapter 7 NPE-G1 and NPE-G2 Installation and Configuration Information Warning Before completing any of the following steps, and to prevent short-circuit or shock hazards, ensure that power is removed from the DC circuit. To ensure that all power is OFF, locate the circuit breaker on the panel board that services the DC circuit, switch the circuit breaker to the OFF position, and tape the switch handle of the circuit breaker in the OFF position.
- Page 126 Installing the NPE-G1 or NPE-G2 Figure 7-28 0.55 in. (14 mm) For the Cisco 7200 VXR routers, insert the stripped end of the ground lead all the way into the ground Step 4 lead receptacle on the DC-input power supply and tighten the receptacle screw using a 3/16-inch flat-blade screwdriver.
-
Page 127: Reconnecting Dc-Input Power To A Cisco Ubr7246Vxr Router
Chapter 7 NPE-G1 and NPE-G2 Installation and Configuration Information This completes the steps for reconnecting DC-input power to a Cisco 7200 VXR router. Proceed to the “Powering Up the Router” section on page Reconnecting DC-Input Power to a Cisco uBR7246VXR Router To reconnect DC-input power to a Cisco uBR7246VXR router, complete the following steps. - Page 128 Installing the NPE-G1 or NPE-G2 Figure 7-29 Power switch Power receptacle Captive installation screw M5 grounding receptacles M5 grounding lug Step 3 SIf necessary, use a wire stripper to strip approximately 0.55 inch (14 mm) from the –V, +V, and ground leads.
- Page 129 Chapter 7 NPE-G1 and NPE-G2 Installation and Configuration Information Connect the two-hole grounding lug on the grounding lead to the M5 grounding receptacles with the M5 Step 4 nuts. Tighten the nuts using an 8-mm wrench or nut driver (or adjustable wrench). (See Insert the stripped end of the +V lead all the way into the +V lead receptacle and tighten the receptacle Step 5 screw using the 3/16-inch flat-blade screwdriver.
- Page 130 Installing the NPE-G1 or NPE-G2 Figure 7-31 Power switch Power receptacle Captive installation screw M5 grounding receptacles M5 grounding lug Step 9 Restore current to the –V and +V leads. For the Cisco uBR7200 series routers, each DC-input power supply rating is 14A, 700 volt Note ampere (VA).
-
Page 131: Powering Up The Router
Chapter 7 NPE-G1 and NPE-G2 Installation and Configuration Information Powering Up the Router To power up a Cisco 7200 VXR router, Cisco uBR7246VXR router, or Cisco uBR7225VXR router that has an installed power supply, complete the following steps: Check for the following: Step 1 Each port adapter is inserted in its slot, and its respective port adapter lever is in the locked –... -
Page 132: Enabling The Second Processor On The Npe-G1
Cisco Internetwork Operating System Software IOS (tm) 7200 Software (C7200-J-M), 11.3(2)T Copyright (c) 1986-1998 by cisco Systems, Inc. Compiled Sun 22-Feb-98 06:00 by Biff This completes the procedures for connecting input power and powering up the router. This also completes the procedure for installing the NPE-G1 or NPE-G2 in a Cisco 7200 VXR router, Cisco uBR7246VXR router, or Cisco uBR7225VXR. -
Page 133: Error Messages
Chapter 7 NPE-G1 and NPE-G2 Installation and Configuration Information Upgrade the ROMmon. (The minimum ROMmon version is 12.3-4r.T3.) • Install the enabling software. • Instructions for upgrading ROMmon are in the on page 7-64. The minimum software release for the Broadband L2TP Access Concentrator (LAC), L2TP Network Server (LNS), and PPP Terminated Aggregation (PTA) is Cisco IOS Release 12.3(14)YM. -
Page 134: Using The Show Interface Stats Command
Enabling the Second Processor on the NPE-G1 Using the show interface stats Command Use the show interface stats command for information about the interface. Router# show interface stats GigabitEthernet0/1 Switching path Multi-Processor Fwding Using the show ip interface Command Use the show ip interface command to get information about the specific interface port. Router# show ip interface g0/3 GigabitEthernet0/3 is up, line protocol is up Internet address is 155.1.1.1/16... -
Page 135: Using The Show Mpf Cpu Command
Chapter 7 NPE-G1 and NPE-G2 Installation and Configuration Information Using the show mpf cpu Command Use the show mpf cpu command to display the average second CPU utilization in the last five seconds, one minute, and five minutes. hostname: show mpf cpu CPU utilization for five seconds: 33%;... -
Page 136: Using The Show Mpf Interface Command
Enabling the Second Processor on the NPE-G1 Using the show mpf interface Command Using the show mpf interface command without arguments shows the interface information for all Gigabit Ethernet interfaces and subinterfaces. This command is supported only for physical interfaces. There is no support for the virtual access interface. -
Page 137: Using The Show Mpf Ip Exact-Route Command
“SB-1 CPU” when processor 1 is enabled. Router# show version Cisco IOS Software, 7200 Software (C7200-I12S-M), Version 12.3(BSNOP4_NIGHTLY.050202) UBUILDIT Image, CISCO DEVELOPMENT TEST VERSION Copyright (c) 1986-2005 by Cisco Systems, Inc. OL-4448-12 RX punts RX punts... -
Page 138: Copying The Saved Configuration To Nvram
Copying the Saved Configuration to NVRAM Compiled Wed 02-Feb-05 04:57 by ROM: System Bootstrap, Version 12.3(4r)T3, RELEASE SOFTWARE (fc1) BOOTLDR: Cisco IOS Software, 7200 Software (C7200-KBOOT-M), 12.3(20040712:050512) [REL-v123_7_xi_throttle.ios-weekly 115] Lac1 uptime is 16 hours, 22 minutes System returned to ROM by reload at 18:12:49 UTC Mon Feb 7 2005 System image file is "tftp://223.255.254.254/auto/tftpboot-users/biff/c7200-i12s-mz.2005-02-02.BSNOP4_NIGH"... -
Page 139: Copying The Saved Configuration File From A Flash Disk Or Pc Card
Chapter 7 NPE-G1 and NPE-G2 Installation and Configuration Information Copying the Saved Configuration File from a Flash Disk or PC Card To copy the saved configuration file from the Flash Disk or PC Card, follow these steps: Step 1 Make sure you are at the privileged level of the EXEC command interpreter (check the system prompt for a pound sign [#]). -
Page 140: Downloading The Saved Configuration From The Tftp Server
Copying the Saved Configuration to NVRAM Downloading the Saved Configuration from the TFTP Server After you install the NPE-G1 or NPE-G2 in the router and verify a successful router boot, you must retrieve the router configuration from the TFTP server and copy it to NVRAM. Use the copy tftp running-config command to copy the saved configuration from the TFTP file server. - Page 141 Chapter 7 NPE-G1 and NPE-G2 Installation and Configuration Information The system prompts you to select a host or network configuration file. The default is host; press Return Step 4 to accept the default. Host or network configuration file [host]? Step 5 The system prompts you for the IP address of the host.
-
Page 142: Auxiliary And Console Port Information
Auxiliary and Console Port Information Auxiliary and Console Port Information If the NPE-G1 or NPE-G2 and an I/O controller are both installed in the same system, the console and auxiliary ports on the I/O controller are used and the console and auxiliary ports on the NPE-G1 or NPE-G2 are disabled by Cisco IOS. -
Page 143: Configuring The Interface Transmission And Speed Modes
Chapter 7 NPE-G1 and NPE-G2 Installation and Configuration Information Configuring the Interface Transmission and Speed Modes Step 1 After changing the media type, configure the speed and transmission modes to appropriately match the new interface characteristics. Changing the speed and duplex of an NPE-G1 or NPE-G2 Gigabit Ethernet interface is done using the speed and duplex interface commands. -
Page 144: Debugging
Configuring the Native Gigabit Ethernet Interfaces ip address 10.198.75.35 255.255.255.240 load-interval 30 no keepalive duplex full speed 1000 media-type gbic no negotiation auto no cdp enable no shutdown interface GigabitEthernet0/2 ip address 10.179.16.2 255.255.255.240 duplex auto speed auto media-type rj45 no cdp enable no shutdown interface GigabitEthernet0/3... -
Page 145: Clearing Counters
Chapter 7 NPE-G1 and NPE-G2 Installation and Configuration Information Clearing Counters Interface counters may be cleared (reset) by using the command: clear counters GigabitEthernet 0/X (where X is 1, 2, or 3) This will not reset the interface. Using show Commands to Check the Installation Use show commands to identify the hardware installed in your router, to verify the operation status, to view interface configuration settings, and to troubleshoot your router configuration. - Page 146 The following example shows an NPE-G2 installed in a Cisco 7206VXR router: Router# show version Cisco IOS Software, 7200 Software (C7200-JS-M), Version 12.4(PC_D.051028) UBUILDIT Image, Copyright (c) 1986-2005 by Cisco Systems, Inc. Compiled Fri 28-Oct-05 00:30 by biff (display text omitted) Cisco 7206VXR (NPE-G2) processor (revision A) with 917504K/131072K bytes of memory.
- Page 147 Chapter 7 NPE-G1 and NPE-G2 Installation and Configuration Information Use the show controllers command to display initialization block information, transmit ring, receive ring, and errors for the interface controllers. The following example provides information about the interfaces on the I/O controller C7200-I/O-2FE/E and the NPE-G1 installed in a Cisco 7206VXR router: Router# show controllers Interface FastEthernet0/0 (idb 0x62EC78B8) Hardware is i82543 (Livengood) A1...
-
Page 148: Upgrading The Cisco Ios Image And The Boot Helper (Boot Loader) Image
Upgrading the Cisco IOS Image and the Boot Helper (Boot Loader) Image 5 minute output rate 0 bits/sec, 0 packets/sec 0 packets input, 0 bytes, 0 no buffer Received 0 broadcasts, 0 runts, 0 giants, 0 throttles 0 input errors, 0 CRC, 0 frame, 0 overrun, 0 ignored 0 watchdog, 0 multicast, 0 pause input 0 input packets with dribble condition detected 0 packets output, 0 bytes, 0 underruns... -
Page 149: Upgrading Rommon On The Npe-G1 Or Npe-G2
Chapter 7 NPE-G1 and NPE-G2 Installation and Configuration Information Copy the boot helper image from the TFTP server to flash memory as follows: Step 3 router# copy tftp bootflash: Address or name of remote host []? biff Source filename []? c7200-boot-mz.120-5.S Destination filename [c7200-boot-mz.120-5.S]? Accessing tftp://biff/c7200-boot-mz.120-5.S... -
Page 150: Using The Show Rom-Monitor Command And Rommon Cli Showmon Commands
If you are in Cisco IOS, use the show rom-monitor command: • Router> show rom-monitor ReadOnly ROMMON version: System Bootstrap, Version 12.2(20031011:151758) Copyright (c) 1994-2003 by cisco Systems, Inc. Upgrade ROMMON version: System Bootstrap, Version 12.2(20031011:151758) Copyright (c) 1994-2003 by cisco Systems, Inc. Currently running ROMMON from Upgrade region... -
Page 151: Changing Preferences To Choose The Other Rommon Image
NPE-G1 and NPE-G2 Installation and Configuration Information Running new upgrade for first time System Bootstrap, Version 12.2(20031011:151758) [biff] Copyright (c) 1994-2003 by cisco Systems, Inc. ROM:Rebooted by watchdog hard reset C7200 platform with 1048576 Kbytes of main memory Upgrade ROMMON initialized rommon 1 >... -
Page 152: Rommon Upgrade Error Messages
A boot of a corrupted upgrade image: • System Bootstrap, Version 12.2(20031011:151758) [biff-npeg2-fur 135], DEVELOPMENT SOFTWARE Copyright (c) 1994-2003 by cisco Systems, Inc. Upgrade ROMMON corrupted. Falling to ReadOnly ROMMON ROM:Rebooted by watchdog hard reset C7200 platform with 1048576 Kbytes of main memory... -
Page 153: Upgrading Fpga On The Npe-G2
Chapter 7 NPE-G1 and NPE-G2 Installation and Configuration Information Upgrading FPGA on the NPE-G2 A field-programmable gate array (FPGA) device exists on the NPE-G2. FPGA devices do not exist on other Cisco 7200 series routers network processing engines. FPGA devices are a type of field-programmable device (FPD) that support separate software upgrades. - Page 154 Chapter 7 NPE-G1 and NPE-G2 Installation and Configuration Information Fiber Optic Cleaning Information Network Processing Engine and Network Services Engine Installation and Configuration 7-68 OL-4448-12...
-
Page 155: Preparation For Installation
You need the following parts and tools to remove and replace an NPE or NSE in Cisco 7200 series routers, Cisco 7200 VXR routers, or Cisco uBR7200 series routers: A network processing engine or network services engine (NPE-100, NPE-150, NPE-175, NPE-200, •... -
Page 156: C H A P T E R 8 Preparation For Installation
See NPE or NSE Requirements When installing an NPE-175, NPE-225, NPE-300, NPE-400, NPE-G2, or NSE-1 in a Cisco 7200 VXR router or Cisco uBR7246VXR router that is using a previously purchased I/O controller, you must upgrade the I/O controller boot helper image. The Cisco uBR7225VXR router does not support port adapters or I/O controllers. - Page 157 Network Processing Engine and Network Services Engine Installation and Configuration Software and Hardware Requirements Supported NPEs or NSE All NPEs and the NSE-1 NPE-100, NPE-150, NPE-175, NPE-200, and NPE-225 NPE-200 NPE-300 and NPE-400 NPE-150, NPE-200, and NPE-225 NPE-150, NPE-200, and NPE-225...
-
Page 158: Port Adapter Jacket Card Support
Software and Hardware Requirements Port Adapter Jacket Card Support The Port Adapter Jacket Card inserts into the I/O controller slot of a Cisco 7200 VXR router when an NPE-G2 or NPE-G1 is installed. The Port Adapter Jacket Card network processing engine support is shown in Table Table 8-3... - Page 159 Chapter 8 Preparation for Installation Table 8-4 Router Platform • Cisco uBR7246VXR Cisco uBR7225VXR • 1. The NPE-G2 has its own Cisco IOS software image with the prefix “c7200p-” in the software images filenames, including the boot image. The NPE-G2 does not boot up with a software image with the prefix “c7200-”. Previous network processing engines, or the network services engine, do not boot up with the “c7200p-”...
- Page 160 Software and Hardware Requirements Table 8-5 Network Processing Engine Router Platform NPE-100 • Cisco 7204 and Cisco IOS Release Cisco 7206 11.1(8) Cisco 7202 — • Cisco AS5800 Universal Access Server Cisco 7206 router — • shelf • Cisco 7206VXR —...
- Page 161 3. For information about the Cisco 7206 or Cisco 7206VXR as router shelves in the Cisco AS5800 Universal Access Server, refer to the Cisco AS5800 Universal Access Server documentation listed in the Table 8-6 Software Requirements for the NPE-175, NPE-225, and NSE-1 NPE or NSE Router Platform...
-
Page 162: Safety Guidelines
1. Cisco IOS Release 12.1(5)T and later releases of 12.1T require a minimum of 128 MB of SRAM or SDRAM. 2. Previous documents stated that the Cisco uBR7200 series routers supported the NPE-175. Because the NPE-175 has reached its end of life and was never made orderable for the Cisco uBR7200 series routers, the NPE-175 is no longer shown as supported for the Cisco uBR7200 series routers. -
Page 163: Safety Warnings
Chapter 8 Preparation for Installation Software and Hardware Requirements Safety Warnings IMPORTANT SAFETY INSTRUCTIONS Warning This warning symbol means danger. You are in a situation that could cause bodily injury. Before you work on any equipment, be aware of the hazards involved with electrical circuitry and be familiar with standard practices for preventing accidents. - Page 164 Chapter 8 Preparation for Installation Software and Hardware Requirements Warnung WICHTIGE SICHERHEITSHINWEISE Dieses Warnsymbol bedeutet Gefahr. Sie befinden sich in einer Situation, die zu Verletzungen führen kann. Machen Sie sich vor der Arbeit mit Geräten mit den Gefahren elektrischer Schaltungen und den üblichen Verfahren zur Vorbeugung vor Unfällen vertraut.
- Page 165 Chapter 8 Preparation for Installation Software and Hardware Requirements Varning! VIKTIGA SÄKERHETSANVISNINGAR Denna varningssignal signalerar fara. Du befinner dig i en situation som kan leda till personskada. Innan du utför arbete på någon utrustning måste du vara medveten om farorna med elkretsar och känna till vanliga förfaranden för att förebygga olyckor.
- Page 166 Chapter 8 Preparation for Installation Software and Hardware Requirements INSTRUÇÕES IMPORTANTES DE SEGURANÇA Aviso Este símbolo de aviso significa perigo. Você se encontra em uma situação em que há risco de lesões corporais. Antes de trabalhar com qualquer equipamento, esteja ciente dos riscos que envolvem os circuitos elétricos e familiarize-se com as práticas padrão de prevenção de acidentes.
- Page 167 Chapter 8 Preparation for Installation Software and Hardware Requirements Network Processing Engine and Network Services Engine Installation and Configuration 8-13 OL-4448-12...
-
Page 168: Electrical Equipment Guidelines
Software and Hardware Requirements Electrical Equipment Guidelines Follow these basic guidelines when working with any electrical equipment: Before beginning any procedures requiring access to the chassis interior, locate the emergency • power-off switch for the room in which you are working. •... -
Page 169: Electrostatic Discharge Prevention
Chapter 8 Preparation for Installation Never touch uninsulated telephone wires or terminals unless the telephone line has been • disconnected at the network interface. Use caution when installing or modifying telephone lines. • Electrostatic Discharge Prevention Electrostatic discharge (ESD) damages equipment and impairs electrical circuitry. ESD occurs when printed circuit boards are improperly handled and results in complete or intermittent failures. - Page 170 Software and Hardware Requirements Figure 8-3 Metal carrier Although the metal carrier helps to protect the printed circuit boards from ESD, wear a preventive antistatic strap whenever handling the network processing engine or network services engine, I/O controller, port adapters, or Cisco uBR7200 series cable interface line cards. Ensure that the strap makes good skin contact and connect the strap’s clip to an unpainted chassis surface to channel unwanted ESD voltages safely to ground.
-
Page 171: Removing And Installing The Npe Or Nse
Removing and Installing the NPE or NSE This chapter describes how to remove a network processing engine (NPE) or network services engine (NSE) from supported platforms and also how to install a replacement network processing engine or network services engine. This chapter provides instructions for the NPE-100 through NPE-400 and the NSE-1. -
Page 172: Removing And Replacing The Npe Or Nse
Reconnecting Input Power and Powering Up the Router, page 9-23 • When installing an NPE-175, NPE-225, NPE-300, NPE-400, or NSE-1 in a Cisco 7200 VXR router that Note is using a previously purchased I/O controller, you must upgrade the I/O controller boot helper image. -
Page 173: Powering Down The Router
Chapter 9 Removing and Installing the NPE or NSE Powering Down the Router To power down a Cisco 7200 series router, Cisco 7204VXR or Cisco 7206VXR router, or Cisco uBR7200 series router, complete the following steps: Before powering down the router, use the copy running-config startup-config command to save the Note router’s running configuration to nonvolatile memory. -
Page 174: Disconnecting Ac-Input Power From A Cisco Ubr7200 Series Router
Removing and Replacing the NPE or NSE Disconnecting AC-Input Power from a Cisco 7200 Series Router or Cisco 7200 VXR Router To disconnect AC-input power from a Cisco 7200 series router or Cisco 7200 VXR router, complete the following steps: Unplug the input power cable from the power source. -
Page 175: Disconnecting Dc-Input Power From A Cisco 7200 Series Router Or Cisco 7200 Vxr Router
Chapter 9 Removing and Installing the NPE or NSE Figure 9-2 AC-input receptacle Power switch Handle Repeat Step 1 through Step 3 if a second power supply is installed. Step 4 This completes the procedure for disconnecting AC-input power from a Cisco uBR7200 series router. Go to the “Removing the NPE or NSE”... - Page 176 Removing and Replacing the NPE or NSE Remove the cable tie that secures the –V, +V, and ground leads to the power supply faceplate. Save the Step 3 cable tie. Note The cable tie that accompanied your Cisco 7200 series DC-input power supply can be removed and replaced on the power supply without the use of a tool.
-
Page 177: Disconnecting Dc-Input Power From A Cisco Ubr7246 Router
Chapter 9 Removing and Installing the NPE or NSE Disconnecting DC-Input Power from a Cisco uBR7246 Router To disconnect DC-input power from a Cisco uBR7346 router, complete the following steps. Before completing any of the following steps, and to prevent short-circuit or shock hazards, ensure Warning that power is removed from the DC circuit. - Page 178 Removing and Replacing the NPE or NSE Captive installation screw M5 grounding receptacles M5 grounding lug Using a 3/16-inch flat-blade screwdriver, loosen the screw below the +V lead receptacle and pull the lead Step 4 from the connector. Repeat this step for the –V lead only. See Figure 9-5 Power switch Power receptacle...
-
Page 179: Removing The Npe Or Nse
Chapter 9 Removing and Installing the NPE or NSE Repeat the Steps 1 to 5 to disconnect secondary power supply, if connected. Note This completes the procedure for disconnecting DC-input power from a Cisco uBR7246VXR router. Go to the following section, Removing the NPE or NSE To remove the NPE or NSE from a Cisco 7200 series router, Cisco 7204VXR or Cisco 7206VXR router, or Cisco uBR7200 series router, complete the following steps. - Page 180 Removing and Replacing the NPE or NSE Figure 9-6 Captive installation screw Handle Using a 3/16-inch flat-blade screwdriver, loosen the screws that secure the router to the front mounting Step 4 strips of the rack. Position at least one person in front of the rack to support the front underside of the router. Step 5 Step 6 From the rear of the rack, carefully push the front of the router out of the rack until there is enough...
-
Page 181: Removing And Installing Memory
This section explains how to remove DRAM SIMMs that are installed on your network processing engine. To remove the installed DRAM SIMMs, complete the following steps: The NPE-175, NPE-225, and NPE-300, and NSE-1 use SDRAM DIMMS. See the Note DIMMs” section on page 9-14 Attach an ESD-preventive wrist strap between you and an unpainted router surface. - Page 182 Removing and Replacing the NPE or NSE Figure 9-7 Latch Latch holes Step 6 When both ends of the SIMM are released from the socket, grasp the ends of the SIMM with your thumb and forefinger and pull the SIMM completely out of the socket. Handle the edges of the SIMM only; avoid touching the memory modules, pins, or traces (the metal fingers on the connector side of the SIMM).
-
Page 183: Installing Dram Simms
Chapter 9 Removing and Installing the NPE or NSE Installing DRAM SIMMs The DRAM SIMMs on the network processing engine are located in the following sockets: U18, U25, U4, and U12 on the NPE-100 and the NPE-150 (See • NPE-200 Overview,” Figure 1-1 U11, U25, U42, and U52 on the NPE-200 (See •... -
Page 184: Removing Sdram Dimms
9-21. Removing SDRAM DIMMs The procedures in this section are required only if you have an NPE-175, NPE-225, NPE-300, or NSE-1 and need to upgrade or replace the SDRAM DIMMs. On the NPE-175, NPE-225, and NSE-1, the SDRAM DIMMs are located in socket U15. The two user-configurable SDRAM DIMMs on the NPE-300 are located in sockets U45 and U44. - Page 185 Removing and Installing the NPE or NSE Figure 9-9 Release latches The SDRAM DIMM sockets on the NPE-175, NPE-225, and NPE-300 are parallel to the circuit Note board. They are not tilted at an angle. With the DIMM socket latches open, grasp the ends of the DIMM between your thumbs and forefingers Step 5 and pull the DIMM completely out of the socket.
-
Page 186: Installing Sdram Dimms
Removing and Replacing the NPE or NSE Figure 9-11 SDRAM DIMM To prevent ESD damage, handle the DIMM by the card edges only. Place a removed DIMM on an Caution antistatic mat and store it in an antistatic container. Step 6 Place the DIMM in an antistatic container to protect it from ESD damage. - Page 187 Align the notch on the DIMM with the connector. The DIMM only inserts one way. Step 4 Insert the edge of the DIMM into the socket. The SDRAM DIMM sockets on the NPE-175, NPE-225, and NPE-300 are parallel to the circuit Note board. They are not tilted at an angle.
-
Page 188: Removing A Sdram Sodimm
Removing and Replacing the NPE or NSE Removing a SDRAM SODIMM This section provides a procedure for removing the small outline dual in-line memory module (SODIMM) on the NPE-400. Follow these steps to remove the existing SODIMM: Remove the NPE-400 from the system. Step 1 Place the NPE-400 on an antistatic mat or pad and ensure that you are wearing an antistatic device, such Step 2... -
Page 189: Installing A Sdram Sodimm
Chapter 9 Removing and Installing the NPE or NSE Figure 9-14 Spring latch on the release latch Remove the SODIMM you want to replace by pulling outward on the SODIMM spring latches with your Step 5 thumbs. The SODIMM springs up to allow you to easily pull it from the socket. Caution To prevent ESD damage, handle the SODIMM by the card edges only (as shown in page... -
Page 190: Checking A Sdram Upgrade Or Replacement
Removing and Replacing the NPE or NSE SODIMMs are sensitive components that are susceptible to ESD damage. Handle SODIMMs by the Caution edges only; avoid touching the memory modules, pins, or traces (the metal fingers along the connector edge of the SODIMM). (See Figure 9-15 TO HU B TO PC... -
Page 191: Installing The Npe Or Nse
To install an NPE or NSE in the router, complete the following steps: When installing an NPE-175, NPE-225, NPE-300, NPE-400, or NSE-1 in a Cisco 7200 VXR router that Note is using a previously purchased I/O controller, you must upgrade the I/O controller boot helper image. - Page 192 Do not align the network processing engine or network services engine metal carrier between the slot Caution guides (for all except the NPE-175 and NPE-225). Doing so damages components on the network processing engine’s printed circuit board as you slide the network processing engine into its chassis slot.
-
Page 193: Reconnecting Input Power And Powering Up The Router
Chapter 9 Removing and Installing the NPE or NSE Figure 9-17 Metal carrier Slot guides Step 6 Gently slide the network processing engine all the way into its chassis slot until you feel the connectors seat with the router midplane. Seat the network processing engine in the router midplane by tightening its captive installation screws Step 7 with a number 2 Phillips or a 3/16-inch flat-blade screwdriver. -
Page 194: Reconnecting Ac-Input Power To The Cisco 7200 Series Router Or Cisco 7200 Vxr Router
Read the installation instructions before you connect the system to its power source. Statement 10 Note When installing an NPE-175, NPE-225, NPE-300, NPE-400, or NSE-1 in a Cisco 7200 VXR router that is using a previously purchased I/O controller, you must upgrade the I/O controller boot helper image. - Page 195 Chapter 9 Removing and Installing the NPE or NSE Reconnecting AC-Input Power to the Cisco 7200 Series Router or Cisco 7200 VXR Router To reconnect AC-input power to a Cisco 7200 series router or Cisco 7200 VXR router, complete the following steps: At the rear of the router, check that the power switch on the power supply is in the off (O) position.
-
Page 196: Reconnecting Ac-Input Power To The Cisco Ubr7200 Series Router
Removing and Replacing the NPE or NSE Reconnecting AC-Input Power to the Cisco uBR7200 Series Router Figure 9-19 Cable-retention clip Power receptacle Captive installation screw To reconnect AC-input power to the Cisco uBR7200 series router complete, the following steps: At the rear of the router, check that the power switch on the power supply is in the off (O) position. Step 1 Slide the cable-retention clip to the left away from the AC receptacle, and plug in the power cable. -
Page 197: Reconnecting Dc-Input Power To A Cisco 7200 Series Router Or Cisco 7200 Vxr Router
Chapter 9 Removing and Installing the NPE or NSE Reconnecting DC-Input Power to a Cisco 7200 Series Router or Cisco 7200 VXR Router To reconnect DC-input power to a Cisco 7200 series router or Cisco 7200 VXR router, complete the following steps: The color coding of the DC-input power supply leads depends on the color coding of the DC power Note... - Page 198 Removing and Replacing the NPE or NSE Figure 9-21 0.55 in. (14 mm) Insert the stripped end of the ground lead all the way into the ground lead receptacle on the DC-input Step 4 power supply and tighten the receptacle screw using a 3/16-inch flat-blade screwdriver. Insert the stripped end of the +V lead all the way into the +V lead receptacle and tighten the receptacle Step 5 screw using the same 3/16-inch flat-blade screwdriver.
-
Page 199: Reconnecting Dc-Input Power To A Cisco Ubr7246Vxr Router
Chapter 9 Removing and Installing the NPE or NSE Reconnecting DC-Input Power to a Cisco uBR7246VXR Router To reconnect DC-input power to a Cisco uBR7246VXR router, complete the following steps: The color coding of the DC-input power supply leads depends on the color coding of the DC power Note source at your site. - Page 200 Removing and Replacing the NPE or NSE Figure 9-22 Power switch Power receptacle Captive installation screw M5 grounding receptacles M5 grounding lug Step 3 If necessary, use a wire stripper to strip approximately 0.55 inch (14 mm) from the –V, +V, and ground leads.
- Page 201 Chapter 9 Removing and Installing the NPE or NSE Connect the two-hole grounding lug on the grounding lead to the M5 grounding receptacles with the M5 Step 4 nuts. Tighten the nuts using an 8-mm wrench or nut driver (or adjustable wrench). (See Insert the stripped end of the +V lead all the way into the +V lead receptacle and tighten the receptacle Step 5 screw using the 3/16-inch flat-blade screwdriver.
- Page 202 Removing and Replacing the NPE or NSE Figure 9-24 Power switch Power receptacle Captive installation screw M5 grounding receptacles M5 grounding lug Step 9 Restore current to the –V and +V leads. For the Cisco uBR7246VXR router, each DC-input power supply rating is 14A, 700 volt ampere Note (VA).
-
Page 203: Powering Up The Router
Chapter 9 Removing and Installing the NPE or NSE Powering Up the Router To power up a Cisco 7200 series router, Cisco 7200 VXR router, or Cisco uBR7200 series router that has an installed power supply, complete the following steps: Check for the following: Step 1 Each port adapter is inserted in its slot, and its respective port adapter lever is in the locked... - Page 204 Cisco Internetwork Operating System Software IOS (tm) 7200 Software (C7200-J-M), 11.3(2)T Copyright (c) 1986-1998 by cisco Systems, Inc. Compiled Sun 22-Feb-98 06:00 by Biff This completes the procedures for connecting input power and powering up the router. This also completes the procedure for installing the network processing engine or network services engine in a Cisco 7200 series router, Cisco 7200 VXR router, or Cisco uBR7200 series router.
-
Page 205: Npe Configuration Tasks
Configuration Tasks and Troubleshooting Information This chapter provides configuration and troubleshooting information. Troubleshooting information includes general show commands, show commands specific to the NSE-1, and error messages and the like. Instructions for removing a power supply for easier removal or installation of the network services engine are also provided. -
Page 206: Boot Changes In Cisco Ios Release
Boot Changes in Cisco IOS Release 12.2 Before enabling the PXF processor, you must have IP routing and IP CEF switching turned on. Note To manually disable or enable the PXF processor, use the ip pxf global command. To see a current list of Cisco IOS features supported by the PXF processor, go to Cisco.com and search for Cisco 7200 product literature for the NSE-1. -
Page 207: C H A P T E R 10 Configuration Tasks And Troubleshooting Information
Chapter 10 Configuration Tasks and Troubleshooting Information If an NPE-G1 or NPE-G2 is installed in a router with either an C7200-I/O-GE+E or C7200-I/O-2FE/E Caution I/O controller, or if a Cisco uBR7200-NPE-G1 will be installed in a router with a C7200-I/O-2FE/E I/O controller, copy your running configuration to a TFTP server or Flash Disk, not a PC Card. -
Page 208: Troubleshooting The Npe-100 Through Npe-400
Cisco 7206VXR router: Router# show version Cisco Internetwork Operating System Software IOS (tm) 7200 Software (C7200-P-M), Released Version 12.1(20000622:181759) Copyright (c) 1986-2000 by cisco Systems, Inc. Compiled Thu 22-Jun-00 11:18 by BIFF Image text-base:0x60008950, data-base:0x60BD8000 (display text omitted) cisco 7206VXR (NPE400) processor (revision 0xFF) with 114688K/16384K bytes of memory. -
Page 209: Using The Show C7200 Command
Chapter 10 Configuration Tasks and Troubleshooting Information Image text-base:0x60008900, data-base:0x6141C000 (display text omitted) cisco 7206VXR (NSE-1) processor (revision B) with 57344K/8192K bytes of memory. R7000 CPU at 262Mhz, Implementation 39, Rev 1.0, 256KB L2 Cache6 slot VXR midplane, Version 2.0 (display text omitted) PXF processor tmc is running. -
Page 210: Using The Show Environment Command With The Npe-G2-Npe-G2 -Specific Output
NSE-1 show Commands 0x20:37 35 20 20 20 04 00 02 02 85 1C 0C 4A 02 CB 84 0x30:4E 53 45 31 FF FF FF FF FF FF FF FF FF FF FF FF 0x40:FF FF FF FF FF FF FF FF FF FF FF FF FF FF FF FF 0x50:FF FF FF FF FF FF FF FF FF FF FF FF FF FF FF FF 0x60:FF FF FF FF FF FF FF FF FF FF FF FF FF FF FF FF 0x70:FF FF FF FF FF FF FF FF FF FF FF FF FF FF FF FF... -
Page 211: Using The Show Pxf Crash Command
Chapter 10 Configuration Tasks and Troubleshooting Information PXF Statistic: Packets RP -> PXF: switch ip: switch raw: qos fastsend: qos enqueue: Total: Packets PXF -> RP: qos pkts: fast pkts: drops:total punts:total " not IP : " CEF receive : Total: Packets ignored: shadow ring full:... -
Page 212: Using The Show Pxf Info Command
NSE-1 show Commands ICM0(b4~13) = 0x00000 ICM2(b4~13) = 0x00010 LOCK0(b0~4) = 0x00000 LOCK2(b0~4) = 0x00000 CPU0/2: SW EX Type=0x00000000 LBUS EX Type=0x00000081 HW EX Type=0x00000400 CPU:row=0x0 column=0x2 cpu=0x2 PC:0000098E r0:00000000 r4:00005400 r8:00000000 r12:00000033 r13:00000008 r14:00000000 r15:00000000 misr1a:00000000 misr1bhi:00000000 misr1blo:00000000 misr2lo:00000000 sisr1a:01000040 cAll:C20DE822 DCD1:00020400 DCD2:00000002 CNTL:00000000 TBuf intr 0:1111111F... -
Page 213: Using The Show Pxf Interface Command
Chapter 10 Configuration Tasks and Troubleshooting Information Using the show pxf interface Command The show pxf interface command provides a summary of the interfaces in the router and which PXF features or capabilities are enabled on these interfaces. The following is an example of the show pxf interface command: Router# show pxf interface Intf... -
Page 214: Nse-1 Error Messages
NSE-1 Error Messages show pxf feature nat ? • Router# show pxf feature nat ? entry stat Router# show pxf feature nat entry --- 171.69.12.175 --- 171.69.12.161 --- 171.69.12.162 --- 171.69.12.163 --- 171.69.12.164 --- 171.69.12.165 --- 171.69.12.166 Router# show pxf feature nat stat NAT translation processing information total nat entries = 0x1000, entries (used, free) = (0x7, 0xFF9) untranslated flows:0x7022D... -
Page 215: Using Debugging Commands And Pxf
Chapter 10 Configuration Tasks and Troubleshooting Information PXF processor crash and error message: • 00:49:37:Fatal pxf interrupt, int_reg=0x80, int_mask=0xFFFF, config=0x1FF40 00:49:37:-Traceback= 6055B9CC 60530D10 This message indicates the PXF processor encountered a serious error and crashed. Workaround: Reboot the router. The most current product documentation is online. For information on accessing documentation, see Note “Obtaining Documentation and Submitting a Service Request”... - Page 216 PXF Troubleshooting Information The PXF has 16 processors, only one of which is in use at a time when there is a low traffic rate. Even though only one of the processors is working, all of the PXF processors are slightly slowed. At higher traffic rates many of the PXF processors are working at the same time, but there is no additional slow down.
- Page 217 Chapter 10 Configuration Tasks and Troubleshooting Information CPU usage becomes more efficient as packet load increases. For example, if you are running at 60 Note percent CPU with only 33 percent of customer load on the system, this does not mean that you need 180 percent CPU for 100 percent of customers.
-
Page 218: Removing And Replacing An Ac-Input Or Dc-Input Power Supply
Removing and Replacing an AC-Input or DC-Input Power Supply WFQ Queues When there is an increase in ignored packets and in the no buffer count, it is possible that the output weighted fair queueing (WFQ) queues are too long. To specify the number of dynamic queues to be reserved for use by the class-default class as part of the default class policy, use the fair-queue policy-map class configuration command;... - Page 219 Chapter 10 Configuration Tasks and Troubleshooting Information Figure 10-1 Captive installation screw Using a 3/16-inch flat-blade screwdriver, loosen the screws that secure the router to the front mounting Step 3 strips of the rack. Position at least one person in front of the rack to support the front underside of the router. Step 4 From the rear of the rack, carefully push the front of the router out of the rack until there is enough Step 5...
- Page 220 Removing and Replacing an AC-Input or DC-Input Power Supply Figure 10-2 Align the power supply to the power supply bay. Step 3 Slide the power supply completely into the power supply bay until its faceplate is flush with the router’s Step 4 rear panel.
- Page 221 Chapter 10 Configuration Tasks and Troubleshooting Information Fiber Optic Cleaning Information To maintain agency compliance requirements and meet EMI emissions standards for the Cisco 7200 Caution series routers with a single power supply, the power supply filler plate must remain in the power supply adjacent to the installed power supply.
- Page 222 Chapter 10 Configuration Tasks and Troubleshooting Information Fiber Optic Cleaning Information Network Processing Engine and Network Services Engine Installation and Configuration 10-18 OL-4448-12...
- Page 223 CWDM SFP module Configuring Interface Transmission and Speed Modes NPE-G1 or NPE-G2 CWDM GBIC Options CWDM SFP module configuration for the NPE-G2 DIMMs, installing NPE-175, NPE-225, NPE-300, NSE-1 Disconnecting AC-input power 7-22 Electrical Equipment Guidelines Electrostatic Discharge Prevention Enabling the Second Processor...
- Page 224 System Management Functions NPE-175 Components Network Processing Engine and Network Services Engine Installation and Configuration IN-2 Memory Configurations Memory Specifications System Management Functions NPE-175 and NPE-225 Description and Overview 9-14 NPE-200 Components Memory Configurations Memory Specifications System Management Functions NPE-225...
- Page 225 Replacing SODIMMs 7-26 Resetting the Interface 7-58 ROMmon upgrade Error Messages Running Configuration File Specifications Speed Modes, Configuring 7-57 Summary Supported Platforms System Management Functions Troubleshooting the LINK LED Troubleshooting the POWER ON LED Troubleshooting the SLOT ACTIVE LED Upgrading ROMmon 7-64 Upgrading the Boot Helper or Boot Loader Image...
- Page 226 SIMMs, removing NPE-100, NPE-150, NPE-200 SNMP Management 1-5, 2-4, 3-4 SODIMMs NPE-G1 7-26 Software requirements NPE-100 NPE-150 NPE-175 NPE-200 NPE-225 NPE-300 NSE-1 Specifications I/O Controller blank panel 6-13 Network Processing Engine and Network Services Engine Installation and Configuration IN-4 specifications...