
Related Manuals for Asus 3DexPlorer GX2


Summary of Contents for Asus 3DexPlorer GX2
- Page 1 3DexPlorer ® PCI & AGP Graphics Cards USER’S MANUAL Hardware & Video Drivers...
- Page 2 Product warranty or service will not be extended if: (1) the product is repaired, modified or altered, unless such repair, modification of alteration is authorized in writing by ASUS; or (2) the serial number of the product is defaced or missing.
- Page 3 Email: tsd-usa@asus.com.tw WWW: www.asus.com ASUS COMPUTER GmbH Marketing Info Address: Harkort Str. 25, 40880 Ratingen, BRD, Germany Telephone: 49-2102-445011 Fax: 49-2102-442066 Email: info-ger@asus.com.tw Technical Support Hotline: 49-2102-499712 BBS: 49-2102-448690 Email: tsd-ger@asus.com.tw WWW: www.asuscom.de FTP: ftp.asuscom.de/pub/ASUSCOM ASUS 3DexPlorer GX2 User’s Manual...
-
Page 4: Table Of Contents
3D Hardware Accelerated Capability ..........7 Standard Features ................7 II. Hardware Installation ..............9 ASUS 3DexPlorer GX2 - PCI Bus Layout ........9 ASUS 3DexPlorer GX2 - AGP Bus Layout ........9 Memory Upgrade ................10 ASUS 3DexPlorer GX2 Connection Examples ......11 Installation Procedures ............. - Page 5 Resolution Table - 2MB Video Memory ........29 Resolution Table - 4MB Video Memory ........30 8-BIT Connector Definitions ............31 DuoView Connector Definitions ........... 31 VIII. Troubleshooting ............... 32 Description ..................32 Recommended Action ..............32 ASUS 3DexPlorer GX2 User’s Manual...
- Page 6 Canadian Department of Communications Statement This digital apparatus does not exceed the Class B limits for radio noise emissions from digital apparatus set out in the Radio Interference Regulations of the Cana- dian Department of Communications. ASUS 3DexPlorer GX2 User’s Manual...
-
Page 7: Introduction
I. Introduction Thank you for purchasing the ASUS 3DexPlorer GX2 Graphics & Video Accelera- tor. With the S3 ViRGE/GX2 built-in, the ASUS 3DexPlorer GX2 provides you surprising acceleration in both 2D/3D graphics and quality scalable video playback, which can fully support 3D Gaming and Multimedia Applications. - Page 8 DuoView function allows simultaneous display of two images on TV and computer monitor IMPORTANT: Both the ASUS 3DexPlorer GX2 graphics cards use an internal Video Decoder in the “Enable” position. If you connect an extenal video capture or TV tuner card through the LPB connector and experience hardware conflicts, “Disable”...
-
Page 9: Hardware Installation
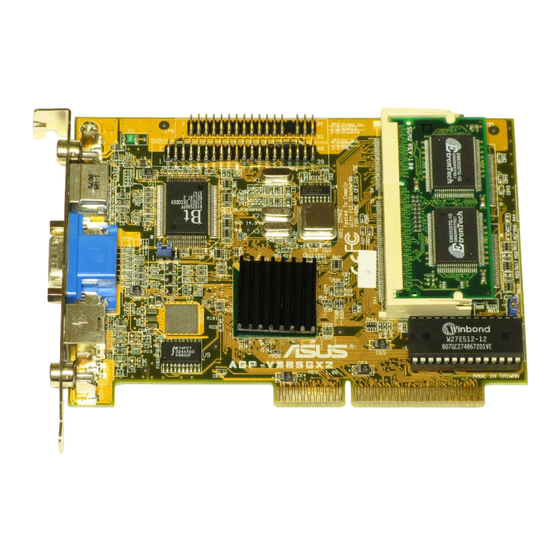
II. Hardware Installation ASUS 3DexPlorer GX2 - PCI Bus Layout 2MB Memory Upgrade DuoView Connector LPB Connector SO-DIMM Socket Composite In (RCA) S-Video In (SVHS) Monitor Out (15-pin VGA) S-Video Out (SVHS) Composite Out (RCA) PCI Bus 2MB Memory PCI Version... -
Page 10: Memory Upgrade
II. Hardware Installation Memory Upgrade The ASUS 3DexPlorer GX2 graphics card comes with a 2MB video memory con- figuration. A SO-DIMM (Small-Outline, Dual-Inline Memory Module) socket is available to upgrade the video memory to 4MB. Memory size of 3MB is not sup- ported on this product. -
Page 11: Asus 3Dexplorer Gx2 Connection Examples
(RCA) Output or Recording Devices RCA Plug NOTES: • ASUS Video cards come in either NTSC or PAL standards. • You may not convert NTSC to PAL or vice versa. • You must use the same standard for all devices. CATV... -
Page 12: Installation Procedures
Systems with Existing VGA Card 1. Shut down your computer and unplug all electrical cords. 2. Replace the existing VGA card with the ASUS 3DexPlorer GX2 graphics card. 3. Restart your computer — the ASUS 3DexPlorer GX2 graphics card should be automatically detected and the display drivers automatically updated. -
Page 13: Windows 95
Virge/GX2 chipset and may cause display problems) Insert the ASUS 3DexPlorer GX2 installation CD and the ASUS Windows 95 Install Shell will appear. If it does not appear, run D:\setup.exe. You will be presented with a menu of options. -
Page 14: Finishing Setup
DirectX Runtime Components and updating as necessary. Click Finish to restart your computer. If the 3DexPlorer GX2 is not detected upon entering Windows 95 with the driver in- stalled, a message will appear to allow you to delete the drivers or shut down your com- puter to install the 3DexPlorer GX2. -
Page 15: Using The Windows 95 Control Panel
3.1 Using the Autorun Screen Insert the ASUS 3DexPlorerGX2 installa- tion CD. Select Remove 3DexPlorer GX2 Display Driver in the ASUS Windows 95 Install Shell and follow the uninstallation steps. 3.2 Using the Windows 95 Control Panel Click Start, and then point to Settings. -
Page 16: Directx5, Video Player, & Live Video Installation
Setup.exe in the root directory of the Click Install DirectX 5 Install Microsoft DirectX 5 dialog box appears Click the “Ok” button After you have installed DirectX 5, you may click Install Video Player, and Install Live Video. ASUS 3DexPlorer GX2 User’s Manual... -
Page 17: Powerplayer
Do not run PowerPlayer with full screen under 1280x1024 16bit high color or 1600x1200 16bit high color resolution modes, it will not function properly. • Do not overlap other windows over PowerPlayer, it will not function properly. ASUS 3DexPlorer GX2 User’s Manual... -
Page 18: Windows 95 Display Settings
6. Windows 95 Display Settings Shell Notify Icon After installing the ASUS 3DexPlorer GX2 Windows 95 Driver, you will see an ASUS icon on your taskbar notification area. You can “Close Enhanced Func- tions” or “Launch Display Properties” from this icon. If you encounter any problem, you may want to close ASUS Enhanced Functions. -
Page 19: Adjustment
List of refresh rate options Customize refresh rate Test customized refresh rate Set to default supported refresh rate ASUS 3DexPlorer GX2 User’s Manual... -
Page 20: Hotkey
Advanced These advanced settings allow you to achieve better performance and video quality. Pentium II & Pentium Pro Acceleration Vertical Interpolation MMX Direct 3D MMX Video Enhancement Acceleration MPEG Color Adjustment Performance Setting ASUS 3DexPlorer GX2 User’s Manual... - Page 21 Performance Setting You can increase the performance setting with faster memory chips. WARNING! Slower memory chips may produce noise or cause your system to hang when the performance setting is too high. Lowest Highest performance performance ASUS 3DexPlorer GX2 User’s Manual...
- Page 22 This option allows you to view computer output directly on your TV in either NTSC, PAL, or NTSC-Japan formats. Output Type ASUS video card supports TV video output in Composite and S-video form factors. Flicker Filter There are four levels of flicker filter settings which allow you to reduce the flickers to the minimum.
-
Page 23: Windows 3.X
& video card and your CD-ROM disc drive is drive D: and that the Win- dows 3.x directory is in C:\windows. Replace these with the actual location, if neces- sary. The ASUS 3DexPlorer GX2 Video drivers for Windows 3.x can be installed under DOS mode or Windows 3.x. -
Page 24: Installation Procedures In Windows 3.X
VGA. Switch to the standard VGA mode (16 colors, 640 x 480 pixels), then start Windows by typ- ing WIN. 5. Insert the ASUS 3DexPlorer GX2 installation D:\setup.exe. A list of install op- tions will appear. 6. Click Install Windows 3.x Display Driver and follow the installation steps. -
Page 25: Installation Of Video For Windows
For Software MPEG support in Windows 3.x, you must first install Microsoft Video for Windows, then you may install your own MPEG Video Player. 1. Start Windows 3.x. 2. Insert the ASUS 3DexPlorer GX2 In- stallation CD. 3. Run D:\setup.exe. A list of install options will appear. -
Page 26: Microsoft Windows Nt
8. Type D:\NT40 (assuming your CD-ROM disc drive is in drive D) or click Browse to select the path of the display driver for Windows NT. Click OK. 9. You will see a list of ASUS 3DexPlorer GX2 drivers. Select ASUS 3DexPlorer GX2 and then click OK. -
Page 27: Windows Nt 3.51
9. Type D:\NT351 (assuming your CD-ROM disc drive is in drive D) or click Browse to select the path of the display driver for Windows NT. Click OK. 10. You will see a list of ASUS 3DexPlorer GX2 drivers. Select ASUS 3DexPlorer GX2 and then click OK. -
Page 28: Dos Drivers
VI. DOS Drivers DOS Drivers Installation 1. Type D:\SETUP.EXE to install video drivers in pure DOS mode. The ASUS DOS installation shell will appear and present you with a list of install options. 2. You can choose Install DOS Utilities, AutoCAD Driver, MicroStation Driver, or S3d Toolkit Drivers. -
Page 29: Product Information
256 colors 60Hz 80.0KHz 72Hz 96.2KHz 640x480 60Hz 31.3KHz 65,536 colors 72Hz 37.9KHz 75Hz 37.5KHz 85Hz 43.4KHz 100Hz 50.8KHz 160Hz 81.3KHz 800x600 60Hz 38.2KHz 65,536 colors 72Hz 48.3KHz 75Hz 47.0KHz 85Hz 53.6KHz 100Hz 62.9KHz 150Hz 94.2KHz ASUS 3DexPlorer GX2 User’s Manual... -
Page 30: Resolution Table - 4Mb Video Memory
16.7 millions 75Hz 81.1KHz 85Hz 89.5KHz 800x600 60Hz 38.2KHz 87Hz(int.) 46.5KHz 65,536 colors 72Hz 48.3KHz 75Hz 47.0KHz 1600x1200 60Hz 76.4KHz 85Hz 53.6KHz 65,536 color 70Hz 85.8KHz 100Hz 62.9KHz 102Hz(int.) 63.7KHz 150Hz 94.2KHz NOTE: int. = Interlaced ASUS 3DexPlorer GX2 User’s Manual... -
Page 31: 8-Bit Connector Definitions
Signal Description Signal Description Definitions YYD0 YYD4 YYD1 YYD5 YYD2 YYD6 YYD3 YYD7 YUD0 YUD4 The 3DexPlorer GX2 has an internal YUD1 YUD5 YUD2 YUD6 Video Encoder. You can connect any YUD3 YUD7 other compatible video encoders YVD0 YVD4 YVD1 YVD5 through the DuoView Connector. -
Page 32: Troubleshooting
10. The system will ask to restart the computer, click Yes 11. After restarting Windows 95, refer to “Installing Drivers for Window 95” in the User’s Manual to complete the 3DexPlorer GX2 driver installation. After installing the You may have installed similar drivers before. Try the following steps to install: driver, Windows 95 does 1.