Table of Contents
Advertisement
Quick Links
Advertisement
Table of Contents

Related Manuals for Asus 3DP-V375DX


Summary of Contents for Asus 3DP-V375DX
- Page 1 3DexPlorer 3DP-V375DX 2D/3D Graphics & Video Accelerator USER'S MANUAL...
- Page 2 TAL, OR CONSEQUENTIAL DAMAGES (INCLUDING DAMAGES FOR LOSS OF PROFITS, LOSS OF BUSINESS, LOSS OF USE OR DATA, INTERRUPTION OF BUSI- NESS AND THE LIKE), EVEN IF ASUS HAS BEEN ADVISED OF THE POSSIBILITY OF SUCH DAMAGES ARISING FROM ANY DEFECT OR ERROR IN THIS MANUAL OR PRODUCT.
- Page 3 Technical Support BBS: +1-408-474-0569 Email: tsd-usa@asus.com.tw WWW: www.asus.com ASUS COMPUTER GmbH Marketing Info Address: Harkort Str. 25, 40880 Ratingen, BRD, Germany Telephone: 49-2102-445011 Fax: 49-2102-442066 Email: info-ger@asus.com.tw Technical Support BBS: 49-2102-448690 Email: tsd-ger@asus.com.tw Hotline: 49-2102-499712 ASUS 3DP-V375 DX User’s Manual...
-
Page 4: Table Of Contents
1.2 Installing Video drivers in Windows 3.x ..... 24 2. Install MPEG Video Player in Windows 3.x ....... 25 3. Changing Display Settings in Windows 3.x ......26 Setting ................. 26 Adjustment ................. 27 Hotkey ................28 DPMS ................. 28 ASUS 3DP-V375 DX User’s Manual... - Page 5 2MB Video Memory ............... 33 4MB Video Memory ............... 35 VIII. Hardware Information ............37 8-BIT LPB Connector ..............37 16-BIT LPB Connector ..............38 Memory Upgrades ................. 39 A. Questions & Answers ..............40 ASUS 3DP-V375 DX User’s Manual...
- Page 6 Canadian Department of Communications Statement This digital apparatus does not exceed the Class B limits for radio noise emissions from digital apparatus set out in the Radio Interference Regulations of the Cana- dian Department of Communications. ASUS 3DP-V375 DX User’s Manual...
-
Page 7: Introduction
Integrated 170MHz RAMDAC supports up to 160Hz Refresh Flicker-Free Display • ASUS Turbo Driver Boosts 20% More 2D/3D Graphics Performance • ASUS Performance Adjustment Tech. Tunes up Speed for Various Types Memory Mix • Multi-Language User Interface & Drivers supported •... -
Page 8: Hardware Installation
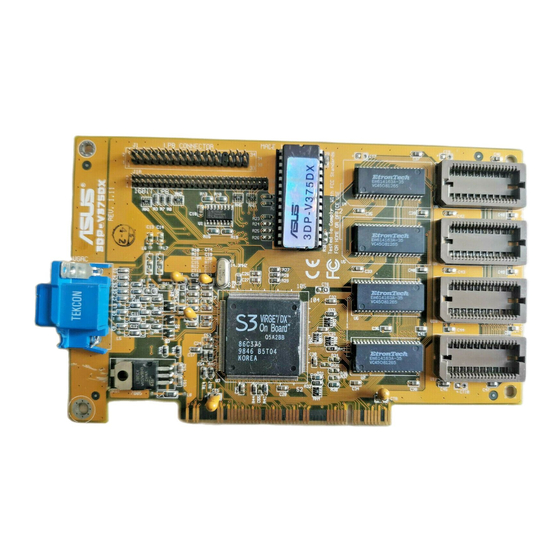
II. Hardware Installation Layout Feature Connector & VGA BIOS 2MB DRAM Memory 8-BIT LPB Connector 16-BIT LPB Connector Upgrade Video Sockets Output Connector S3 ViRGE/DX Chipset TV-Tuner, Video Capture, Hardware MPEG, or other compatible LPB expansion cards ASUS 3DP-V375 DX User’s Manual... -
Page 9: Installation Procedures
II. Hardware Installation This section tells you how to install the ASUS 3DP-V375DX graphics and video card in your PC computer. The steps provided below demonstrate how to install the card in a typical system. Your system may be slightly different. - Page 10 11. Replace the cover on the system unit. 12. Connect your analog monitor's 15-pin VGA connector to the card and fasten the retaining screws (if any). 13. Connect other cables and devices if available. ASUS 3DP-V375 DX User’s Manual...
-
Page 11: Microsoft Windows 95
D: drive. Please use this accordingly. 1.1 Installing Drivers for Windows 95 (New Hardware Found) If you are installing the ASUS 3DP-V375DX graphics & video card for Win- dows 95 for the first time, a New Hardware Found window will appear:... -
Page 12: Updating Drivers For Windows 95 (Using The Autorun Screen)
III. Microsoft Windows 95 1.2 Updating Drivers for Windows 95 (Using the Autorun Screen) If an ASUS graphics card or any other version of the ASUS video driver was installed at one time, Windows 95 Plug and Play may not detect automatically the new 3DP-V375DX graphics &... - Page 13 After all drivers have successfully been installed, restart your computer. Your ASUS 3DP-V375DX graphics card should be automatically detected. If the ASUS 3DP-V375DX graphics card is detected, click the OK button to install other utilities. If no ASUS 3DP-V375DX graphics card is detected, you can either select Remove ASUS 3DP-V375DX Display Driver or Shutdown and install ASUS 3DP-V375DX VGA Card.
- Page 14 1.5MB on-screen memory. TESTING OFF-SCREEN MEMORY: (This screen will flick during the testing) Since the maximum video memory configuration of the ASUS 3DP-V375DX graphics card is 4MB, if your display settings use 2MB, then the unused 2MB will be the off-screen memory.
-
Page 15: Traditional Installation
2.1 Installing Drivers for Windows 95 (New Hardware Found) If you are installing the ASUS 3DP-V375DX graphics & video card for Win- dows 95 for the first time, a New Hardware Found window will appear: Select which driver you want to install for your new hardware:... -
Page 16: Installing Drivers (Using Windows 95 Control Panel)
Win- Change Display Type dows 95. Click OK. 9. You will see a list of ASUS 3DP-V375DX drivers. It is recommended that you select the ASUS 3DP-V375DX V1.02 Enhanced Driver (with 1280x1024x24) and press the OK button to start installation 10. -
Page 17: Removing The Video Drivers
V375DX display drivers, you can use one of the following procedures to com- pletely remove the drivers from Windows 95 to save disk space. 3.1 Using the Autorun Screen 1. Insert the ASUS 3DP-V375DX V1.02 Installation CD 2. Select Remove 3DP-V375DX... -
Page 18: Install Mpeg Video Player, Directx 3A, And S3 S3D Toolkit
4. Install MPEG Video Player, DirectX 3A, and S3 S3d ToolKit For Software MPEG support in Windows 95, you must first install Microsoft DirectX 3A libraries, then install MPEG Video Player. ASUS also provides the S3 S3d ToolKit, which contains three kinds of 3D libraries: S3d ToolKit Win- dows drivers, RenderWare Windows drivers, and BRender Windows drivers. -
Page 19: Windows 95 Display Settings
Shell Notify Icon After installing the ASUS 3DP-V375DX Windows 95 Driver, you will see an ASUS icon on your taskbar notification area. You can “Close Enhanced Functions” or “Launch Display Properties” from this icon. If you encounter any problem, you may want to close ASUS Enhanced Functions. -
Page 20: Adjustment
List of refresh rate options Customize refresh rate Test customized refresh rates Add to list Set to default supported refresh rate Delete from list ASUS 3DP-V375 DX User’s Manual... -
Page 21: Hotkey
Value box with a single key stroke such as the Up key. (Ctrl and Alt keys are not necessary when making these settings) Value List of hotkey options Description Enable Hotkey Set to default hotkey values ASUS 3DP-V375 DX User’s Manual... -
Page 22: Advanced
Set to default values Pentium II & Pentium Pro Acceleration Check this function to enable Pentium II & Pentium Pro CPU accel- eration. MMX Direct 3D Acceleration Check this function to enable MMX Direct 3D acceleration. ASUS 3DP-V375 DX User’s Manual... - Page 23 Performance Setting You can increase the performance setting with faster memory chips. WARNING! Slower memory chips may produce noise or cause your system to hang when the performance setting is too high. Highest Lowest performance performance ASUS 3DP-V375 DX User’s Manual...
-
Page 24: Microsoft Windows 3.X
D:\WIN31 and type INSTALL) When the ASUS drivers have been successfully installed, you can launch Windows 3.x by pressing the Y key if the 3DP-V375DX Video card has been installed in your system. After Windows 3.x boots up, the CD-ROM’s autorun facility will present you with a list of install options. -
Page 25: Install Mpeg Video Player In Windows 3.X
2. Install MPEG Video Player in Windows 3.x For Software MPEG support in Windows 3.x, you must first install Microsoft Video for Windows, then install MPEG Video Player. 1. Start Windows 3.x 2. Insert the ASUS 3DP- V375DX installation CD 3. Execute D:\SETUP.EXE The CD-ROM’s autorun fa- cility will present you with ASUS Windows 3.x Install Shell... -
Page 26: Changing Display Settings In Windows 3.X
IV. Microsoft Windows 3.x 3. Changing Display Settings in Windows 3.x To enter the ASUS Display Panel, open ASUS S3 Series program group and click ASUS Display Panel icon. Click the appropriate Tab as follows: Setting This allows you to adjust screen resolution, virtual desktop size, color palette, font size, and change performance. -
Page 27: Adjustment
List of refresh rate options Customize refresh rate Test customized Add to list refresh rates Delete from list ASUS 3DP-V375 DX User’s Manual... -
Page 28: Hotkey
Hotkey enabled On-Line Help Enabled DPMS This lets you configure the time of Standby, Suspend, and PowerOff mode for your DPMS-compliant monitor to conserve electrical en- ergy. DPMS enabled Set to default values On-Line Help Enabled ASUS 3DP-V375 DX User’s Manual... -
Page 29: Microsoft Windows Nt
CD-ROM such as D:\NT40 (assuming your CD-ROM drive is letter D). 8. A list of ASUS video adapters will be displayed. Select ASUS 3DP- V375DX , then click on the OK button. 9. Windows NT will once again prompt for confirmation. All appropri- ate files are then copied to the hard disk. -
Page 30: Installing Video Display Drivers In Windows Nt 3.51
V. Microsoft Windows NT Video Driver Installation Installing Video Display Drivers in Windows NT 3.51 The procedure below describes how you install ASUS 3DP-V375DX dis- play driver for Windows NT. 1. Change Display Type to Standard VGA mode. 2. Double-click the Main icon. -
Page 31: Dos Drivers
Install AutoCAD, MicroStation, & S3d Toolkit Drivers 1. Enter pure DOS mode 2. Insert the ASUS Installation CD (assuming your CD-ROM drive is letter D) 3. Type D:\SETUP.EXE to install video drivers in DOS. The ASUS DOS installation shell will appear and present you with a list of install options. -
Page 32: Display Information
The following 3D functions are supported on this product: Dynamic Z-buffering Double buffering Texture modes Point sampling Bilinear filtering MIP mapping Trilinear MIP mapping Perspective correction Atmospheric effects Fogging Transparency Shading Dynamic flat shading Gouraud shading Lighting ASUS 3DP-V375 DX User’s Manual... -
Page 33: Resolution Table
256 colors 72Hz 66.4KHz 75Hz 70.2KHz 85Hz 79.6KHz 100Hz 92.1KHz 1280x1024 87Hz (int.) 46.5KHz 256 colors 60Hz 64.0KHz 75Hz 80.1KHz 85Hz 90.4KHz 1600x1200 98Hz (int.) 63.9KHz 256 colors 60Hz 80.0KHz 72Hz 96.2KHz int. = Interlaced ASUS 3DP-V375 DX User’s Manual... - Page 34 640x480 60Hz 31.3KHz 16.7M true 72Hz 37.9KHz colors 75Hz 37.5KHz 85Hz 43.4KHz 100Hz 50.7KHz 160Hz 81.3KHz 800x600 60Hz 38.2KHz 16.7M true 72Hz 48.3KHz colors 75Hz 47.0KHz 85Hz 53.6KHz 100Hz 62.9KHz 150Hz 94.2KHz int. = Interlaced ASUS 3DP-V375 DX User’s Manual...
-
Page 35: 4Mb Video Memory
60Hz 64.0KHz 75Hz 80.1KHz 85Hz 90.4KHz 1600x1200 98Hz (int.) 63.9KHz 256 colors 60Hz 80.0KHz 72Hz 96.2KHz 640x480 60Hz 31.3KHz 65K high 72Hz 37.9KHz colors 75Hz 37.5KHz 85Hz 43.4KHz 100Hz 50.8KHz 160Hz 81.3KHz int. = Interlaced ASUS 3DP-V375 DX User’s Manual... - Page 36 60Hz 47.7KHz colors 70Hz 55.5KHz 75Hz 59.5KHz 85Hz 67.4KHz 100Hz 79.1KHz * 1280x1024 87Hz (int.) 46.5KHz * Windows 95 S3 16.7M true 60Hz 63.3KHz Enhanced Driver colors 75Hz 79.1KHz Only 85Hz 89.5KHz int. = Interlaced ASUS 3DP-V375 DX User’s Manual...
-
Page 37: Hardware Information
26-pin cable used for feature connector applications to be swap out for a standard 34-pin cable to achieve LPB operation. Signal Description Signal Description PA0/LPB0 PA1/LPB1 PA2/LPB2 EVIDEO/VREQ/VRDY/HS PA3/LPB3 ESYNC/NF PA4/LPB4 EVCLK/CREQ/CRDY/VS PA5/LPB5 PA6/LPB6 PA7/LPB7 VCLK/LCLK BLANK/NF HSYNC/NF VSYNC/NF NF/I C CLK NF/I C DATA NF/ENABLE2 NF/ENABLE1 ASUS 3DP-V375 DX User’s Manual... -
Page 38: 16-Bit Lpb Connector
Signal Description Signal Description PA0/LPB0 PA1/LPB1 PA2/LPB2 EVIDEO/VREQ/VRDY/HS PA3/LPB3 ESYNC/NF PA4/LPB4 EVCLK/CREQ/CRDY/VS PA5/LPB5 PA6/LPB6 PA7/LPB7 VCLK/LCLK BLANK/NF HSYNC/NF VSYNC/NF NF/I C CLK NF/I C DATA NF/ENABLE2 NF/ENABLE1 PA8/LPB8 PA9/LPB9 PA10/LPB10 PA12/LPB12 PA11/LPB11 PA13/LPB13 PA14/LPB14 PA15/LPB15 ASUS 3DP-V375 DX User’s Manual... -
Page 39: Memory Upgrades
VIII. Hardware Information Memory Upgrades The ASUS 3DP-V375DX graphics card comes with 2MB video memory configuration. Four memory sockets are available to upgrade the video memory to 4MB by adding four 512KB (256Kx16) EDO DRAM chips. Memory size of 3MB is not supported on this product. Specifications may change without notice. -
Page 40: Questions & Answers
9. Now display driver will work correctly. QIII. My monitor is not capable of high resolution or refresh rate. A> It depends on display characteristics of your monitor. Consult your monitor manual for proper configuration. ASUS 3DP-V375 DX User’s Manual...