Table of Contents
Advertisement
Quick Links
Advertisement
Table of Contents

Related Manuals for Philips AVENT SCF883/03


Summary of Contents for Philips AVENT SCF883/03
- Page 1 SCF883, SCF885 User manual...
-
Page 2: Table Of Contents
Table of contents Important ��������������������������������������������������������������������������������������������������������������������������� 3 Safety systems ����������������������������������������������������������������������������������������������������������������������� 8 Electromagnetic fields (EMF) �������������������������������������������������������������������������������������������� 8 Introduction ����������������������������������������������������������������������������������������������������������������������� 8 General description ���������������������������������������������������������������������������������������������������������� 9 Before first use ���������������������������������������������������������������������������������������������������������������� 10 Using the appliance ������������������������������������������������������������������������������������������������������� 11 Filling the water tank ��������������������������������������������������������������������������������������������������������12 Steaming ������������������������������������������������������������������������������������������������������������������������������13 Blending after steaming ���������������������������������������������������������������������������������������������������16 Blending without steaming���������������������������������������������������������������������������������������������18 Reheating �����������������������������������������������������������������������������������������������������������������������������21 Defrosting ����������������������������������������������������������������������������������������������������������������������������24... -
Page 3: Important
- Do not use the appliance if the plug, the power cord or the appliance itself is damaged. If the power cord is damaged, you must have it replaced by Philips; a service center authorised by Philips or similarly qualified persons in order to avoid a hazard. - Page 4 - The appliance gets hot during or shortly after steaming (especially surfaces with this symbol “ ”) and may cause burns when touched. Only lift the jar by its handle. - Hot steam comes out of the jar during steaming and when its lid is removed.
- Page 5 - Do not use the appliance if it has fallen or is damaged in any way. Take it to an authorized Philips service center for repair. - Never use the steam function without water in the water tank.
- Page 6 - Always disconnect the device from supply if it’s left unattended. - Make sure that the water in the tank does not exceed the MAX water level marking on the side of the water tank (250 ml) or the MAX water level indication in the water tank. - Make sure the water tank lid is correctly locked before putting the jar on the main unit.
- Page 7 - Before using the storage pot, clean it thoroughly, and then sterilize it with a Philips Avent sterilizer or place the storage pot in boiling water for 5 minutes. This is to ensure hygiene. Make sure that there is enough water in the container when...
-
Page 8: Safety Systems
Introduction Congratulations on your purchase and welcome to Philips Avent! To fully benefit from the support that Philips Avent offers, register your product at www.philips.com/welcome� This 4-in-1 healthy baby food maker helps all parents in preparing nutritious meals for their babies with steaming and blending functions combined in one appliance. -
Page 9: General Description
General description - 9 -... -
Page 10: Before First Use
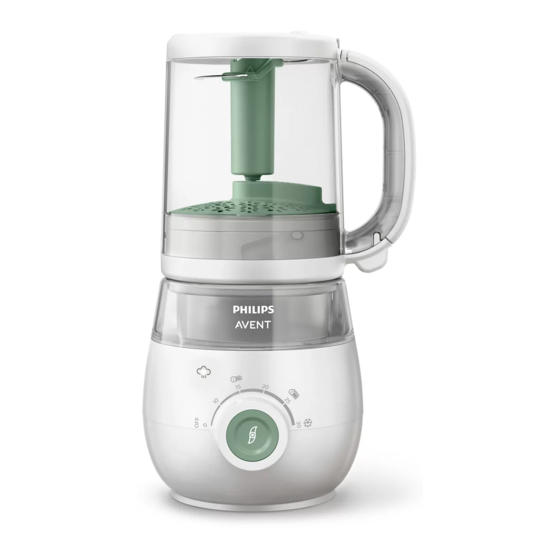
Product overview Lid tab Water level markings Connector on the jar lid MAX water level indication Jar lid Water tank (not detachable) Sealing ring Boiler Locking pin Main unit Sieve Control knob Blade unit Blending button Blade unit holder Power cord Locking area on the water tank Water tank lid Controls overview... -
Page 11: Using The Appliance
Using the appliance Caution • Always check the temperature of the cooked food on the back of your hand to make sure it is safe for your baby. This appliance is intended for steaming fresh, solid ingredients and blending them to the consistency of your choice. -
Page 12: Filling The Water Tank
Filling the water tank Note • Make sure that the water in the tank does not exceed the MAX water level marking on the side of the water tank (250 ml) or the MAX water level indication in the water tank. -
Page 13: Steaming
Steaming Caution • Hot steam or hot water can burn your fingers. Do not touch, and never let children touch any hot parts of the appliance or the steam coming from the top of the appliance, as this may cause scalding. Note •... - Page 14 We recommend cutting solid ingredients into small pieces (cubes not bigger than 1 cm)� Put the ingredients in the jar� Press the sieve into the jar lid� Place the jar lid on the jar and turn it clockwise to close it securely� Note •...
- Page 15 If you have not yet filled the water tank with water for steaming, refer to the chapter “Filling the water tank” and add water to the water tank before putting the jar on the main unit� Note • Make sure the water tank lid is correctly locked in place before placing the jar on the main unit.
-
Page 16: Blending After Steaming
Turn the control knob back to the off position (OFF)� Wait 2 minutes, or until there is no more steam coming from the top of the appliance before removing the jar� Caution • If you intend to start another steaming cycle, let the appliance cool down for 10 minutes, and empty any remaining water out of the water tank before you refill and start a new steaming cycle. - Page 17 From the steaming position, lift the jar by the handle and turn it upside down� Shake the jar to allow the steamed ingredients to move to the bottom of the jar where the blending blades are� If needed, remove the jar lid and add additional ingredients for blending (e.g. water for purees or additional cooked ingredients like rice or pasta).
-
Page 18: Blending Without Steaming
When you have finished blending, release the blending button. Unplug the appliance� Remove the blade unit� Be careful when you remove the blade unit as it might be hot� Remove the blended food from the jar� If necessary, use the spatula included with this appliance�... - Page 19 Put the blade unit on the blade unit holder in the jar� Cut solid ingredients into small pieces (cubes not bigger than 1 cm) before you put them in the jar� Put the ingredients in the jar� Press the sieve into the jar lid� Place the lid on the jar and turn it clockwise to close it securely�...
- Page 20 Note • The jar has grooves that help smoothly guide the locking pins and lock the lid in place. Make sure that the lid tab slides into the handle of the jar. Place the jar on the main unit with the lid on the top, align the icon on the jar with the icon on the main unit, and turn the jar clockwise to securely lock it in...
-
Page 21: Reheating
When you have finished blending, release the blending button. Unplug the appliance� Remove the blade unit� Be careful when you remove the blade unit as it might be hot� Remove the blended food from the jar� If necessary, use the spatula included with this appliance�... - Page 22 Flip the storage pot over and place it onto the blade unit holder in the jar� Place the jar lid on the jar and turn it clockwise to close it securely� Note • The jar has grooves that help smoothly guide the locking pins and lock the lid in place. Make sure that the lid tab slides into the handle of the jar.
- Page 23 Align the connector on the jar lid to the locking area on the water tank, and then place the jar on the main unit with the jar lid on the bottom� Press the jar downwards to lock it firmly on the main unit, and make sure the handle is on the right-hand side�...
-
Page 24: Defrosting
Open the jar lid, and use the hook on the spatula to take the storage pot out � There may still be some water remaining in the water tank after a reheating cycle� This is normal� Wait until the appliance cools down to room temperature, then empty the water tank of all residual water�... - Page 25 Turn the control knob back to the off position (OFF)� Wait 2 minutes, or until there is no more steam coming from the top of the appliance before removing the jar� Open the lid and use the hook on the spatula to take the storage pot out� There may still be some water remaining in the water tank after a defrosting cycle�...
-
Page 26: Ingredients And Steaming Time
Ingredients and steaming time Approximate Water level in the Type of food Ingredient steaming time (min.)* water tank (ml) Fruit Apple Orange/mandarin Peach Pear Pineapple Plum Strawberry Vegetables Asparagus Broccoli Carrot Cauliflower Celery Eggplant Fennel French beans Leek Onion Peas Bell pepper Potato Pumpkin... -
Page 27: Cleaning And Descaling
Cleaning and descaling Cleaning Caution • Clean the appliance after every use. • Never immerse the main unit in water. Never rinse the main unit under the tap. • Never use bleach or chemical sterilizing solutions/tablets in the appliance. • Never use scouring pads, abrasive cleaners or aggressive liquids such as gasoline, acetone or alcohol to clean the appliance. - Page 28 Dissemble the sealing ring from the jar lid for cleaning when necessary� Remove the blade unit� Thoroughly clean the blade unit under the tap immediately after use� Make sure you also rinse the inside of the blade unit tube� Caution •...
-
Page 29: Descaling The Water Tank
Descaling the water tank For optimum performance, we recommend descaling the appliance every 4 weeks. To reduce the build up of limescale, we recommend using soft or purified water for steaming, reheating or defrosting. To descale the appliance, follow the descaling instructions below. Make sure the appliance is switched off. -
Page 30: Storage
Correct disposal helps prevent negative consequences for the environment and human health. Guarantee and service If you need information or if you have problems, please visit the Philips website at www. philips. com / avent or contact the Philips Customer Care Center in your country (refer to the enclosed worldwide guarantee leaflet for details). -
Page 31: Troubleshooting
Troubleshooting This chapter summarizes the most common problems you could encounter with the appliance. If you are unable to solve the problem with the information below, contact the Consumer Care Center in your country. Problem Possible cause Solution The appliance This appliance is Assemble all parts correctly. - Page 32 Problem Possible cause Solution Steam is leaking The water tank lid is not Close the water tank lid correctly. Make from the water closed correctly. sure the icon on the water tank lid is tank. lined up with the icon on the water tank.
- Page 33 Problem Possible cause Solution The sealing ring Make sure the sealing ring is correctly around the jar lid is not assembled around the jar lid with the flat assembled correctly or is side facing out. not assembled. The blending There is too much food Switch off the appliance and process a function does not in the jar.
- Page 34 Problem Possible cause Solution Food in the storage pot is Let the appliance cool down for too viscous. 10 minutes and defrost again. The storage pot The storage pot lid is not Before putting the storage pot in the jar leaks during closed correctly.
-
Page 35: Technical Specifications
Problem Possible cause Solution There are food Small food residue Remove the jar from the main unit. Remove residues in the particles get into the the jar lid and blade unit from the jar. inner layer at the inner layer at the Flip the jar, align the small hole on the bottom of the jar. - Page 36 © 2021 Koninklijke Philips N�V� All rights reserved� 15/12/2021...