Table of Contents
Advertisement
Quick Links
Advertisement
Table of Contents

Related Manuals for iBasso Audio DX320


Summary of Contents for iBasso Audio DX320
- Page 1 Audio USER GUIDE...
-
Page 2: Table Of Contents
Contents Package Components Main Features Specifications Names of Parts & Functions 9-13 Android Basic Features Introduction 14-25 15-16 WiFi Connection/Bluetooth Connection Application (APP) Installation/App, to Uninstall/USB Connections 17-20 System Settings 21-25 Power Off/Reboot/System Switching iBasso Mango Music Player Application 27-59 Playback Screen (home screen) Music Screen 28-38... -
Page 3: Package Components
Package Components DX320 Player Leather Case Coaxial Cable Balanced Burn-in Cable USB-C cable Screen Protector Quick Start Guide Warranty Card... - Page 4 Leather Case: Use the leather case to protect the DX320 chassis from scratches. Coaxial Cable: Connect the coaxial cable to an external DAC, to allow the DX320 to work as a digital transport. Balanced Burn-in Cable: Plug the burn-in cable into the output socket and keep playing music to burn-in the DX320.
- Page 5 It is also not mandatory to use the burn-in cable, we supply it as a convenience for when you are not listening to the DX320 and you would like to get your dap conditioned as soon as possible.
-
Page 6: Main Features
Main Features - Dual ROHM BD34301EKV DAC Chips are incorporated, with a four-channel balanced headphone amplification circuit. - Bit for bit playback with support up to 32bit/768kHz. Support of Native DSD up to 512x. - 6.5″ IPS full screen (1080*2340), with In-Cell capacitive touch panel. - Page 7 - 3 settings for hardware gain control. - 100 steps for volume control. - Patented replaceable AMP card design. - Audio Formats Supported: MQA, APE, FLAC, WAV, WMA, AAC, ALAC, AIFF, OGG, MP3, DFF, DSF, and DXD. - Support for M3U playlists. - Patented dual battery power structure with dedicated power management for each battery.
-
Page 8: Specifications
Specifications 4.4mm/2.5mm Balanced Phone Port: Maximum output level: 7.1Vrms Output Power: 1200mW@32ohm, 168mW@300ohm Frequency Response: 10Hz~40kHz +/-0.3dB S/N: 125dB Dynamic Range: 125dB THD+N: -112dB (no Load, 2.8Vrms) -110dB (300R Load) -103dB (32R Load) Crosstalk: -120dB Output impedance: 0.38ohm 3.5mm Single Ended Phone Out: Maximum output level:... - Page 9 4.4mm/2.5mm Balanced Line Out: Maximum output level: 7.1Vrms Frequency Response: 10Hz~40kHz +/-0.3dB S/N: 125dB Dynamic Range: 125dB THD+N: -110dB (no Load, 2.8Vrms) Crosstalk: -120dB 3.5mm Single Ended Line Out: Maximum output level: 3.5Vrms Frequency Response: 10Hz~40kHz +/-0.3dB S/N: 122dB Dynamic Range: 122dB THD+N:...
-
Page 10: Names Of Parts & Functions
Names of Parts & Functions Micro SD USB-C Port Coaxial Output Port Amp Card 4.4mm Balanced 3.5mm Single Ended 2.5mm Balanced... - Page 11 The output of this port is up to 24bit/384kHz or DoP DSD128. USB-C Port Connect the DX320 to a computer or a USB charger to charge the DX320. Connect the DX320 to a computer to allow the DX320 to work as a card reader or an external storage.
- Page 12 USB-C Coaxial Output Port 6.5inch LCD Indicator Power/Volume Previous/Rewind Play/Pause Next/Fast Forward Indicator: A different colored light bar distinguishes music sampling rates and charging status. 88.2kHz/96kHz 44.1kHz/48kHz 352.8kHz/768kHz 176.4kHz/192kHz DSD64 705.6kHz/768kHz DSD256 DSD128 Charging DSD512...
- Page 13 Power: Short Press - Power the LCD screen on and off. Long Press - To display the pop up window with three options that are Power off, Reboot, and To Mango. Volume: Rotate the wheel clockwise to increase the volume. Rotate the wheel counter clockwise to decrease the volume.
- Page 14 Power on/off: 1. Press and hold the power button to power on. 2. After the DX320 is powered on, a long press of the Power button to display the pop up window, press Power Off button to power off the DX320.
-
Page 15: Android Basic Features Introduction
Android Basic Features Introduction WiFi Battery indicator Digital Filter for analog section Gain Battery indicator for Volume digital section Time... -
Page 16: Wifi Connection/Bluetooth Connection
WiFi Connection: ① On the Android desktop, from the top, swipe down the screen to display the notification bar. ② Press the Wireless local area network(WLAN) to turn on the WiFi function. The first time you enter the WLAN, you need to choose the hot spot you will be using and enter the password. - Page 17 The DX320 will automatically search for the nearby Bluetooth device. At the same time, the DX320 will be visible to the nearby devices. Choose the device that you would like to pair with. After the device has been paired, you can use the...
- Page 18 APP Installation: Method 1: ① APKPure is pre-installed on the DX320. It is similar to Play Store. ② Launch the APKPure. ③ Search for the APP that you would like to install. ④ Download the APP and install it. Method 2: ①...
- Page 19 App, to Uninstall: ① Press the Settings icon on the desktop and scroll down and press APPs. ② Press the APP that you would like to uninstall. ③ Press uninstall to delete the APP.
- Page 20 USB Connections: Connect the DX320 to the computer using the furnished USB-C cable. The DX320 will show on the computer as an external storage. Users can transfer files by copying and pasting. *If you are using a Mac computer, please make sure the...
- Page 21 DX320. USB Soundcard: Turn the DX320 to the USB DAC mode, connect the DX320 to a computer via the USB-C cable. After the DX320 is detected, the soundcard driver will be installed automatically.
-
Page 22: System Settings
System Settings: Press Settings icon on the DX320 desktop to go into system settings. - Page 23 Audio Settings: Press Settings Icon, then press Audio Settings. ① Gain: One of the three gains can be selected. ② Digital Filter: A total of two filters are available for user setting. ③ DSD Filter: This sets the Cut Off Frequency of the DSD Filter.
- Page 24 DX320 DX320 DX320 Online Update: ① Make sure the DX320 is connected to WiFi. ② After online update is selected, press Check Update. ③ Press Download, the DX320 will start downloading the available update package. ④ After the download complete, press Update Now to...
- Page 25 DX320 DX320 Local Update: ① Download the firmware file from our website. If it is a rar file, extract it. ② Press the icon located on the top right corner, then press Local Update. ③ Browse the folder where the firmware file is saved, and select the firmware file.
- Page 26 Firmware Version: ① Press Settings icon, System, About DX320. ② Scroll down the page, the Build number is the firmware version.
-
Page 27: Power Off/Reboot/System Switching
Power Off, Reboot, And System Switching: ① Long press the power button for 3 seconds. ② There is a pop up window with three options. ③ When To Mango is selected, system will be switched to Mango OS. -
Page 28: Ibasso Mango Music Player Application
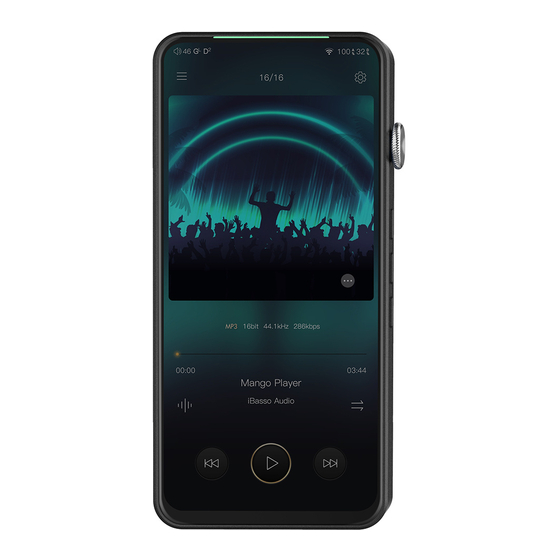
Mango Music Player Application iBasso Audio Mango music player is composed of the Playback screen (home screen), Music screen and Settings. When on the playback screen, one can swipe left and right on the Album artwork area ③ to switch a song: Press the icon on the top left corner ①... - Page 29 Playback Screen (home screen): Sample Rate Equalizer WiFi Battery indicator for Digital Filter analog section L/R Balance Battery indicator for Gain digital section Volume Settings Music screen Now Playing Track title Artist name Play Mode Music info Next/Fast Forward Previous/Rewind Play/Pause...
- Page 30 Now Playing Screen: Press the icon located on the bottom right to display the now playing screen. One can swipe a song to the left to display the Delete button. Press the delete button to remove it from this now playing list. ①...
-
Page 31: Music Screen
Music Screen: Directory view ② Search bar ③ Detail view ① Navigation bar ④ Navigation bar management ⑥ Now playing Music order Music format Track title /Artist name Long press ⑤ Playback bar Play/Pause Thumbnail artwork ⑦ Track title and artist name of the song that is playing. - Page 32 Search bar: Press the search bar to go into the search page to search the desired music or album. Navigation Bar: One can swipe it left or right to choose: All Music view, Album view, Artist view, Genre view, Now Playing view, or Playlist view.
- Page 33 Long Press Pop-up: Further Options: Long Press of a song will pop up a window with further options that allows to play this song, add this song to a playlist, or delete this song.
- Page 34 Album View: Thumbnail view Artwork view Artist View: Thumbnail view Artwork view...
- Page 35 Playlist View: New Playlist: Press the New Playlist to create a playlist. On the pop-up window, one can name the playlist and add playlist description. Further Options: A Long press of the playlist will popup a window with further options, which allows renaming the playlist, exporting the pla ylist, or deletion of the playlist.
- Page 36 Navigation Bar Management Screen: Press the icon located on the right side of the navigation bar to go into the navigation bar management and music sorting screen.
- Page 37 Navigation Bar Management: One can customize the navigation bar. When selected, the icon is highlighted. Press the icon again to unselect. The selected icon will be shown on the navigation bar. Otherwise, it will not be shown. All Music View Sorting: One can sort the all music view by title, album, artist, added time, or folder.
- Page 38 Directory View: Press the Directory View icon① to go into directory view. ① ② ④ ③ Press the Directory View icon① to go into directory view. One can browse the music files under internal storage and SD card via folder structure. Press Internal Storage②...
- Page 39 Search Screen: Input the keywords to search a track, an album, or an artist.
-
Page 40: Settings Screen
Settings Screen: Press the Settings icon to go into settings screen. Gapless: One can enable the gapless to eliminate the gap between two tracks. Gain: There are three gain settings. The low gain has the lowest noise floor, it is good for ultra sensitive IEMs. - Page 41 After a full media scan, or rescan the library, you can go to Directory and select a song under a folder. After this folder is played, the DX320 will play the next folder. L/R Balance: Press to go into the L/R balance setting page.
- Page 42 Equalizer: The DX320 has two types of Equalizers, Graphic EQ and Parametric...
- Page 43 Graphic Equalizer: Press the button of the Graphic Equalizer to enable the Graphic Equalizer. Pre-set EQ: There are 5 kinds of pre-set EQ and a custom option. One can quickly set the equalizer as desired by selecting them. How to Adjust The EQ Settings: Press on the response curve, the 10 band slide bars will show up.
- Page 44 Parametric Equalizer: Press the button of the Parametric Equalizer to enable the it. Parametric Equalizer: Press the button of the Parametric Equalizer to enable the it. How to Go Into The Parametric EQ Setting Screen: Press the response curve to go into the parametric EQ setting screen.
- Page 45 Parametric Equalizer Setting Screen: ① ② ③ ④ ⑤ ⑥ ⑦ ① Settings on the Selection Bar: One can swipe left and right to select a setting.
- Page 46 ② Filter Navigation Bar: There are maximum of 6 filters allowed for each setting. One can swipe left and right to select a filter, then customize it. ③ Status: Status of each filter. One can turn on or turn off the selected filter.
- Page 47 Parametric Equalizer Setting Instruction: Central Frequency (Fc): The central frequency of each filter setting. Gain: The gain for the central frequency. Quality Factor: The range of effect of the filter. As shown on the pictures below, the larger value of the Q factor, the smaller the effect compared the central frequency.
- Page 48 2. High Pass Filter The frequency smaller than the central frequency will be affected. Gain setting is ineffective with high pass filter. 2 3 4 5 6 20 30 100 200 4 5 6 7 8 9 10 30 40 50 200 300 ③.
- Page 49 4. Band Filter There is not a large effect on the central frequency. The frequency beside the central frequency has similar effect. Gain setting is ineffective with band filter. 2 3 4 5 6 20 30 100 200 4 5 6 7 8 9 10 30 40 50 200 300 ⑥.
- Page 50 6. Notch Filter The central frequency has obvious reduction. The frequency beside the central frequency has similar effect. Gain setting is ineffective with notch filter. 2 3 4 5 6 20 30 100 200 4 5 6 7 8 9 10 30 40 50 ⑩.
- Page 51 8. Low Shelf Filter There is a wide effect on the frequency that is lower than the central frequency. 2 3 4 5 6 20 30 100 200 200 300 4 5 6 7 8 9 10 30 40 50 ⑭.
- Page 52 L/R Balance: Slide clockwise to decrease the volume in right channel. Slide in counterclockwise to decrease the volume in left channel.
- Page 53 Digital Filter: Digital Filter: There are two digital filters available. Press a digital filter to unfold the figure.
- Page 54 Advanced To access more system settings. DSD Filter: This sets the Cut Off Frequency of the DSD Filter. A total of three options are available. DSD Volume Compensation: 6dB increase for the DSD volume when turned on. This adjusts for the difference between DSD and PCM.
- Page 55 USB DAC: The DX320 can work as a USB DAC for Windows PC, Mac computer, and Linux computer. It is driver free. Turn the DX320 into the USB DAC mode, connect the DX320 to a computer via the USB-C cable. After the DX320 is detected, the soundcard driver will be installed automatically.
- Page 56 Bluetooth DAC: DX320 Bluetooth DAC. After turning on the Bluetooth DAC, Bluetooth devices such as a mobile phone can be paired with the DX320. The DX320 can now stream from the connected Bluetooth device. Note: When in Bluetooth DAC mode, the DX320 supports...
- Page 57 Display Settings: Ambient mode: Use album artwork as the background picture. Normal mode: Use the selected picture as the background picture. Playback screen album artwork, choose to display rectangular artwork or rounded artwork. Lock screen artwork: Display the album artwork on the lock screen. Year tag: Display year information of the ID3 on the playback screen.
- Page 58 Sleep Timer: Set the count down sleep timer to power off the DX320. The left hand side is the value of hours. The right hand is the value of minutes. The DX320 will be powered off after the counter has completed. If there are any operat ions in the meanwhile, the DX320 will start the counter again after the last operation.
- Page 59 System Info: One can see the Mango music player APP version on this screen. Also, one can see the space available of the internal memory and micro SD card.
-
Page 60: Mango Os
Mango OS To reboot to Mango OS from Android, first of all, long press the power button for 3 seconds to pop up a window with three options. When “To Mango” is selected, the system will switch to the Mango OS. -
Page 61: Mango Os User Interface
The Mango OS User interface is composed of three parts: Music playback screen (homepage), my music, and settings. On the Music playback screen, press the icon① to go to My Music, press the icon② to go to Settings. ① ② * The Mango OS operation is similar to the iBasso Mango APP, please refer to the iBasso Mango APP instruction for any questions. -
Page 62: To Return To The Android System
To return to the Android System, go into the settings menu, press “Android System”, then press “Yes”. -
Page 63: Mtp
MTP (File Transfer) After MTP is turned on, the DX320 can be connected to a computer for file transfer. -
Page 64: Mqa
(Master Quality Authenticated) MQA is an award-winning British technology that delivers the sound of the original master recording. The master MQA file is fully authenticated and is small enough to stream or download. ‘MQA’ or ‘MQA.’ indicates that the product is decoding and playing an MQA file, and denotes provenance to ensure that the sound is identical to that of the source material.