Table of Contents
Advertisement
Advertisement
Table of Contents

Related Manuals for iBasso Audio DX160


Summary of Contents for iBasso Audio DX160
- Page 1 Audio USER GUIDE http://www.iBasso.com...
- Page 2 Contents Package Components Main Features Specifications Names of Parts & Functions 7-12 Android Basic Features Introduction 13-25 13-14 WiFi Connection/Bluetooth Connection Application (APP) Installation/App, to Uninstall/USB Connections 15-17 System Settings 18-24 Power Off/Reboot iBasso Mango Music Player Application 25-57 Playback Screen (home screen) Music Screen 26-36 Settings Screen...
- Page 3 Package Components Clear TPU DX160 Player protection case Type-C Cable Screen Protector 数字音乐播放器 Quick Start Guide Warranty Card...
- Page 4 Use the Clear TPU protection case the DX160’s chassis from scratches. Screen Protector: Use the screen protector to protect the DX160’s screen from scratches. Warranty Card: The warranty card will be requested at the time of warranty repair. Please retain the warranty card.
- Page 5 Main Features - Dual Cirrus CS43198 DAC Chips. - Bit for Bit Playback With Support up to 32bit/384kHz. - Support of Native DSD up to 256x. - 5.0" IPS Full Screen with On Cell Capacitive Touch Panel. - CNC Aluminum Frame (1080*1920) , With Curved Glass Rear Panel.
- Page 6 - Support for M3U Playlists. - 3200mAh 3.8V Li-Polymer Battery. - 13 Hours Play Time.
- Page 7 Specifications 4.4mm Balanced Output Output Level : 6.4Vrms Frequency Response : 10Hz~40kHz+/-0.15 dB S/N : 130 dB THD+N : 0.00022% (no load) 0.00022% (32Ωload,3Vrms) Crosstalk : -125dB 3.5mm Headphone Out : Output Level : 3.2Vrms Frequency Response : 10Hz~40kHz+/-0.15 dB S/N : 125dB THD+N :...
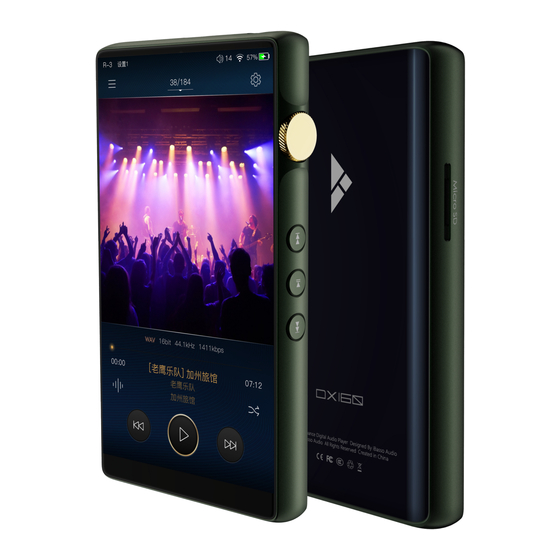
- Page 8 Names of Parts & Functions Type-C Port Micro SD Card Slot Phone Port/Line Out Port/ Balanced Phone Port Coaxial Output Port...
- Page 9 Connect the DX160 to an OTG storage device to play music files. Connect the DX160 to a PC or a Mac computer to work as a USB DAC.
- Page 10 Type-C Power Volume Control Wheel Next/Fast Forward Play/Pause Previous/Rewind Balanced Phone Port 5.0inch LCD Line Out Port/ Phone Port...
- Page 11 Power/System Switching: Short Press - Power the LCD screen on and off. Long Press - To display the pop up window with two options that are Power off and Reboot. Volume Control Wheel: Rotate the wheel upward to increase the volume. Rotate the wheel downward to decrease the volume.
- Page 12 Power on/off: 1. Press and hold the power button to power on. 2. After the DX160 is powered on, a long press of the Power button to display the pop up window, press Power Off button to power off the DX160.
- Page 13 Connecting to a computer to work as a USB DAC: The DX160 can work as a USB DAC for Windows PC, Mac computer, and Linux computer. It is driver free on Mac computer and Linux computer. For Windows PC, one can download the driver from iBasso. com and install it following the steps, before using the USB DAC function.
- Page 14 Android Basic Features Introduction WiFi Connection: ① On the Android desktop, from the top, swipe down the screen to display the notification bar. ② Press the Wireless local area network(WLAN) to turn on the WiFi function. The first time you enter the WLAN, you need to choose the hot spot you will be using and enter the password.
- Page 15 Bluetooth device. At the same time, the DX160 will be visible to the nearby devices. Choose the device that you would like to pair with. After the device has been paired, you can use the DX160 in the Bluetooth mode.
- Page 16 APP Installation: ① APKPure and CoolAPK are pre-installed on the DX160. They are similar to Play Store. ② Launch one of them. ③ Search for the APP that you would like to install. ④ Download the APP and install it.
- Page 17 App, to Uninstall: ① Press the internet browser on the desktop. ② Enter the website address of the APP. ③ Find the download icon on the website and start the download. ④ Return to the desktop and open the download manager.
- Page 18 USB Connections: ① Connect the DX160 to a computer using the furnished type-C cable. ② Swipe down the screen from the topto display the notification bar. ③ Press the USB connection icon to choose the type of USB use. Charging: This only charges the DX160.
- Page 19 System Settings: Press Settings icon on the DX160 desktop to go into system settings.
- Page 20 Audio Settings: Press Settings Icon, then press Audio Settings. ① Gain: One of the two gains can be selected. ② Digital Filter: A total of four filters are available for user setting. These are designed by the chip manufacturer and are included as an option.
- Page 21 Audio Control Button Settings: Press Settings Icon, then press Audio Control Button Settings. ① Audio Control Button: When turned on, audio control buttons enabled after the screen is off. ② Customize Audio Control Button Placement: customize the placement of previous button and next button.
- Page 22 Firmware Update: 1: Press Settings Icon, System, Updater. 2: Select Online Update or Local Update.
- Page 23 Online Update: ① Make sure the DX160 is connected to WiFi. ② After online update is select, press Check Update. ③ Press Download, the DX160 will start downloading the available update package. ④ After the download complete, press Update Now to...
- Page 24 Firmware Version: ① Press Settings icon, System, About DX160. ② Scroll down the page, the Build number is the firmware version.
- Page 25 Power Off, Reboot: ① Long press the power button for 3 seconds. ② There is a pop up window with two options.
- Page 26 Mango Music Player Application iBasso Audio Mango music player is composed of the Playback screen (home screen), Music screen and Settings. When on the playback screen, one can swipe left and right on the Album artwork area ③ to switch a song: Press the icon on the top left corner ①...
- Page 27 Playback Screen (home screen): Equalizer Settings L/R Balance Music screen Track title Artist name Album name Play Mode: Music info Previous/Rewind Next/Fast Forward Play/Pause...
- Page 28 Now Playing Screen: Swipe down from the track number icon ① to display the now playing screen. One can swipe a song to the left to display the Delete button. Press Delete to delete it from this playlist. ① Delete Music Info Screen: Press the Music info icon ②, the album artwork will show the music info.
- Page 29 Music Screen: Directory view ② Search bar ③ Detail view ① Navigation bar Navigation bar ④ management ⑥ Music order Music format Now playing Tracktitle /Artist name Long press ⑤ Playback bar Play/Pause Thumbnail artwork ⑦ Track title and artist name of the song that is playing.
- Page 30 Search Bar: Press the search bar to go into the search page to search the desired music or album. Navigation Bar: One can swipe it left or right to choose: All Music view, Album view, Artist view, Genre view, Now Playing view, or Playlist view.
- Page 31 Long Press Pop-up: Further Options: Long Press of a song will pop up a window with further options that allows to play this song, add this song to a playlist, or delete this song.
- Page 32 Album View: Thumbnail view Artwork view Artist View: Thumbnail view Artwork view...
- Page 33 Playlist View: New Playlist: Press the New Playlist to create a playlist. On the pop-up window, one can name the playlist and add playlist description. Further Options: A long press of the playlist will pop up a window with further options, which allows renaming the playlist, exporting the playlist, or deletion of the playlist.
- Page 34 Navigation Bar Management Screen: Press the icon located on the right side of the navigation bar to go into the navigation bar management and music sorting screen.
- Page 35 Navigation Bar Management: One can customize the navigation bar. When selected, the icon is highlighted. Press the icon again to unselect. The selected icon will be shown on the navigation bar. Otherwise, it will not be shown. All Music View Sorting: One can sort the all music view by title, album, artist, added time, or folder.
- Page 36 Directory View: Press the Directory View icon① to go into directory view. ① ② ④ ③ Press the Directory View icon① to go into directory view. One can browse the music files under internal storage and SD card via folder structure. Press Internal Storage②...
- Page 37 Search Screen: Input the keywords to search a track, an album, or an artist.
- Page 38 Settings Screen: Press the Settings icon to go into settings screen. Gapless: One can enable the gapless to eliminate the gap between two tracks. Gain: There are two gain settings. The low gain has the lowest noise floor, it is good for ultra sensitive IEMs.
- Page 39 Play Mode: One can choose the desired play mode here. L/R Balance: Press to go into the L/R balance setting page. Digital Filter: There are four filters, press the number to quickly choose a filter. Advanced: To access to more system settings.
- Page 40 After a full media scan, or rescan the library, you can go to Directory and select a song under a folder. After this folder is played, the DX160 will play the next folder.
- Page 41 Equalizer: The DX160 has two types of Equalizer, Graphic EQ and Parametric EQ.
- Page 42 Graphic Equalizer: Press the button of the Graphic Equalizer to enable the Graphic Equalizer. Pre-set EQ: There are 5 kinds of pre-set EQ and a custom option. One can quickly set the equalizer as desired by selecting them. How to Adjust The EQ Settings: Press on the response curve, the 10 band slide bars will show up.
- Page 43 Parametric Equalizer: Press the button of the Parametric Equalizer to enable the it. Parametric Equalizer: Press the button of the Parametric Equalizer to enable the it. How to Go Into The Parametric EQ Setting Screen: Press the response curve to go into the parametric EQ setting screen.
- Page 44 Parametric Equalizer Setting Screen: ① ② ③ ④ ⑤ ⑥ ⑦ ① Settings on the Selection Bar: One can swipe left and right to select a setting.
- Page 45 ② Filter Navigation Bar: There are maximum of 6 filters allowed for each setting. One can swipe left and right to select a filter, then customize it. ③ Status: Status of each filter. One can turn on or turn off the selected filter.
- Page 46 Parametric Equalizer Setting Instruction: Central Frequency (Fc): The central frequency of each filter setting. Gain: The gain for the central frequency. Quality Factor: The range of effect of the filter. As shown on the pictures below, the larger value of the Q factor, the smaller the effect compared the central frequency.
- Page 47 2. High Pass Filter The frequency smaller than the central frequency will be affected. Gain setting is ineffective with high pass filter. 2 3 4 5 6 20 30 100 200 4 5 6 7 8 9 10 30 40 50 200 300 ③.
- Page 48 4. Band Filter There is not a large effect on the central frequency. The frequency beside the central frequency has similar effect. Gain setting is ineffective with band filter. 2 3 4 5 6 20 30 100 200 4 5 6 7 8 9 10 30 40 50 200 300 ⑥.
- Page 49 6. Notch Filter The central frequency has obvious reduction. The frequency beside the central frequency has similar effect. Gain setting is ineffective with notch filter. 2 3 4 5 6 20 30 100 200 4 5 6 7 8 9 10 30 40 50 ⑩.
- Page 50 8. Low Shelf Filter There is a wide effect on the frequency that is lower than the central frequency. 2 3 4 5 6 20 30 100 200 4 5 6 7 8 9 10 30 40 50 200 300 ⑭.
- Page 51 L/R Balance: Slide clockwise to decrease the volume in right channel. Slide in counterclockwise to decrease the volume in left channel.
- Page 52 Digital Filter: Digital Filter: There are four digital filters available. Press a digital filter to unfold the figure.
- Page 53 Advanced To access more system settings.
- Page 54 USB DAC: The DX160 can work as a USB DAC for Windows PC, Mac computer, and Linux computer. It is driver free on a Mac computer and Linux computer. For Windows PC, one can download the driver from iBasso.com and install it following the steps included with the download, before using the USB DAC function.
- Page 55 ” as the audio output device. Then one can play music on the computer and listen it via the DX160, which will use the DX160's DAC and amplifier. Or you can use the line out of the DX160 into any amp of choice.
- Page 56 Sleep Timer: Set the count down sleep timer to power off the DX160. The left hand side is the value of hours. The right hand is the value of minutes. The DX160 will be powered off after the counter has completed. If there are any operations in the meanwhile, the DX160 will start the counter again after the last operation.
- Page 57 Scanning: Select the scan locations and the press start to perform a complete media scanning. One can use this feature to rebuild the music library.
- Page 58 System Info: One can see the firmware version on this screen. Also, one can see the space available of the internal memory and SD card.
- Page 59 MQA (Master Quality Authenticated) DX160 includes MQA technology, which enables you to play back MQA audio files and streams, delivering the sound of the original master recording. ‘MQA’ or ‘MQA.’ indicates that the product is decoding and playing an MQA stream or file, and denotes provenance to ensure that the sound is identical to that of the source material.