
Related Manuals for Yamaha Revolabs FLX2


Summary of Contents for Yamaha Revolabs FLX2
- Page 1 Revolabs FLX2 Wireless Conference System for analog phone lines System Guide Models: 10-FLX2-200-POTS 10-FLX2-020-POTS 10-FLX2-002-POTS 10-FLX2-101-POTS 10-FLX2-200-DUAL-POTS...
- Page 2 © YAMAHA UNIFIED COMMUNICATIONS INC. All rights reserved. No part of this document may be reproduced in any form or by any means without express written permission from Yamaha Unified Communications, Inc. Product specifications are subject to change without notice.
-
Page 3: Important Information
PC, mobile device, and video conferencing system. The Revolabs FLX2 Conferencing Phone allows enhanced freedom for telephone and video conferences by allowing independent locations of the microphones and the speaker used during the call. -
Page 4: Safety Warnings
Safety Warnings • Do not expose any of the FLX2 components to water, moisture, or high humidity. • Do not expose any of the FLX2 components to extreme high or low temperatures. • Do not expose any of the FLX2 components to lit candles, cigarettes, cigars, or to open flames, etc. -
Page 5: Table Of Contents
Contents Important Information ........................3 Analog Telephone ..........................3 Introduction ............................3 Safety Warnings ............................. 4 Contents ..............................5 General Information ..........................7 Quick setup for Telephone Conference Calls ................8 Description ............................11 Unpacking ................................. 11 Installing FLX2 Components ......................12 FLX2 Base Station ............................ - Page 6 Contacts ................................35 Audio Control ..............................38 Device Status ..............................40 System Information ............................40 Bluetooth ................................41 Home .................................. 41 Call ..................................41 Setup ................................... 41 Power On/Off the System Components ..................49 Battery Exchange ..........................51 ................................... 52 Connecting using AUX IN / AUX OUT ....................
-
Page 7: General Information
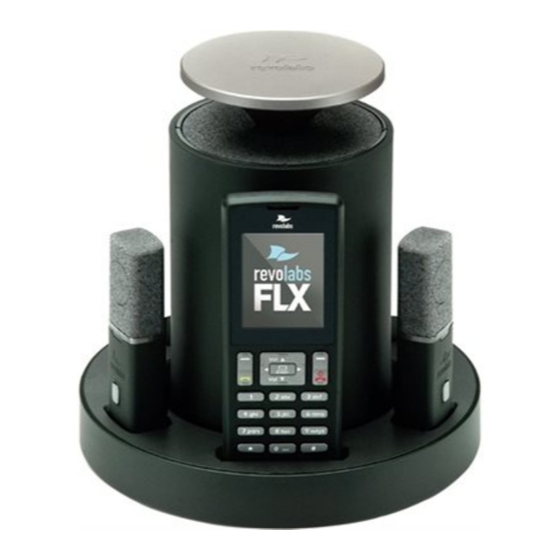
General Information The Revolabs FLX2 Conference Phone includes several components which, in the sum, make up the conferencing phone. The components are the Charger Base, Speaker, Microphones, and Dialer (handset). In addition, the Base Station receives the wireless signals from those components and... -
Page 8: Quick Setup For Telephone Conference Calls
Speaker, the Microphones, and the Dialer for at least 8 hours or overnight before configuring and using the system. Please note that the Revolabs FLX2 Conference Phone comes with two different power supplies. Please ensure that you are using the correct power supply when connecting the Base Station and the Charger Base. - Page 9 FLX for the requirements of that country or region. If your country or region is not in the list, please contact Revolabs support. uc-support@music.yamaha.com Lastly, the system will ask for date and time settings. Please enter the current time and date.
- Page 10 pressing the button on the microphone while it is in the charger. The microphone will start in a muted state. Once it starts blinking red, unmute it by pressing the mute button once again. Microphones in the charger base never transmit audio to the AUX OUT connector.
-
Page 11: Description
Description The Revolabs FLX2™ Wireless Conference Phone is a unique marriage of innovative technology and ergonomic design, allowing for an unparalleled experience when making telephone calls, video conference calls, or using it with your Bluetooth enabled cell phone or computer to make speaker phone calls. -
Page 12: Installing Flx2 Components
Installing FLX2 Components The Revolabs FLX2 System is comprised of several components that work together to provide you with a great wireless conferencing system. These components must be setup correctly for optimal performance of the system. FLX2 Base Station The Base Station is the wireless receiver and sender of the audio stream from the Microphones and to the Speaker, as well as to the Dialer. -
Page 13: Flx2 Charger Base
FLX2 Charger Base The FLX2 Charger Base, shown below, provides charging capabilities for all battery operated system components, including the Dialer, the Speaker, and the Microphones, by allowing them to charge in one simple and organized location. The FLX2 Charger Base is not required while in a conference call, however it can maintain the charge of the FLX Speaker and FLX Dialer while a call is in progress. -
Page 14: Flx Dialer
FLX Dialer The FLX Dialer equips the user with an intuitive and interactive tool for configuring and operating the FLX System. The Dialer is not only used to make and answer conference calls, but it is also used for configuring the system settings, having a call using the handset, and monitoring the system components. -
Page 15: Flx Speaker
FLX Speaker The FLX Speaker, shown below, is a wireless active omnidirectional speaker that has been designed and optimized specifically for use with the FLX Conferencing System. The Speaker is equipped with a pairing button on the bottom and 4 LED indicators on the top to display the activity of the Speaker and the mute status of the system. -
Page 16: Flx Microphones
FLX Microphones The FLX Microphones provide a sleek and unobtrusive form factor allowing for closer proximity to the participants and creating the best audio available to the far end. They are equipped with a button for pairing and muting, an LED indicator to display mute status and battery charge level, and an internal buzzer to warn if the Microphones have lost connection to the Base Station. -
Page 17: Initial Setup
Initial Setup After unpacking the FLX2 Conferencing System, there are a few initial setup tasks that must be performed before a call can take place or any system configuration can be changed. Connecting System Cables The FLX2 Base Station and Charger Base each have a power supply that need to be connected, as shown below. -
Page 18: Managing A Call
Once the language is selected, the FLX2 will ask for the country / region in which the system is being used. Select the country or region from the list. If no country matches your location, contact Revolabs support for more information. - Page 19 Microphones in the Charger Base has to be activated manually by pressing the Microphone button before switching from the handset call to a speaker call. Telephone Call The FLX2 Conference Phone allows making conference calls using an analog telephone connection. A telephone call can be made using either ‘speaker mode’ or ‘handset mode’.
-
Page 20: Flx Home Screen
FLX Home Screen Whenever the FLX is not in a call, the FLX Dialer will show the FLX Home Screen. The Top of the home screen shows several symbols, indicating the current status of the FLX components. From left to right they are an indicators for each of the possible Speakers, one symbol for each of the mics, and a charging indicator for the handset itself. -
Page 21: Placing A Telephone Call
From the home screen a call can be started by dialing a number, The Home screen also provides information on new voice mails for the extension (if available), and on missed or rejected calls. Placing a Telephone Call 1. From the home screen on the FLX Dialer enter the phone number to be called. -
Page 22: Answering An Incoming Telephone Call
Answering an Incoming Telephone Call 1. When the FLX2 System identifies an incoming call, it will play the ring tone through the FLX Speaker. If the Dialer is not in the Charger Base it will play a ring tone, too. 2. -
Page 23: Ending A Telephone Call
Ending a Telephone call 1. A call can be ended in two fashions. a. Press the Red ‘End Call’ button on the FLX Dialer during a call. b. Place the Dialer in the charger. (‘Handset mode’ only) 2. When a call is ended the FLX Dialer will display the phone number and the call duration for 2 seconds. - Page 24 number and Caller ID. NOTE: An incoming Bluetooth call might display caller ID information as well. Muting a Call 1. In handset mode, the ‘Mute’ and ‘UnMute’ key will mute/unmute the FLX Dialer microphone, not the wireless Microphones. 2. In speaker mode, the ‘Mute’ and ‘UnMute’ key will mute/unmute all wireless Microphones.
-
Page 25: Charging Components During A Call
4. After the second call has been established, merge the two calls by pressing the green ‘Call’ button again. Call Waiting 1. While a call is active and the FLX2 System receives a second call, the Speaker or Dialer will play the call waiting indication tone. -
Page 26: Bluetooth
during a speaker call, all Microphones will switch off and the call will automatically switch to handset mode. To return to a speaker call a Microphone will need to be manually switched on by pressing the mute button, and then unmuted by pressing the button again. - Page 27 Device List To see the list of Bluetooth devices the FLX has been connected to, go to Menu Bluetooth and select ‘Device List’. Adding a Device 1. Go to the Menu Bluetooth. Select ‘Discovery Mode’ to activate Bluetooth and accept Bluetooth Request from other devices.
- Page 28 Viewing Device Details 1. Go to the Menu Bluetooth. Select ‘Device List’. 2. Select desired device and press the ‘Enter’ key or the ‘Select’ key to view device details 3. Device Information screen is shown with device name, address, BT version, and date/time the device was first connected.
-
Page 29: Making A Call Via Bluetooth
Setting Device Trust Level 1. Go to the Menu Bluetooth. Select ‘Device List’. 2. Select the desired device and press the ‘Enter’ key or the ‘Select’ key to view the device details. 3. Press the ‘Option’ key and then select ‘Options…’. 4. -
Page 30: Video Conference Collaboration
Video Conference Collaboration The FLX2 System is equipped with balanced analog audio input and output to be connected to 3 party video or PC conferencing system. This allows the FLX Microphones and Speaker to be used as Microphones and Speaker for the video call. It also provides Acoustic Echo Cancelation and Noise Control to the video call. -
Page 31: Mixing The Audio Signals
Mixing the audio signals As discussed earlier, Audio and Video, or Bluetooth and Video calls can be made simultaneously from a FLX system, requiring FLX to mix the audio of the different inputs to go to the different outputs. In the Audio Controls menu, available from the main menu and the Active Call Menu, the Audio Mixer menu is offered. -
Page 32: Flx2 System Configuration
FLX2 System Configuration There are many features to the FLX2 System that can be modified and configured using the FLX Dialer. The following is a list of those features and their options. Menu Hierarchy Device Audio System Recent Bluetooth Home Call Contacts Setup... -
Page 33: Recent Calls
Recent Calls The Recent Calls call log stores the contact information from calls placed or received, allowing the user to review recent calls, redial a recent call, or store a recent call in the system directory. Recent Call Log 1. Access recent call log by browsing: Menu Recent Calls 2. - Page 34 View Recent Call Information 1. Access the recent call log by browsing: Menu Recent Calls or pressing the green ‘Call’ button while no call is in progress. 2. You can view a recent call one of two ways: a. In the recent call list, select the entry you want to view, and press the ‘View’...
-
Page 35: Contacts
Delete Call History 1. Access the recent call log by browsing: Menu Recent Calls or pressing the green ‘Call’ button while no call is in progress. 2. In the Recent Call menu, press ‘Enter’ to open the Options Menu. 3. - Page 36 the contact list. Edit a Contact 1. Browse to the Contacts menu: Menu Contacts, scroll to the desired contact, and select ‘View’ to access the contact. 2. The contact screen shows the current name and number. Pressing the ‘Edit’ key will open the Edit Contact menu.
- Page 37 Search for Contact 1. Browse to the Contacts menu: Menu Contacts. 2. Use the keys to apply a filter alphanumeric a. Once a key is pressed the title line will read ’Contact()’ and display the characters being typed. b. The search string can be up to 5 characters long.
-
Page 38: Audio Control
Set Speed Dial 1. Browse to the Contacts menu: Menu Contacts, scroll to the desired contact, and selects the ‘View’ key to access the contact. 2. The contact view screen shows the current name and number. Pressing the ’Edit’ key will open the Edit Contact menu. - Page 39 Ringer 1. Browse to the Ringer menu: Menu Audio Controls Ringer. 2. Choose ‘Ringer Volume’ in the Ringer Settings menu to adjust the Ringer Volume. 3. Press the up and down buttons to increase and decrease the volume. 4.
-
Page 40: Device Status
Device Status 1. Browse to Device Status: Menu Device Status. 2. The Device Status screen shows status for the Microphones and the Speaker. NOTE: The device status list is colorized. If a device is charging or off, it will appear white. If a device is fully charged or has more than 50% battery remaining, it will appear green. -
Page 41: Bluetooth
Bluetooth The ‘Bluetooth’ menu has been explained earlier in this manual on page 26. Home When selecting the ‘Home’ menu item, the Dialer will go back to displaying the home screen. The same effect can be achieved by pressing the ‘Return’ key, or the red ‘End Call’... - Page 42 Date/Time 1. Browse to the Date/Time menu: Menu Setup Set Date/Time. 2. To set the date or time, highlight either the ‘Set Date’, or ‘Set Time’ option, and press either ‘Enter’ or ‘Select’. 3. Edit time and date (month/day/year) using the numeric keys and the left and right buttons.
- Page 43 Advanced Audio Browse to Advanced Audio menu: Menu Setup Advanced Setup Advanced Audio. Mic Audio The ‘Mic Audio’ allows controlling the Microphones. 1. If ‘All Mic Mute’ is ON, all active Microphones are affected when a mute button is pressed. If one or more active Microphones are outside the Charger Base, pressing the mute button will change the mute status on all Microphones...
- Page 44 Aux Audio ‘Aux Audio’ is to control the AUX In and AUX Out connections on the base. Aux In ON/OFF and Aux Out ON/OFF allow enabling / disabling the Aux connectors of the FLX phone. Aux In Level allows changing the level of the Aux In signal.
- Page 45 Admin Settings The Admin Settings menu allows changing settings that are related to general system settings. Setting System Name 1. Go to Menu Setup Advanced Setup Admin Settings Set System Name. 2. Change the current System Name to the new name, and press Enter.
- Page 46 Recent Calls ON / OFF The Recent Calls option allows you to enable or disable logging of the recent calls. If you switch Recent Calls OFF the list of the recent calls will be erased and no future information on recent calls will be kept in the system. Pairing All FLX2 wireless components are paired before the system is shipped, providing much of the system setup already...
- Page 47 3. On the Dialer, browse to the Pairing menu: Menu Setup Advanced Setup Pairing. 4. Select SPK 1 (Speaker 1) and press the ‘Enter’ or ‘Pair’ key to enter pairing state. 5. The screen will display ‘Pairing Speaker 1’. 6.
- Page 48 Phone Settings 1. Browse to the Phone Settings menu: Menu Setup Advanced Setup Phone Settings. a. You can change the dialing method by selecting the entry, and then pressing the ‘Select’ key. The factory preset is TONE. b.
-
Page 49: Power On/Off The System Components
NOTE: We recommend changing the Region setting only after previous consultation with Yamaha Unified Communications Customer Support Support. Power On/Off the System Components During normal use and operation of the FLX2 System, there is no need to turn off any part of the system. - Page 50 Dialer On/Off To power off the FLX Dialer, hold down the red ‘end call’ soft key until the device asks whether you want to shut it down. Confirm this by pressing ‘Yes’. To turn the Dialer back on, either: 1. Hold down the red ‘end call’ soft key until the Dialer powers on. 2.
-
Page 51: Battery Exchange
Dispose of batteries in accordance with manufacturer’s instructions and local regulations. Replace batteries only with approved batteries! Please contact Yamaha Unified Communications, Inc. (uc.yamaha.com) or your AV service provider for correct manufacturer approved and recommended replacement type batteries. Microphones To exchange a microphone battery push the bottom part of the back cover slightly down towards the charger port and then lift it as shown in the illustration below. - Page 52 Dialer The battery in the dialer can be exchanged after the dialer’s back was opened. The back of the dialer opens if pressure is applied, pushing it back away from the charger port and lift it, as shown in the picture. Take the current battery out of the handset as shown, and replace it with the new battery.
-
Page 53: Connecting Using Aux In / Aux Out
The following table shows the different cables required to connect the FLX to common Connecting using AUX IN / AUX OUT videoconferencing codecs in the market. FLX OUT Brand Codec Connects FLX IN Level Cable Connects TO: Cable Lifesize Mic Input 07-35MUTO35MU-01 Line Output 07-35MUTO35MS-01... - Page 54 Tandberg 3000 MXP Mic Input 07-35MBTOXLR-01 Line Output 07-35MUTODRCA-01 Tandberg 6000 MXP Mic Input 07-35MBTOXLR-01 Line Output 07-35MUTODRCA-01 USB Audio PC Audio Mic Input Line 07-35MUTO35MU-01 Line Output 07-35MUTO35MS-01 Adapter Sony XG-80 Mic Input 07-35MUTO35MU-01 Line Output 07-35MUTODRCA-01 Sony PCS-G70 Mic Input 07-35MUTO35MU-01 Line Output...
-
Page 55: Troubleshooting
Troubleshooting Warning Messages Speaker / Microphone Link Lost If a FLX Microphone or FLX Speaker loses connection to the FLX2 Base Station, the LED indicator will begin flashing a sequence of red – yellow - green - yellow and start emitting a beeping notification. -
Page 56: Microphone, Speaker, Or Dialer Not Paired With Base Station
the Base Station. All components should automatically connect to the Base Station after a few seconds. 2. The Base Station is powered up, but the Status LED indicates a fault has happened by missing every fifth green double flash. Power down and power up the Base Station. -
Page 57: Led Indicators
LED Indicators Device LED Indicator Status Microphone in Charger Base Steady Red Charging Steady Green Fully charged Active phone call, both microphones in Charger Single red flash Base, microphones muted via Master Mute or All Mic Mute is ON Active phone call, microphone(s) in Charger Base, Double red flash microphone is muted. - Page 58 Device LED Indicator Status Microphones are muted. o Connected, battery charging, no phone call in progress, Microphone(s) outside of Charger Base, “All Mic Mute” is ON, all Microphones are muted. o Connected, battery fully charged, no phone call in progress, Microphones in Charger Base o Connected, battery fully charged, phone call in progress, Microphones are not muted using All Green flash every second...
-
Page 59: Reset To Factory Defaults
Device LED Indicator Status Green The speaker will try to re-establish the link for about 10 minutes, then power off. Speaker is not paired to a Base Station Alternating slow Red - Green flash The speaker will power down after two minutes. o Speaker is being powered down Steady Red o Speaker is in pairing mode. -
Page 60: Technical Specifications
Technical Specifications Models The Revolabs FLX2 System is available with a variety of configurations to provide the best audio capture in the industry. The following is a list of the available models. All of these models work with analog telephone lines. - Page 61 reduced for telephone calls based on the bandwidth supported by the phone transport. Battery life (talk time) 8 hours Charge time 2 hours Base Station Power 5V 1A Dimensions Base Station 180 x 153 x 32mm Weight 302g Connections Telephone RJ11 2 Mini-USB connectors AUX IN / AUX OUT...
-
Page 62: Regulatory Information
Regulatory Information FCC Notice to Users This device complies with Part 15 of the FCC Rules. Operation is subject to the following two conditions: (1) this device may not cause harmful interference, and (2) this device must accept any interference received, including interference that may cause undesired operation. Users are not permitted to make changes or modify the equipment in any way. -
Page 63: Industry Canada Notice To Users
Industry Canada Notice to Users This Class B digital apparatus complies with Canadian ICES-003. Operation is subject to the following two conditions: (1) This device may not cause interference and (2) This device must accept any interference, including interference that may cause undesired operation of the device Model Number Industry Canada Identification... -
Page 64: Restricted Use With Certain Medical Devices
Notice to Customers in Australia • Do not use the areas where there are explosive hazards • Do not use in environments where there is a danger of ignition of flammable gasses. Restricted use with certain medical devices Hearing Aids Some devices may interfere with some hearing aids. - Page 65 Notice to European Customers Yamaha UC EMEA 190, High Street, Tonbridge, Kent, TN9 1BE, Declare that for the hereinafter mentioned product model numbers, the presumption of conformity with the applicable essential requirements has been approved in accordance with Council Directive 1999/5/EC “Radio and Telecommunications Terminal Equipment” and RoHS II...
- Page 66 If trouble is experienced with this equipment, Model 10-FLX2BASE-POTS, for repair or warranty information, please contact Yamaha Unified Communications Customer Service at 1-800-326-1088 or on the web at uc-support@music.yamaha.com. If the equipment is causing harm to the telephone network, the telephone company may request that you disconnect the equipment until the problem is resolved.
-
Page 67: Limited Warranty And Limitation Of Liability
The product must contain all of the original one year from the date of purchase from Yamaha Unified accessories and be properly packaged. Products returned to Communications or its authorized reseller provided the... - Page 68 TO THE FULL EXTENT ALLOWED BY LAW, YAMAHA UNIFIED COMMUNICATIONS EXCLUDES FOR ITSELF AND 1TS SUPPLIERS ANY LIABILITY, WHETHER BASED IN CONTRACT OR TORT (INCLUDING NEGLIGENCE), FOR INCIDENTAL, CONSEQUENTIAL, INDIRECT, SPECIAL, OR PUNITIVE DAMAGES OF ANY KIND, OR FOR LOSS OF...
-
Page 69: Gpl Licensed Software
GPL LICENSED SOFTWARE The following GPL licensed software is used in this product and is subject to the GNU General Public License version 2 (GPLv2) License Agreements included as part of this documentation: uClinux 2.6.26 BusyBox 1.2.2 Source code for this software can be obtained by contacting Revolabs at support@revolabs.com. - Page 70 Finally, any free program is threatened constantly by software patents. We wish to avoid the danger that redistributors of a free program will individually obtain patent licenses, in effect making the program proprietary. To prevent this, we have made it clear that any patent must be licensed for everyone's free use or not licensed at all.
- Page 71 itself is interactive but does not normally print such an announcement, your work based on the Program is not required to print an announcement.) These requirements apply to the modified work as a whole. If identifiable sections of that work are not derived from the Program, and can be reasonably considered independent and separate works in themselves, then this License, and its terms, do not apply to those sections when you distribute them as separate works.
- Page 72 If distribution of executable or object code is made by offering access to copy from a designated place, then offering equivalent access to copy the source code from the same place counts as distribution of the source code, even though third parties are not compelled to copy the source along with the object code.
- Page 73 consistent application of that system; it is up to the author/donor to decide if he or she is willing to distribute software through any other system and a licensee cannot impose that choice. This section is intended to make thoroughly clear what is believed to be a consequence of the rest of this License.
-
Page 74: Technical Support
ADVISED OF THE POSSIBILITY OF SUCH DAMAGES. Technical Support If you are experiencing technical problems or if you have questions about the operation, configuration or troubleshooting of any Revolabs product, please email uc-support@music.yamaha.com or call 1-800-326-1088 MN-FLX2-POTS-USER-SETUP-GUIDE-20180519-EN Copyright 2018 Yamaha Unified Communications, Inc.