Panasonic FZN1C Operating Instructions Manual
Hide thumbs
Also See for FZN1C:
- Operating instructions manual (29 pages) ,
- Operating instructions manual (28 pages)
Table of Contents
Advertisement
Quick Links
Operating Instructions
Smart Handheld
EB-3901
Operating Instructions
Basic Guide
Tablet Computer
FZ-N1
Model No.
series
Thank you for purchasing a Panasonic product.
For optimum performance and safety, please read these
instructions carefully.
For detailed information about this product, refer to the Reference
Manual, which is available by tapping [Online Manual] in the
product's app list. (Download required.)
Advertisement
Table of Contents

Related Manuals for Panasonic FZN1C


Summary of Contents for Panasonic FZN1C
- Page 1 Tablet Computer FZ-N1 Model No. series Thank you for purchasing a Panasonic product. For optimum performance and safety, please read these instructions carefully. For detailed information about this product, refer to the Reference Manual, which is available by tapping [Online Manual] in the...
-
Page 2: Table Of Contents
Table of Contents Introduction.............. 3 Regulatory information........... 3 Handling cautions ............5 Terms and illustrations in this document ....... 9 Disclaimers ..............10 Getting Started............11 Confirming the included items ........11 Description of parts............12 Opening and closing the interface cover ..... 16 Removing and attaching the battery cover .... -
Page 3: Introduction
Introduction Regulatory information Regulatory information For USA FCC RF exposure information The highest SAR value for this product as reported to the FCC when tested for use at the ear is listed below: FCC ID Highest value (W/kg) 0.19 ACJFZN1C And when worn on the body, is listed below: FCC ID Highest value (W/kg) - Page 4 The highest SAR value for this product as reported to the IC when tested for use at the ear is listed below: Highest value (W/kg) 0.19 216A-FZN1C And when worn on the body, is listed below: Highest value (W/kg) 1.17 216A-FZN1C Information sur l’exposition aux radiofréquences (RF)
-
Page 5: Handling Cautions
Handling cautions Handling cautions General use • Operating environment Temperature: Operation: -10 °C to 50 °C {14 °F to 122 °F} (IEC60068-2-1, 2) Storage: -30 °C to 70 °C {-22 °F to 158 °F} Humidity: Operation: 30 % to 80 % RH (No condensation) Storage: 30 % to 90 % RH (No condensation) Even within the above temperature/humidity ranges, operation for a long time in extreme environments, smoking nearby, or operation... - Page 6 • Do not scratch the rear camera or flash panel. • Do not use the dedicated stylus when dust or dirt (e.g., oil) is on the screen. Otherwise foreign particles on the screen/dedicated stylus may scratch the screen surface or obstruct operation of the dedicated stylus.
- Page 7 Protecting your data • To prevent accidental loss of data, we recommend that you back up any important data that you store in the product and SD card. • To prevent the unintended disclosure of private information, always confirm the destination before sending messages, file attachments, or any other communications, such as email.
- Page 8 • If the product is wet, wipe off the moisture before connecting with peripheral devices. • Do not dry the product with an appliance or heat source such as a microwave oven or dryer. • Accessories Do not use in the rain or in very humid places such as bathrooms because the accessories are not waterproof/dustproof.
-
Page 9: Terms And Illustrations In This Document
Make sure that you use the specified battery. Terms and illustrations in this document Terms and illustrations in this document • Panasonic Corporation and/or its affiliates are referred to collectively as “we” or “Panasonic”. • This product supports microSD, microSDHC, and microSDXC memory cards. -
Page 10: Disclaimers
Disclaimers Disclaimers Panasonic shall not be liable for loss of data or other incidental or consequential damages resulting from the use of this product. This product can download, store, forward, and receive additional content, such as applications, ringtones, contact information, and media files. -
Page 11: Getting Started
Getting Started Confirming the included items Confirming the included items If any items are missing, please contact your technical support representative. – Main unit ×1 – Battery (Model number FZ-VZSUN110U) ×1 – Operating Instructions - Read Me First ×1 Getting Started... -
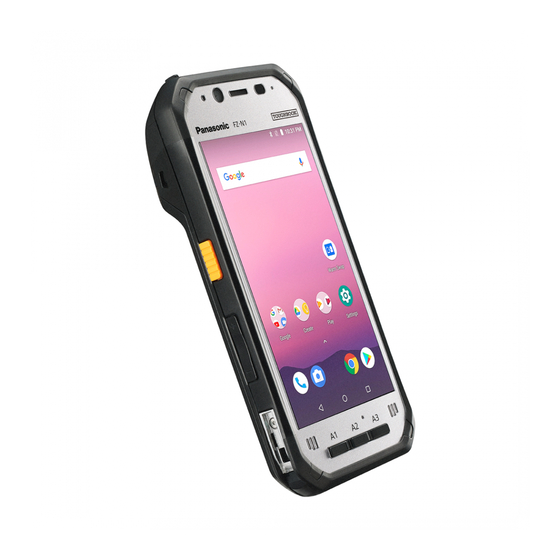
Page 12: Description Of Parts
Description of parts Description of parts Front view A Indicator Orange, lit: Battery is charging Green, lit: Battery charging is complete Red, lit: Battery level is less than 15 % of a full charge B Front camera C Earpiece... - Page 13 D Ambient light sensor, proximity sensor The ambient light sensor automatically adjusts the screen brightness. The proximity sensor prevents accidental operations on the touch panel during phone calls. E NFC antenna (internal) When using an NFC card or other NFC device, touch the card/ device to this area of the unit.
- Page 14 Rear view A Microphone B Rear camera C Fingerprint sensor D Battery cover E Battery lock lever F GPS antenna (internal) G Flash Can be used when taking pictures. H Strap attachment hole I Wi-Fi, Bluetooth antenna (internal) J Side button (page 27) K Volume buttons...
- Page 15 L Cradle rail Used when connecting the unit to an optional cradle, etc. M Expansion bus connector Used when connecting an optional cradle, etc. or for other future expansion options. Opening and closing the headset jack cover Pull back at the protrusion of the headset jack cover with your fingertip.
-
Page 16: Opening And Closing The Interface Cover
Opening and closing the interface cover Opening and closing the interface cover Opening the interface cover Slide in the direction of the 2. Pull back the cover and arrow at the protrusion rotate it downward. (circled in the illustration above) with your fingertip. Closing the interface cover Rotate the cover upward 2. -
Page 17: Removing And Attaching The Battery Cover
IMPORTANT • Observe the following to ensure the waterproof and dustproof performance of the unit. – Make sure the interface cover is securely closed and locked when the micro USB port is not being used. – When closing the interface cover, make sure there is no debris lodged in the gasket that seals the cover. - Page 18 2. Slide the battery cover by firmly placing your hands as shown in the illustration. • When removing the battery cover, be careful so that you do not drop the battery. Attaching the battery cover 1. Place the battery cover on the unit as shown in the illustration. •...
- Page 19 2. Slide the battery cover by firmly placing your hands as shown in the illustration until you hear a click. 3. Lock the cover by sliding the battery lock lever (circled in the illustration) toward . • Firmly slide until the red area is no longer visible. IMPORTANT •...
-
Page 20: Installing An Sd Card
Installing an SD card Installing an SD card When installing or removing an SD card, place the unit on a flat surface. 1. Remove the battery cover (page 17). • If a battery is installed, remove it (page 23). 2. Slide the microSD card slot in the direction of the arrow (A), and then open it (B). - Page 21 4. Slide the microSD card slot in the direction of the arrow until you hear a click. • To remove a microSD card, follow the same procedure, and then pull out the microSD card at step 3. Getting Started...
-
Page 22: Installing And Removing The Battery
Installing and removing the battery Installing and removing the battery Make sure to turn off the unit before replacing the battery. Installing the battery 1. Remove the battery cover (page 17). 2. Insert the tabs at the battery’s terminal side (A) into the notches of the unit (B), and then lower the battery into place (C). -
Page 23: Replacing The Battery (Battery Warm Swap)
Removing the battery 1. Remove the battery cover (page 17). 2. Lift the battery up using the tab (circled in the illustration) (A), then remove it (B). IMPORTANT • Do not remove the battery while the unit is wet. When the unit is wet, remove the water by wiping off the water droplets and thoroughly drying the unit before removing the battery. -
Page 24: Charging The Battery
Charging the battery Charging the battery You can charge the unit by using the optional Charging Cup and the optional adaptor. For more information, refer to the Operating Instructions of the Charging Cup. • Optional accessories Charging Cup: FZ-VCBN11U AC Adaptor: CF-AA6373A 1. -
Page 25: Turning The Unit On And Off
• The unit prevents overcharging of the battery by charging only when the remaining battery level is less than approximately 95 % of its full capacity. • You can also charge the unit by connecting it to the USB port of a computer or other device using a USB connection cable. -
Page 26: Home Screen, Status Bar, And Notifications
Turning the screen on and off 1. Press 2. Swipe up from the bottom of the screen to release the screen lock. • Swiping the bottom-left to the right launches the [Voice Search] app. Swiping the bottom-right to the left launches the [Camera] app. -
Page 27: Navigation And Function Buttons
Using the notifications panel The notifications panel provides detailed information about incoming email messages, app updates, calendar events, etc. You can open the notifications panel by sliding your finger down slowly from the top of the screen toward the center of the screen. To close the notifications panel, slide your finger up slowly from the bottom of the screen toward the center of the screen. -
Page 28: Factory Data Reset
Factory data reset Factory data reset CAUTION • The following procedure resets all settings and erases any data you have stored in the unit. Back up important data before performing this procedure. → [Settings] → [Backup & 1. From the home screen, tap reset]. -
Page 29: Troubleshooting
Troubleshooting If you experience any trouble while using the unit, refer to the information in this section for troubleshooting. See the Reference Manual (tap [Online Manual] in the app list) for additional troubleshooting information. If the problem persists, contact your technical support representative. Starting up The unit does not turn on. - Page 30 Shutting down The unit does not turn off. • It may take one or two minutes for the unit to turn off. This is not a malfunction. • Press and hold (power button) for at least 10 seconds to force the unit to restart, and then try again.
- Page 31 Indicator The indicator flashes in orange. • The battery cannot be charged temporarily because the ambient temperature is too low or too high. Leave the unit in an environment of 10 °C to 35 °C (50 °F to 95 °F) for about an hour. The indicator lights in red.
- Page 32 Other The date and time are incorrect. • Confirm the date and time settings. From the home screen, tap → [Settings] → [Date & time]. • Set the date and time automatically. → [Settings] → [Date & 1. From the home screen, tap time].
-
Page 33: Appendix
Appendix Specifications Specifications Typical unit specifications and certain options are described below. Unit configuration may vary. Model No. FZ-N1 ® Qualcomm MSM8974AB 2.3 GHz Quad Core Memory 2 GB Storage 16 GB Display Internal LCD 4.7 in. HD (1280 × 720 dots), Aspect ratio 16:9 16 777 216 colors Appendix... - Page 34 Wi-Fi Standards supported IEEE 802.11a / IEEE 802.11b / IEEE 802.11g / IEEE 802.11n / IEEE 802.11ac Transmission method OFDM system, DSSS system Wireless channels used IEEE 802.11a / IEEE 802.11n (5 GHz) / IEEE 802.11ac • W52 (36, 38, 40, 42, 44, 46, 48 ch) •...
- Page 35 Bluetooth Version 4.1, Class 1 Transmission method FHSS system Wireless channels used 0 - 78 ch (Low energy: 0 - 39 ch) RF frequency band 2402 MHz - 2480 MHz Supported profile A2DP, AVRCP, HFP, HID, HOGP, HSP, MAP, OPP, PBAP, SPP, GAVDP, GATT Sound Speaker Twin speakers (100 dBA), phone speaker...
- Page 36 microSD card slot ×1 Card slots (microSDXC compatible) USB 2.0 port ×1 , Headset jack ×1, Interfaces Expansion bus connector (lower part of the unit) Touchscreen 10-finger touch (capacitive) with: Glove touch mode Rain sensing touch mode Stylus pen mode (Active type, Passive type) Power supply Battery AC adaptor...
- Page 37 *2 Used to unlock the screen. *3 Operation has been tested and confirmed using the following Panasonic brand memory cards: SD (up to 2 GB), SDHC (up to 32 GB). Compatibility with other SD devices is not guaranteed. *4 Does not guarantee operation of all USB-compatible peripherals.
- Page 38 *13 Do not expose the skin to this product when using the product in a hot or cold environment. When using the product in hot or cold environments, some peripherals may not perform properly. Confirm the recommended operation environment of the peripherals. Using the product continuously in hot environments will shorten the product life.
-
Page 39: Limited Warranty
PSSNA, referred hereafter as “Panasonic” will repair the products listed below with Panasonic approved parts, free of charge in the Global Panasonic approved location for the period specified below from the date of original purchase in the event of a defect in materials or workmanship. - Page 40 Complete unit replacement fulfills the full obligation and is at the discretion of Panasonic and is limited to once during the coverage term. Refer to the Panasonic web site for full terms and conditions on the above programs. Options and Accessories Warranties...
- Page 41 Section 2: Limited Warranty - Software Panasonic warrants to you only that the disk(s) or other media on which the Programs are furnished will be free from defects in material and workmanship under normal use for a period of sixty (60) days from the date of delivery thereof to you, as evidenced by your purchase receipt.
- Page 42 This limited warranty only covers failures due to defects in materials or workmanship which occur during normal use. If a unit is sent to a Panasonic Authorized Service Center and no hardware failure is found, the customer will be billed for labor to correct a software issue or reimage the hard drive plus shipping and applicable administrative fees at the current rates set by the service provider.
- Page 43 This limited warranty gives you specific legal rights, and you may also have other rights which vary from state to state. For technical support or to arrange for service on your Panasonic computer product, call our toll-free hotline at 1-855-PSC-TECH (1-855-772-8324).
-
Page 44: Limited Warranty / Garantie Limitée
For Canada PANASONIC COMPUTER AND PERIPHERALS LIMITED WARRANTY Coverage – Panasonic Canada Inc. (“PCI”) warrants to you, the first end user customer, this computer product (excluding software media), when purchased from PCI or from a PCI authorized reseller, to be free from defects in materials and workmanship under normal use, subject to the terms set forth below, during the period of warranty coverage specified. - Page 45 THIS PRODUCT IS NOT INTENDED FOR USE AS, OR AS PART OF, NUCLEAR EQUIPMENT/SYSTEMS, AIR TRAFFIC CONTROL EQUIPMENT/SYSTEMS, OR AIRCRAFT COCKPIT EQUIPMENT/SYSTEMS . PANASONIC WILL NOT BE RESPONSIBLE FOR ANY LIABILITY RESULTING FROM THE USE OF THIS PRODUCT ARISING OUT OF THE FOREGOING USES.
- Page 46 No Coverage – This limited warranty does not apply if the disk(s) or other media has been used in other than a Panasonic product, or in environmental conditions other than those specified by PCI or the manufacturer, or if subjected to misuse, neglect, mishandling, modification or attempted modification of the program, or if damaged by accident or act of God.
- Page 47 Pour le Canada GARANTIE LIMITÉE – ORDINATEURS ET PÉRIPHÉRIQUES PANASONIC Couverture – Panasonic Canada Inc. (« PCI ») garantit à l’acheteur original que ce produit informatique (à l’exclusion des supports des logiciels) est, au moment de sa vente par PCI ou d’un revendeur agréé par PCI, exempt de défauts de pièces et de fabrication dans les conditions normales d’utilisation, et ce, pendant la période de...
- Page 48 Éléments couverts Durée de Type de couverture couverture • Batterie Un (1) an à partir de Défauts de • Chargeur de batterie la date d’achat pièces et de • Adaptateur secteur et cordon original. fabrication d’alimentation • Adaptateur automobile et cordon d’alimentation •...
- Page 49 GARANTIE LIMITÉE – SUPPORTS DES LOGICIELS Couverture – Panasonic Canada Inc. (« PCI ») garantit à l’acheteur original que le ou les disques ou tout autre support sur lequel le ou les programmes sont fournis sont exempts de défauts de pièces et de fabrication dans des conditions normales...
- Page 50 été utilisés dans un produit d’une marque autre que Panasonic ou dans des conditions environnementales autres que celles spécifiées par PCI ou le fabricant, ou soumis à une mauvaise utilisation, à la négligence, à une manutention inadéquate ou encore si le programme a été...
- Page 51 Appendix...
- Page 52 Two Riverfront Plaza, Newark, NJ 07102, USA Panasonic Canada Inc. 5770 Ambler Drive, Mississauga, Ontario L4W 2T3 © Panasonic Mobile Communications Co., Ltd. 2018 20170245ZAD C0218-0...
- Page 53 Thank you for purchasing a Panasonic product. Maintenance This product is designed for use with the Panasonic FZ-N1J (hereinafter ● Always disconnect the cable before cleaning the product. referred to as “the unit”) (as of January 2018). ● Clean the product with a soft, dry cloth.
- Page 54 Description of parts Specifications <Front view> <Rear view> Dimensions Approx. 141 mm × 35 mm × 88 mm (excluding protrusions) (XX in. × XX in. × XX in.) Weight Approx. 143 g (XX lb) Operating environment -10 °C to 50 °C (14 °F to 122 °F) 30 % to 80 % relative humidity 1 Release levers Releases the lock for the unit attached to this product.