Table of Contents
Advertisement
Quick Links
Advertisement
Table of Contents

Related Manuals for Casio CTK800ES1A


Summary of Contents for Casio CTK800ES1A
- Page 1 USER’S GUIDE GUÍA DEL USUARIO CTK800ES1A...
- Page 2 Changes or modifications not expressly approved by the party responsible for compliance could void the user’s authority to operate the equipment. Model Number: CTK-800 Trade Name: CASIO COMPUTER CO., LTD. Responsible party: CASIO, INC. Address: 570 MT. PLEASANT AVENUE, DOVER, NEW JERSEY 07801...
-
Page 3: Safety Precautions
Safety Precautions Congratulations on your selection of the CASIO electronic musical instrument. • Before using the instrument, be sure to carefully read through the instructions contained in this manual. • Please keep all information for future reference. Symbols Various symbols are used in this user’s guide and on... - Page 4 • Never twist or stretch the cord. • Should the electric cord or plug become damaged, contact your original retailer or authorized CASIO Service Provider. G Never touch the AC adaptor while your hands are wet.
- Page 5 2. If you are using the AC adaptor for power, unplug it from the wall outlet. 3. Contact your original retailer or an authorized CASIO Service Provider. Plastic Bags Never place the plastic bag the product comes in over your head or in your mouth.
- Page 6 Safety Precautions Connectors Connect only the specified devices and equipment to the product’s connectors. Connection of a non-specified device or equipment creates the risk of fire and electric shock. Location Avoid the following locations for this product. Such locations create the risk of fire and electric shock.
-
Page 7: Main Features
❐ Storing and Playing Back Tune Data You Transferred from Your Computer You can connect your keyboard to a computer, use special CASIO conversion software to convert SMF data you purchase or create to CASIO format, and then transfer it to the keyboard. -
Page 8: Table Of Contents
Contents Safety Precautions ... E-1 Main Features ... E-5 General Guide ... E-8 Attaching the Score Stand ... E-9 Quick Reference ... E-11 To play the keyboard ... E-11 Power Supply ... E-13 Using batteries ... E-13 Using the AC Adaptor ... E-14 Auto Power Off ... - Page 9 Auto Accompaniment ... E-31 Selecting a Rhythm ... E-31 Playing a Rhythm ... E-32 Adjusting the Tempo ... E-32 Using Auto Accompaniment ... E-32 Using an Intro Pattern ... E-35 Using a Fill-in Pattern ... E-35 Using a Rhythm Variation ... E-35 Using a Fill-in Pattern with a Variation Rhythm ...
-
Page 10: General Guide
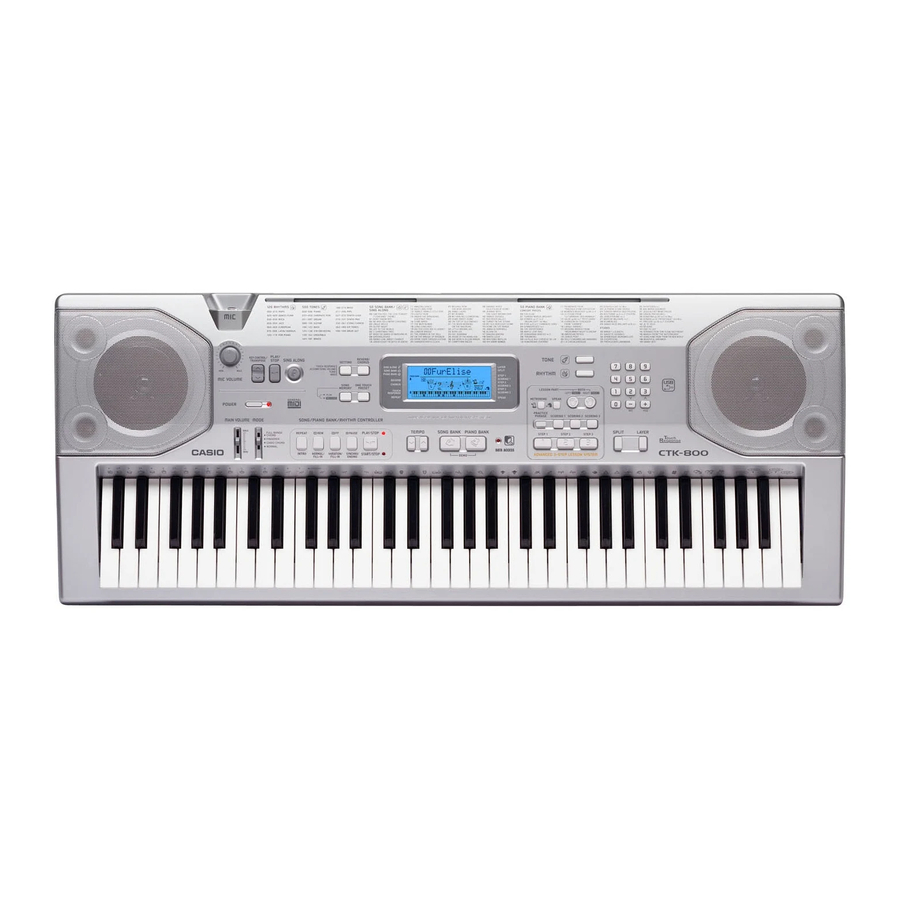
General Guide 706A-E-010A... -
Page 11: Attaching The Score Stand
NOTE • This keyboard has two PLAY/STOP buttons. In this manual, the PLAY/STOP button that is located near the SING ALONG button is indicated as <PLAY/STOP>. 1 MIC jack 2 MIC VOLUME knob 3 POWER button 4 Power indicator 5 KEY CONTROL/TRANSPOSE buttons 6 <PLAY/STOP>... - Page 12 General Guide Rear Panel Controller Indicators Song/Piano Bank controller indicator Pressing the SONG BANK, PIANO BANK, or SING ALONG button, or pressing the SONG BANK and PIANO BANK buttons at the same time to start demo tune play causes the Song/Piano Bank controller indicator to light. This indicates that buttons X through \ are currently functioning as playback control buttons.
-
Page 13: Quick Reference
Quick Reference Power indicator POWER MODE This section provides a quick overview of keyboard operation using steps one and two of the 3-step lesson feature. With the 3-step lesson feature, the on-screen keyboard guide keys light to show the next note of the tune. To play the keyboard Press the POWER button to turn on power. - Page 14 Quick Reference If you selected lesson Step 1 • Play the notes on the keyboard. • Accompaniment (left-hand part) plays in time with the notes. • With Step 1, the correct melody note is played no matter which keyboard key you press. If you selected lesson Step 2 •...
-
Page 15: Power Supply
Power Supply This keyboard can be powered by current from a standard household wall outlet (using the specified AC adaptor) or by batteries. Always make sure you turn the keyboard off whenever you are not using it. Using batteries Always make sure you turn off the keyboard before loading or replacing batteries. -
Page 16: Using The Ac Adaptor
Power Supply Using the AC Adaptor Make sure that you use only the AC adaptor specified for this keyboard. Specified AC Adaptor: AD-5 [Rear Panel] DC 9V jack Note the following important precautions to avoid damage to the power cord. GDuring Use •... -
Page 17: Connections
The wrong type of connector at either end can cause one of the stereo channels to be lost. When connected to a musical instrument amplifier, set the volume of the keyboard to a relatively low level and make output volume adjustments using the amplifier’s controls. -
Page 18: Microphone Jack
Connections Microphone Jack You can connect a commercially available microphone to the microphone jack and sing along with notes played on the keyboard. For details, see “Using a Microphone for Sing Along” on page E-29. Accessories and Options Use only the accessories and options specified for this keyboard. -
Page 19: Basic Operations
Basic Operations SING ALONG POWER MAIN VOLUME This section provides information on performing basic keyboard operations. To play the keyboard Press the POWER button to turn the keyboard on. Set the MODE switch to NORMAL. Use the MAIN VOLUME slider to set the volume to a relatively low level. -
Page 20: Using Tone Effects
Basic Operations Polyphony The term polyphony refers to the maximum number of notes you can play at the same time. The keyboard has 32-note polyphony, which includes the notes you play as well as the rhythms and auto-accompaniment patterns that are played by the keyboard. -
Page 21: Playing A Built-In Tune
Playing a Built-in Tune REPEAT Your keyboard comes with a total of built-in 100 tunes. You can play back built-in tunes for your own listening pleasure, or you can use them for practice and even sing-along. Built- in tunes are divided between the two groups described below. •... -
Page 22: To Play Back A Piano Bank Tune
Playing a Built-in Tune To play back a Piano Bank tune Find the tune you want to play in the PIANO BANK List, and note its number. • See page A-9 for the PIANO BANK List. Press the PIANO BANK button to specify the Piano Bank group. -
Page 23: To Fast Reverse
To fast reverse While a tune is playing or paused, hold down the REW button to skip in a reverse direction at high speed. • The fast reverse operation skips back one measure at a time. • The measure and beat numbers on the display change while the fast reverse operation is being performed. -
Page 24: To Play All Tunes In Succession
Playing a Built-in Tune To play all tunes in succession Press the SONG BANK button and PIANO BANK button at the same time. • Playback starts from Song Bank tune number 00, followed in sequence by Piano Bank tunes. To stop tune play, press the PLAY/STOP button. NOTE •... -
Page 25: Advanced 3-Step Lesson
Advanced 3-Step Lesson With the 3-Step Lesson System, you can practice built-in tunes and SMF data you download over the Internet, and even plot your progress according to the evaluation points the keyboard awards you. * See “Expanding the Selections in the Song Bank Tunes” on page E-48 for information about the SMF data you download over the Internet. -
Page 26: Evaluation Mode
Advanced 3-Step Lesson Evaluation Mode The keyboard’s Evaluation Mode awards points to your performances during Step 1, Step 2, and Step 3 of the 3-Step Lesson. A perfect score is 100. Also, the Evaluation Mode provides comments about your play, both on the monitor screen and by means of a simulated human voice. -
Page 27: Step 1 – Master The Timing
Step 1 – Master the timing. Select the tune you want to use. Press the RIGHT/TRACK 2 button or the LEFT/ TRACK 1 button to specify the part you want to practice. • If you want to practice both hands, press both buttons at the same time. -
Page 28: Step 2 - Master The Notes
Advanced 3-Step Lesson After you finished playing, your evaluation result appears on the display. • For information about evaluation ranks and sound effects, see “Evaluation Results” on page E-24. • The keyboard will tell you where you scored the lowest during your performance, so you can find out where you need the most work. -
Page 29: Using The Phrase Practice Mode
Play the notes as indicated by the on-screen keyboard guide. To stop play at any time, press the PLAY/STOP button. Evaluation 3: Find out how the keyboard evaluates your Step 3 play. Press the SCORING 3 button. • This causes the SCORING 3 indicator to appear on the display. -
Page 30: Using The Metronome
Advanced 3-Step Lesson To turn voice fingering guide on or off Press the SPEAK button to toggle voice fingering guide on (voice fingering guide indicator displayed) and off (indicator not displayed). NOTE • Note that Voice Fingering is disabled in the Evaluation Mode. -
Page 31: Using A Microphone For Sing Along
Using a Microphone for Sing Along MIC jack Connecting a commercially available microphone* to the MIC IN jack makes it possible to sing along with the keyboard’s built-in tunes or with SMF playback. When connecting a microphone, be sure to first adjust the MIC VOLUME to a relatively low setting, and then adjust to the level you want after connecting. - Page 32 Using a Microphone for Sing Along Use the number buttons to input the two-digit song number. Example: To select “ALOHA OE”, which is song number 46, input 4 and then 6. NOTE • The initial power on default tune setting is “00”. •...
-
Page 33: Auto Accompaniment
[+] and decrement it by pressing [–]. • Some rhythms consist of chord accompaniments only, without any drums or other percussion instruments. Such rhythms do not sound unless CASIO CHORD, FINGERED, or FULL RANGE CHORD is selected as the accompaniment mode. -
Page 34: Playing A Rhythm
To use Auto Accompaniment Set the MODE switch to CASIO CHORD, FINGERED, or FULL RANGE CHORD. Press the START/STOP button to start play of the currently selected rhythm. - Page 35 You can change the location of the split point, which also changes the sizes of the keyboard areas. Chord Types CASIO CHORD accompaniment lets you play four types of chords with minimal fingering. Chord Types Major chords Major chord names are marked above the keys of the accompaniment keyboard.
- Page 36 Auto Accompaniment Caug Csus4 Cmaj7 5 *1 C7sus4 Cmadd9 CmM7 See the FINGERED Chord Chart on page A-7 for details on playing chords with other roots. *1: Inverted fingerings cannot be used. The lowest note is the root. *2: The same chord can be played without pressing the 5th NOTE •...
-
Page 37: Using An Intro Pattern
The following procedure describes how to use synchro start. Before starting, you should first select the rhythm you want to use, set the tempo, and use the MODE switch to select the chord play method you want to use (NORMAL, CASIO CHORD, FINGERED, FULL RANGE CHORD). E-35... -
Page 38: Finishing With An Ending Pattern
Auto Accompaniment To use synchro start Press the SYNCHRO/ENDING button to put the keyboard into synchro start standby. Flash Playing a chord and the rhythm pattern starts to play automatically. NOTE • If the MODE switch is set to NORMAL, only the rhythm plays (without a chord) when you play on the accompaniment keyboard. -
Page 39: Song Memory Function
Song Memory Function SONG MEMORY INTRO MODE NORMAL/FILL-IN VARIATION/FILL-IN You can use Song Memory to record your lesson play (lesson recording) and to record your keyboard play along with the Auto Accompaniment you are using (performance recording). Parts and Tracks How data is recorded to Song Memory and the type of data that is recorded depends on whether you are performing a performance recording operation or a lesson recording... -
Page 40: Recording Play Along With A Built-In Tune
Song Memory Function Recorded Data Storage • Anything previously stored in song memory is replaced whenever you make a new recording. • Song Memory contents are retained even when power is turned off, as long as the keyboard is being supplied battery or AC adaptor power. -
Page 41: Playing Back A Lesson Recording
To record as you play along with a built-in tune Press the SONG BANK button or PIANO BANK button to select the mode that includes the tune you want to play along with. Use the SONG MEMORY button to select record standby. - Page 42 Song Memory Function Part/Track Indicators in Playback Standby Each press of a part/track button toggles playback of that track on (part/track indicator displayed) and off (indicator not displayed). Track 1 Playback (displayed) Example: The above indicates that Track 1 will be played back, while Track 2 will not.
-
Page 43: Playing Back A Performance Recording
Track 1 Data In addition to notes played on the keyboard and chord accompaniments, the following data is also stored in Track 1 during performance recording. • Tone number • Rhythm number • INTRO button, SYNCHRO/ENDING button, NORMAL/ FILL-IN button, VARIATION/FILL-IN button operations •... -
Page 44: Overdubbing A Performance Recording
Song Memory Function Overdubbing a Performance Recording You can use the following procedure to record a melody in Track 2 so it combines with a recording you previously made in Track 1. Press the RHYTHM button to enter the rhythm mode. -
Page 45: Keyboard Settings
Keyboard Settings SETTING KEY CONTROL/TRANSPOSE This section describes how to use layer (to play two tones with a single key) and split (to assign different tones to either end of the keyboard), and how to make touch response, transpose, and tuning settings. NOTE •... -
Page 46: Using Layer And Split Together
Keyboard Settings To split the keyboard First select the main tone. Example: To select “139 STRINGS” as the main tone, press the TONE button and then use the number buttons or [+] and [–] buttons to input 1, 3 and then 9. S t r i n Press the SPLIT button. -
Page 47: Transposing The Keyboard
Play something on the keyboard. • Press the LAYER button to unlayer the keyboard, and the SPLIT button to unsplit it. LAYER SPLIT Split Tone (PIZZICATO STRINGS) Layered Split Tone (STRINGS) Layered Tone (FRENCH HORN) Split point Transposing the Keyboard Transpose lets you raise and lower the overall key of the keyboard in semitone units. -
Page 48: Adjusting Accompaniment And Song Bank Volume
• In this case, a song volume screen will appear in place of the accompaniment volume screen. Tuning the Keyboard Use the following procedure to fine tune the keyboard to match the tuning of another musical instrument. To tune the keyboard Press the SETTING button until the tuning screen appears. -
Page 49: Connection To A Computer
MIDI driver user’s guide.* * You need to have Adobe Reader or Acrobat Reader installed on your computer in order to view the contents of the “CASIO USB MIDI Driver User’s Guide” (manual_e.pdf). If your computer does not have either Adobe Reader or Acrobat Reader installed, use the procedure below to install it. -
Page 50: Expanding The Selections In The Song Bank Tunes
CASIO MUSIC SITE Keyboard USB port http://music.casio.com/ • In addition to the software itself, the CASIO MUSIC SITE will also provide you with information about its installation and use. You can also find out about the latest news about your keyboard and other CASIO musical instruments, and much more. -
Page 51: General Midi Tone
NOTE • This keyboard supports SMF 0 and 1 format data. • Voice Fingering Guide, on-screen fingering indicators, voice announcement of evaluation points, and the Practice Phrase function are not supported for SMF data you purchase or create. General MIDI Tone The General MIDI standard defines the tone numbering sequence, the drum sound numbering sequence, the number of MIDI channels that can be used, and other general factors... - Page 52 Connection to a Computer LOCAL CONTROL (Default: On) oFF: Anything played on the keyboard is output as a message from the USB port, without being sounded by the internal sound source. • Note that no sound is produced by the keyboard if LOCAL CONTROL is turned off and no external device is connected.
-
Page 53: Troubleshooting
1. Power supply problem. 2. Power is not turned on. 3. Volume setting is too low. 4. The MODE switch is in the CASIO CHORD or FINGERED position. 5. LOCAL CONTROL is off. Low battery power Accompaniment volume is set to 000. - Page 54 * Multiple digital samples are taken for the low range, middle range, and high range of the original musical instrument. Because of this, there may be a very slight difference in tonal quality and volume between sample ranges. Action Turn on ACCOMP OUT.
-
Page 55: Specifications
500 (362 panel tones + 128 General MIDI tones + 10 drum sets); with layer and split 32 notes maximum (16 for certain tones) Variable (226 steps, = 30 to 255) 3 fingering methods (CASIO CHORD, FINGERED, FULL RANGE CHORD) START/STOP, INTRO, NORMAL/NORMAL FILL-IN, VARIATION/ VARIATION FILL-IN, SYNCHRO/ENDING 0 to 127 (128 steps) Recalls settings for tone, tempo, layer, and split. -
Page 56: Care Of Your Keyboard
Specifications Power Jack: Power Supply: Batteries: Battery Life: AC Adaptor: Auto Power Off: Speaker Output: Power Consumption: Dimensions: Weight: • Design and specifications are subject to change without notice. Care of your keyboard Avoid heat, humidity or direct sunlight. Do not overexpose the instrument to direct sunlight, or place it near an air conditioner, or in any extremely hot place. Do not use near a TV or radio. - Page 57 706A-E-057A...
- Page 58 Appendix/Apéndice 706A-E-113A...
- Page 59 Appendix/Apéndice 706A-E-114A...
- Page 60 Appendix/Apéndice 706A-E-115A...
- Page 61 Appendix/Apéndice 706A-E-116A...
- Page 62 Appendix/Apéndice 706A-E-117A...
-
Page 63: Appendix
Appendix/Apéndice Drum Assignment List/Lista de asignación de batería Key/ Note number STANDARD SET 1 STANDARD SET 2 — — C#-1 — — — — E -1 — — — — — — F#-1 — — — — A -1 — —... - Page 64 Appendix/Apéndice 706A-E-119A...
-
Page 65: Rhythm List
Appendix/Apéndice Rhythm List Lista de ritmos POPS 000 POP 1 001 WORLD POP 002 8 BEAT POP 003 SOUL BALLAD 004 POP SHUFFLE 1 005 8 BEAT DANCE 006 POP BALLAD 1 007 POP BALLAD 2 008 BALLAD 009 FUSION SHUFFLE 010 8 BEAT 1 011 8 BEAT 2 012 8 BEAT... -
Page 66: Song List
Song List/Lista de canciones SONG BANK/SING ALONG List Lista SONG BANK/SING ALONG CAN YOU FEEL THE LOVE TONIGHT (“LION KING” THEME) DON’T KNOW WHY WE WISH YOU A MERRY CHRISTMAS JINGLE BELLS SILENT NIGHT JOY TO THE WORLD O CHRISTMAS TREE WHEN THE SAINTS GO MARCHING IN GREENSLEEVES SWING LOW, SWEET CHARIOT... - Page 67 706A-E-122A...
- Page 68 706A-E-123A...
- Page 69 This recycle mark indicates that the packaging conforms to the environmental protection legislation in Germany. Esta marca de reciclaje indica que el empaquetado se ajusta a la legislación de protección ambiental en Alemania. CASIO COMPUTER CO.,LTD. 6-2, Hon-machi 1-chome MA0505-B Printed in China Shibuya-ku, Tokyo 151-8543, Japan...