
Related Manuals for Bosch rexroth PE 2/X


Summary of Contents for Bosch rexroth PE 2/X
- Page 1 PE 2/X, PE 2/H, PE 4 Positioning unit 3 842 998 324 Assembly instructions Replaces: – 3 842 999 000 3 842 564 350/2020-06 ENGLISH 3 842 998 067...
- Page 2 Our products are subject to natural wear and aging. © All rights reserved by Bosch Rexroth AG, including for the registration of industrial property rights. This document may not be reproduced or distributed to third parties without our consent.
-
Page 3: Table Of Contents
Installing WT 2/H and WT 4 control parts 7.5.6 Connecting the pneumatics Start-up Residual risks Setting the lifting speed Example of a guard provided by the customer 3 842 564 350/2020-06, MIT: PE 2/X, PE 2/H, PE 4, Bosch Rexroth AG... - Page 4 Decommissioning Disassembly and replacement 12.1 Preparing the product for storage/later use Disposal Upgrading and modifi cation Troubleshooting and repair Technical data 16.1 Ambient conditions 16.2 Pneumatics Bosch Rexroth AG, MIT: PE 2/X, PE 2/H, PE 4, 3 842 564 350/2020-06...
-
Page 5: About This Documentation
Be sure to observe all safety precautions. 3 842 564 350/2020-06, MIT: PE 2/X, PE 2/H, PE 4, Bosch Rexroth AG... -
Page 6: Symbols
If this information is not observed, the product cannot be used and/or operated as designed. Single, independent action Numbered steps: the numbers indicate that the steps must be performed in order. Bosch Rexroth AG, MIT: PE 2/X, PE 2/H, PE 4, 3 842 564 350/2020-06... -
Page 7: Designations
Any use other than that described in the section “Intended use” is considered improper and is not permitted. Bosch Rexroth AG is not liable for any loss or damage resulting from improper use. The user alone bears any risks associated with improper use. -
Page 8: Personnel Qualifi Cation
• Only start up the product if it has been determined that the end product (e.g., a machine or system) into which the Rexroth products have been installed complies with national provisions, safety regulations and application standards. Bosch Rexroth AG, MIT: PE 2/X, PE 2/H, PE 4, 3 842 564 350/2020-06... -
Page 9: Product-Specifi C Safety Instructions
• After an EMERGENCY STOP or a malfunction, only switch the system back on when EMERGENCY STOP, you have established and rectifi ed the cause of the fault. malfunction 3 842 564 350/2020-06, MIT: PE 2/X, PE 2/H, PE 4, Bosch Rexroth AG... -
Page 10: Personal Protective Equipment
• Prevent cleaning agents from getting into the system. • Never use solvents or corrosive cleaning agents. • Do not use a pressure washer for cleaning. Bosch Rexroth AG, MIT: PE 2/X, PE 2/H, PE 4, 3 842 564 350/2020-06... -
Page 11: Scope Of Delivery
5.1.2 PE 2/X, PE 2/H and PE 4 positioning unit design • Extremely compact construction. Suitable for tight spaces. • Pneumatic drive. 3 842 564 350/2020-06, MIT: PE 2/X, PE 2/H, PE 4, Bosch Rexroth AG... -
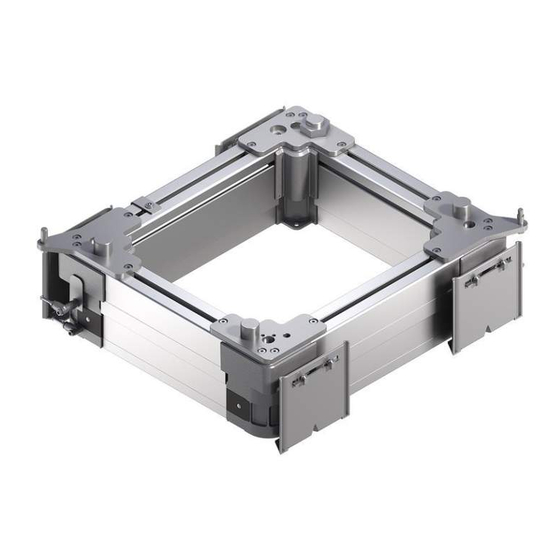
Page 12: Product Description
Positioning pins Lifting frame Supporting bolts Mounting bracket PE 2/X PE 4 PE 2/H 554 089-02 Fig. 2: PE 2/X, PE 2/H, PE 4 positioning unit Bosch Rexroth AG, MIT: PE 2/X, PE 2/H, PE 4, 3 842 564 350/2020-06... - Page 13 WT 4 ST 4… WT 4/F Load up to 250 kg* * Observe the maximum conveyor section load (see section 16 “Technical data” on page 36) 3 842 564 350/2020-06, MIT: PE 2/X, PE 2/H, PE 4, Bosch Rexroth AG...
-
Page 14: Identifi Cation Of The Product
• Protect the product from environmental infl uences, such as dirt and moisture. • Pay attention to the ambient conditions, see page 37. • Support the product so that suspended motors/actuators/cylinders will not be strained. Bosch Rexroth AG, MIT: PE 2/X, PE 2/H, PE 4, 3 842 564 350/2020-06... -
Page 15: Assembly
• Open-end wrench, SW13. • Allen keys, sizes 3, 4, 5, 6. • Torx keys, T30, T50 • Phillips screwdriver, PZ2 • Rubber mallet • Level 3 842 564 350/2020-06, MIT: PE 2/X, PE 2/H, PE 4, Bosch Rexroth AG... -
Page 16: Symbols Used
The letters denote the components mentioned in the accompanying text. Detail view from a different direction, for example of the back or the bottom side of the product. Bosch Rexroth AG, MIT: PE 2/X, PE 2/H, PE 4, 3 842 564 350/2020-06... -
Page 17: Assembling The Positioning Unit
(mounting brackets can still be moved). = Workpiece pallet length in conveyor direction 554 089-06 Fig. 4: Pre-installing the mounting bracket 3 842 564 350/2020-06, MIT: PE 2/X, PE 2/H, PE 4, Bosch Rexroth AG... - Page 18 PE 2/H SW13 =25 Nm =18 Nm 554 089-07 Fig. 5: Assembling the positioning unit (shown here on PE 2/H and PE 2/X) Bosch Rexroth AG, MIT: PE 2/X, PE 2/H, PE 4, 3 842 564 350/2020-06...
-
Page 19: Pe 2/X, Pe 2/H; Assembling The Position Monitoring Kit
Proximity switches B: Detects lower end position C: Detects upper end position 554 089-08 Fig. 6: Assembling the position monitoring set (example shown here on PE 2/H) 3 842 564 350/2020-06, MIT: PE 2/X, PE 2/H, PE 4, Bosch Rexroth AG... -
Page 20: Pe 4: Assembling The Position Monitoring Kit
B: Detects lower end position C: Detects upper end position +0,5 = 5 Nm = 10 Nm 554 089-8.1 Fig. 7: Assembling the position monitoring kit (PE 4) Bosch Rexroth AG, MIT: PE 2/X, PE 2/H, PE 4, 3 842 564 350/2020-06... -
Page 21: Installing Wt 2 Control Parts
WT: main stop gate (B) closes, pre-stop gate (A) opens (starting 554 089-10 position). Fig. 8: Installing stop gates and proximity switches (shown here on PE 2/X) 3 842 564 350/2020-06, MIT: PE 2/X, PE 2/H, PE 4, Bosch Rexroth AG... -
Page 22: Installing Wt 2/H And Wt 4 Control Parts
Before installing the stop gate cross struts, remove the marked components and screw the throttle non-return valve directly into the cylinder. Removal at Position X is optional, but necessary at Position Y. Bosch Rexroth AG, MIT: PE 2/X, PE 2/H, PE 4, 3 842 564 350/2020-06... -
Page 23: Connecting The Pneumatics
Connect the positioning unit to the directional control valve. 1) Not included in delivery 554 089-11 Fig. 10: Pneumatic connection (shown here on PE 2/H) and pneumatic diagram 3 842 564 350/2020-06, MIT: PE 2/X, PE 2/H, PE 4, Bosch Rexroth AG... -
Page 24: Start-Up
• Only start up the product if all safety equipment has been installed in the system and is functional. • Only start up a product that has been completely installed. Bosch Rexroth AG, MIT: PE 2/X, PE 2/H, PE 4, 3 842 564 350/2020-06... -
Page 25: Residual Risks
Conveyor medium: Pieces of clothing or long Crushing Between conveyor hair can be pulled in medium and workpiece carrier 554 089-12 554 089-13 554 089-14 3 842 564 350/2020-06, MIT: PE 2/X, PE 2/H, PE 4, Bosch Rexroth AG... -
Page 26: Setting The Lifting Speed
The stroke becomes slower. • Rotate in the “–” direction The stroke becomes faster. 554 089-15 Fig. 11: Setting lifting speed (shown here on PE 2/H) Bosch Rexroth AG, MIT: PE 2/X, PE 2/H, PE 4, 3 842 564 350/2020-06... -
Page 27: Example Of A Guard Provided By The Customer
2.8 “Owner responsibilities” on page 10. Contact protection from below Contact protection from above 554 089-16 Fig. 12: Example of a guard provided by the customer 3 842 564 350/2020-06, MIT: PE 2/X, PE 2/H, PE 4, Bosch Rexroth AG... -
Page 28: Operation
Signifi cantly different weights may require special measures to avoid malfunctions. This applies to: • The permitted accumulation length before stop gates. • Damper functionality. • Dampened stop gates. Bosch Rexroth AG, MIT: PE 2/X, PE 2/H, PE 4, 3 842 564 350/2020-06... -
Page 29: Environmental Factors
– Lubricating media can lead to a loss of power transmitted by friction. Such cases require special attention when planning the system and require adjusting the maintenance intervals. 3 842 564 350/2020-06, MIT: PE 2/X, PE 2/H, PE 4, Bosch Rexroth AG... -
Page 30: Maintenance And Repair
10.2 Inspection Lift unit Regularly check the pneumatic connections for leaks. 10.3 Maintenance Bearings The bearings have lifelong lubrication and are maintenance-free under normal operating conditions. Bosch Rexroth AG, MIT: PE 2/X, PE 2/H, PE 4, 3 842 564 350/2020-06... -
Page 31: Replacing Positioning Pins
• Open-end wrench, SW13. • Allen keys, sizes 3, 4, 5, 6. • Phillips screwdriver, PZ2 • Caliper, 500 mm • Rubber mallet • Strainer • Hand-lever press 3 842 564 350/2020-06, MIT: PE 2/X, PE 2/H, PE 4, Bosch Rexroth AG... - Page 32 Please observe the position of the chamfers on the positioning pin (B)! SW13 SW13 =25 Nm =25 Nm 554 089-17 Fig. 13: PE 2/X; replacing positioning pins Bosch Rexroth AG, MIT: PE 2/X, PE 2/H, PE 4, 3 842 564 350/2020-06...
- Page 33 Please note: Do not damage the fi ts in the leveling washer and fi tting screw. 554 089-18 Fig. 14: PE 2/H, PE 4; replacing positioning pins 3 842 564 350/2020-06, MIT: PE 2/X, PE 2/H, PE 4, Bosch Rexroth AG...
-
Page 34: Spare Parts
Observe bearing load; for product weight, see shipping documents. Check that the slings are securely fastened. Secure the load against toppling before you lift it. Bosch Rexroth AG, MIT: PE 2/X, PE 2/H, PE 4, 3 842 564 350/2020-06... -
Page 35: Preparing The Product For Storage/Later Use
14 Upgrading and modifi cation • Do not modify the product. • The Bosch Rexroth warranty only applies to the confi guration as delivered, and to approved upgrades. The manufacturer will not accept any warranty claims for systems with unapproved modifi cations or upgrades. -
Page 36: Troubleshooting And Repair
3500 N, incl. WT • Maximum load: PE 2/X 100 kg PE 2/H, PE 4 250 kg • Noise emission: < 70 dB (A) Bosch Rexroth AG, MIT: PE 2/X, PE 2/H, PE 4, 3 842 564 350/2020-06... -
Page 37: Ambient Conditions
) The pressure dew point should be at least 15 °C below the ambient temperature. • Oil content – Oil quantity ≤ 1 mg/m (Class 3 as per ISO 8573-1:2010) 3 842 564 350/2020-06, MIT: PE 2/X, PE 2/H, PE 4, Bosch Rexroth AG... - Page 38 38/40 Technical data Bosch Rexroth AG, MIT: PE 2/X, PE 2/H, PE 4, 3 842 564 350/2020-06...
- Page 39 Technical data 39/40 3 842 564 350/2020-06, MIT: PE 2/X, PE 2/H, PE 4, Bosch Rexroth AG...
- Page 40 Bosch Rexroth AG Postfach 30 02 07 70442 Stuttgart Germany Fax +49 711 811–7777 info@boschrexroth.de www.boschrexroth.com Subject to change 3 842 564 350/2020-06...