D-Link DUB-A2 Installation Manual
Usb 2.0 2-port pci adapter
Hide thumbs
Also See for DUB-A2:
- Release notes (5 pages) ,
- Reference (1 page) ,
- Quick installation manual (12 pages)
Table of Contents
Advertisement
Quick Links
Download this manual
See also:
Reference
This Installation Guide includes instructions for:
§ Windows XP
§ Windows 2000
§ Windows Me
§ Windows 98/98SE
Installation Guide Contents:
Section 1: Installing the DUB-A2 into your PC
Section 2: Windows XP Driver Installation
Section 3: Windows 2000 Driver Installation
Section 4: Windows Me Driver Installation
Section 5: Windows 98/98SE Driver Installation
Section 6: Hardware Diagram
Section 7: Technical Support
Package Contents:
Verify that your D-Link DUB-A2 package contains the following items. If
any items are missing, please contact your reseller.
§ D-Link DUB-A2 Hi-Speed USB 2.0 2-Port PCI Adapter
§ This Installation Guide
§ CD with Drivers and PDF version of Installation Guide
Minimum System Requirements:
For proper usage, you must have at least the following...
§ Pentium 233-MHz or faster or equivalent with 32MB RAM
§ One Available PCI Slot on your Motherboard
§ Windows XP, 2000, Me, 98, 98 SE
Installation Guide
D-Link DUB-A2
USB 2.0 2-Port PCI Adapter
1
Advertisement
Table of Contents

Related Manuals for D-Link DUB-A2


Summary of Contents for D-Link DUB-A2
-
Page 1: Package Contents
Section 6: Hardware Diagram Section 7: Technical Support Package Contents: Verify that your D-Link DUB-A2 package contains the following items. If any items are missing, please contact your reseller. § D-Link DUB-A2 Hi-Speed USB 2.0 2-Port PCI Adapter § This Installation Guide §... - Page 2 Consult the manufacturer of your computer before opening the case to ensure that you adhere to warranty guidelines. In some cases, the DUB-A2 may need to be installed by your computer manufacturer. A. Turn off your computer and unplug the power cord.
-
Page 3: Windows Xp Driver Installation
Windows XP Driver Installation A. Insert the DUB-A2 Driver CD into your CD-ROM drive. B. Select “Next”. C. Select “Continue Anyway”. D. Select “Finish”. E. Windows will continue to load drivers for the Root Hub. Once completed, you will be able to connect USB... -
Page 4: Windows 2000 Driver Installation
Windows 2000 Driver Installation A. Insert the DUB-A2 Driver CD into your CD-ROM drive. B. Select “Next”. C. Select “Next”. D. Select “Next”. - Page 5 E. Make sure that “CD-ROM drives” is the only option selected and click “Next”. F. Select “Next”. G. Select “Finish” to complete the installation.
-
Page 6: Windows Me Driver Installation
Windows Me Driver Installation A. Insert the DUB-A2 Driver CD into your CD-ROM drive. B. Windows will load drivers built- into the OS and ask you to restart your computer. Select “Yes”. C. (1) Right-click on the My Computer Icon on the Windows desktop and (2) select “Properties”. - Page 7 E. (1) Select the “VIA Tech…” line that shows and (2) select “Properties”. F. Select “Update Driver”. G. Select “Next”. next to it...
-
Page 8: Windows 98/98Se Driver Installation
I. Select “Yes” to restart the computer and complete the installation. Windows 98/98SE Driver Installation A. Insert the DUB-A2 Driver CD into your CD-ROM drive. B. Select “Next”. C. Select “Search for the best driver from your device” and click “Next”. - Page 9 D. Put a check next to “CD- ROM drive” and uncheck all other options and select “Next”. E. Select “Next”. F. Select “Next”. G. If prompted for the Windows 98 CD, insert the Windows 98 CD into the CD-ROM drive and click “OK”. H.
- Page 10 I. Select “Finish”. J. Repeat steps B through I one more time. (Windows 98 requires that this driver be installed twice in order to support USB 2.) K. Select “Next”. L. Select “Next”.
- Page 11 M. Select “Next”. N. Select “Next”. O. Select “Finish”. P. Windows may ask you to restart your computer. Click “Yes” to restart your computer to complete the installation.
-
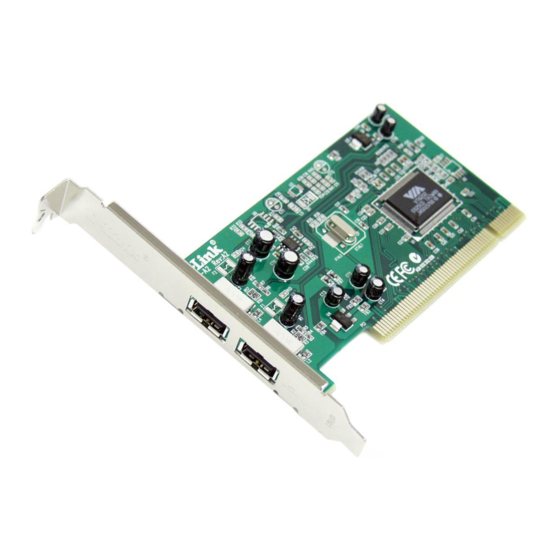
Page 12: Hardware Diagram
Hardware Diagram The DUB-A2 is designed to fit into a PCI slot on your computers motherboard. Refer to the diagram below for feature layout. Hi-Speed USB 2.0 Ports Technical Support D-Link provides free technical support for customers within the United States during the warranty period.